Home Recording Academy: Great Vocals in a Home Recording Studio (Part 1)
We've explored quite a few recording techniques that certainly benefit the CD mastering processing here at Sage, but today I want to start a new series on tips for recording vocals in a home studio. I say series, because it will definitely take a few installments to cover all the bases for recording vocals. Yep, it's that important.

For most popular types of music, vocals are front and center. Understandably, then, recording engineers spend a sometimes inordinate amount of time making sure the vocals sound as good as they possibly can. And of course part of our job as online mastering engineers is to make those vocals sound even better. But what I want to talk about today happens well before we hear a song in our Nashville mastering studio, and even before any effects are put on vocals. A great vocal track starts with a great recording – pure and simple.
If you've been looking into home recording tips, you've probably heard the above advice ad nauseum: the best sounding tracks start with a great recording. It sounds obvious – but too many engineers rely on effects and other practices to “fix” recordings – and while an original audio can certainly be improved by adding effects during mixing, beginning with a great track will give you an even better end product.
Here are six tips to give you the best home studio vocal sound you can get:
1. Use the Best Microphone You Can Find
There's a reason many home studio owners borrow microphones for recording vocals, even if they have decent mics already as part of their studio collection. But even less expensive microphones can be used if you're on a budget. Though they are typically used for live performances, Shure's SM57 and SM58 microphones can be a great starting point on a budget, and both are right around $100. For about $200, you can get a fairly decent condenser mic.
- Condenser Microphones versus Dynamic Microphones
Both of the Shure microphones listed above are dynamic mics, but many engineers prefer to record vocals with condenser microphones, which will typically cost more than dynamic mics. In the end, it will come down to preference and budget, and don't forget to experiment – particularly when you are working with a singer you haven't worked with before. See more on microphones at our blog on choosing the best microphone for you home studio. If you have a serious case of"GAS" : Gear acquiring syndrome , then reading this upstart review from aaacreditguide.com might interest you.
2. Use a Good Preamp
Particularly if you are using a lower end-microphone, a good preamp can make it sound leagues better – as an external preamp is almost guaranteed to provide a better input sound than the preamps on your audio interface, no matter which you are using. If your budget it allows it, go for a tube preamp for even better sound.
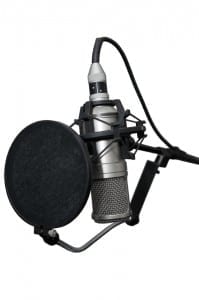
3. Use a Pop Filter
Some home studio owners will forgo this step, feeling it is unnecessary, but this is also one of the easiest things you can do to make your vocal sound much better. If you don't have the budget for a pop filter (which you can typically find for around 20 bucks), you can use the go-to DIY method of stretching a piece of pantyhose over a piece of metal clothes hanger folded into a circle.
4. Don't Be Afraid to Play with Microphone Placement
A good rule of thumb is to record vocals between 6-9 inches from the singers' mouth, but this isn't a hard and fast rule. A “closer” vocal often sounds more intimate (think Elliot Smith's acoustic work), while moving further away can create a “distant” effect. Keep in mind that if you are moving away from the mic, you'll likely want to use a condenser mic, as dynamic models need to be closer to their audio source.
5. Record in the Best Environment Possible
While professional recording studios likely will spend tens of thousands of dollars on acoustic treatments in vocal isolation booths, home studio owners usually do not have such luxury. And there are ways that you can improve your recording environment without breaking the bank.
In general, you'll want the “dryest” sound possible – with no natural reverb. You can help to achieve this effect by hanging blankets around the vocalist. Reverb and/or is often added later, but having a dry original signal allows you more room to experiment with the final sound.
6. Record Numerous Takes
Even the best singers will never sing a song the exact same way twice. Therefore, when recording, you will likely want to record multiple takes, and then comp the best parts together for the final track. Though this is the traditional way producers work today, don't forget that sometimes a more rough sound may be desired, in which case it may be best to use one full take, even if there are slight imperfections.
In future installments for the how to record the best vocals series, we'll look at mixing practices and using various effects and other tricks to making your vocals the best they can be.


