1 Trick To Make Your Reverb Pop
Most engineers know how to set up a reverb send. Few know how to process that reverb for specific, and often useful effects. Here, you’ll learn how to use your compressor, to affect your reverb, and make it pop.
There are multiple ways of compressing your reverb send, each technique resulting in unique and valuable outcomes. After mastering these three techniques, you’re well on your way to engineering better records, and making your clients happy.
Technique 1: Reverb on the Transient
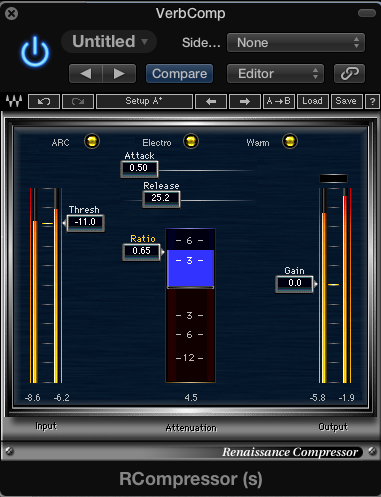
Use expansion to emphasize the reverb transient
Step 1: send your track to a reverb Auxiliary send.
Step 2: insert a compressor with expansion capability after that reverb
Step 3: Set a quick attack, and a relatively short release. (Optional - Have the release in time with the tempo of your track)
Step 4: Set your ratio and threshold, for expansion that matches your desired output. Side note: 3 to 4dB of expansion is a good place to start.
Step 5: Listen to your track, and adjust your aux send and parameters as needed.
By following these steps, your reverb is being amplified only when the transient hits, and then decreasing in amplitude before the tail of the instrument or track plays. This results in increased reverb on the transient, and a relatively decreased reverb level on the tail.
Technique 2: Reverb on the Tail
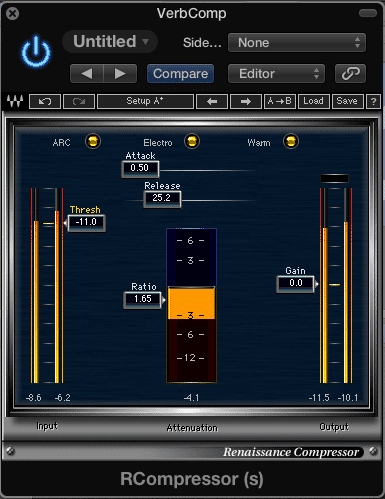
Use compression to emphasize the reverb tail
Follow steps 1, 2 and 3 from the previous example.
Step 4: Follow step 4 as listed above, but instead of expanding, compress your signal.
Step 5: Increase your output gain to compensate for the amount attenuated during compression.
Step 6: Again listen to your track, and adjust your aux send and parameters as needed.
By using Technique 2, your reverb signal is being attenuated when the instrument initially plays, or during the transient. Conversely, the amplitude increases during the tail of the reverb, making that aspect louder relative to the transient aspect of the reverb.
Technique 3: Reverb with Increased Detail
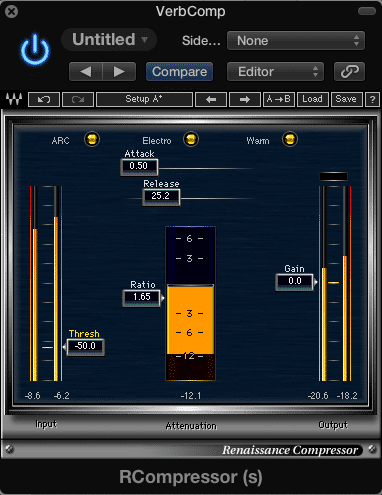
Use compression with a low threshold to compress the entire reverb signal
Again Follow Steps 1, 2, and 3 as previously stated.
Step 4: Decrease your threshold, to achieve significant compression.
Step 5: Increase your output gain to compensate for the amount attenuated during compression.
Step 6: Listen to your track, and adjust your aux send and parameters as needed. In this case, if you increased the output gain on your compressor to compensate for the amount attenuated, you may want to decrease your aux send. Otherwise you have a significant amount of reverberated signal in your output.
Using Technique 3 decreases the amplitude of your transients initially, but ultimately results in an overall increase in reverb. Use this technique when you want the amplify all aspects of your reverb send, and to bring up the quieter, more intricate aspects of your reverb signal.
Conclusion
Now that you understand how to implement compression into your reverb send for certain effects, you can experiment and come up with sounds of your own. Perhaps add some distortion, or saturation to the signal, and create a distinctive effect.
What other plugins or effects could you put after your reverb send?


