Fundamentals of Mixing Drums Before Mastering
It is no secret that drums are the foundation of mixing across the majority of contemporary genres. They drive an immense amount of feel and emotion to any given song without much melodic context. Drums and their overall aesthetic alone can easily make or break any mix. Why? They are complex in nature, and they often cover the entire audible frequency spectrum. This can make them a challenge for novices and professionals alike. However, the truth is that a variety of fundamental concepts will provide the tools to make your drums sing within a mix! This article aims to portray those essential drum-mixing concepts in a chronological fashion. Regardless of genre, the following concepts can provide fundamental concepts to take your drums to the next level.
Preparation
First, let’s assume the drum tracks are ready to mix. They are labeled, colored, organized, grouped, sub-grouped, and their corresponding aux tracks and sub mixes are solo-safe. All routing, phase, and tuning issues have been sorted out, and parallel channels have been set up for compression, reverb, and any other effects we might desire along the way. If you have any concerns about your drum set up prior to mixing, refer to the following article ( How to Prepare Drum Tracks For Mixing )
Mix In Solo
First, dial in an initial mix with the drums in solo. What is important here is to insure that everything is audible and somewhat balanced. Don’t sweat it. Next, do an initial panning of the drum elements. Always keep in mind which drum perspective is desired. If it is a real drum kit it will typically be either drummer or audience perspective in regards panning. Electronic based drum mixes are much more open to experimentation in regards to stereo perspective (imaging) that we achieve through pan pots. Anyhow, let’s say we go with drummers perceptive, for example. This means the kick and snare are center. The hi-hats will be panned slightly left, and the rack toms will be panned left and right to some desired degree. The floor tom will be panned hard right. The overheads are also panned to left and right the desired image.
Mix In Context
Next, drop in the most important non-drum elements and continue to rebalance and adjust your pan pots as each element enters the mix. It is a good idea to drop in the most prominent elements first. In modern mixing the most prominent parts of the mix are typically vocals; they could also be guitars or lead synths in some cases. As you methodically drop each and adjust it, pay special attention to the balance between the close mics, overheads and room mics. Punchier mixes require heavier emphasis on the close mics. Roomy sounding drum mixes require more emphasis on the overhead and any room or trash mics. How much of the room and overhead signal to use will often be determined by the targeted genre of the song, but generally acoustic and more organic styles of music call for “roomier” drums. That is acoustic based music often uses real room tones captured by microphones as opposed to using reverb to create the sense of space. If significant budget is being spent to record in a legitimate space with nice microphones, then let the room tones live in the mix! On the contrary, as more elements are added to a busier mix, we gradually lean towards intimate sounding close mics that allow the hits to punch through. Always pay particular attention to how prominent the drums are in any given genre. For example, modern pop productions often feature drum sounds and vocals more than melodic elements. In fact, in heavier types of rock music the drums can often compete with vocals for relative volume.
Another essential element of balancing a drum mix in context is determining how wide or narrow the drums should be. We adjust the width primarily through the levels and panning of the overheads. Are the vocals wide or narrow? How about the guitars, keys and synths? Listen to the stereo elements in context of the song and adjust the overhead panning accordingly. It may be effective to use less overhead signal if other prominent elements of the song are occupying the width of the stereo image. The goal is - make the drum elements audible without competing for a heavily occupied space within the stereo spread.
Tom tracks are another element that can give width to the drums. They are often panned out to match a drummer’s perspective, but there are no hard rules as to where they should sit. A drummer’s perspective on the toms would often have the rack toms slightly left and right, and the floor tom hard right. Envision being the drummer if you are mixing in drummer’s perspective. The challenging aspect of mixing toms is the fact that they play very different roles in many songs. That is in some songs the toms might only be played briefly during specific drum fills, and in other songs the toms might be busy driving the rhythmic foundation. In the case that the toms are only played during fills, they are often mixed at higher level because they serve as an interjection that is meant to be a temporary dynamic increase. If the toms play more of a lead roll on the drum tracks then they will often lower in level so they aren’t competing with and masking other key elements.
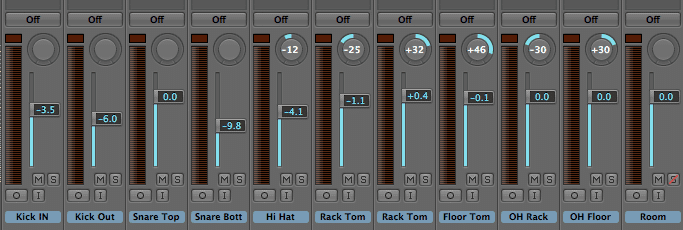
An example of drummers perspective panning.
EQ
After we achieve initial fader and pan positions in context of the song, we can start EQing our channels. It is common practice to first achieve subtractive EQ or cutting. Save boosting to add color, brightness, or body for later. So, let’s first take out the tones we do not love. In order to do this we are going to use a standard parametric EQ. All DAWs have them, and most work in a very similar fashion. Note, that a parametric EQ is not the only effective tool used for subtractive EQing. There are many other sweepable, fixed, and graphic EQ’s out there that do an excellent job. However, for this purpose, we will discuss as if we are using a parametric EQ. The reason being is that they are the most flexible and universal among digital EQs.
Initial High Passing (Low Cutting)
First cut all unneeded low frequency content out of each track. It is a great way to clean up the tracks without affecting fundamental tones of each drum. Be conservative with initial cuts, we can always cut more later. Generally, we should only high pass what isn’t needed in the signal. For example, the kick drum is most likely bleeding into or being picked up by the snare mic (and other mics too). So, it is a good idea to low cut the snare around 100 Hz to clean that low end bleed from the kick mic. There are many instances of bleed like this going on within and between the drum tracks – do your best to address without taking away from the source signal. Do not cut too much. Theses initial cuts should only be subtly perceptible. Start with a conservative slope of 6 or 12 dB/octave. More aggressive high-pass slopes tend to sound less natural. If needed, be more aggressive at a later time.
High Pass Targets
In this section – we will discuss and list good starting points for the cut-off frequency of the high pass filter. Keep in mind that these are just starting points that lie on the conservative side. Different mixes will require a variety of settings. In general, more organic sounding mixes will call for more conservative cuts, and punchier/busier mixes will call for more extensive cuts. Use your ears and clean up the signal! Here are some suggested starting points:
Kick – 30 Hz
Snare – 100 Hz
Hi Hat – 300 Hz
Overheads – 200 Hz
Rack Toms – 100 Hz
Floor Tom – 60 Hz
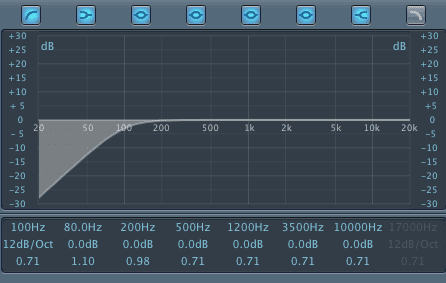
Logic Pro’s Parametric EQ – high passing the snare at 100 Hz with a 12 db per octave slope.
Other Cuts
After the kit has been cleaned up with high pass filtering, its time to make some other cuts to optimize the drum sound. Generally, we cut narrow and boost wide. How narrow or wide the notches will be is determined by the Q setting which controls bandwidth of EQ adjustments. Low Q settings are wider, and high Q settings are narrower. A common technique to effectively make cuts is to sweep the problem area with a heavy boost in order to expose the offending frequency; next, simply cut that frequency out. Be careful with how aggressive the cuts are; a 6dB cut is often aggressive, but use your ears and address problems accordingly. Busier arrangements with higher track count tend to require more aggressive notches. Per usual, start conservative and you can always widen or deepen the cut at a later time. Also, always be sure that the cuts are being referenced within the whole mix. Cutting in solo can be problematic if you aren’t checking back with the rest of the elements in a given arrangement.
Notch Targets
In this section, we will discuss and list some problem areas to consider while making subtractive cuts to each drum track. These areas are often a good starting point for the sweeping technique that was mentioned in the last section. The listed frequencies are NEVER exact. They serve as general areas to listen around. As always, do not try to address a problem unless you hear it in the first place! Overcutting leads to thin mixes. Also, be sure not to cut multiple elements at the same frequency. Use the full spectrum.
Kick – 250 Hz (muddy) / 600 Hz (boxy)
Snare – 600 Hz (boxy)
Hi Hat – 200-500 Hz (low mid “gong”)
OH – 500 Hz (hi mid room tones) 3 kHz (presence)
Rack Toms – 700 Hz (High mid) 300 Hz (low mid)
Floor Toms – 500 (mids) 200 (muddy)
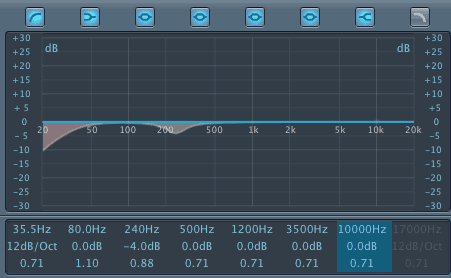
Cleaning up the kick drum with a gentle high pass filter and a conservative notch at 240 Hz to address muddiness.
Channel Compression
After we’ve made all of our initial subtractive EQs, we should start working on with the dynamics and transient content of the drum hits. A compressor is commonly used to even out performance and shape transient content to liking. The parameters will be highly dependent on the drum performance and genre of the arrangement. For channel inserts, a low ratio (1.5:1 or 2:1) is typically preferred because we wish to keep the sharp transient material in tact to provide punch. High ratios typically cause more reduction to a smaller portion of the signal. This results in the sharper part of the transient being affected more than the rest of the drum hit. On the contrary a lower ratio implies that more of the overall hit will cross the threshold, so we can shape the dynamics of the hit without over crushing the initial transient attack. Keep the ratio low at this point!
Next, with a low ratio of 2:1, set the threshold of the compressor to achieve around 3dB of gain reduction for desired hits. If the drummer is highly skilled and the performance is consistent, you might strive for less than 3dB of gain reduction; if the drummers performance is lacking consistency and punch than we may want to push that up to near 6dB of gain reduction. In general, closer mics will be compressed to a lesser degree than overhead and room mics. OH and room mics often call for higher than 6dB of gain reduction. Once the gain reduction is set, it is a good idea to gain match the compressed and uncompressed signal with make up gain. This will allow you to accurately a/b the difference of the compressor to ensure we are make positive changes. If the dynamics of any hit are still not consistent enough then it might be better to rely on sample assistance or volume automation because overly compressing to compensate for performance is a fast way to take the life out of a mix.
Attack and release settings are difficult to grasp at first, but they can be simple with attentive practice. Attack time can either flatten out punch or allow more punch through. Very fast attack times decrease punch by rounding out the fast approaching transient. Gradually slower attack times increase punch by allowing more of the initial transient to come through unaffected. We generally want fast attack times when compressing drums, but be cautious of attack times a that are too fast because they don’t allow the transient to come through. This will particularly kill low end energy (punch). Release times can either allow the tail of the hit to open (fast release), or they can dampen the tail to make the impact sound tighter/shorter (slow release). Be cautious of too fast of a release time, as it causes unwanted pumping on drum tails. It will vary, but your ears won’t fail you! The general goal when compressing drum hits is to preserve punch and to bring out the sustain or decay of the impact to make hits punchy then full.
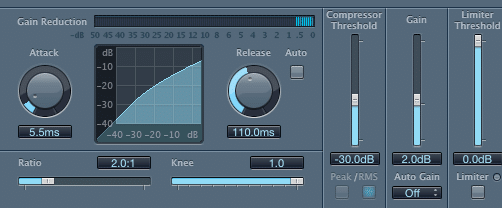
A good starting point for drum channel compression, with gain reduction on its way to about 3 dB. Notice the Auto release option also.
To set the attack and release parameters, start with at a very slow attack, a very fast release, and a low threshold. Gradually make the attack faster until you are able to hear the punch being decreased. Once we are at this point we have gone too far with the attack speed, so slow it down a little bit until the punch is preserved. We want our attack time as fast as possible without taking punch away. Do the same thing with the release but in the other direction. Make it gradually slower until the gain meter is moving with the music. The gain reduction meter should be almost completely back to zero when the next hit arrives. Use your ears and find what is pleasing in context! Don’t forget to a/b the difference between the compressed and uncompressed signals to hear the result.
Many compressors have a switchable function that emulates various types of analog compression. While this article will not go into the details about types of compressors and how they function. Be aware that switching between compressor types can make a notable difference in how the drums sound. Familiarize yourself with characteristics of optical, vary mu, VCA, and FET compression. Reach for a compressor with a sonic goal in mind, or switch between them until it pleases you! Subtleties are wins during mixing.
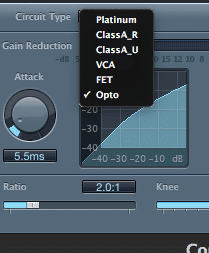
Notice the drop down menu to switch between different compression circuit types on the compressor.
Drum Bus Processing
While it is not a requirement, one common drum compression technique worth mentioning is on the drum bus. This only works if all drums are routed (directly or indirectly) to a stereo aux as a subgroup. Drum bus compression can serve as “glue” that helps the drums sound like a cohesive unit. Although, if you decide to use this technique, it is imperative that that the compressor is set at the beginning of the drum mix process. That is you should mix into the compressor. Do not apply bus compression after achieving a balance. The result will change the balance that you worked to achieve. Work with intent early on to avoid backtracking and second-guessing later.
When achieving drum bus compression, set the compressor with a low ratio. 2:1 is a good starting point. Next, adjust the threshold while looking at the gain reduction caused by the compressor. Lower the threshold until a moderate touch of gain reduction is achieved. 2dB of gain reduction is a great starting point. If samples or other drum elements are added to the session as the mix progresses, then be careful of where the threshold is set. It is imperative to know how much gain reduction the compressor is performing when the drums are at their loudest. Do not over compress! Leave the threshold where it is once its set, but definitely check in periodically to ensure that that moderate gain reduction is being applied.
Attack and release settings on the drum bus compressor will vary based on sonic goals. However, if we are aiming to “glue” our drums together we want to tighten them up with a fast attack time (up to 8ms). Release times on the drum bus are dependent on the tempo; aim to make the release groove with the music sonically and visually. Often bus processing applications call for a medium release time (between 100 and 300 ms). Many compressors also have auto attack and release options that can work well on the drum bus. If you are unsure about the parameters, then try the automatic settings out. Auto parameters can especially be helpful when drum sections are played distinctly, and when the rhythmic elements change form between song sections. Another helpful parameter to use on the drum bus is the soft knee. The soft knee allows the compressor to start working gradually before signal approaches the threshold. This results in smoother and more transparent compression.
Some engineers religiously apply multiband compression to the drum bus in place of a stereo compressor. A multi-band compressor has the same parameters as most digital compressors; the difference is that the parameters only apply to a specific band of frequencies. This is an advanced technique, but when used appropriately it can provide a powerful way to tonally shape and control the drum bus in ways that are impossible with static EQ. This article will not go into depth about multi-band compression techniques, but if you are comfortable try it out! It can be a great way to get the sub frequencies rockin. It can also help clean up and control low mid mud and harsh presence.
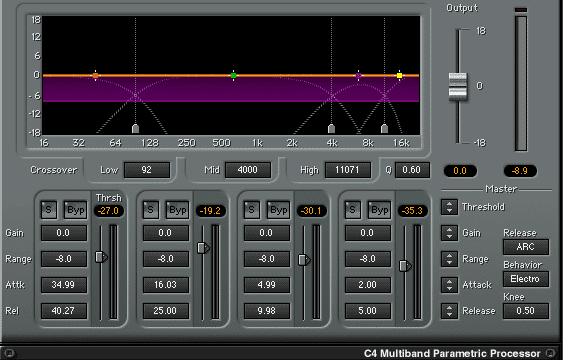
Waves C4 plugin is a popular multiband compressor that can be utilized on the drum bus.
Parallel Processing
Parallel compression is a common technique to get even more body and punch out of drum tracks. To set up a parallel compressor send the drums on a stereo bus to a stereo aux track. On the stereo aux track lives the compressor in parallel. We can either send the full drum bus to the parallel compressor, or we can send each individual drum element to the parallel compressor. The difference is that sending each individual channel to the compressor allows adjusting for the relative levels of what is sent. For example, you can send more kick and snare to the compressor than the rest of the drum elements. You can even leave some elements completely out of the compressor. However, for simplicity’s sake, let’s send our entire drum bus to the parallel compressor.
For parallel drum settings, start with a ratio around 3:1. Lower the threshold until achieving anywhere from 12dB-30dB of gain reduction. That is a ton! Then use the attack and release parameters to manipulate punch and sustain. The tricky thing about parallel compression is that it should not sound sonically pleasing by itself. Often it is used to highlight aspects of the drum impact (Attack Decay Sustain Release) in an unnatural way. When we add it with the channels, it creates fullness. In fact, it may seem odd, but we often wish to kill some of the initial punch (but not all) with a faster attack. Also, we strive for pumping with a faster release. It is important that we keep the parallel channel at a low volume relative to the drum tracks. When muting and unmuting the parallel channel to hear its effect, we shouldn’t perceive a large volume boost. Don’t trick yourself into thinking that it is better with parallel compression just because it’s too loud. Although the compression settings are dramatic, the volume drum increase with its addition should only be subtle, but effective.
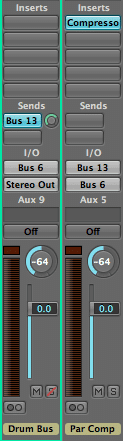
The drum bus is being sent on bus 13 to the parallel compressor. The parallel compressor is then outputting back to the drum bus on bus 6, so that the signals are combined on one fader.
Parallel Drum Reverb
If the room mics and overheads are not providing enough sense of space, it would be a good idea to create a parallel reverb. It can be any type of reverb, so find one that you like or use a go-to. A plate reverb is a common choice for drums. Send the snare, toms, and high hat to the reverb and adjust the send levels in context of the mix. Typically we want more reverb on the snare and toms than the other drum elements. Reverb creates a sense of distance so be cautious not to place these elements too far back in the mix. Next, dial in a reverb length that is sonically pleasing. Many engineers will use musical values to set their reverb. This requires having to convert note values into milliseconds based on the BPM of the music. If you find it tricky to rely on your ears for length values, then look up how to do that conversion! It is easy and effective. After that, it is a good idea to EQ the reverb return. Clean up unwanted lows with the high pass and cut out some of the upper air with a low pass. You may consider notching out some mud buildup around 250 Hz also. Be careful not to thin out the reverb too much!
Mastering Considerations
It is important to consider the mastering process during mixing, and this is especially true regarding drum tracks. In modern music, drums are often very prominent in a mix. They contain sharp, fast, and relatively loud transient content. The relationship will vary per genre, but drums are often the one group of tracks that competes with vocals for the loudest aspect of a mix. It is important to realize that the loudest aspects of a mix are the most affected during mastering due to their relationship with the threshold of mastering compression and limiting. The loudest part of any given frequency band is what triggers a complex chain of multiband processing. Drum groups fundamentally cover more of the frequency spectrum than any other instrument, and this means they are typically most attenuated by the mastering process. This is especially true for kick, snare and tom tracks, which serve as the sharpest/punchiest and most broadband aspects of today’s popular mixes.
Thus, drum mixing often calls for slightly exaggerated dynamics to prepare for mastering. It is often requested by the mastering engineer to push the snare, kick, and tom tracks up an extra dB or 2. This can help the drums sit in the mastered mix. It is also helps preserve punch and relationship with the rest of the kit. If a mastering chain attenuates the kick snare and toms, then the cymbals may be perceived as too loud. Consult your mastering engineer for their preference on receiving mixes in your genre. While some masters are transparent and more honest to a mix, others are more aggressive in reshaping mixes. A mastering engineer may even request more than one version of the mix to ensure an ideal final product. The good news is that even some of the most notable mastering engineers in modern music are accessible to hire. Contact them and listen to their preferences regarding drum levels. You can trust they have the tools, knowledge, and ears to take your projects to the next level!
Final Thoughts
At this point, you are ready to tackle a drum mix by dialing in appropriate subtractive EQ, channel compression, drum bus compression, parallel compression, and reverb. Always repeat and refine the process to hone in on your craft. Train the ears until attack and release settings become second nature; the same goes for EQ. Repetition is the only path to competence. Once these fundamental techniques are in your comfort zone, you can dive into the more aggressive and experimental techniques like additive EQ, distortion, saturation, sample assistance, and classic hardware emulation to further improve your drum sound.


