How to Get Your Mixes Loud Using Equalization Before Mastering
Loudness is a major concern for almost every artist and engineer. In an industry that’s flooded with plugins and gear that continually tries to offer a one size fits all preset to make your music louder than then next person, we have missed the foundation of how to actually achieve loudness.
We have limiters, compressors, expanders, exciters, and multibands, but all of these things are just one part of getting your mixes into a place where loudness can actually be achieved. Let’s talk a little bit about what makes something loud.
All music is experienced currently from speakers and your ears. Speakers take an electrical current and push it essentially through a coil and then a cone, which pumps out soundwaves that our eardrum can interpret into music. There’s a lot that goes into this miracle but one of the main things that makes a speaker pump out rich full sound is dependant on whether or not the signal is balanced.
Equalization or commonly referred to as “EQ” is used all over the music creation process, but it’s main application is normally to help cut, boost, and balance different elements individually or in a mix in order to achieve something sonically that’s pleasing. If a mix is unbalanced then the speaker will struggle to push out sound. The cone and woofers may be firing off at different times or if there is too much low end for example, then the sound may feel weak and lack impact because the speakers can not handle it.
Our ears are incredible. They can hear typically anywhere from 20Hz to 20,000Hz. That’s a lot of sound information. Within that range, our ears are most sensitive at 2,000Hz to 5,000Hz. We perceive that range to be louder than any other range on the frequency spectrum. Just by knowing this, we can start to think about why some songs sound “loud” even though they are not compressed. To get things loud, we often need to have the range in which our ears are most sensitive, extremely dialed in. If your song lacks cohesiveness in that area, then no compressor or limiter will be able to really help you achieve something that competes in today's industry.
We have all heard songs distort on phones and smaller speakers. We have all heard songs on big home theater speakers turn into an assault of low end as if the vocal and all top end has vanished somehow. Both of these things are caused by a poor balance in the mix and EQ. The key to solving this issue and having big full mixes is equalization. You can only take advantage of compressors and limiters if they are set up to win. This happens when they are given a source that is overall balanced.
As we unpack equalization it's important to note that there are different types of “EQ’s”. Knowing how the different types of EQ function, is just as important as playing the right part. Even if the source is great, you will still most likely need to manipulate the part to fit it into the bigger picture of the mix. Lets jump into the three most common types of EQ.
Graphic EQ is one of the most used EQ’s in creating music because it normally has predetermined frequencies that can be boosted or cut independently. This means you can really boost or cut something without it really impacting the other frequencies surrounding it. Of course anytime you change anything it will impact something, but in general a Graphic EQ is a great way to be surgical and specific. See image below for an example.
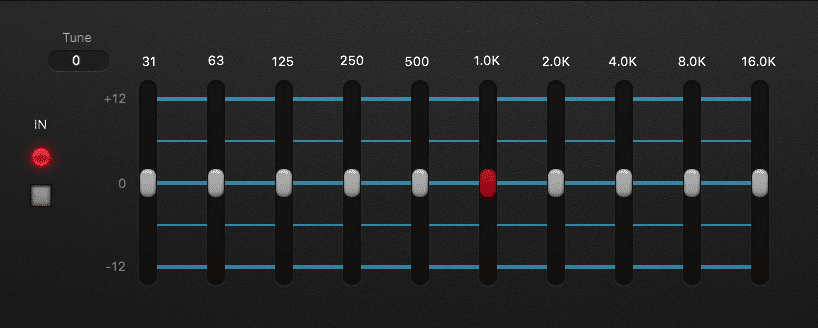
(Above is an example of what a typical Graphic EQ would look like. Notice how it has predetermined frequencies. These operate independently, and are great for surgical adjustments.)
Parametric EQ is a little more dependent on how much you boost or cut something. With parametric EQ we have to discuss a often confusing little letter, “Q”. You may have seen it on your plugin or hardware, but this little letter stands for “Quality Factor”. A simpler way to think of it would be “Bandwidth” or the width of the frequencies that will be impacted in the adjustment. The higher your “Q” the more narrow or surgical the bandwidth becomes. The lower the “Q” the more wide your bandwidth comes. When we use a Parametric EQ we pick a frequency that becomes the center and then as we boost or cut, the frequencies around it will be impacted directly by how high or low our “Q” is. This type of EQ is great for making large movements to shape your mix. Maybe your mix feels a little thin, you could use this EQ to make a nice wide boost in the low mids to bring out some warmth and body. See photo below for an example.
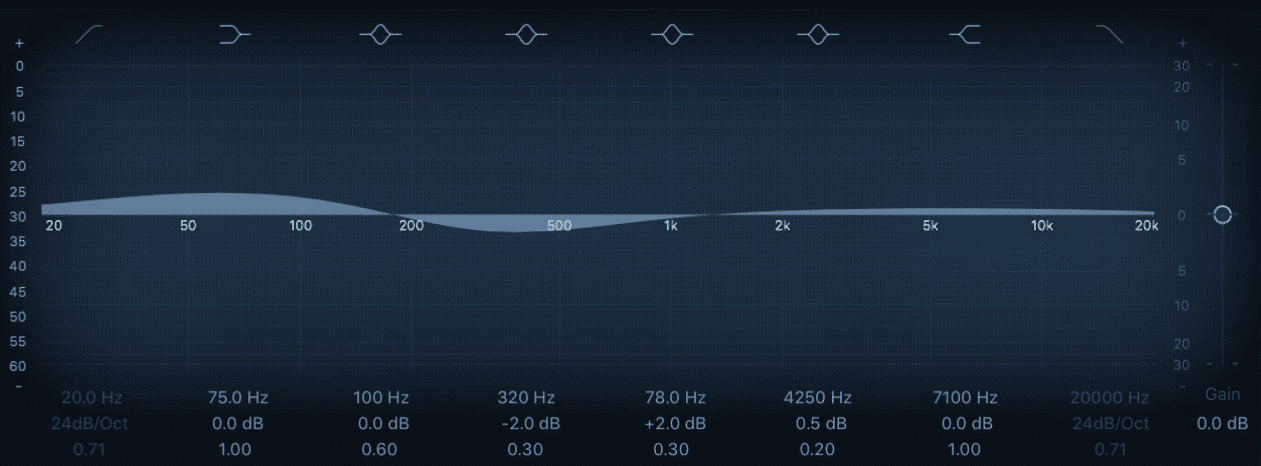
(Above is an example of a typical Parametric EQ. The aboves shows a low “Q” which creates wide boosts and cuts. Parametric EQs are great for shaping sources and mixes as a whole.)
One of the most useful and simple EQ’s that often gets overlooked is called a “Shelving EQ”. With this type of EQ you pick a frequency that becomes your “threshold”. Think of it as the starting point of your shelf, from there you can boost or cut. All the frequencies will equally be impacted. This is a great way to add or remove things without really surgical impacting anything. If the mix feels a little dull, a top end shelf that boosts everything equally can really lift the mix and open things up. See photo below for an example.
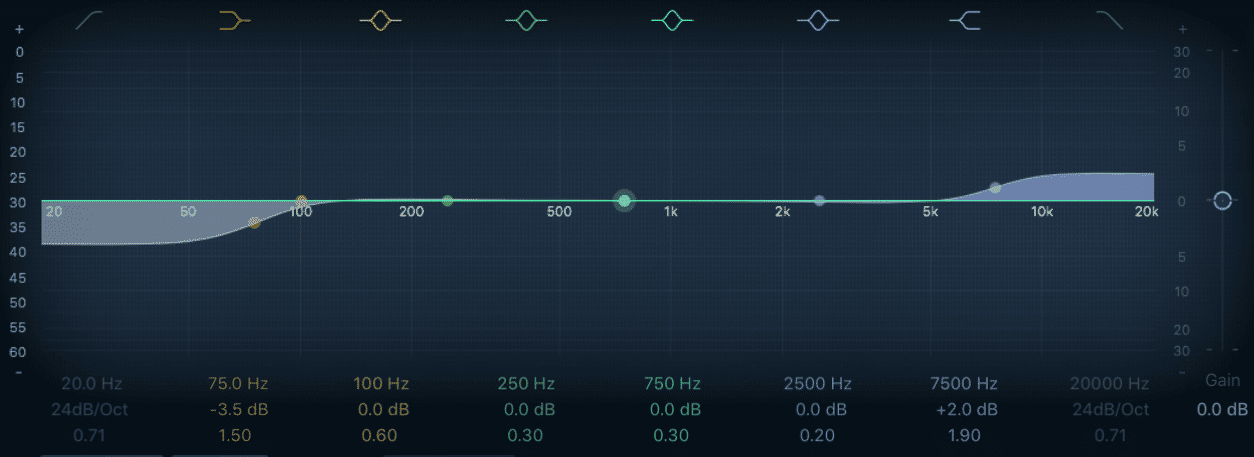
(This is an example of a Shelf EQ. On the left side we have a low shelf that is removing bottom end information and on the right side we a high shelf adding top end. A little goes a long way.)
Now that we have a basic understanding of three common EQs and their functions, let's dive into how we can get things loud from just making simple adjustments. A normal consumer speaker is normally made up of a larger woofer and a tweeter. The woofer will put out a lot of the low end sound as well as midrange information that makes a song feel “large”. If a song feels empty, thin, or lacking fullness a simple boost in the mid range of around 250Hz to 700Hz will immediately make the song feel warmer and more full. You have to be careful however as you can begin to make things boxy and muddy as well.
If things are feeling congested or or dull a simple shelf boost in 6000Hz and above can really bring out some brightness, air, and a lot of tangibility that our ears will perk up to. With this you also have to be careful as you can add to much and your mix could become harsh, edgy, and sibilant. A little goes a long way normally with everything in audio so be sure to make small movements and always compare. Ask yourself, “Is this better or worse?”.
As you begin to EQ things, you can begin to stack EQ and compression together. When we make music, we are constantly in the process of adding and subtracting things, pushing and pulling things. It’s key to find the balance in all of this. Over compression can make things feel very controlled and tight, but at the same time can make things feel small and lacking impact. One of the best ways to take advantage of a compressor is to “stack” an EQ after it’s been processed. When we approach a compressor it normally will be engaged depending on our threshold we set. Whatever is loudest in the source or mix will be attenuated first. Within this, it will normally raise the softer transients or noise floor as well.
We are always losing something in compression but sometimes this makes room for things in the mix. As we lose certain transients in compression, this is the perfect time to use an EQ to “make up” what has been attenuated. If we put a compressor on a kick drum to bring together the low end thump we feel and the top end attack that we hear, it begins to sound like one unit together. Our ears enjoy this. Directly following compression on that kick drum we can then add an EQ, such as a Parametric EQ to boost the low end thump and top end attack to bring out the characteristics of what the compressor is doing. See image below for an example.
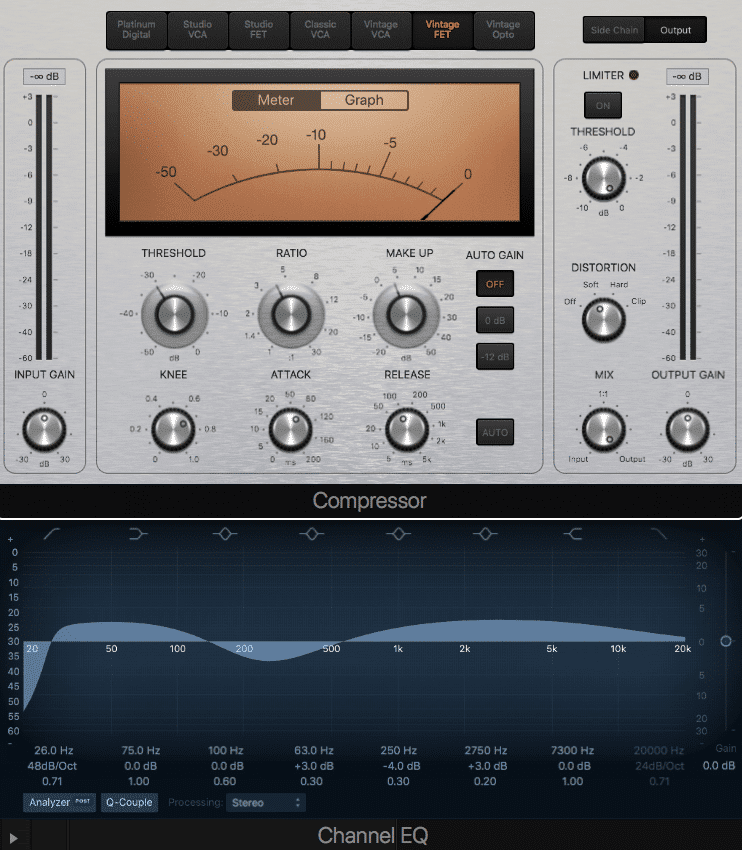
(Above is a simple example of a compressor going into an EQ. Notice the EQ curve for a typical kick drum. A low end boost, mid range mud cut, and a top end boost for tangibility and attack.)
With the compressor we may have lost a few dB’s, but with a simple EQ boost in those areas we are bringing forward all the unique sounds of that kick drum which make ours ears interpret it as louder. This is a phenomenon called perceived loudness. The overall level really hasn’t changed but because the compressor is being followed by an EQ that is bringing to light the character and harmonics the compressor has created, we get a much more forward and tangible sound that cuts through speakers and our environment.
This principle can be applied all over the mix on different sources and can even be used multiple times in a row to dial in a desired sound. Just remember that a balanced source and mix will always sound more full and will be received better by a compressor or limiter. If you grab a compressor or limiter first to try and tame things in the source or a mix, you most likely will get something sonically that’s unbalanced and pumpy. Just remember a little goes a long way. That is the golden rule.
Once you have your mix balanced and you begin to think about sending it off for Mastering, it’s important to realize that your mix should sound like a “mix”. It should be balanced and in a place that sets your Mastering Engineer up to give you the best end product. Making mixes that have drastic low end and high information often make for a poor master. Overall a mix that sounds natural and balanced will then set up the Mastering Engineer to really enhance what is great about the song and hide anything that may hinder it from translating.
So always remember, mix for balance and emotion over a desire to make it feel loud and compressed. Most Mastering Engineers will say that “loudness” is actually very easy to achieve because they have the right tools. If you learn to trust your Mastering Engineer to bring out what's great about the song and to bring it up to commercial loudness, then your mixes will sound better and more full. This will then create happy return clients for years to come. If you learn how to use EQ to make your music balanced to take advantage of how speakers work and how our ears work your mixes will sound loud and more professional naturally. When in doubt, balance it out!


