How to Mix Your Music Using Psychoacoustics
Quick Answer:
To mix with psychoacoustics, first consider the many unique ways with which the ear and brain receive and interpret sound. Some things that can be utilized are the ‘Fletcher-Munson Curve’ when using equalization, the ‘Haas Effect’ when implementing spacial design, and the ‘Phantom Fundamental Effect’ when recreating low end frequencies.
Psychoacoustics in Detail:
Listener experience is key when it comes to music production. Although we often talk about music as if it’s separate from the listening experience, it is irrevocably interlinked.
In fact, one could argue that sound and our actual perception of sound is the same thing, as there is no way to separate one from the other.
This is all to say, that hearing, and the perception of sound and music with all of its unique characteristics and quirks, is an incredibly important, and often ignored aspect of music production.
Although I won’t be delving into some of the finer details regarding the inner ear mechanisms, or how they physically interact, I will be going over some interesting effects that can be utilized to create better mixes.
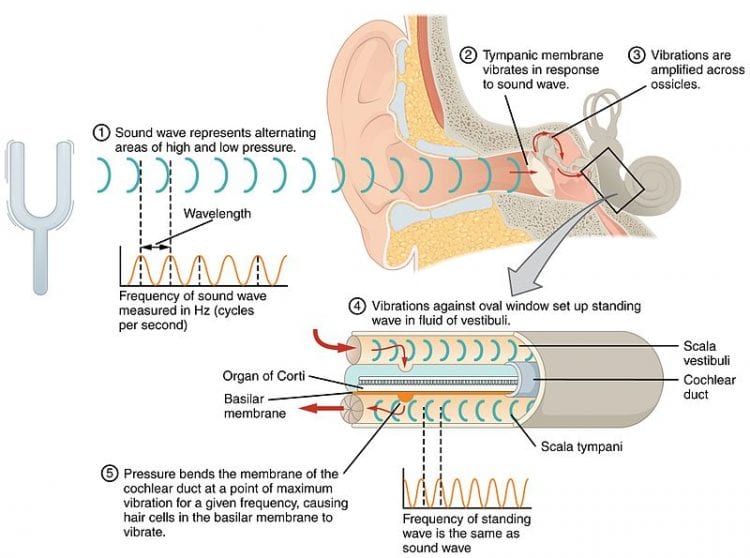
A detailed diagram of how sound waves interact with the inner ear mechanisms.
If you’re interested in some of the more exciting and unexpected ways in which our ears transfer and our minds interpret sound, read on for a detailed description of both.
We’ll also be delving into the practical ways you can recreate some of these effects using various plugins and audio editing techniques.
Spectral Panning - How the Head Shapes Sound:
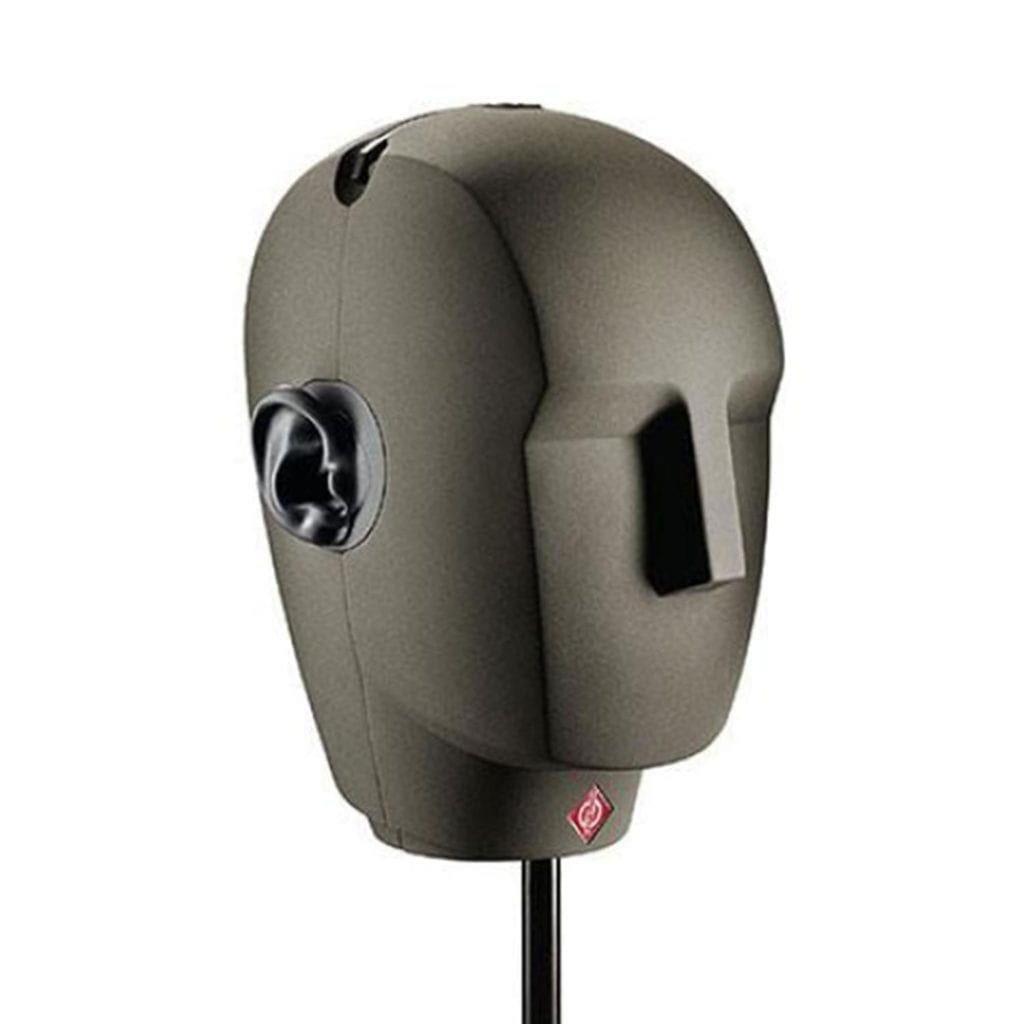
The Neumann KU100 uses condenser microphones on each modeled ear, with a mannequin head to create spectral effects.
When we think about sound as it relates to the body, we typically think about our ears. But the head, it’s shape, size and orientation play a role in how a sound is affected prior to reaching the ear.
For example, if a sound source is to your left, and the sound is moving directly toward your left ear, how will it sound to your right ear? Will it sound the same as it does to your left ear, or will it sound different?
If you answered ‘different’, you are correct.
Physical objects absolutely have an effect on the nature of any sound wave it interacts with, and the head is no different.
The term for this effect is diffraction. It describes a sound wave’s ability to bend around an object or obstacle, and continue moving in its original direction.
As a sound wave diffracts, or bends around an obstacle, low frequency waves easily traverse the object, while high frequency waves are often reflected, absorbed or dispersed due to their lower energy.
To go back to our example, although many aspects of the frequency response, volume and phasing will be altered by the time the sound reaches our right ear, the primary aspect affected is the high range frequencies. Again this is due to high frequencies having a difficult time diffracting.
This is where spectral panning comes into play.
If a sound source is oriented to our left, the right ear will still hear the sound, but with an attenuated high frequency range.
If a sound source is oriented to our right, the left ear will still hear the sound, but with an attenuated high frequency range.
This means that in a stereo image, by attenuating the high frequencies of a sound source, and changing it’s level panning to the right or the left, we can create a spectral panning effect.
Because we experience this type of phenomenon in our everyday lives, the spectral effect sounds natural.
Quick Experiment with Spectral Panning:
If you’d like to experiment with this effect play a sound or song on your phone.
Hold it up toward you left ear, and then plug your left ear with your finger. Take note of how your right ear perceives the sound.
Then unplug and replug your left ear and notice how much more high range frequencies you can perceive.
Repeat the process with the phone on your right side, and with your right ear plugged.
Move the phone around your head to observe how the frequency response and amplitude changes with the position of the sound source.
How to Create a Spectral Panning Effect in Your Mix:
There are a couple ways to accomplish this effect. The first is less expensive, as you can create it using stock plugins and DAW functions.
Step 1:
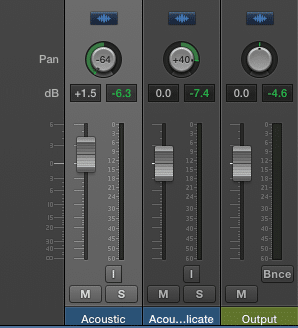
Take your mono track and duplicate it. To start, pan each mono track equally and oppositely. You now have a stereo image.
Step 2:
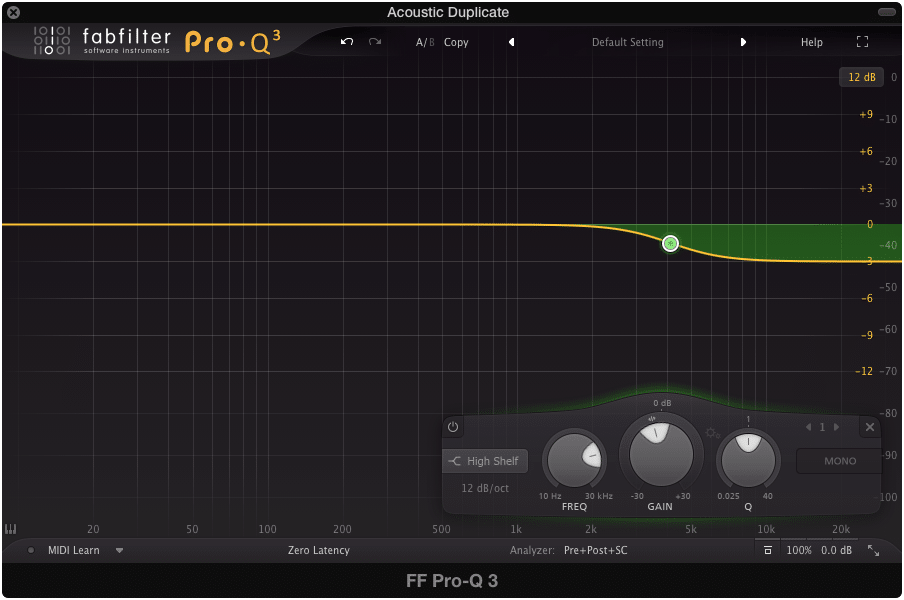
Place a stock equalizer, or a ‘clean’ nondestructive equalizer on each channel. Slightly amplify the high frequency range of one of the tracks.
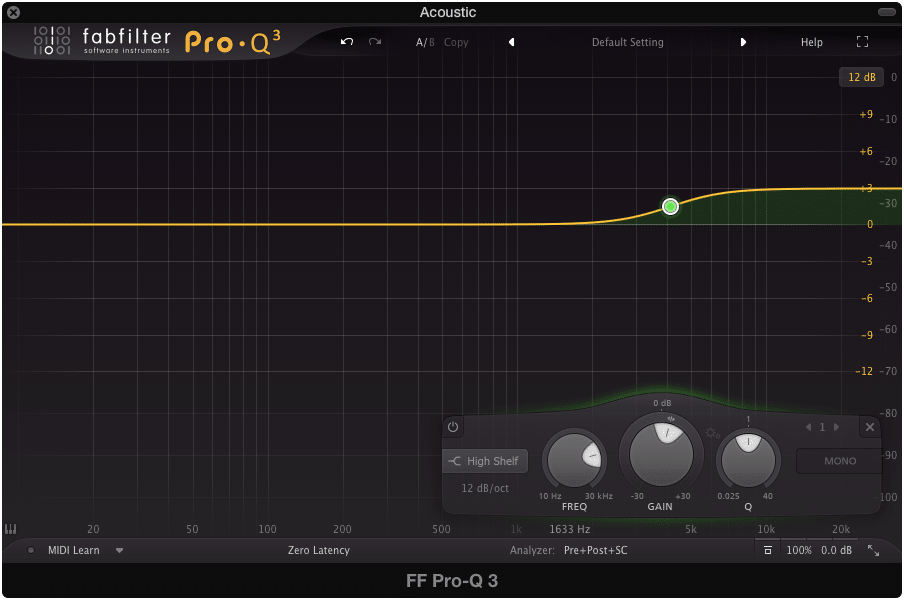
Then slightly attenuate the high frequency range of the other.
Step 3:
Notice that the sound appears to come more from one direction than the other, depending on which track you amplified and which you attenuated. With this concept in mind, gradually affect the tracks respective channel fader levels, pan amounts, and equalization curves, to fine tune the placement of the object within the stereo field.
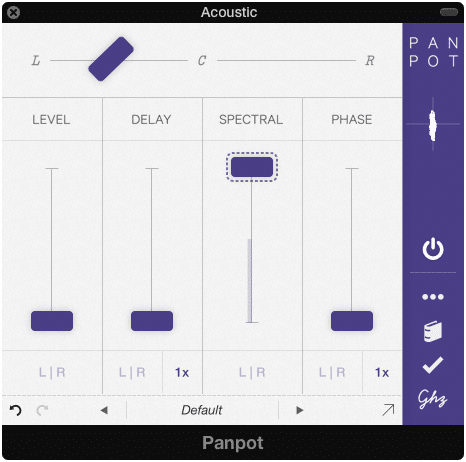
A Great and Easy Alternative:
Many plugins offer this same functionality, but organized into the interface of a single processor. The Good Hertz Panpot is an excellent option for anyone wishing to achieve the spectral effect, without having to follow the steps detailed above.
Other plugins also offer this functionality, so look around to find one that works for your DAW, workflow, and budget.
The Phantom Fundamental - How the Brain Creates Sound:
Saying your brain creates a sound probably isn’t the best way to explain this phenomenon to be honest.
But, “How the Brain Generates Electrical Impulses it Then Interprets as a Fundamental Frequency”, probably doesn’t make for an attractive title.
Essentially, when the harmonics of a tone are heard, the brain generates the fundamental as well, even if the fundamental frequency isn’t present. This can present itself in couple ways.
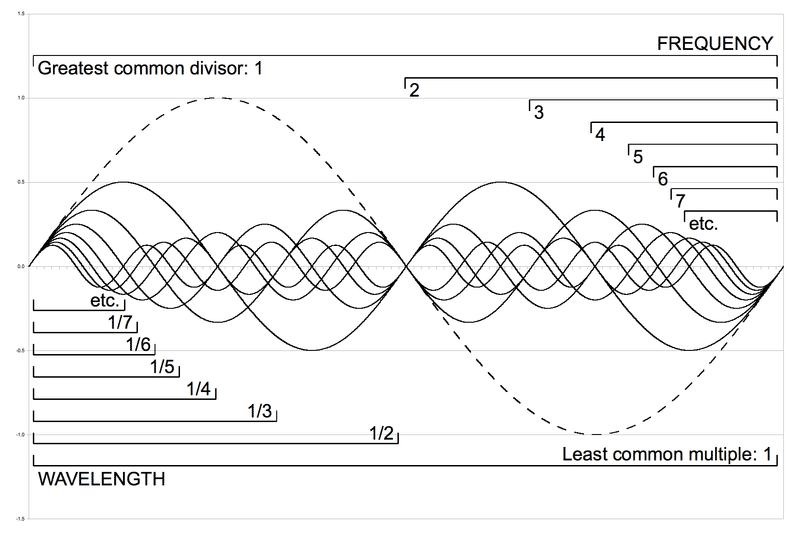
The "Greatest Common Divisor" is the Fundamental Frequency.
Most listeners report hearing the fundamental when it isn’t present, while others report they only hear the upper harmonics. Regardless of the different ways the sound is perceived, all listeners report having the same experience with pitch.
Even when the sound it attenuated with a high-pass filter, and only the upper harmonics are present, the relative pitch is still perceived the same as when the fundamental is present.
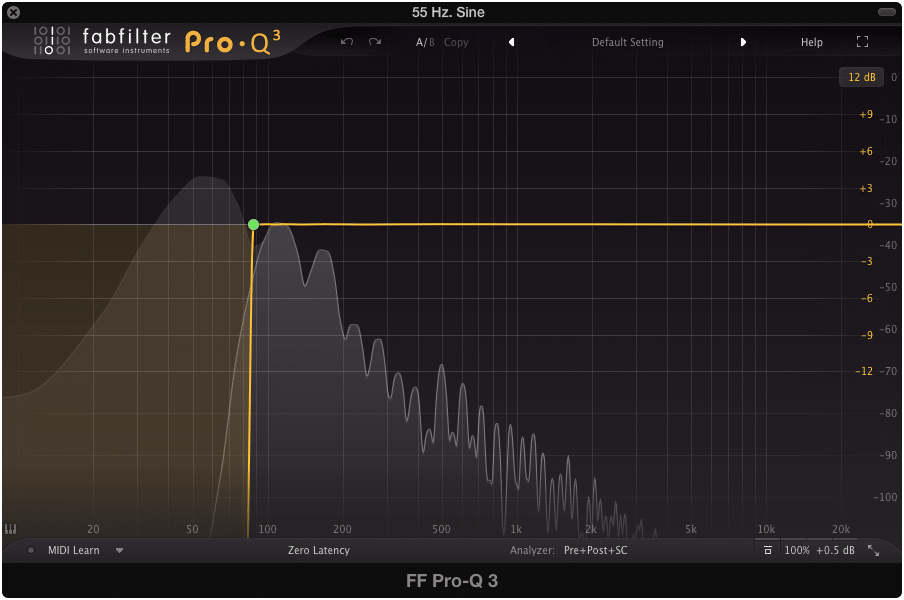
The FabFilter Pro Q, with a brick wall cut to cleanly remove the fundamental.
This suggests that our ability to relate pitch to perceived frequency isn’t dependent on the fundamental frequency.
Let’s hear how this effect works using some examples:
Take a listen to this 55Hz. sine wave, using a high end monitoring system or some full frequency headphones:
55Hz. at -3dB
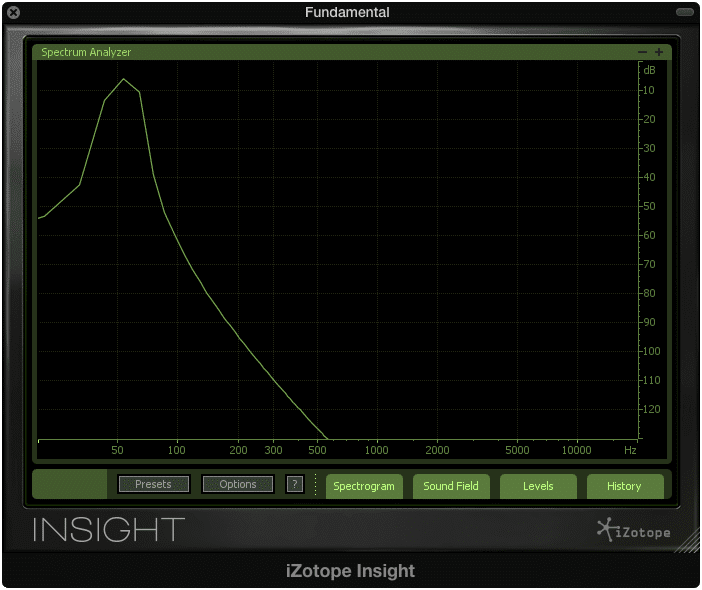
A 55Hz. Sine Wave
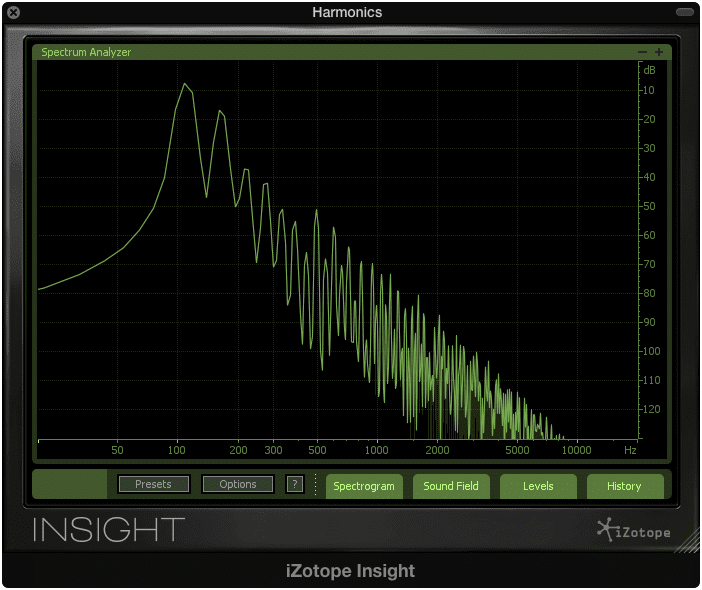
Now take a listen to that sine wave with the harmonics above it being generated:
55Hz with 1st, 2nd, 3rd and so on order harmonics, at -3dB
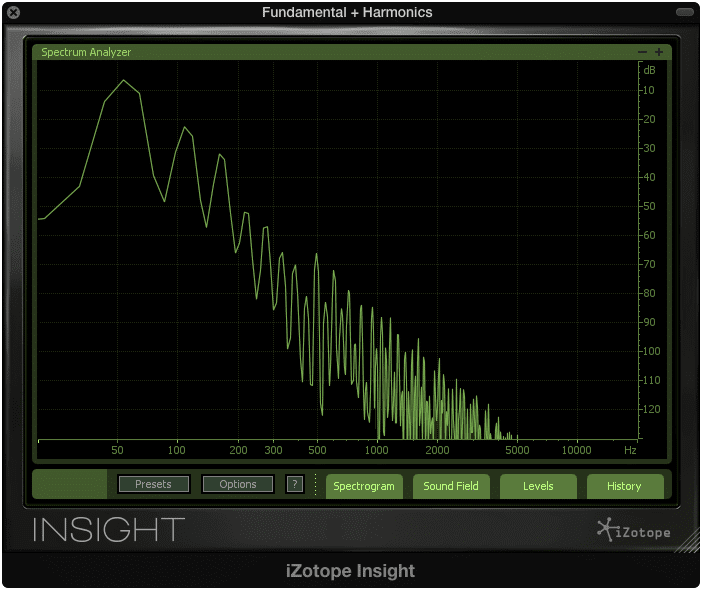
The same sine wave with added harmonics.
Lastly take a listen to just those harmonics, without the fundamental, and with the gain compensated to match that of the original signal:
1st, 2nd, 3rd and so on order harmonics, at -3dB
The harmonics with the fundamental cut out.
You’ll notice that the perceived pitch does not change. And most of you will still perceive the fundamental frequency even when it isn’t present. The timbre may change due to the harmonics, but the overall perception of the full frequency range does not.
In truth, no one fully understands how this effect happens. Some speculated that the mechanisms of the ear generate distortions, and these distortions are processed as the fundamental frequency. But further research has shown this not to be the case.
However, our lack of understanding doesn’t mean that this effect cannot be used in a innovative and practical way.
Imagine you’re mastering a mix for either yourself or a client. Although you anticipate many of the potential listeners having balanced stereo systems, you know that some will have speakers that have a limited frequency response.
Almost all small speakers will be unable to reproduce low frequencies.
This means that many won’t be able to hear the full range of your master, unless you utilize this effect.
Using a low harmonic generator, that forms harmonics based on lower pitch fundamentals can counteract this technical limitation.
How to Generate Low Frequency Harmonics:
Unfortunately unlike the last example, there is no way to generate low frequency harmonics using stock plugins. I could of course be wrong, but if there is a way it is most likely convoluted, and doesn’t get the exact desired effect.
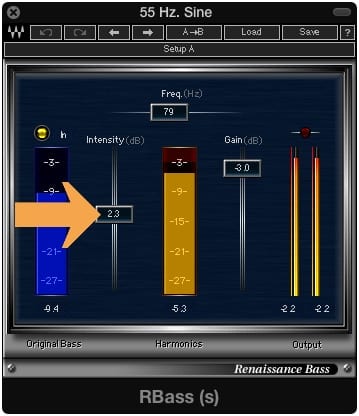
To generate these harmonics use the R Bass plugin from Waves.
Step 1:
Insert the R Bass plugin on your full mix or on the instrument you wish to affect.
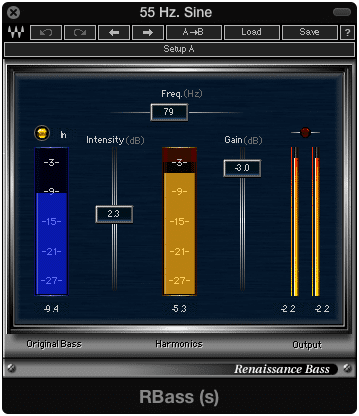
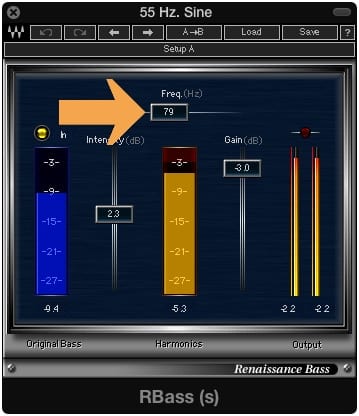
Step 2:
Adjust the “Freq.” function, and set it above your lowest fundamental. Typically 80Hz. or the default is a good starting point.
Step 3:
Increase the intensity, while keeping in mind that a little goes a long way. If you’re affecting an entire mix, be particularly careful when using this effect, as you can severely alter the low end without much effort.
Once this has been accomplished, the listener will correlate the harmonics with the fundamental frequency, and will be able to experience the low fundamental, even if their speaker system cannot reproduce it.
The Hass Effect:
The Hass Effect has been known about since the 1940s, and is also referred to as the Precedence Effect . This effect works best when using two identical signals, and then altering the timing of one by between 10ms and 35ms.
When scientist Helmut Hass began studying the relationship between sonic reflections and perceived points of origin for those sounds, he found that delaying a signal slightly, while simultaneously playing a direct, or immediate signal, resulted in the immediate signal being perceived first.
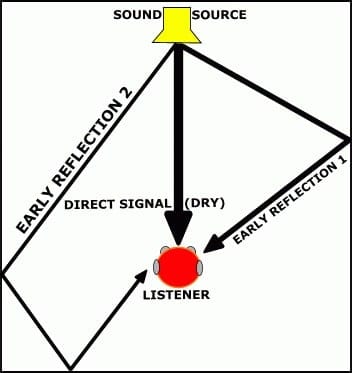
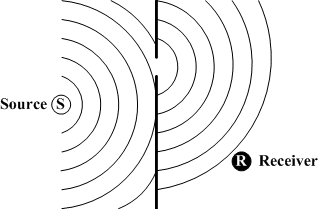
In this diagram, the direct signal would be heard first, followed by the "early reflection 1," then "early reflection 2."
When perceiving two signals in this manner, the two sounds are perceived as one, however, with added spatial context.
Because the immediate signal is perceived first, the sound source is interpreted as coming from that direction. Even when you amplify the delayed signal by up to 10dB, the immediate signal still causes the listener to have the same spatial perception.
There are many ways you can use the Hass or Precedence Effect while mixing to add perceived depth and spatial complexity to your mixes.
When doing so you must make sure that you are delaying the signal between 10ms and 35ms . Too small a delay and you can cause destructive interference with improper phasing. Too great and the listener will perceive the two signals as separate, and the effect will not work.
It should also be noted that using this effect in a extreme way will create an almost ‘washed out’ feel. This can be great for some instruments such as synth and guitar, but may not be great on kick, bass, and vocals if you’re trying to achieve a more traditional mix.
How to Use the Haas Effect in Your Mixes:
There are three different ways you can create this effect in your mix.
The First:
Duplicate the desired mono signal to a separate track, pan both hard left and right, then adjust the duplicated waveform’s location by 10 to 35ms. Play both simultaneously.
The Second:
Duplicate the desired mono signal, pan both hard left and right, then insert a delay plugin, using 10 - 35ms of delay. Play both simultaneously.
The Third:
Insert a plugin such as the Good Hertz Panpot, and increase the delay function, and then adjust the side you wish the effect to occur on.
Let’s look at each of these in greater detail:
Adjusting the Waveform to Accomplish the Haas Effect:
Step 1:
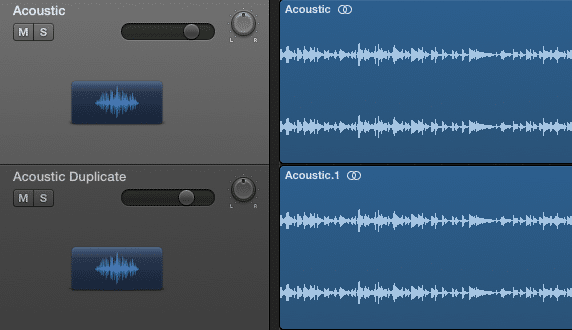
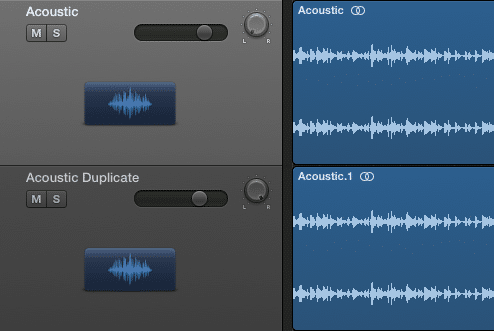
Duplicate the mono track to a separate track.
Step 2:
Pan the original track and the duplicated track hard left and right respectively.
Step 3 :
Change your display from project or beats to the SMPTE time code.
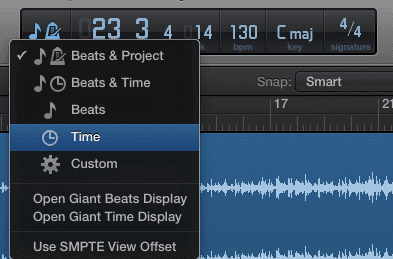
Click on the metronome and note symbol, then select 'Time.'
Step 4:
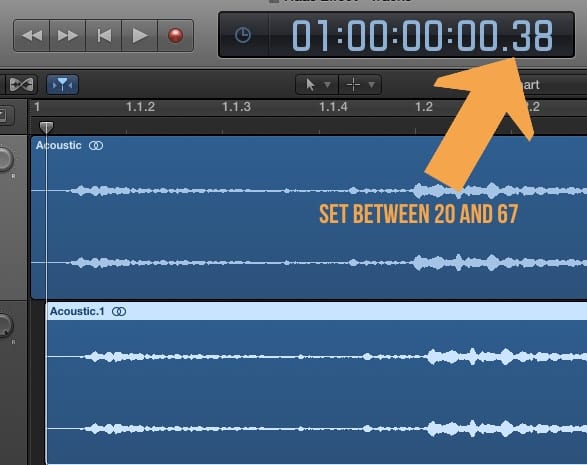
Keeping in mind that the delay needs to be between 10ms and 35ms, adjust the duplicated waveform back.
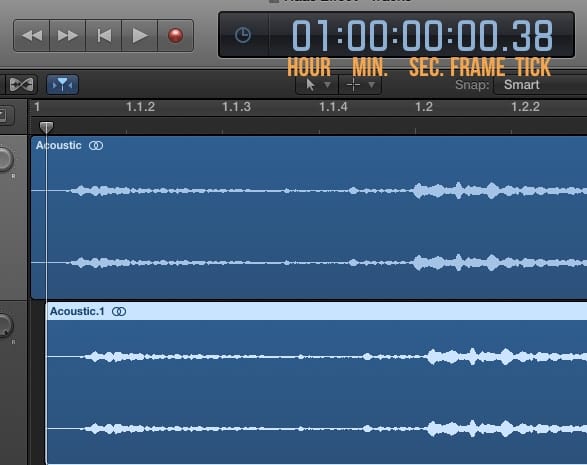
In SMPTE the timing is Hours, Minutes, Seconds, Frames, and then Ticks from left to right. Each frame equates to roughly 42ms, so you will need to move the duplicated waveform back using the Ticks as reference.
Each frame is composed of 80 ticks, which means that each tick is roughly .52ms. With that said the acceptable range to adjust your duplicated waveform is between 20 and 67 ticks.
Step 5:
Play both the original and the duplicated track at the same time. Make any adjustments as needed.
Using Delay to Accomplish the Haas Effect:
Step 1:
Duplicate the mono track to a separate track.
Step 2:
Just like before pan the original track and the duplicated track hard left and right respectively.
Step 3:
Insert a delay plugin on the duplicated track. Set the delay to any time between 10ms and 35ms.
Finding a delay that offers such short delay times, without introducing disruptive functions can be slightly difficult.
Step 4:
Play both the original and the duplicated track at the same time. Make any adjustments as needed.
Using a Panning Plugin to Accomplish the Hass Effect:
Step 1:
Insert the plugin on your track. Unlike before, there is no need to duplicate the original signal.
Step 2:
Adjust the fader to the side from which you want to perceive the signal.
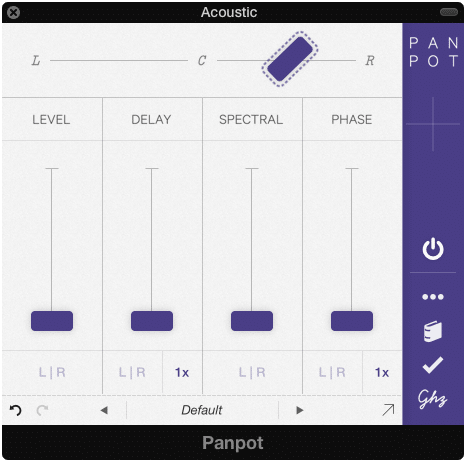
Step 3:
Increase the Delay function and observe the difference being made. Make any adjustments as needed.

Conclusion:
The effects covered here barely scratch the surface. There are so many different ways our ears and mind work together to create unique listening experiences.
The more you understand what these effects are and how they work, the more you’ll be able to recreate them in your mixes.
Their usefulness expands far past that of just music, as you’ve certainly heard them used in video games, movies, theme parks, or any other medium in which audio can be used.
Try using these effects in your next mix, as well as research other strange phenomenon to discover how they can be recreated for entertainment purposes.
Once you’ve tried the three above, and incorporated them on different instruments, and to various degrees, you’ll notice the difference they can make on you mix regarding depth, spatial design complexity, and the translatability of you mix and master.
Have you ever mixed with psychoacoustic techniques?


