How to Prepare Drum Tracks Before Mastering
Aside from vocals, drum tracks serve as the most prominent elements in most forms of modern music. Not only do drums provide the rhythmic foundation of to a song, but they can also cover the entirety of the audible frequency spectrum. As engineers, becoming proficient in the art of treating and mixing drums is one of the most difficult yet essential tasks we face. However, learning essential tips and techniques on how to methodically organize and set up drum tracks before mixing, will set you up for later success. Initial drum organization yields success and can save a lot of time, second-guessing, and head scratching further down the road during the mix process. This article will aim to provide insight on how to effectively address and organize your routing, grouping, soloing, parallel channels, fx sends, phase relationships, and tuning for your drum tracks. We can make our drums rock before mixing even commences!
Stay Organized
Before diving into the drum mix process, it is essential that we set up our drum grouping and routing in an organized and logical manner. Each DAW has its own unique ways to group, color, and organize tracks, but as far as audio routing goes, all DAWs work in a very similar manner. We can use digital audio routing to group our drum tracks logically, and the good news is if you know how to set up aux outputs (sub groups) in one DAW, then you can do it in all DAWs!
Mono Subgroup Routing
The first step would be to sub group any drum source that has multiple mics on it. For example, the snare drum will often have a top and a bottom mic recorded to separate tracks. So, set the output (not a send) of both the snare top and bottom to the same bus. It could be sent to any bus, but since a snare is a mono source, we should send it to a mono bus. Let’s say we use Bus 1. Many DAWs will automatically create an aux return track and set its appropriate input for the newly bus-grouped snare sources. However, in some older software, it may be required to manually create a mono aux track and set its input to Bus 1 so that it receives the output of the snare top and bottom tracks. Let’s say the kick had two microphones also. We will follow the exact same steps as we did with the snare tracks, but this time we will choose a unique mono bus for the kick. Again, it can be any bus, but for this example let’s say all of our kick mics are outputting to bus 2.
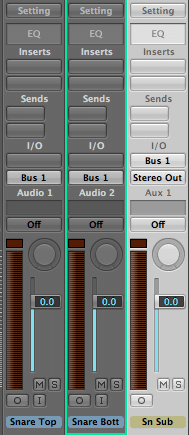
Mono snare sub-group routing.
Stereo Subgroup Routing
Aside from the kick and snare groups, we often create sub groups for our toms and overheads. The steps for subgrouping toms and overheads are almost the same as we discussed previously with the kick and snare tracks. The difference is that toms and overheads require a stereo bus output for subgrouping, as opposed to a mono bus output. This is because we often pan out our toms and overheads to the left and right, so we need a stereo aux return (subgroup) to maintain our grouped channels stereo image. Thus, the toms could be grouped and outputted to Bus 3-4 and the overheads could be grouped and outputted to Bus 5-6, in this example. Again, be sure that aux track return is created with its input set to the corresponding bus.
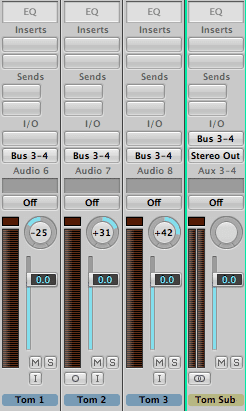
Stereo toms sub-group routing.
Drum Bus
After creating all of our mono and stereo sub groups, it is important that we create one last stereo subgroup for the whole drum kit. It’s commonly called the “drum bus” or “drum sub”. This particular subgroup receives and combines all unique drum channels and other drum subgroups into a stereo aux track. This aux track can serve as an overall level control for drum volume, and it also provides us with insert capability to compress and EQ the drum kit as a whole.
In order to create the drum sub mix, we first need to set the output on all of the subgroups we previously created to a new stereo bus. In this example, lets use Bus 11-12 as an output for all of the sub groups we discussed creating (kick sub, snare sub, overhead sub, toms sub). We also need to output the rest of the existing drum elements to our drum bus (11-12) if they are not already sub grouped. These elements would probably include the high hat and any other auxiliary percussion instruments used by the drummer. At this point, the full kit should be adjustable on a stereo drum bus and its corresponding fader.
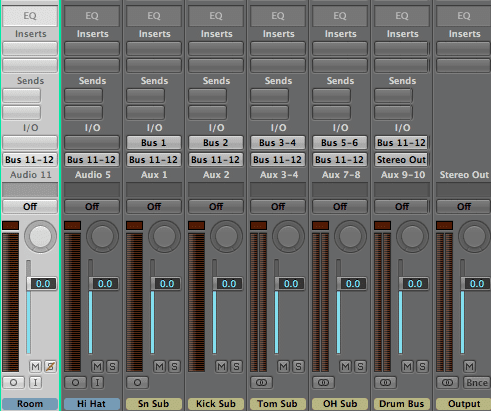
All sub groups are now outputting to the drum bus on bus 11-12. Elements that are not in the subgroup are outputting to the drum bus also!
AUX Sends
Before the mixing commences, it is always a good idea to set up some aux sends for parallel compression and reverb returns for later use. Note, it is imperative to make a distinction between channel sends and channel outputs. Bus outputs are typically used for sub grouping or sub mixing like we previously discussed, while bus sends are generally used for reverbs, delays, and parallel channels while mixing.
To set up parallel compression, first create a stereo aux track and set its input to an open bus. In this example we will use bus 13-14. Next, choose a stereo linked drum compressor; any one is fine because it simply a place holder and can always be changed later. Now, we must choose which channels we want to go to the parallel compressor and SEND them to bus 13-14 where the said compressor lives. Often engineers will create several different parallel compressors. Perhaps they have one parallel compressor designated to receive the entire drum bus. They might also have another unique parallel compressor to receive the snare sub group, or even a third to compress the overheads group alone. There are many effective options to experiment with and achieve great results. In this example, let's keep it simple only send the entire drum subgroup to the parallel compression on bus 13-14. Now mute the parallel aux return, until we dial it in later!
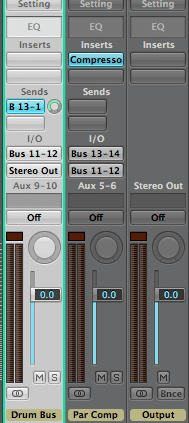
Parallel compression of the entire drum bus. Alternatively we could choose to send each element to the parallel compressor instead of the whole bus.
To set up a reverb, create an aux track and set its input to an open bus. The aux track could be either mono or stereo depending on what type of reverb is desired. For this example, let's create a stereo aux track and set its input to open bus 15-16. Next, choose a stereo reverb. Do not go crazy picking reverbs at this point; pick one and move on because we will focus on the reverb’s sonic quality at a later time. Of course we must also SEND certain elements to the reverb. It is common to send the snare subgroup and tom subgroup to a reverb, so let’s start with that. Once all desired elements are sent to the reverb, mute the corresponding aux return it until we dial it in later!
Solo/Mute Groups and Solo SAFE
At this time it would be a great idea to create a solo/mute group in your DAW. When making this solo/mute group we need to include all of the drum tracks, but do not include any drum sub mixes. Instead, the kick, snare, overhead, and tom sub mixes we created earlier should be “solo-safe”. Look up how to do this in your respective DAW. This will allow you to monitor the elements that are in solo through their designated output busses without having to also solo their associated aux returns. Obviously, the solo/mute group will need to be turned off if we wish to solo individual drum elements, but at the moment lets use the grouping to solo the whole kit.

Solo-safe all of your sub mixes! It is common practice to Solo safe reverb returns and parallel channels also.
Phase Relationship
WHEW! After a long but necessary setup, we are prepared listen to our drum tracks. First, we must achieve a general drum balance. With all of the drum tracks in solo (using our solo/mute group), push up each fader until every source signal is clearly audible. Once everything can be heard, we should check phase relationships before moving on to any panning and EQ. If the drum kit was well mic’d then the phase relationship may not need any adjustment. If it isn’t broken, don’t try and fix it! Although, it will save significant time and effort on your compression and EQ process if you establish constructive phase relationship from the start. If your drums aren’t sounding full initially, then it’s a good idea to check for phase cancellation by flipping polarity on particular tracks. We will go over how to do that shortly, but first, let's briefly discuss the difference between phase and polarity.
It is important to make a clear distinction between phase and polarity, because the two terms are commonly misused. They are not interchangeable terms even though they might seem like it. Phase is a time relationship between a source and multiple microphones. That is there is a slight time variation when multiple mics capture the same source at different distances. Polarity has nothing to do with time. We flip polarity, not phase. When polarity is flipped all positive parts of the waveform become negative and all negative parts become positive. Flipping polarity is basically turning the waveform upside down. Many plugins have a polarity inversion option. It will most likely be found on an EQ plugin or another utility plugin within the DAW. The polarity flip is commonly used as a way to check for phase because signals that are 180 degrees out of polarity cancel each other. If phase we have a good (constructive) phase relationship between two signals, then flipping the polarity on one of those signals should result in a very thin version of that sound and a bad (destructive) phase relationship. If flipping the polarity doesn’t create some sort of phase cancellation, then this is a good indicator that there are indeed phase inefficiencies between the original signals.
How to Check and Address Destructive Phase
Before checking our phase relationships with a polarity switch, we first must set our output to monitor in mono. If we don’t, we will not be able to hear the effect of the polarity flip. There are many ways to do listen in mono, but it is common you’re your audio interface will have a mono/stereo monitoring button or switch. There are also many plugins that will sum the mix bus to mono, and some DAW's even have a button right on the mixer that can switch any channel from stereo to mono.
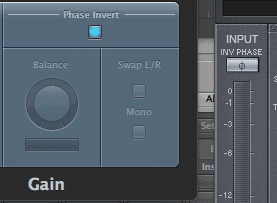
On the left is the polarity flip on Logic’s Gain plugin. On the right is the polarity flip on Eventide’s UltraChannel plugin. Notice how it is often labeled “Phase Invert”, but it is actually a polarity invert. It is confusing.
Once listening in mono, solo the overheads and flip the polarity on one overhead track. If the reversed polarity results in a thinning of the overheads, then we know that we had a good constructive relative phase relationship between them (flip the polarity back to where it was). If the reversed polarity results in a thicker or even a similar sound, then we likely have exposed a relative phase issue. Let's say it actually sounds much thicker when we flip the polarity on the overheads. Next, we can either decide to leave our overhead polarity flipped because it is more constructive that way, OR we can decide to flip it back and address the phase relationship issues we just exposed by time aligning the overheads with precision. The importance here is that we strive for a thicker and more broadband sound because its more efficient to cut something that’s there with an EQ rather than try to make up for something that’s completely missing. If we decide to time align the overheads, we can manually do it ourselves, but there are also several plugins that can effectively complete phase alignment for you. Either way, be careful and use your ears because phase relationships are complex and often intentionally imperfect. Once, the overheads are we you want them, repeat that same process with the kick, snare, and toms subgroup by soloing them and checking them against the overheads by flipping the polarity of the sub grouped hit. If phase alignment is required, then move the appropriate track the overheads when matching phase.
Drum Tuning
In many circumstances, tuning the drums by pitching them up or down semi-tones can yield great results. Although, doing so is a creative decision, and it might be best left up to the producer as opposed to the mix engineer. That is if you are hired strictly to mix a project, then you should consult with the producer or artist before tuning the drum hits. On the other hand, it is becoming increasingly more common that the producer and the mix engineer are the same person. If this is the case then it is up to you and the artist to create the sound that reaches for an intended sonic goal.
Proceed with caution when tuning drums. This goes especially for real drum kit recordings. In pop and electronic based music, tuning drum hits is a no brainer because each hit stands on its own. Tuning one drum doesn’t affect its relationship with the other drums. There is no microphone bleed, and phase issues are non-existent for the most part. Dramatic tuning changes can effectively be made. In contrast, a real multi-mic’d drum kit always has bleed and phase between microphones. For example, the cymbal hits are picked up by the close snare microphones, and the snare hits bleed into the high hat mic. The relationship between the microphones placement is complex!
If we wish to tune the close mic subgroup, we must be aware that the bleed into the other mics will remain in their original tuning. As a result, the newly tuned close mic track will blend with that original snare signal bleeding into the other microphones. Engineers can often get away with slight tuning adjustments (+ or – 2 or 3 semitones), but more aggressive tuning will result in phase relationship discrepancies with distant mics. This will likely result in unpleasant artifacting when the drums are summed together. Negative artifacts will be especially prominent in drum mixes are heavily reliant on overhead and room mic signal. However, if the close mics are being heavily featured, then the room and overhead mics will be less of an issue. The point, is that we should be aware that tuning can be tricky and problematic for multi-mic situations. If problems and artifacts do arise, then back off and do not compromise sound quality! If the tuning causes issues with the drum sonics, then you would be better off using a tuned sample for replacement or assistance.
When an effective opportunity arises to tune the drums, we generally want the hits to be in the key and scale of the song. The kicks and snares sound great on the root note or perfect 5th of the songs scale, or sometimes its fun to try what the minor or major 3rd sounds like. Toms are usually best tuned to the scale of the song also, and they typically ascend in intervals of 3rds and 4ths. When working with a real drum kit, we generally leave the overheads and any other cymbal mic in their original tuning. In pop production, we need to pay close attention to the sub percussion tuning. 808s and sub kicks are sonically pleasing when they are in tune they are easy to overlook.
There are several different tools that serve as effective ways to tune drums. Most popular modern DAWs offer a native tuning solution without having to purchase third party plugins or software. However, there are many popular tuning plugin manufacturers that people love to use also (Melodyne, Autotune, Waves Tune, etc.) Each one has a unique user experience and graphical interface, but they offer much of the same options and parameters. When working with electronic and midi based production, tuning drums is generally very straightforward. In some circumstances, drum hits can be tuned just by adjusting midi note values chromatically. Also, many of the best modern beat production plugins (like Maschine, Battery, Kontakt, Stylus, etc) come with a tuning parameter built in. Find a tuning tool that works for your needs and take your drums to the next level!
It is also important to keep the drummers choice in mind. That is, a well-seasoned professional drummer will tune their drum heads appropriately to help the engineer achieve a tasteful tone in a mix. If you have hired the drummer at a professional price, then it might be in your best interest to trust the drummers taste in terms of tuning the drums heads. Professional musicians are usually tone junkies, and their sonic decisions should not be taken lightly. There are also many instances where the drums are not supposed to be in tune with a songs melodic landscape and it sounds just fine. The moral of the story is be careful tuning drums especially if they are meant to sound authentic. Not everything is required to be melodic!
Final Thoughts
Completing all the way through a drum set up can be a very involved process as you can tell if you have made it this far in the article. Do not let it discourage you! After repeating the process several times you will be able to fly through it. Outputs, sends, groups, solos, phase relationships, and tuning will become second nature. However, everything good takes time, and repetition is the mother of education. So get started, and learn the ways of the experts! You will be glad you did once the mixing process begins. A calculated drum set up will lead to efficiency and success down the line.


