How to Use Plugin Automation
Have you ever listened to a song and noticed that the snare sounded a little brighter during the chorus, the kick had more of a thump, and the vocal effect had changed from an eighth-note to a quarter note delay. A mix tends to get boring hearing the same sonic textures from beginning to end. That’s why mix engineers use plugin automation to create impact and keep the audience engaged!
Making the vocal stay on top of the mix is one of the greatest challenges of mixing and what mix engineers tend to pride themselves on the most. Compression will help the vocal lock in place and make it not go underneath or way over its intended volume. It’s important that the vocal stays loud and proud to ensure its rightful place, and for the listener to discern what the vocalist is conveying.
Pro Tip: A great compressor that gets the vocals to sit in the mix is the Waves Renaissance Vox (usually referred to as RVox). Many of the elite mix engineers swear by this plugin, and you’ll know why as soon as you use it! It offers compression, gate/expansion, limiting, and level maximization and is extremely easy to use with a simple user interface. Vocals are always locked in place by using this compressor. A great way to start is to take the loudest part of the vocal and have it compress down to around -6dB. Mix engineer Jaycen Joshua (Camila Cabello, Chris Brown, G-Eazy, Demi Lovato) recalls using the RVox compressor in a vocal chain he used on the song ‘Reminder’ by The Weeknd.
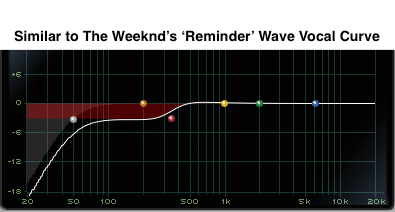
Jaycen Joshua Vocal Chain Technique Used on the Song “Reminder” by The Weeknd:
(as stated in Pensado's Place episode #330 - chain in order from first to last)
- FabFilter high-pass filter the pulses below around 50Hz.
- Waves RVox Compressor - puts the vocal at attention.
- Take out proximity effect by shelving around 250Hz-400Hz.
- McDSP 404 Multiband Compressor.
- Eiosis AirEQ - for top end.
- Blue Face CLA-76 - parallel compress the vocal as a limiter to catch any peaks that escape.

If you have a mix with no volume automation, chances are that it will sound stagnant and boring. We use compression to make instruments sound better while locking them in the mix. With all of this compression though, instruments don’t jump out of the speakers the way they naturally would when uncompressed. It is essential to use volume automation to change the dynamics of the mix and to make certain parts shine during specific times.
Automate Those Plugins!
Volume automation will make your mix more exciting and entertaining to the listeners, but we can go a step above that and automate our plugins to create an even bigger impact.
There are infinite ways to make your mixes sparkle with plugin automation. Just listen to Serban Ghenea’s and Manny Marroquin’s mixes! Plugin automation is a great way to be creative and give an extra bit of emotion to the song.
One of the most popular ways to use plugin automation is having different effects and aux tracks that consist of different delays, reverbs, distortion, compression, and just about everything else playing only during certain sections of the song. Whether a bridge needs a dense, long reverb sound, or a certain vocal phrase needs to be distorted, working with these creative mix ideas are what can make a great mix really stand out.
Sometimes we do so much to a track that it’s best to ask the question, “what should I take out” over “What should I add”. Lets say a band had a horn section that played throughout the song. In the verses, they sounded perfect. During the choruses, the horns are overpowering and stand out too much pretense-wise. In this case, it would be easy to just lower the volume, but you don’t want to turn down the low end, midrange, and airy top end. Go to your equalizer and turn down only those harsh frequencies. Turn on plugin automation for those eq bands or the bypass automation plugin. Leave the eq on during the choruses and off during the rest of the song. Now the horns sound perfect. Never too harsh, never too dull.
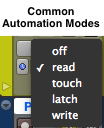
Common Automation Modes
Off: Bypasses any automation.
Read: Playback automation data. No automation will be recorded.
Touch: No automation data will be recorded until the fader is moved. Once the fader has written data and not selected, it will go back to its original position.
Latch: Like touch mode, but once the fader is deselected, it will remain at that same volume.
Write: All changes to the fader will be written. This mode will overwrite all the automation data. Usually used to create a first pass or automation. Make sure to deselect this mode after it has been written once because anytime you press play, the data will be overwritten.

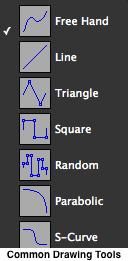
Common Drawing Tools Used for Automation
The Freehand tool: Allows you to draw the data at any point on the track. Similar to using fader automation.
The Line tool: Click and drag breakpoints to create a smooth line. This is faster and easier to edit.
The Square and Triangle tool: Quickly draw repeating patterns. Can quickly make tempo-synched changes in Grid Mode.
The Random tool: Creates random breakpoint changes for unique effects.
Knowing these tools can save you a lot of time as well as get your creative and technical ideas playing faster and more efficiently.

Changing the Stereo Image
A great way to achieve a wide mix can work best by making the stereo image smaller and automating the stereo image to make it wider when the chorus hits. Widening tools can be a bit tricky since some of them raise the volume of the sides but abandon the mid section (center volume), which creates a wide, but lopsided mix. If you want your mix to really hit hard with the kick, snare and vocals, make the stereo image smaller, then automate with your widener of choice to open up the stereo image when needed. It’s the wise “what can I take away” over “what can I add” scenario.
You can create more impact with certain instruments by panning them further to the sides on certain sections and tucking them back in when they don’t need to be as cinematic. Taking advantage of the full spectrum of your pan knob (instead of just left/right/center) can fill a lot of room in your stereo image without it being too crowded.
Dynamic EQ - The Self-Automated Equalizer
Masking of frequencies is a very annoying and a hard thing to fix without making some sort of compromise toward the sonic sound of your tracks. If the kick gets lost every time the bass plays certain notes but you don’t want to change their sonic qualities, a compromise has to be made. Taking an eq and removing those specific notes in the bass track for the kick to not get lost can make the overall bass sound thin. An even worse way to try and fix this problem is by using a wide band graphic equalizer to tame those bass notes, as it lowers many other notes around the ones you want to control, making the bass sound a lot more thin than a parametric eq would. This is where a dynamic eq could save the sonic qualities of both the kick and bass, giving the best of both worlds. Use a dynamic equalizer and find the bass notes that are clouding the kick. A good way to find the notes is to take a narrow parametric band, boost it up and sweep until you reach those loud notes, then turn it down until they don’t poke out. An easier way is looking at a spectrum analyzer to see those resonant notes. For the fastest and most efficient way, it’s best to know the note when it’s played and be able to recall its frequency (the 4th Octave of A is 440, the 3rd octave is 220, and so on). After you’ve found those resonant notes, you can leave it alone or even side chain the kick to the bass equalizer to only tame the bass when the kick hits.
Another great kick/bass technique to control competing frequencies is side chaining the kick to the bass dynamic equalizer. Find which frequencies the kick should live in and take those frequencies out of the bass every time the kick hits so there is no masking involved.
Pro Tip: If you hear unnatural pumping from the dynamic eq, slow the release down.

If a vocal is singing in a lower range during a section while sounding muddy and a higher range in another area of the song and they sound harsh, it would be a bad move to eq and clean up the muddy sounds because when the higher range hits, the vocals will sound more harsh as well as muddier with that same eq also used to tame the harshness. This is where dynamic eq can really be beneficial! If you mix live recordings, this can really save you a lot of time. Of course, you could also duplicate the tracks, but using a dynamic eq will take a load off of your CPU (by not having to duplicate and use twice the amount vocal plugins) and keep things more simplified with edits needed.
Plugin Automation Tricks
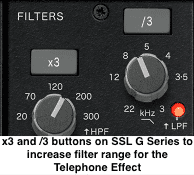
The telephone effect: I think it’s safe to say we’ve all heard a song thats had a telephone effect. Sounding very thin and nasally, impersonating a loudspeaker, phone, or a lo-fi sound. A great starting point is to take a high pass-filter and bring it to around 500Hz and a low-pass filter around 2kHz (both with a steep slope) and adjust to your liking. The smaller the remaining frequencies, the thinner the sound. You can also boost around 2kHz for more presence. This technique can make for a very interesting sounding production when used in the right places, and can drastically change the emotional impact of the song.

The Square Tool
If your mix was recorded to the grid, the square tool can offer some very diverse, rhythmic options for creating automation. Lets say you have a track that you want to add energy to. Using the square tool to lower and raise the volume of the track every few bars is a great way to help that instrument sound energetic and keep the song moving rhythmically. Since it would take a lot of effort to ride the fader to do this, the square tool can save you a lot of time with better accuracy.
Impact with Distortion
Any time an instrument is sounding great but just needs to cut through the mix a bit more, distortion can be your best friend. Many mixers use distortion to make the bass and kick play well with an iPhone speaker and other smaller, consumer electronics. Distortion also works great when equalization isn’t helping the instrument sit where you would like it to, and increasing the volume just isn’t cutting it. Distortion is also a very fun element to use with automation. Using it on certain words or phrases, making the snare pop during the chorus or even instancing it on a reverb or delay. The options of using automated distortion are as limitless as they are beneficial!
Automating the Mix Buss
Want your song to really stand out? The best way to drastically change your mix during a section of the song is by taking advantage of the mix buss. Sometimes, you may want the chorus to have a different color than the rest of the song, or sound a bit brighter, darker, maybe more dynamic, or even a bit compressed. If that’s the case, mix buss automation is your go-to! With mix buss automation, the options are limitless. Mix engineers take full advantage of their mix buss to really let the song sing.
Change Your Effects
While using your effect that you already have running, automating the delay and reverb parameters can make for an interesting part or transition. You can experiment with raising the volume of your effects or changing the delay and reverb time to be longer and of a different rhythm pattern. For example, many mixes will have a delay throw used in certain sections or during a transition to help it blend more smoothly and keep the flow going into the next section. Changing the reverb length to make an instrument sound like it’s getting farther and farther away, or experimenting with the pre-delay can lead to a more creative and enhanced mix, helping to draw in Its listeners. A great example of using creativity with plugin automation is mix engineer Derek “MixedByAli” Ali (Kendrick Lamar, Dr. Dre, Jay Rock, Mac Miller). Ali uses many stereo imaging effects of vocals, pitch shifting delays, and will automate the panning of many instruments so they sweep across the stereo field in a very cinematic and entertaining way.
Final Thoughts
Having plugin automation in your mix not only unleashes the infinite amount of creativity you can provide for the song, it also gives way for that song to create an even greater emotional experience for its listeners. As engineers, we have an incredible amount of potential to impact the song and take it in the direction that it is intended to go. We can use our ideas and creative outlooks to help define the artists vision. Using these automation techniques can make you a more well-rounded engineer as well as help you discover new possibilities and directions to take your mix. Next time you’re mixing a track and you have a unique idea, dive in!


