Workflow Tips for Audio Engineers: Production to Pre-Mastering
Everyone wants to make hit records, but little do they know of the hundred small steps that go in to getting a client and taking them to a finished mix that is ready to be sent off to mastering.
One of the most common pitfalls that new and even seasoned engineers run into is having poor workflow and Organization which eats away at time, and in return costs money. By having proper Organization and systems in place, it allows the client to know they are getting the best end product while also equipping the engineer with everything they need to best serve the project.
It is really important to have proper Organization because as you get busier in the industry more and more things are required at different stages. Time will become your biggest asset. If you are just starting off, you may only work with local artists or indie artists. This is great! You have clients! At first, they may only want a standard mix delivered, but as you move up in the world, you will start to deal with multiple versions.
At the professional level, you may have to turn in versions for television and film, stems or multi- track for live performances, vocal up versions and vocal down versions, alternative versions for radio or certain mediums, and the list continues. Before you know it, you could have five or more versions of the same song. This can get complicated and confusing very quickly. Organization is key.
On Board Process
When we approach Organization and workflow, it’s super important for us to start at the very beginning with what is called the “On Board Process”. The On Board Process is where we lay a foundation to set ourselves up to win not only personally, but to make sure we have all the details from the client in order to meet their expectations. The importance of expectations and communication can not be stressed enough in the music creation process.
It’s very hard to give the client the best end product when they have not stated what they really want. When we look at engineers, producers, or songwriters that are just starting out, we often see people who are so eager to dive into making music that they never take the time to really ask the right questions to the client to ensure a smooth process from start to finish.
This is where a simple form such as a “File Checklist” or “Mix Specification Sheet” comes into play. You can name the form whatever you want, but this On Board Process form is going to contain everything you need to know in order to give the client the best end product. The form may contain simple things such as “Artist Name” and “Album Name”, or if it’s a mix specification sheet “File Format, Labeling of Files, References” etc. On any form you send your client during the On Board Process, you will want to include a section that clarifies who will be paying you, and how you can get in contact with them. To see an example of this type of form, see below:
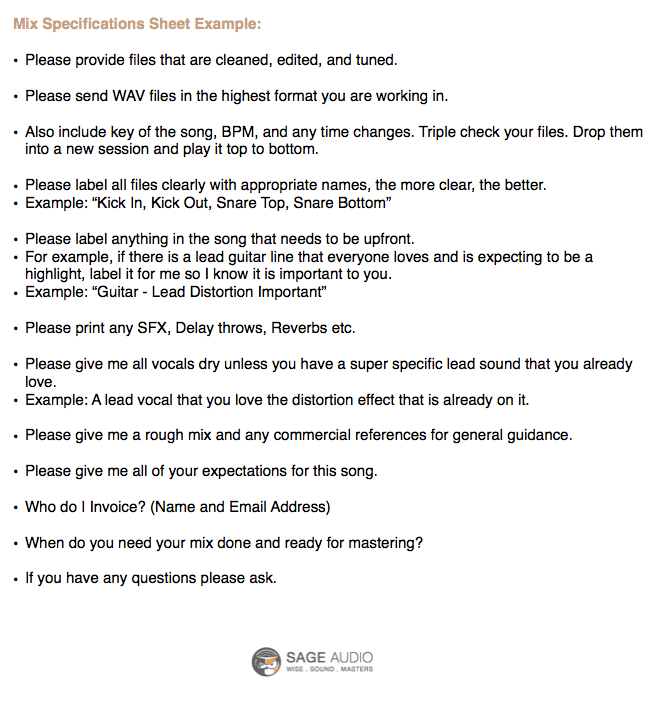
(Mix Specifications Sheet example above, creating one of these will cut hours off your work time as well as help you gather all the information from your client so you can give them the best end product.)
This form is something you should send to your client as soon as you agree to work together. It will become your answer key to giving them exactly what they want. When you create an On Board Process form, it will take hours off your work week which in return gives you more time to work on the project. More projects equal more money. Happy clients equal return clients, and referrals. This all starts from a good On Board Process.
Invoicing - Getting You Paid
Once you have your client fill out your On Board Process form, you can then start with the Invoice Process. So often people get scared of asking for money or charging a set rate in the music industry. Anytime we provide a service for someone we should be compensated for it. The industry often goes by a “work first, pay later” approach, but in the end you decide how you want your business to function. This is one of the biggest myths people hold on to in the industry - that you have to do all the work first in hopes of the client paying you. This is an amature move. You need an Invoice Process.
If you look at any of the professionals who are making Top 40 music, none of them have a system of doing the work first, then getting paid. They all get paid in full, ahead of time (if you can even get them to work with you in the first place). How can they do this?
It may feel like because of their track record in the industry they are able to demand these payment policies, but in reality they have just established a proper Invoice Process. They have trained their clients to know that if they want to work with them, it will require them to treat them like a professional. Anytime you establish boundaries and create professional workflows with Organization, an On Board Process form, and Invoice Processes, it sets the tone that you care, you want to get the client the best end product, and that your time is equally as valuable as theirs.
Getting paid upfront may make clients nervous, but if you’re confident in the work you deliver, there should be zero issues with getting paid in full before you begin the project. If that currently seems like too far of a jump, then you should at least be doing a partial deposit to hold the client’s spot, and then collect the remaining payment when final files are delivered. There are a number of online services that offer business invoicing options. Take some time to figure out which one best meets your needs. An invoice, at the very least, should contain your business name, date, the client's name and contact information, the service that is being given, and the amount owed for the project. Payment options can also be given on the invoice unless it’s already built in to the program you choose to use. If you are confused about what an invoice should look like, see example on the next page:
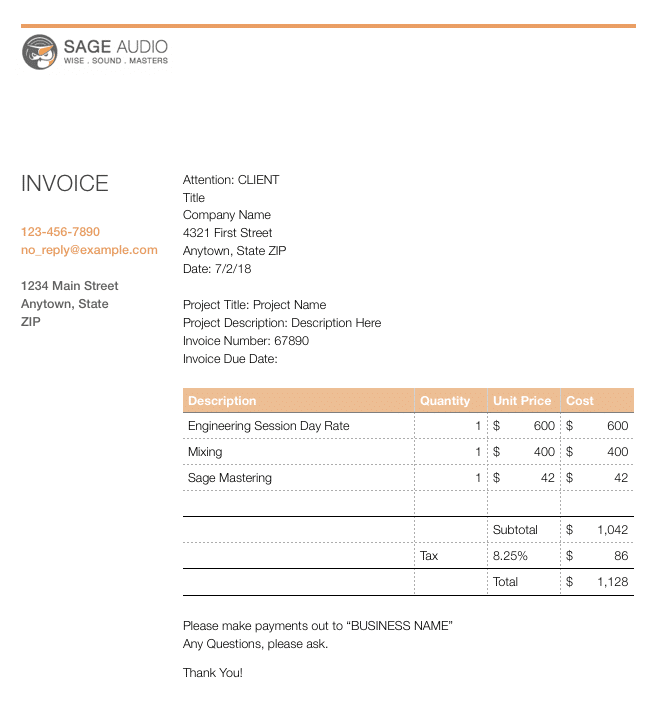
(Above is an example of an invoice. Having a clear invoice is key to getting paid, as well as keeping accurate business records. Remember to include at least the above information. )
Working with clients who do not want to pay you until they hear your work creates an unstable creative and business relationship. It implies that you may not deliver a product they like, and that they have the freedom to not pay you if they decide they do not like it, regardless of how much time you have already worked on it.
This is a terrible place to work from and puts all sorts of self doubt and creative pressure on both sides. Having the On Board Process form and Invoice Process in place, will clear up any concerns about what you offer as a service provider, and what they will be getting delivered to them. You may have clients pushback on this policy at first, but you are the one providing the service they need, so hold your ground. You have value, train your clients to know that. Your time is valuable, and the service you are offering solves a problem for them. Not only that, but you are providing them with a product that they can then make money off of. In most cases, far more money then what they are paying you. (Raise your rates! Wink Wink).
Businesses and Banks
Now that your Invoice Process is In place and you are getting paid properly, we need to talk about taxes. Everyone's favorite topic. In order for you to get paid correctly, you should be registered as a proper Business. Being registered as a DBA or LLC are the most common options for self employed people in the music industry. Being registered as a Business helps you stay Organized and also keeps you operating legally. If you want to have longevity in this industry you have to treat yourself like a professional from the get go.
If you are currently taking money under the table, then you are damaging the very industry you are working in. This does no one any favors, and in the long run it will hurt your Business. If you ever want to get any kind of loan, buy a house and/or studio, open up a credit card, or show people you are legitimate and trustworthy to work with, you have to actually be a registered Business. If you want to work with any label or management company they will often ask you to fill out a W-9 form. This form asks for your Business name. If you do not have one, I can assure you they will question how serious you are about the work you do. In some cases, they may not even want to work with you at all.
After you are registered as a Business, you will want to open a Business Bank account. You do this so you can keep the money you make from your Business separate from your personal money, and what you pay yourself from the Business. It’s easy for it to all mix together and having a Business Bank account will bring clarity on how much your Business is actually making, and how much you are actually spending.
It’s super simple. Register as a legal Business, get a Business Bank account, report your income, and pay your taxes!
Timeline
Let’s assume you are now registered as a Business, you have a Business Bank account, and you are officially operating legally. Let’s assume you have applied Organization, the On Board Process, Invoice Process, and created your On Board Process forms. Do you have a Timeline laid out? Do you have the project booked out in your calendar? What do you do to ensure you hit your clients deadline?
One of the main reasons why people do not get return clients is because they miss deadlines and do not understand the Timeline. In this industry people pick release dates for a reason. Nothing is left to chance for any “A list” artist. The release date is calculated based on promotion, marketing, touring, interviews, industry meetings, and radio shows. All of those things lead up to the release date. If you do not hit the deadline given to you from your client, even though it may be months away from when they’re actually releasing the song, you could be costing the client thousands of dollars.
Everything you do impacts everyone else. This is why having a Timeline established is so important.
If your Timeline is one day late, it could push everyone else a whole day back. Music videos are often shot after the song is done, high end music videos are booked out ahead of schedule. If you miss your delivery date and the label has to push the music video schedule back, you are costing the company thousands of dollars as well as ensuring that you cannot be trusted to perform at a professional level. When you have lots of people and steps involved, everything adds up quick. Mind the Timeline.
If you currently have no idea how long it takes you to complete a project, start keeping a timer with you. Be honest about this process. Time yourself from the moment you respond to an email from a potential client, to the final delivery of the project. All of it takes time, and as we mentioned before, time will become your most valuable asset as you get busier in your career. Track yourself, and make a Timeline. Once you have a good gauge on how long things take you, then you can map out when you will do things in a calendar.
If you’re engineering, maybe you allow two hours for pre-production the day before a session. Put it in your Timeline. The session is scheduled for 10 A.M. to 6 P.M. and you need to allow for one hour of editing after the band leaves from 6 P.M. to 7 P.M. Put it in your Timeline. Everything needs to be accounted for and put in your calendar in order to properly map out your Timeline. See image on next page for an example of what a calendar might look like:
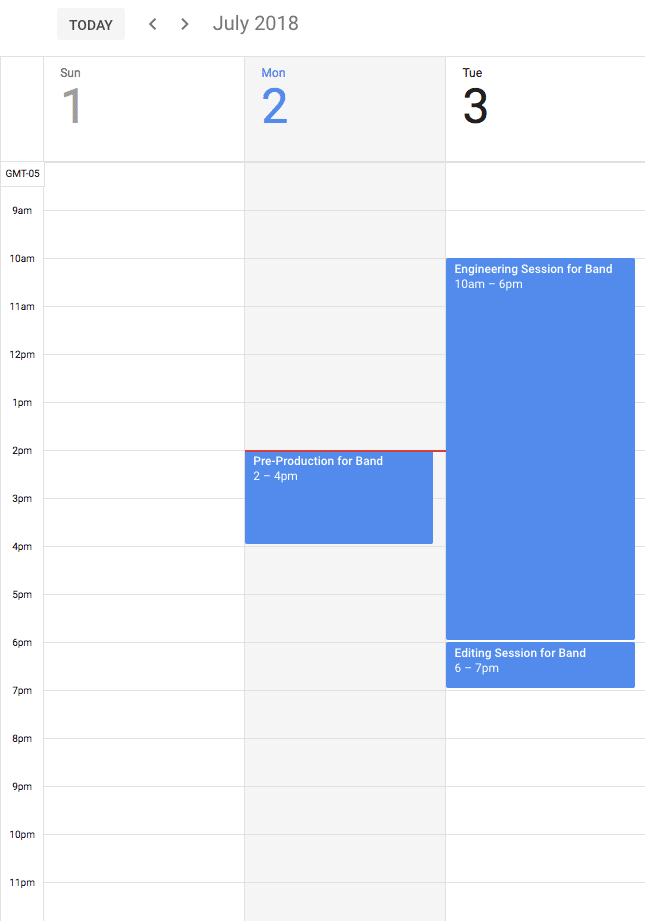
(Above is a a simple example of how you might organize your calendar. Remember that everything you do takes time. The only way to keep it all organized is to have it laid out clearly in order to hit deadlines.)
Being able to see the Timeline mapped out in your calendar will immediately free up head space and ease the pressure on the project. Once we lay out the Timeline for a project, we know we will never have to rush through any process because we have properly prepared, and blocked off the proper time needed to do the project. One of the best things you can do is always deliver a project a day early, if possible. If a client has a deadline of Friday, align your schedule to deliver Thursday. If you are diligent in your time management, scheduling, and building a Timeline, then in theory you can always make this happen. This is a sure way to earn a client's trust as well as get them to comeback time and time again.
Now, we have the clients expectations and desires because of our Organization and On Board Process, we have the money for the project because of our Invoice Process and proper Business Banking, and we have our Timeline for how long we need to spend on the project.
A few more details before we get to work.
File Management and Labeling
Let’s discuss how we are going to Label and Manage all the files and backups. There is nothing worse than having a hard drive crash and losing a client's session. You will never feel the sting of this if you take the following seriously.
Back up often, and back up multiple times.
Hard drive space is so affordable now, and cloud storage is cheaper then hard drives. There is no reason to not back up every session as soon as you are done. Allow for this in the calendar and Timeline! It takes maybe five or ten minutes to backup files to an external drive and cloud storage. If you lose a session or file, a client will most likely never come back. Let’s assume you are wise enough to do this. How do we organize and Label a hard drive?
There are a number of ways to organize a hard drive. The key is to find which one works for you. The pitfall is to allow yourself to have a hundred files on your desktop at one time and call it organized. One of the most common ways to organize your workflow, Manage your Files, and back them up, is to keep and Label current projects on your main computer hard drive. Create a folder on your desktop that says “Current Projects”. Within that folder, have the clients name, organize sessions, documents, notes, project files, and anything else that might be sent your way for that specific project. Adding the date is always something you will not regret either. Whatever you do though, be consistent. It’s far easier to organize it all into specific folders then to toss everything in randomly. If a client wants something recalled a year later, you will want to have all files Labeled and as organized as possible. See image below for an example:

(This is an example of file organization on a desktop. The more you can clarify and label things, the smoother your project will go. More detail is always better in these situations. )
Once you have your main computer organized, you should also have an external hard drive or two ready for backups and File Management. This could be organized into “Music Projects”, then the year, and so forth. It should be reflective of all the current workflow on your desktop. Make sure you back up every project as soon as you make changes to it. If you have two mirrored hard drives and then everything also mirrored on a cloud storage, you will never find yourself in a bad position. Anyone who has been in the industry can tell you horror stories of losing files. Of all the things we cannot control in the music creation process, File Management and Labeling is something we can execute with ease each time.
How Do I Start? Mindset & Templates
One of the most challenging parts for people who are new in the industry is knowing where to start on a project. We have the client, the money, the files are organized, and now we can actually get to work. Before people begin on a project, they will often get a flood of emotions and feelings. It’s not uncommon to find yourself full of excitement, and also full of self doubt. Anyone who has mixed a song, engineered a session, or mastered an album has encountered this Mindset. The good thing is, it is all completely normal.
We all want to succeed and do well. Part of having a good organization and workflow is having the right Mindset. One of the easiest things we can do before we start a project is review past work that has gone well. Remind ourselves of all the great projects we have done. If this is your first project ever, then remind yourself that the client has picked you. They want you to do this. They hired you for your ear, your thoughts, and your approach. We know that those who go far in the industry do so because they are true to themselves. We know that a million dollar studio doesn’t equal hit records. So take a deep breath and enjoy the process of being a part of creating something that doesn’t exist yet and has the potential to impact millions.
Now that you have the right Mindset, lets focus on organizing your session and creating a Template.
Every great engineer, producer, or songwriter has a Template of some sort. Even if it is super simple, it is something that they start with every single time. No matter what you do in the music process, you can create a Template that makes you have confidence in what you are about to start on. This Template should be made to fit with your workflow. There is no right or wrong way to make a Template, as long as it helps you with your process in getting the best end product for your client. It can also save you hours in your Timeline every week!
If you are a songwriter, you might have a Template of how you like to write. Concept first? Title first? If you are an engineer you may have routing and colors set up how you like for tracking bands that match gear or plugins. If you are a mix engineer you may have all your groups of instruments, busses, effects, all set up ready to go. To see an example of a Mix Template see image below:
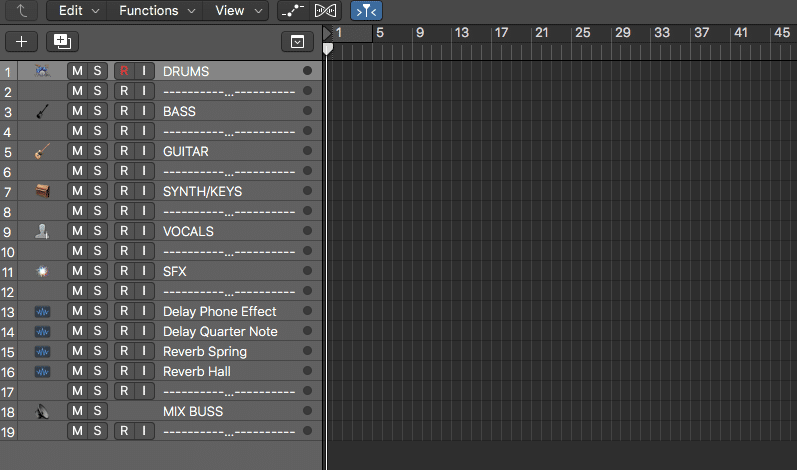
(The image above is a simple “Mix Template”. Creating templates for your workflow will always give you confidence and set you up to win. In addition you can save hours off your actual work time.)
Keep in mind that you can change your Template at anytime. Most professionals would recommend continually updating your Template as you continue to improve in your skill or workflow. Make sure you label these Templates as well. A simple way to start, is to save the Template as “Mix MONTH/YEAR” or whatever line of work you are in. Having the Template ready to go will always ensure consistency and confidence for when you start your project.
Starting the Project
Now it’s time to work! While there are endless ways to describe how to work on a project, there are a few lessons that will always apply and help. You are always in control of the song. No matter what stage you are at in the process of making music, when it started there was nothing, and each step you make in the process is your choice. If you’re a mixer, at one point there was no sound, no faders pulled up. As soon as you pull something up, like a kick drum, the mix has started. From there, every choice you make should be surrounded by the thought, “Does this improve the project or hurt the project?”
Often people talk about not being happy with the way their song sounds. This usually results in making a lot of compromises over and over again in hopes that something will come together in the end that feels great. Rarely does that work out well. With proper organization, and remembering the expectations of the client, you should always be able to make choices that move you closer to the end goal. There is much more to say about this topic, but these couple ideas should get you started in the right direction.
A quick note on knowing when something is done: A project can be completed a number of ways. Music is a moving target as far as what is “good” or “bad”. At the end of the day, it is highly subjective. We may have standards on what is currently popular or desired, but those change as well. When you are working on a project, it’s rarely just you involved. All projects should be worked on with the Mindset that there are going to be edits, revisions, and several different versions. This is normal. In most cases, we get a better end product when we continue to adjust things until we feel like it hits the client’s vision.
It is important to go back to the original On Board Process at this stage and review your On Board Process forms. What did the client want? What were their expectations? Did you clearly communicate what you thought you could deliver? Did they have concerns about the project? These things will shape your Mindset and help you discern and know when a project is ready to be delivered.
Every project should represent your current skill level, knowing that there will be growth and improvement with each project ahead. Making adjustments doesn’t always create a better end product, when the experience and skill level is not there yet. You know a project is done when everyone has felt like they have been heard. This is how you create a happy client and a return client. We are all here to serve the client. That should be kept in the forefront of all of this. If you do that, you will know when the project is done and ready to turn in.
Version 1 - How to Present Your Files
Once you feel good about sending the files off for review, you have to know how you are going to send and Present the files. How you send a file speaks directly to how organized and professional you are. Sending your sessions or files to the next stage of the music making progress should be simple and clear.
Most professionals use a file sharing service. There are so many options now and it is very easy to pick one. Some are free, some cost. Essentially, they all do the same thing. The important thing is that you verify early on how your client wants the final delivery. Most people are fine with download links, or shared folders. Whatever you end up using, make sure it is organized and labeled.
If you are a mixer, you may label your file as, “Song Title”, followed by your name, the format and date. See image below for an example:

(File labeling is crucial as you most likely will have multiple versions even if you nail it the first time. Make sure to include at least the basics shown above. Don’t be afraid to add more as well.)
Many people label their mixes as “version one”. This implies that what you are sending is not the final product. If you feel like what you are sending to the client is not something that could be released or sent to the next stage, it would be good idea to revisit where you are at.
How you Present your work to the client is important. The last thing you want to do is imply to them that you are not confident in what you are sending them. Whenever we Present a version, we want to make sure we are letting the client know it is in a place where you feel like it represents both you and the client the best. With that being said, we know we often do revisions, but we should never give the client a reason to think that you haven’t nailed it the first time around. It is possible to do this and many people do it.
Always allow the client to give feedback first before you bring up any of your own thoughts, you are there to serve the client and to educate. Part of that comes from listening first, and then responding. Set the client up to listen to something without your doubts or concerns. Without your own critique in the way, the client can hear and form their own opinion first, and they may be more pleased than you expect. We often don’t notice things until they are brought to our attention. Use that to your advantage.
Feedback and Revisions
When you get Feedback, you should add that into your session. In almost every DAW there is a place for notes. Add the client’s Feedback to that area to keep it organized. See image below for an example:
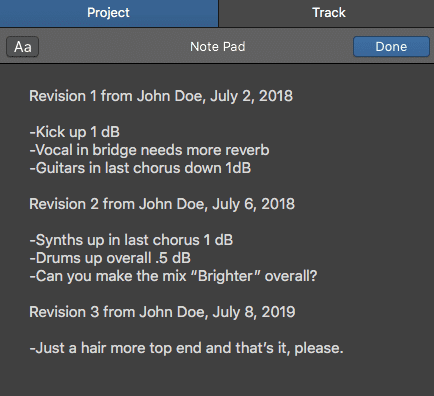
(Keep your mix revisions and feedback in your DAW. This will help you see where you are at, what you have done, and what you need to do to get the client exactly what they want.)
Feedback should be viewed as a way to move forward in a project and to give the client what they want. It should never be viewed as a personal attack. It is your answer key to the test. Often times newer people in the industry crumble when Feedback is given. This is normal. There are rarely projects that do not have multiple versions and revisions. It is possible, as I mentioned above, to nail it the first time, but your client will most likely have some adjustments to make, and this is normal!
When you make a revision, save it as a new version. Most DAW’s have alternate saving options within the original project. Take advantage of this to save hard drive space. Any Feedback should be respected. You can always try it out first so the client can compare where the song is at and what the changes did. Keep in mind that the end goal is to make the client happy and to get them to return. This comes from respecting their wishes and being happy to carry out the Feedback given. Remember to be proactive in this situation not reactive. Think, “Does this move us forward or backwards?”.
Once the final version is landed on, you will want to make sure it is Labeled correctly in your folders. Most people will have a folder Labeled “Final Mixes” or “Final Masters”. This is to make it super clear on which file is which. If you have to do alternative versions, those should get their own folder as well. Sometimes clients will only request a standard version of the song. If this client or artist ever gets signed or noticed on a commercial scale, they will most likely want other versions such as TV, Film, Instrumental, and Acapella.
If you are a mixer, you will want to print those versions regardless of if they need them or not. You will save time by doing this now, and also take care of any risk of recall issues down the road. Even if you work fully in the box, you may run into software issues or future plugin compatibility. Print now, instead of scrambling later.
Always make note of gear settings as well. You can do this manually by hand, or taking a picture can help. There are also multiple companies that now make digital recall sheets. Organize all of those things in their own folder. The more in depth you can be about the project the better. Even if the client never has you recall it again, there is a good chance you may go back to that project at some point to see what you did if you can’t remember how you achieved a certain sound. This is not uncommon. See image below for an example of simple recall notes:
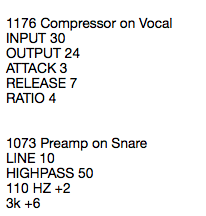
(Above is an example of how to document recall notes. Learn from the pros, take five minutes and document your settings.)
Preparing Your Mixes for Mastering
One of the most neglected parts in the process of making music is mix delivery to the mastering facility. Mastering is the last stage in music creation, and it should be viewed as much a part of the music creation process as any other step. Often mixers do not fully understand how to prepare their final mixes to be given to mastering, or why they should even have their music mastered at all.
A mastering engineer works in a room with a listening environment that is flat and unmatched sonically. They are literally able to hear things that most people cannot hear because they have intentionally built their workflow around monitors and gear that allows for this. The need for professional mastering today is more than ever as music is often made in non-ideal sonic situations. With the rise of music being mixed in bedrooms, home studios, and even headphones, having your mixes sent to a professional mastering facility is a sure way to take any of the “what if” questions out of the equation.
When you work with a mastering engineer, they will take your mixes across the finish line and put to rest any doubt of whether or not your music will sound great on a phone, earbuds, or expensive monitors. Not only do you get peace of mind by working with a great mastering engineer, but the work you have put in also translates better, which in turn makes you sound more professional. You can then leverage this to market to other potential clients.
As you prepare your mixes for mastering, you should take off all final limiters. You can normally leave everything else on the mix buss that you are using, but a final limiter is often doing more harm than good. A mastering engineer normally has the outboard gear or plugins specifically made to achieve a certain commercial loudness while retaining the integrity of the mix. Your mastering engineer will thank you if you give them some dynamic range to work with.
This leads us to the often misunderstood part of mix delivery. Dynamic Range verses Headroom. Without going down the rabbit hole too far, there is a large difference between Dynamic Range and Headroom. Most people ask mastering engineers how much headroom to leave. By this, they are usually asking what level their final peak output should be. You will find all sorts of information on this. Some say -1 dB, some say -3, or -6dB, but in reality with digital today, the only thing that matters is that it is not going above 0.0 db. Your mastering engineer can simply turn down your mix to create unlimited headroom as long as your mix is not peaking over 0.0 db. Dynamic Range, on the other hand, deals more with overall compression and or limiting. A mastering engineer needs dynamic range to work with in order to properly take advantage of the tools they have. If you back them into a corner with no dynamic range, they will most likely not be able to make the mix feel bigger, more glued together, or tonally balanced.
Dynamic Range is extremely important to have in your mixes when you send it to a mastering engineer. Try to leave the most dynamic range you can when preparing your mixes. Your mastering engineer has far better tools and more experience in getting your track up to a loudness that is competitive.
Dynamic Range is something that is often hard to reverse if the mix is already over compressed or limited, so take off the final limiters and let your mastering engineer do their job. This is what you are paying them for. Feel free to send them the mixes that have been approved if they have a limiter on them, but also send a version that has no limiting on it at all. Often mixers that are frustrated with the mastering stage feel this way because they deliver mixes that are essentially impossible to master. If you keep your output ceiling below 0.0 dB and leave 3 dB of dynamic range, you will become your mastering engineers favorite person, and you will also get a much better sounding master. If you don’t know how to measure these things, contact your mastering engineer and if they are worth working with, they will be happy to help you. Most DAW’s have stock plugins that can give you an accurate picture of your levels. See image below for an example:
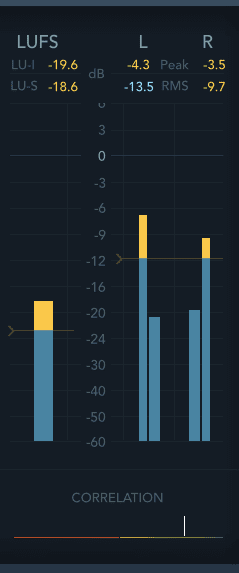
(This is Logic Pro X’s stock multimeter. It shows the peak, dynamic range, RMS, and LUFS. If you need help, ask your mastering engineer to explain them to you.)
Another thing that is extremely important when preparing you mixes for mastering is to make sure you export or bounce your files in the highest native-resolution that you have been working in. A good mastering engineer will be able to work in almost every format and in most cases even increase the fidelity of the recording if needed before printing final masters for either CD or digital distribution. Whatever sample rate and bit rate you are mixing in, should be the format you use for exporting. Never upsample or downsample your mixes when exporting as it can increase the chance for artifacts, distortion, and noise. Leave this to your mastering engineer to deliver you the correct format for a professional release.
After you have left proper headroom, dynamic range, and are ready to export at your current highest resolution, you need to label your mixes in a clear and concise format. As we have mentioned before, there are often multiple versions of a song. Most artists need at least the standard master, an instrumental master, and then the TV Mix (Lead vocal only muted).
Label these correctly for your mastering engineer. Many mixers also include a “vocal up” version and a “vocal down” version as well just to cover their bases. See below for an example of file labeling:

(When you go to send your files for Mastering, make sure all the versions are clearly labeled. Above is a an example of basic information any Mastering Engineer would want to be aware of.)
This seems so simple but it is often neglected and causes confusion later on for everyone involved. The more clear you can be, the better. If you follow these rules, you are setting everyone up to win. Once you have done these things, you can either deliver them to the mastering engineer or back to the artist if they are taking care of the next step.
Wrapping Projects and Follow Up
Once you deliver all the files to the client or mastering engineer in a clean and presentable way, you will want to follow up with them. Make sure they have everything they need a week later. Thank them for letting you work on the project, and ask them to send referrals your way if they know of anyone who would be a good fit. Make a note in the calendar to reach back out to them every month just to see what they are up to. This is an easy way to make sure they know you loved working with them and are ready to meet their needs for the next project.
An easy way to manage this is to put calendar reminders in your phone as well as keeping a spreadsheet of your clients, work that was done, and when you will follow up with them. You can add things such as contact information, who all was involved and any other notes you may have had from the project. See image below for a sample client spreadsheet:

(Above is an example of how to keep your clients organized. Knowing what work you have done in the past and when to follow up is a big factor in getting return clients. The more you know about your client, the better you can best serve them.)
Final Thoughts
Now that you are equipped to organize and execute a successful project, it is important to always take what is learned and to figure out how it fits into your workflow. Every project is different, but there are foundational things you can do each time to set yourself up to win. Stay organized, and always deliver above and beyond to your clients. Now go make that hit record!


