How to Master a Bollywood Song with FREE Plugins
Insert 1: Melda Audio’s MEqualizer to Cut Side Image Lows and Boost Highs
Insert 2: Slate Digital’s Fresh Air to Increase Transient Clarity
Insert 3: Voxengo’s Tube Amp to Add Mild Harmonic Distortion
Bus Send: Analog Obsession’s Britpressor for Parallel Compression
Insert 1 on Stereo Output: Venn Audio’s Free Clip to Softclip prior to Limiting
Insert 2 on Stereo Output: Thomas Mundt’s LoudMax for Limiting
Bollywood is a fascinating genre. Not only does it utilize traditional instrumentation with complex timbres, but it also blends in modern western instrumentation and themes like 808s with modern pop melodies and singing styles.
Of course, the genre is complex and takes many forms, but this blend of traditional and modern instrumentation seems to be somewhat common in the genre.
With that in mind, a Bollywood master needs to sound upfront and present, but it also needs to hold on to its natural timbre.
The chain that we’re using in this video achieves this, all while using free plugins. We’ll showcase each plugin being used, how we’re using it, and then listen to the master along the way as well as one full time through near the end of the video.
If you have a mix that you’d like mastered, send it to us here:
We’ll master it for you and send you a free mastered sample of it for you to review.
Insert 1: Melda Audio’s MEqualizer to Cut Side Image Lows and Boost Side Highs
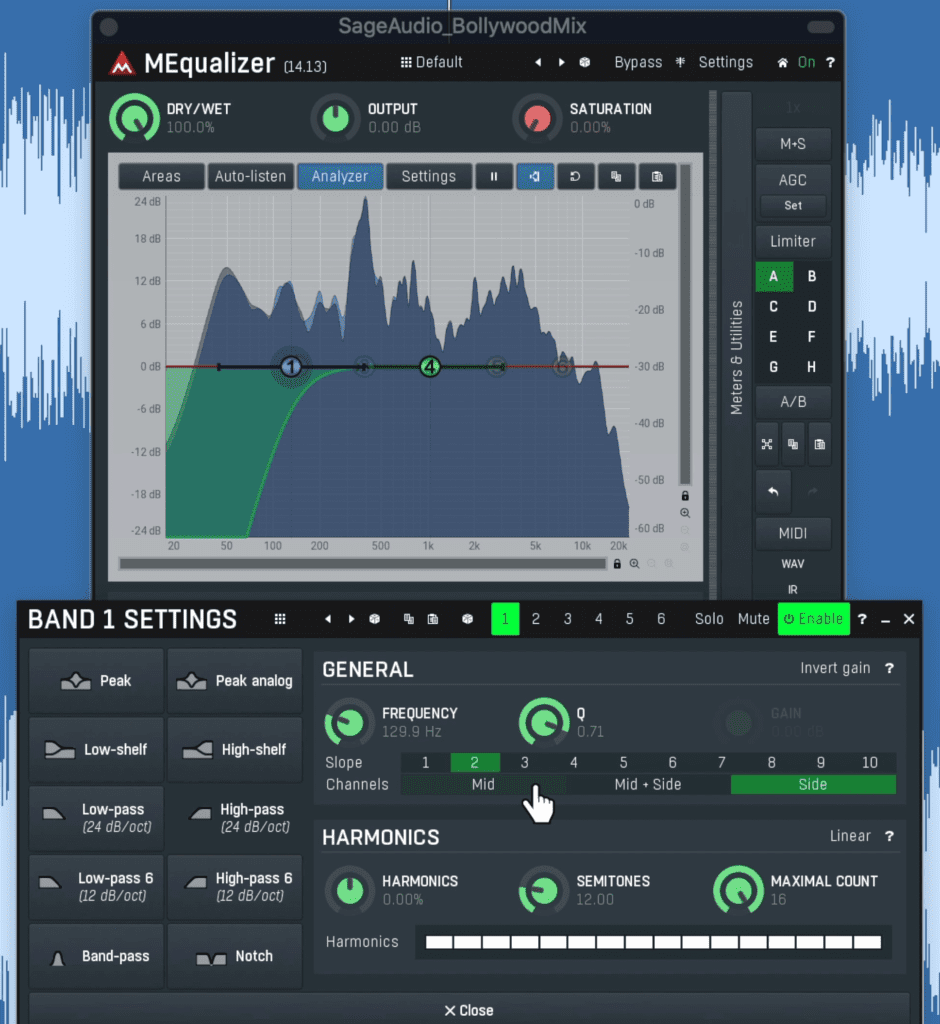
The MEqualizer is used to attenuate the side image's low frequency range.
Although what you choose to equalizer will depend on the mix, some of the settings we use here will work well for most mastering sessions.
Using the MEqualizer in its mid-side mode , we’re going to attenuate the side image using a high-pass filter.
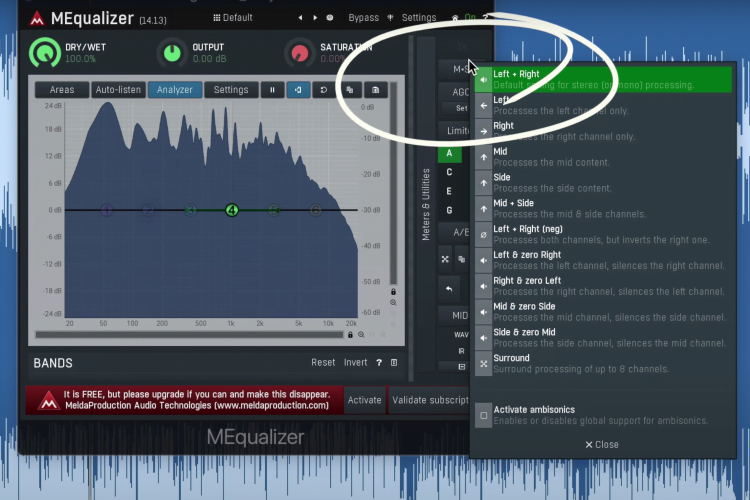
Be sure to enable mid-side processing on the plugin.
To do this we’ll create a band, right-click it, then select high pass and assign it to the side image.
Then we’ll cut up to a little over 100Hz. This will make our low-end mono and more driving. Additionally, we’ll boost the side image’s high frequencies with a high shelf. This will naturally expand the stereo image by amplifying the side image. Additionally, it’ll add some clarity.
Lastly, for this particular mix, I want to cut a little of the low frequencies in the mid image, since they’re a little too strong.
If you want to learn more about equalization during mastering, watching this!
Insert 2: Slate Digital’s Fresh Air to Increase Transient Clarity
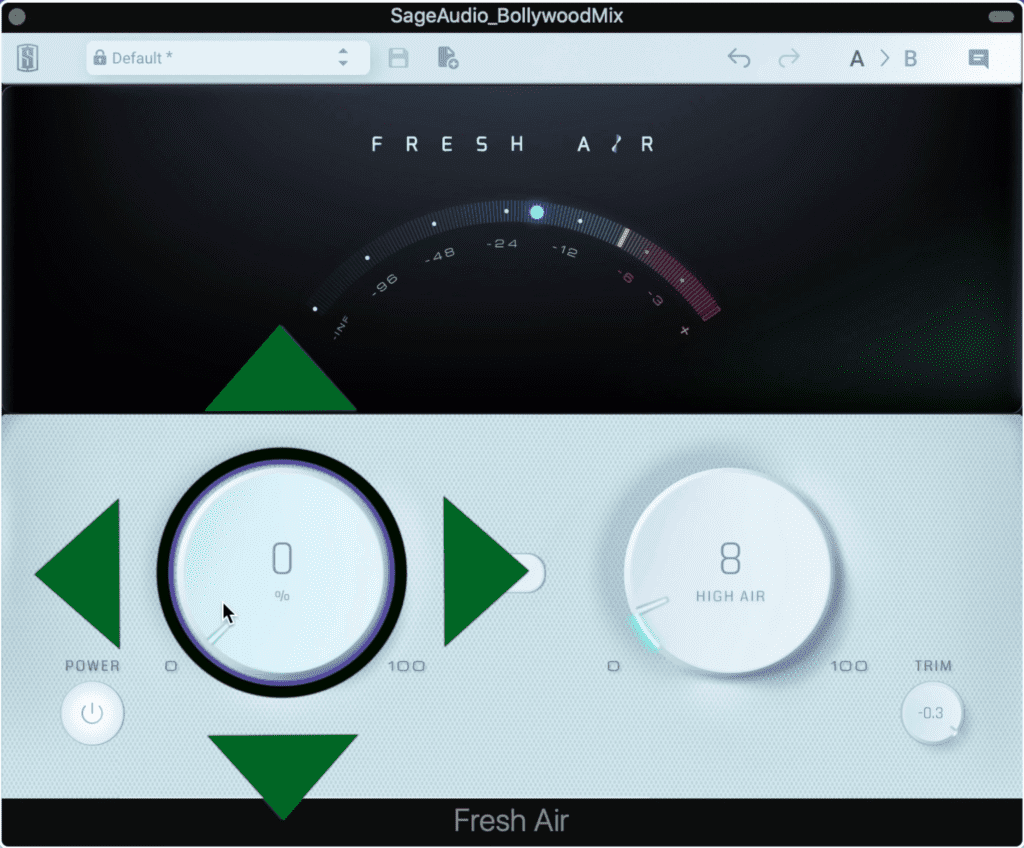
Fresh Air augments the high end of the frequency spectrum.
Fresh Air is a high frequency equalizer, as well as a very subtle stereo image which adds a lot of clarity and air to a master.
With it, I’ll increase the mid-air setting to somewhere under 10 and the high air setting to somewhere right above 10 . This will give us a clear and modern sound without becoming overbearing.
Be careful with these settings if you do choose to use this plugin since it isn’t difficult to use them excessively.
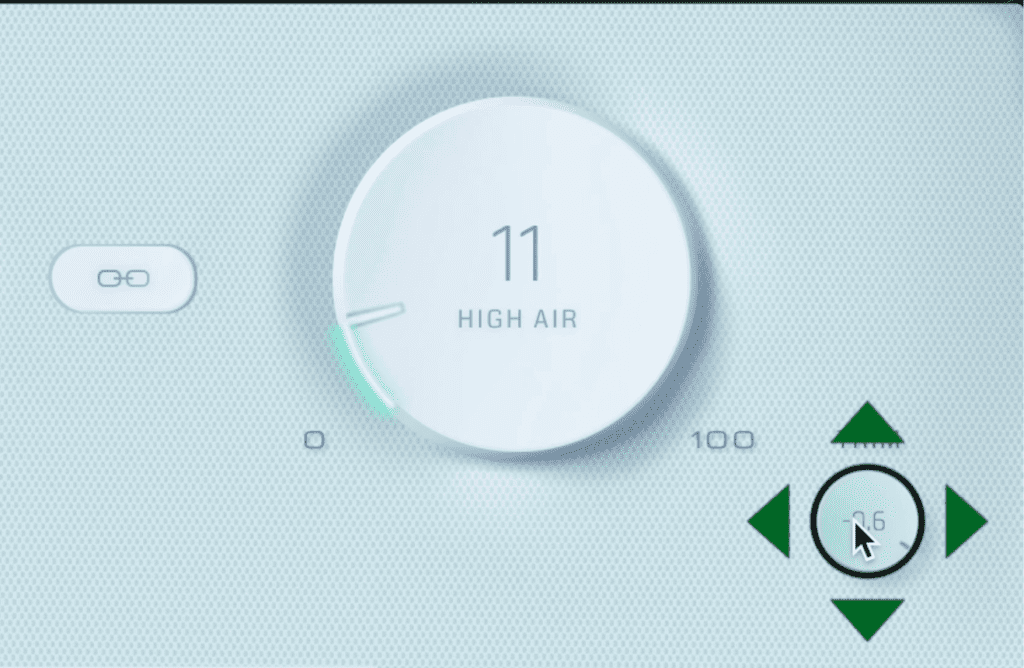
Reduce the output trim to compensate for gain changes made using the plugin.
Lastly, I slightly reduce the trim to compensate for some of the gain I just added to the signal.
Insert 3: Voxengo’s Tube Amp to Add Mild Harmonic Distortion
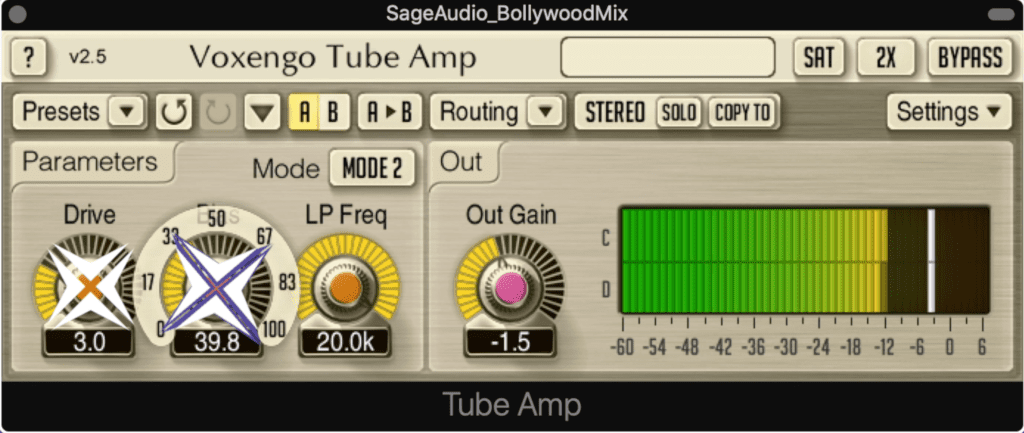
Tube Amp adds subtle harmonic distortion which warms the master.
For the next insert, I want to add some mild distortion to make the master sound fuller and to make the fundamental frequencies more easily perceived. This will give the track a more forward and present sound.
Using the Voxengo Tube Amp, I’ll increase the drive to about 3, and the bias to about 40 to give the signal some warmth. I like the sound of Mode 2, and I increase the low-pass filter to 20kHz to avoid truncating the high-frequency range.
Next, I reduce the output by a little more than a dB to again compensate for gain changes made to the signal.
Lastly, I enable oversampling to ensure that aliasing distortion doesn’t occur. This way, I can be sure that the only distortion I’m hearing is the distortion I intentionally created with the plugin.
For more free saturation plugins, check out this video:
Bus Send: Analog Obsession’s Britpressor for Parallel Compression
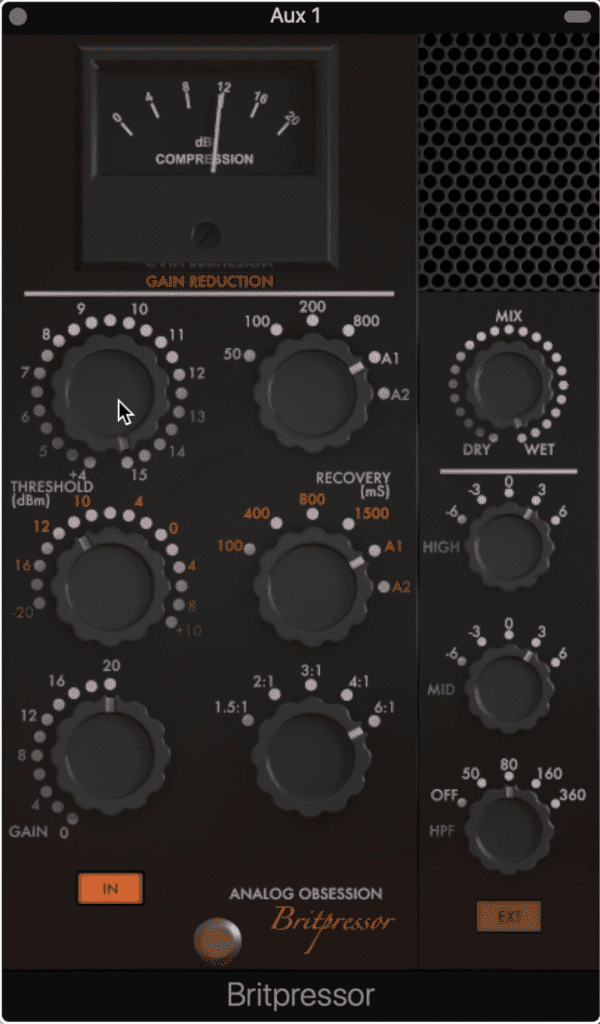
The Britpressor makes for a great parallel compressor.
Next up, let’s use a bus and auxiliary track for some parallel compression.
I’ll set my bus send to unity and then insert the Analog Obsession Britpressor on the auxiliary channel.
This compressor makes for a fantastic parallel compressor due to the mild harmonic distortion it imparts on the signal, and the program-dependent attack and release settings it provides.
I reduce the threshold and use the highest ratio setting to achieve about 12 to 16dB of attenuation. Additionally, I use the automatic or A1 functions for both the attack and release.
Then I increase the high and mid-frequency ranges by 3dB and turn on a high-pass filter on up to 80Hz on the internal side chain to emphasize some high and mid frequencies prior to compression.
Lastly, I increase the gain to the full 20dB and balance that by lowering the auxiliary track’s channel fader.
This way I get the most character from the compressor as possible, but still, keep the overall level of the parallel compressed track low with the channel fader.
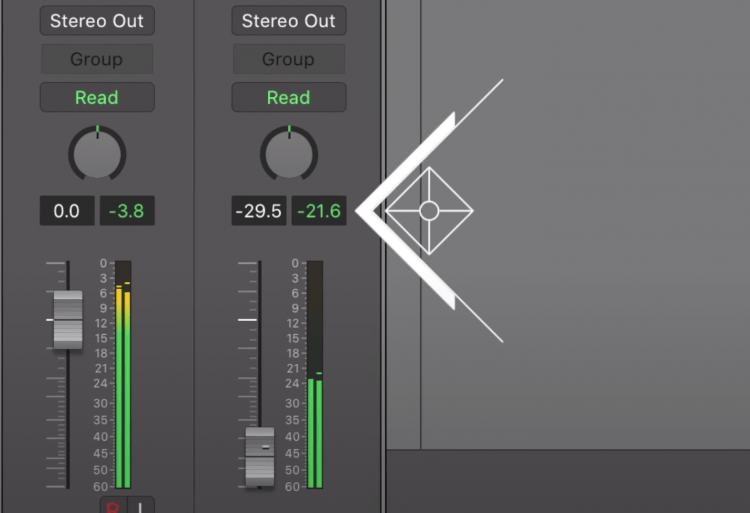
Ideally your parallel compressed signal should be around -20dB.
Ideally, I like to have my parallel compressed signal peak somewhere around -20dB on the auxiliary track's meter.
Insert 1 on Stereo Output: Venn Audio’s Free Clip to Softclip prior to Limiting

Free Clip lets you shape transients prior to limiting.
With my signal processed on the channel strip, and then routed to an auxiliary track, I’m going to affect both channels simultaneously on the stereo output.
The first insert I’ll use on the stereo output is the FreeClip plugin which takes any peaks and compresses them or soft-clips them.
This way I’ve soft-clipped these peaks before sending the signal to a limiter , which would have used more aggressive and unpleasant sounding hard clipping via its brick wall ceiling.
I use the Quintic setting, which is a more subtle option, and turn off the plugin to see at what level the signal is peaking. I then lower the plugin’s clip ceiling to a little lower than where I observed the highest peaks.
This way I know I’m using the soft-clipper, but not in a drastic way.
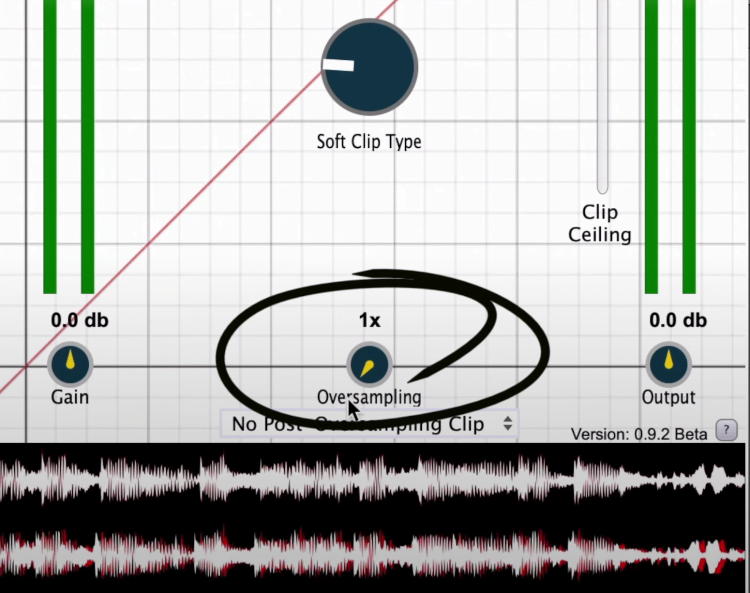
This plugin includes oversampling which can be used to reduce aliasing distortion.
Lastly, and what I like about this plugin, is that I can turn on oversampling. This will make the amplitude of the signal more accurate, in turn, reducing the possibility of inter-sample clipping which leads to unpleasant distortion.
Insert 2 on Stereo Output: Thomas Mundt’s LoudMax for Limiting

LoudMax is similar to the Waves L1 Limiter.
The last insert I’m going to use is a great free limiter called Loudmax. It’s nearly identical to an earlier version of the Waves Audio’s L1 limiter.
With the plugin, I lower the threshold which begins to limit the signal as well as introduces automatic makeup gain. As a result, my signal becomes louder and more aggressive.
I do this by a little under 3dB since I don’t want the effect to be too dramatic.
Then I turn on inter-sample peaking and reduce the output slightly. This way I can ensure that the signal doesn’t clip and cause unwanted distortion.
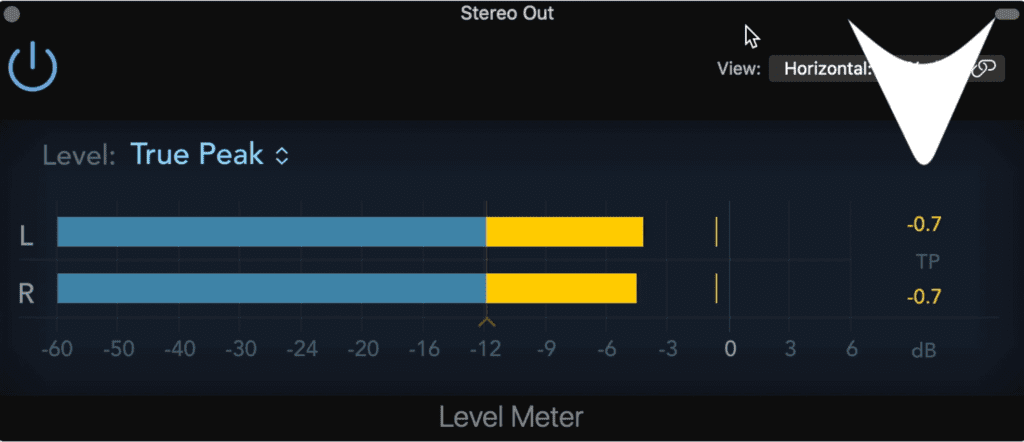
Use a True Peak level meter to ensure that no clipping is occurring. Take this plugin off of your signal chain prior to exporting the track.
Lastly, I follow this plugin with Logic Pro’s utility level plugin and enable true peak monitoring just to ensure that again, no peaking is occurring. Once I’m confident in that, I remove this level meter prior to bouncing out the track.
Conclusion
Following the steps above and adapting them to the particular mix that you’re working on can yield great results. Additionally, definitely replace any of the free plugins shown here with your favorite paid plugins to get even better results.
Again, the steps that we followed are:
Insert 1: Melda Audio’s MEqualizer to Cut Side Image Lows and Boost Highs
Insert 2: Slate Digital’s Fresh Air to Increase Transient Clarity
Insert 3: Voxengo’s Tube Amp to Add Mild Harmonic Distortion
Bus Send: Analog Obsession’s Britpressor for Parallel Compression
Insert 1 on Stereo Output: Venn Audio’s Free Clip to Softclip prior to Limiting
Insert 2 on Stereo Output: Thomas Mundt’s LoudMax for Limiting
If you think that you master benefitted from the info here, let us know in the comment section of the video. Additionally, if there are any additional steps that you wish we had used, let us know that as well.
If you have a mix that you’d like mastered, send it to us here:
We’ll master it for you and send you a free mastered sample of it for you to review.


