How to Master with T-RackS
1. Linear Phase EQ
2. De-Esser
3. One - Mastering Processor
4. (Parallel) VC60 Compressor
5. (Parallel) Saturator X
6. Master EQ-432
7. Quad Limiter
8. Stealth Limiter
T-RackS is an often overlooked and underappreciated software. It provides a lot of flexibility while still keeping things simple.
That’s why we wanted to take a look at this rarely discussed platform and establish a signal chain that sounds great.
We'll use the T-RackS suite plugin to house all of our processing and control the routing.
We’ll use the T-RackS 5 Suite plugin and perform all of our routing and processing using solely IK Multimedia plugins.
We’ll also discuss how to use these plugins and cover some of the general functionality and our thoughts on why they work well when mastering.
If you have a mix that you need mastered, send it to us here:
We’ll master it for you and send you a free sample to review.
1. Linear Phase EQ
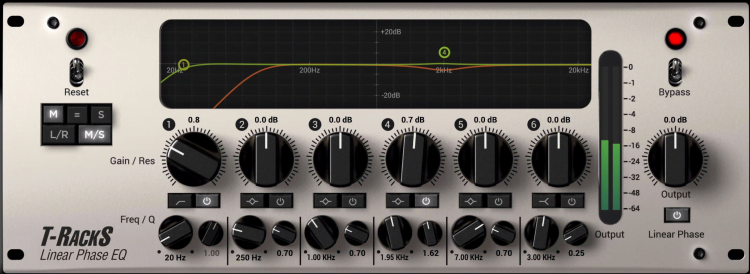
Linear phase EQ is great as a first insert. With it we can attenuate aspects of the frequency spectrum.
First I’m going to set the EQ to linear phase mode. This way I can affect the low frequencies without having to worry about altering the phase.
I’ll cut some of the infrasonic frequencies in the mid-channel, and cut up to about 80Hz on the side channel. Then I cut a little of 2kHz on the side channel so that the mid vocal has some room to sit and cut through.
Lastly, I bumped 2kHz on the mid to amplify some of the clarifying aspects of the vocal. This way when the signal hits the next processor, 2kHz will be a little stronger, meaning it’ll be more likely to cause some distortion at that range, trigger a compressor at the range, and so on.
This gives the vocal a slightly more pronounced and unique timbre.
For more info on mastering plugins, check out this video:
2. De-Esser
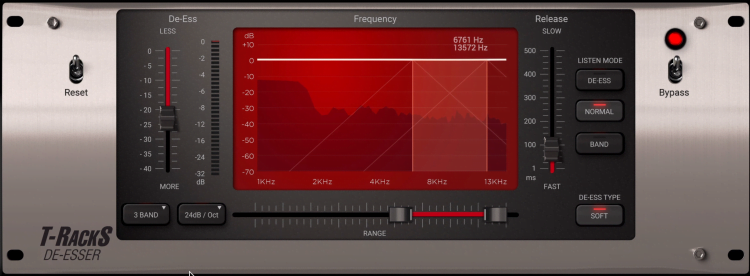
A de-esser will calm down sibilance before amplifying the signal and potentially making sibilance worse.
With some very subtle settings, I used this de-esser to control the high frequencies - mainly sibilance.
I used a moderate release speed, 3 bands to isolate the frequencies, and a soft de-essing type to keep the effect subtle.
This averaged about 0.3dB to 0.7dB of attenuation.
3. One - Mastering Processor
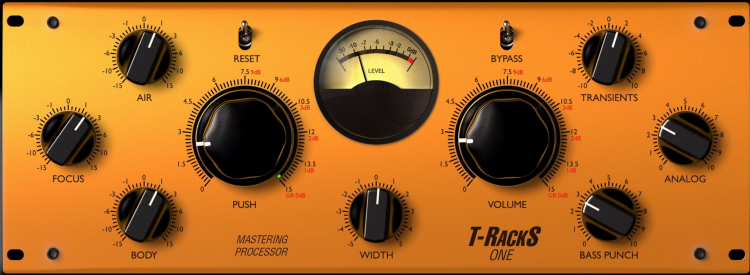
One handles a lot of processing. It's an EQ, an exciter, an expander, and more.
One is an incredibly powerful processor. It was designed to include everything you’d need for a quick master, but it can be used subtly in a chain to really augment a master.
I added some air for the high end, some focus which clarifies the mids, a small amount of body for the low-mids, a little push to bring quieter aspects of the signal forward, and a tiny amount of stereo expansion.
I increased the gain without triggering the limiter, as well as introduced some moderate transient expansion, and analog emulated harmonic distortion.
Lastly, bass punch augmented the kick and the thump of the bass guitar. This will help the master translate better over smaller speakers that can’t support the full frequencies spectrum.
4. (Parallel) VC60 Compressor & 5. (Parallel) Saturator X

I use this compressor to heavily compress the parallel signal.
At the same time of processing the signal with the One Mastering Processor, I sent a parallel signal to a bus compressor and subsequent saturator.
One thing that I didn’t expect for some reason was for the send to be set to unity, in turn doubling the amplitude of the signal. I think since I didn’t have a visual for the additional signal this was confusing at first, but makes sense when you think about running a signal in parallel.
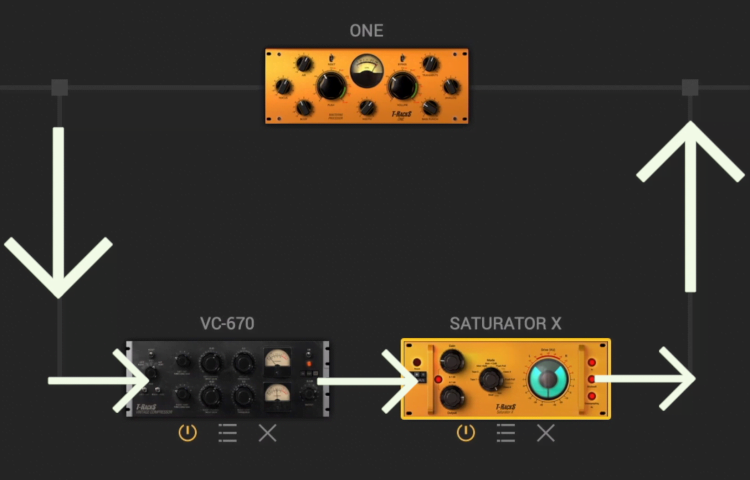
This routing will double the amplitude if you don't attenuate the signal.
With that in mind, I reduced the output of both processors since I wanted this parallel channel to be introduced subtly.
With the compressor, I heavily compressed the signal. This way I could get a lot of coloration from the compressor and make the signal a uniform level in which the quieter aspects and lower aspects of the signal were at an equal level.
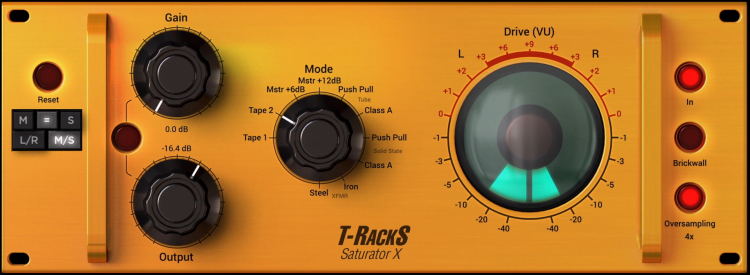
After the compression, I use a small amount of saturation
Then I used some saturation to make the effect more pronounced and get a bit more power from the compressed signal.
I used a tape 2 setting which will provide some even and odd harmonics, and enabled oversampling, which is important when introducing distortion.
Additionally, I used mid-side processing to cause differing amounts of distortion to the mid and stereo signals.
6. Master EQ-432
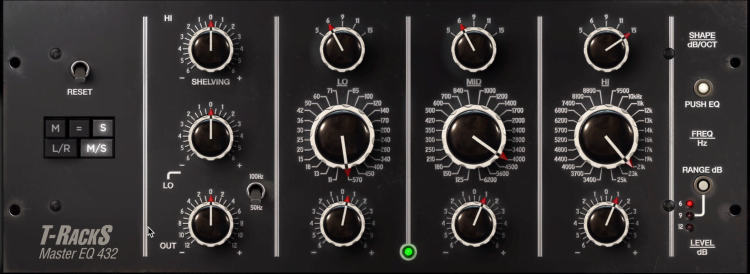
With this eq make small bumps to the response, as well as widen the image slightly.
Prior to this insert the series signal and parallel compressed and saturated signal recombined.
With this EQ, I listened intently and decided on some very small amplifications I wanted to make. I separated the signal into mid and side to affect the relevant instrumentation separately.
On the mid, I boosted 120Hz by 0.5dB. I liked how this makes the kick stand out a little more.
I boosted 2.4kHz by 0.5dB as well to make her vocal stick out and feel more like a focal point of the song.
Then I amplified 21kHz by 0.5dB to add a little air.
For the side image, I amplified 570Hz by 0.5dB to add a little body to the side image. I applied 4kHz by 1dB since it seemed to add a little clarity that was missing, and 21kHz by 1dB to make the high end of the acoustics and the reverb have more of an ethereal feeling to them.
7. Quad Limiter
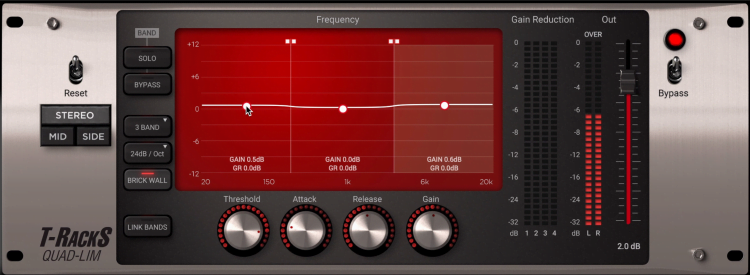
The Quad limiter is used rarely, but helps when it's needed.
I used this limiter to make sure no peaking was occurring, but mainly to control the signal based on the frequency. I used 3 bands to separate the low, mid, and high and amplified the low and high very slightly.
I carefully set my thresholds to ensure that compression occurred rarely, and only when truly needed.
For the lows, I used a slightly longer release than the other 2 bands to avoid distortion.
Check out this limiter!
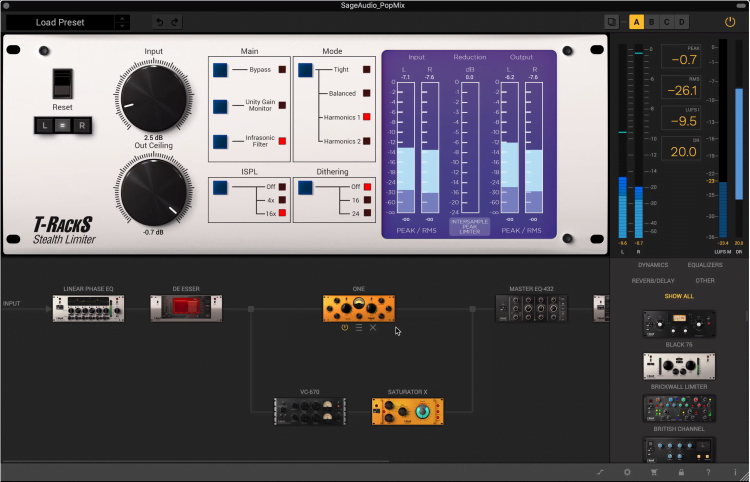
8. Stealth Limiter
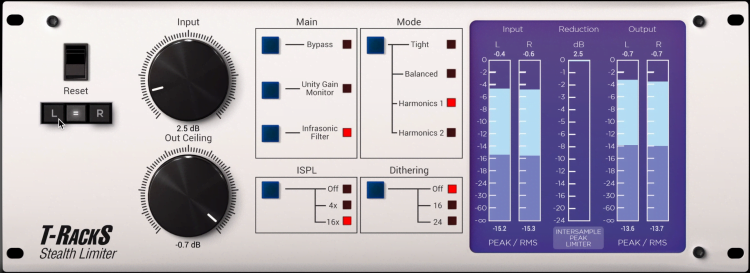
Stealth Limiter provides both transparency and slight distortion on the transients to make the signal pop.
To finish the chain, I used a limiter I’ve tried before and liked a lot for its transparency.
My settings here were really simple. I introduced a mild amount of gain, which got the level of the master to around -10 LUFS, which will be suitable for most streaming platforms.
I reduced the output to -0.7dB, in case it gets uploaded online. This will help compensate for gain changes caused by encoding.
I used the highest level of oversampling to make quantization as accurate as possible - in turn reducing distortion.
I also used an infrasonic filter to reduce low frequencies that can’t be perceived but still take up headroom.
Lastly, I decided on Harmonics 1, since it offered a good balance between transparency and mild distortion to help the transients stick out.
Let’s listen to the full chain from start to finish and pay attention to how each processor really affects the timbre, clarity, stereo image, and overall level.
Conclusion
Although the end result wasn’t my favorite, I did still appreciate the T-RackS line of plugins. They’re easy to use, aesthetically pleasing, and sound good, especially for the price point.
If you’re looking for a good introduction to mastering music, I’d definitely recommend trying these plugins out.
They offer enough freedom to make comprehensive and intricate changes, while still keeping the interface easy to understand and helpful.
If you do decide to try these plugins out, let us know your thoughts about them in the comment section of the video. We’d love to get your take on these plugins.
If you have a mix that you need mastered, send it to us here:
We’ll master it for you and send you a free sample to review.


