Parallel Compression Explained
Quick Answer
Parallel Compression is a way to introduce significant compression to an audio signal without the listener being able to perceive the compression or unwanted artifacts. Because parallel compression occurs in tandem with the original signal, it can be blended in - making it a great way to subtly increased perceived loudness.
Parallel Compression Explained in Detail
Parallel Compression has been a popular topic in mastering for decades. Although not used by every engineer, the technique is undoubtedly powerful and useful.
If you’re trying to make an aggressive master, one with a higher perceived loudness, but you don’t want to sacrifice an enjoyable timbre and your transients, parallel compression is your best bet.
Here, we’ll cover how to use parallel compression and set up the basic routing, how different parallel compressors can be used for different purposes, what New-York style parallel compression is, and a couple of creative techniques you can use to augment your parallel compression.
If you’re an artist or engineer, and you have a mix that you’d like to hear mastered, send it to us here:
We’ll master it for you and send you a sample to review.
How to Set Up Parallel Compression
Parallel compression is relatively easy to set up. Sometimes, it’s as simple as inserting a compressor onto your mix that has a wet/dry or mix percentage dial coded in; but, if the compressor you want to use doesn’t have that feature, you need to use a bus or send.
Using a mix dial or wet/dry function on a compressor is an easy way to achieve parallel compression.
Setting this up is pretty simple as well. Although it looks a little different from DAW to DAW, in Logic Pro X, all you need to do is create a bus on your track and an auxiliary channel will automatically be created.
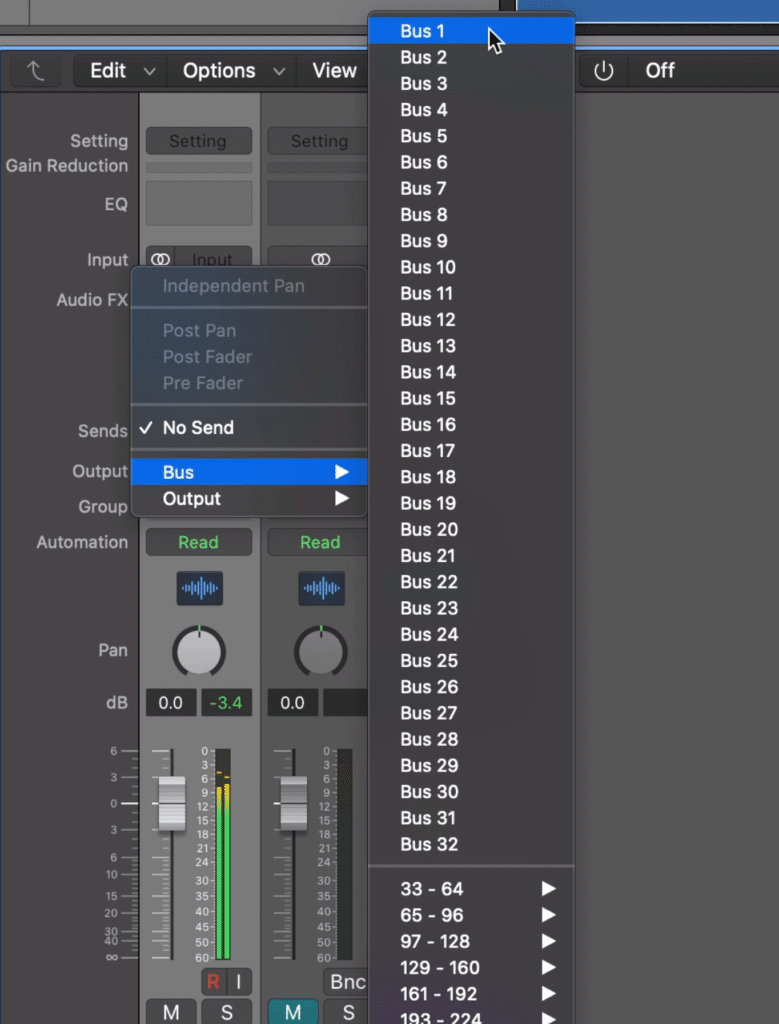
You can also use an auxiliary send or bus to use parallel compression.
From there, you’ll set your send to unity - this way the signal is equally represented on your master track channel and auxiliary channel.
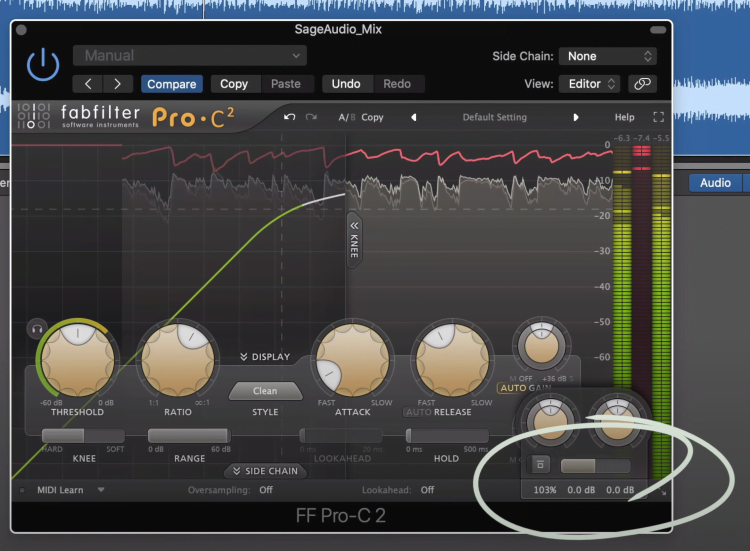
Then insert your compressor on the auxiliary channel and compress somewhat heavily. To avoid an excessively loud signal or too aggressive of an effect, you’ll blend this auxiliary channel back in with the original signal.
One more thing to consider routing-wise is the effect that the bus’s place in the signal chain will have on the overall effect. Your bus send will come after all of the effects in your chain.
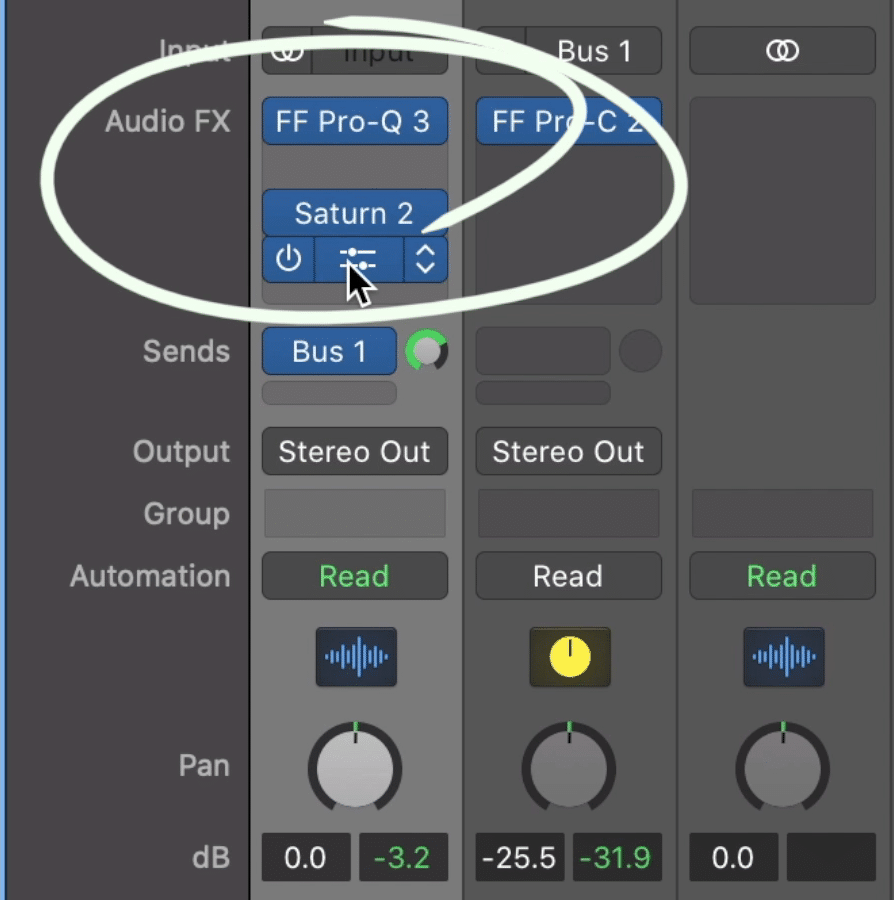
Keep in mind that a bus send comes after all inserts and forms of processing that are in the signal chain.
This means that this processing will carry over to your bus send and your auxiliary track. If you want to use parallel compression prior to any other effects you’ll need to use a plugin with wet/dry functionality , or create multiple busses and/or utilize the stereo output channel to separate the signal and perform your mastering on these auxiliary channels.
How to Get Great Sounds with Parallel Compression
Although it almost goes without saying, how your parallel compression will sound depends heavily on the compressor that you use and its settings. Using the right compressor for what you’re trying to accomplish, and finding the right settings is crucial to getting a great sound out of parallel compression.
The compressor and settings that you choose greatly impact the sound of the parallel compression.
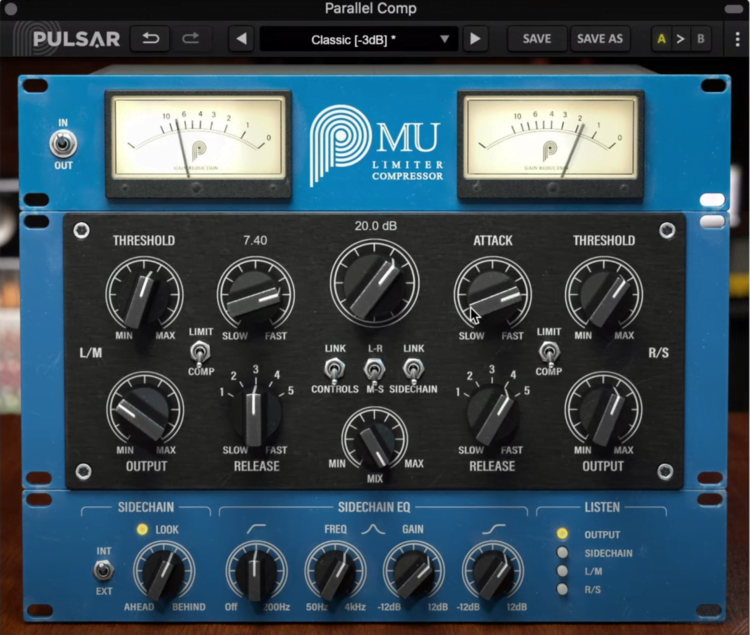
Let’s start by considering what type of compressor should be used. My preference is to use a parallel compressor with a lot of character - by this, I mean one with a unique compression curve and one that introduces some mild and pleasant harmonic distortion.
The Drawmer 1973 is a good example of one of these compressors, and one that I use often, but let’s try the Chandler Limited Germanium Comp.
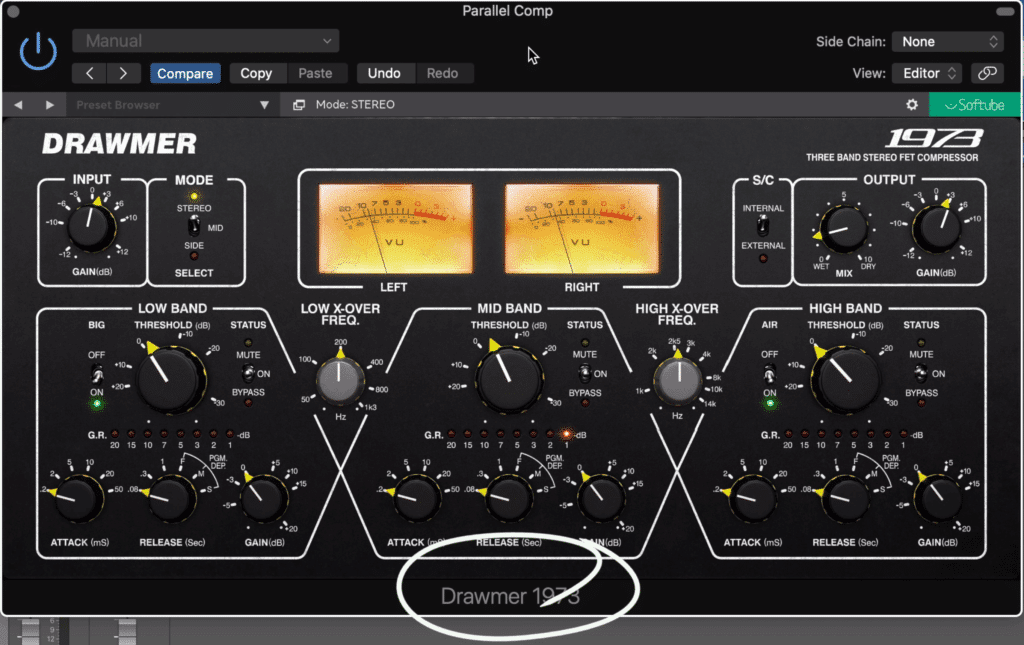
The Drawmer 1973 is a good example of a compressor with a lot of character.
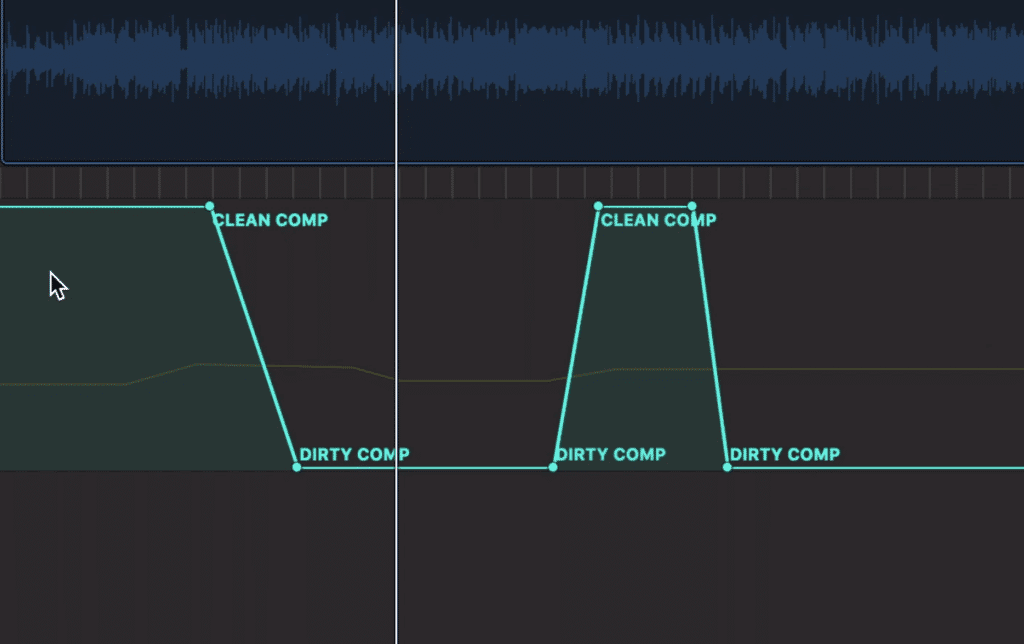
This plugin has a unique tonality that can be controlled to a good extent. We can make our parallel compression a little grittier and more aggressive by enabling the dirty comp function and increasing the drive - or keep it more transparent with the clean comp setting and a little less drive.
Settings like these really control how much harmonic distortion you create, and the order and amplitude of these harmonics.
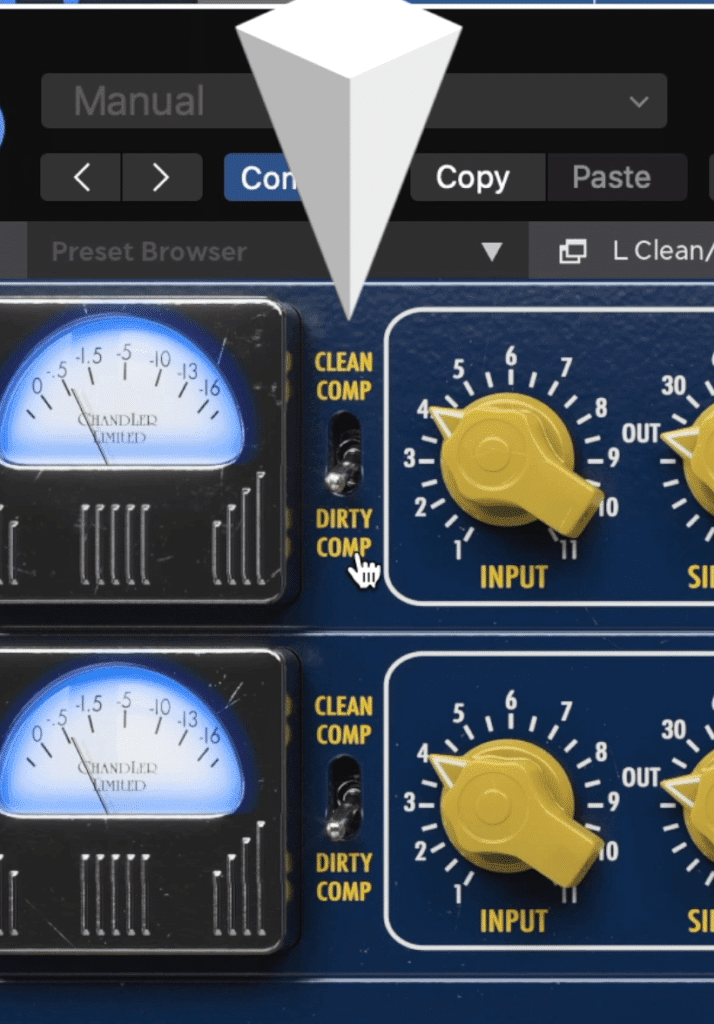
This compressor allows for more harmonic distortion with its drove and dirty comp settings.
For the ratio, I might choose a higher one for more attenuation or keep things relatively lite. The comp curve is going to affect the knee of the compression, which at softer settings will introduce more compression that’ll be more gradual. At harder settings, there will be less overall compression, but it’ll occur more dramatically when it is initiated.
Some of the most if not the most important settings are the Attack and Release. A quicker attack will cause more compression - which when it comes to parallel compression is a good thing.
The Release will vary a bit more - at shorter settings the parallel compressed signal will retain more of its dynamics. At longer settings, the compressor will hold onto the signal, in turn lessening the dynamics, and gluing the sound together.
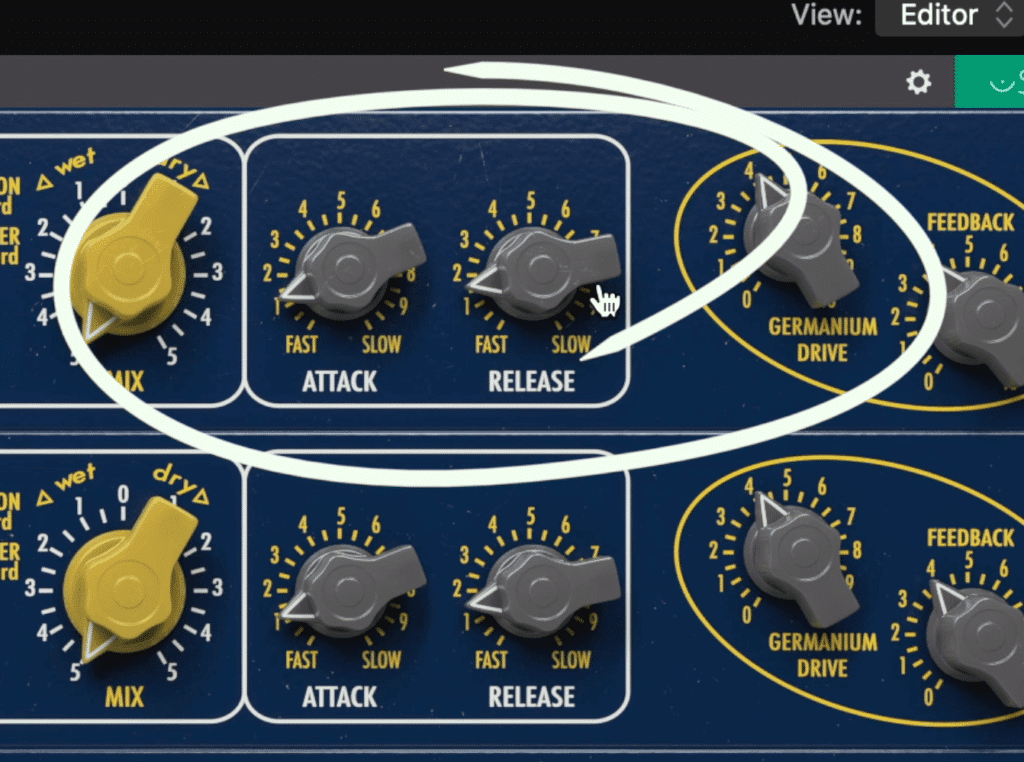
The attack and release play a huge role in shaping the sound of a parallel compressed track.
If you’re working on a funk, r&b, or pop mix, it might be better to use a longer release. For EDM, Rock, and Metal, it’s usually better to use a shorter release - but this will really depend on the mix and what you want to achieve.
Lastly, this plugin allows for mid-side processing, which can be really useful to achieve a wider stereo image. If you switch the processing to mid/side, the mid, which holds the majority of the signal, will naturally be compressed more (that is, if your mid and side compressor settings are kept identical).
Since the mid is compressed more, the side will have a greater amplitude, resulting in a wider stereo image.
For some compressors that you could use for your parallel compression, check out this video:
What is New-York Style Parallel Compression?
New-York Style Parallel Compression is the act of using parallel compression on a master or individual instrument, and then following that parallel compression with equalization. To achieve New-York Style parallel compression, you’ll need to use an auxiliary track to separate the signal from its original signal path.
New York style parallel compression uses an EQ after the compressor.
To do this we’ll just use a bus send as we did earlier.
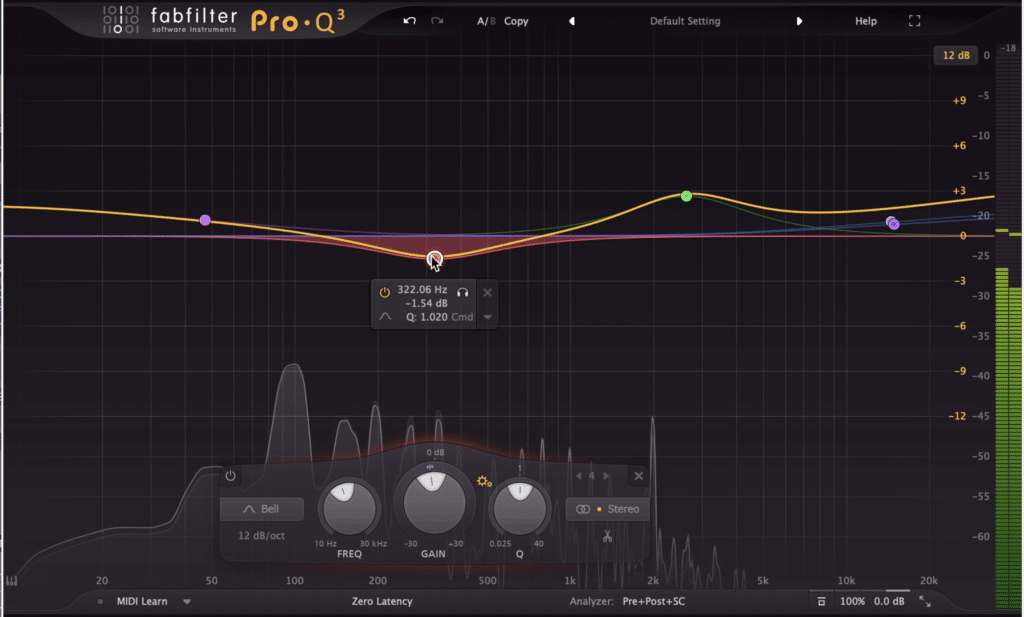
Using the same compressor as before, we’ll insert an equalizer after this compression. This way, we can boost and attenuate various aspects of the compressed signal.
Just like the compressor that we used, this equalizer can either be clean and transparent or introduce a little bit of distortion - this is really up to your personal preference.
I’m going to make my parallel compressed signal even more distinct by using a Pultec emulation.
With it, I’ll boost some of the highs, and some of the lows around where the kick is.
Furthermore, I’ll attenuate some of the low-mids around 300Hz to bring a little extra clarity to the compressed signal.
What you attenuate is up to you, your preference, and what you’re working on, but this is the basic set up for New-York style parallel compression.
How to Get Creative with Parallel Compression
Getting Creative with Parallel Compression means finding ways that it can be augmented and altered to better accommodate a mix or master. What New-York Style parallel compression taught us, is that you don’t need to use only 1 form of processing when performing parallel compression.
In keeping with this thought, let’s consider some other forms of processing that can be introduced to parallel compression.
One of the first things that come to mind is automation.
Automating your parallel compressed track or processor is a great way to add something extra to it.
We could automate the level of the parallel compressed signal to bring it forward or send it back in parts of the track. We could also automate various parameters of the plugin itself, to cause maybe a grittier sound in places, or a glued together sound in places.
Another idea is to use a dynamic equalizer or multi-band compressor after the compressor. This way we can dynamically attenuate any frequencies that come out a little too harsh, or more excitingly, expand parts of the compressed signal like the kick or snare, or top end, to bring some life into the compressed signal.
One last technique that I’ve tried and liked, is to follow the parallel compression with a low-level compressor. This brings forward imperceivable details of the signal - which might be some of the distortion, or maybe just elements that would have otherwise been masked by louder signals.
For more info on using low-level compression after parallel compression, check out this video:
If you can think of some interesting ways to augment parallel compression, let us know in the comment section of the video, we’d love to get your insight on how to make parallel compression even better.
Conclusion
Parallel compression is no doubt useful. When used correctly and thoughtfully, it can really bring a master, an instrument stem, or even an individual instrument to the next level.
Try parallel compression using some of the routing, techniques, settings, and creative tricks we’ve covered here, and let us know what you think.
Furthermore, if there’s a way that you use parallel compression which we didn’t directly cover, we’d like to hear about that too.
If you’re an artist or engineer, and you have a mix that you’d like to hear mastered, send it to us here:
We’ll master it for you and send you a sample to review.


