How to DeEss Vocals
How to DeEss Vocals
If you want to de-ess your vocal, the easiest way to accomplish it is by using a de-esser plugin; these plugins work like a compressor, but just on sibilance-based frequencies. For better results, you can manually edit these sections with clip-gain, but this can be tedious.
How to DeEss Vocals in Detail
De-essing vocals really isn’t talked about enough. Having a properly de-essed vocal is the difference between an enjoyable track and one that sounds shrill and possibly even piercing.
With that in mind, it helps to know how to de-ess a vocal, and some of the best ways to accomplish it.
The methods used for de-essing range from incredibly quick and easy to accomplish, too laborious and tedious, but we’ll look at each in-depth to give you as many options as possible.
If you have a mix that you need mastered, send it to us here:
We’ll master it for you and send you a free sample for you to review.
The Easiest Way to De-Ess Vocals
The easiest and quickest way to de-ess your vocals is to simply use a de-esser plugin; these plugins are basically compressors that focus on a specific area of the frequency spectrum that’s associated with sibilance-based frequencies. De-esser plugins are easy to use as well.
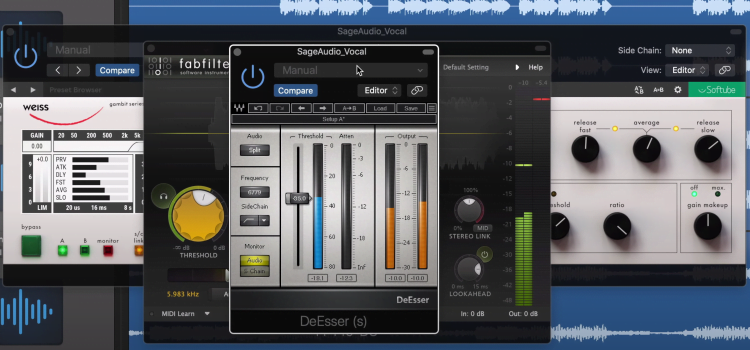
First, let’s use the FabFilter Pro-DS plugin. This plugin lets you change what frequencies are being affected, and how the attenuation occurs.
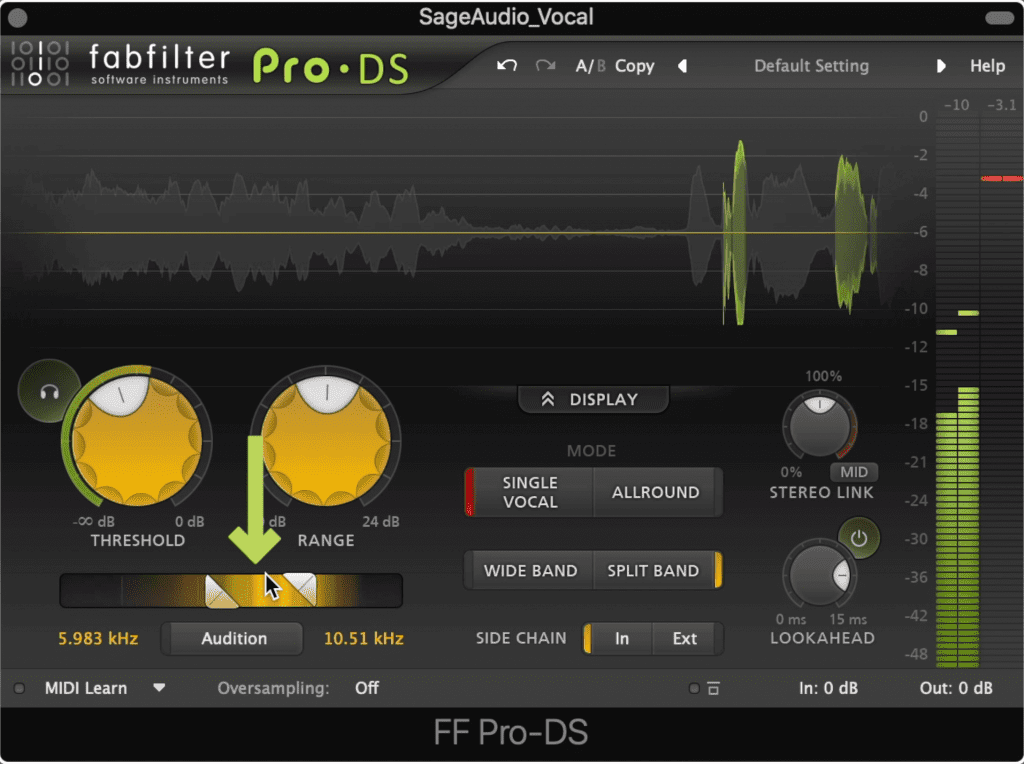
The audition section lets you control what gets compressed.
For example, I can adjust the frequency range in the bottom left to include just the frequencies I want to de-ess. So if the sibilance is only between 6kHz and 10kHz, I can adjust these settings to attenuate only when the sibilance is strong enough.
The threshold function is going to determine the level at which the de-esser will begin to attenuate this range. Adjust this function until attenuation begins, and keep an eye on your gain reduction meter to see how much of the signal is being compressed.
If you want more or less attenuation to occur, adjust the range function. This is basically the maximum amount of attenuation that can occur. So, if you want to only attenuate 3dB of the sibilance, set the range to 3dB, and so on.
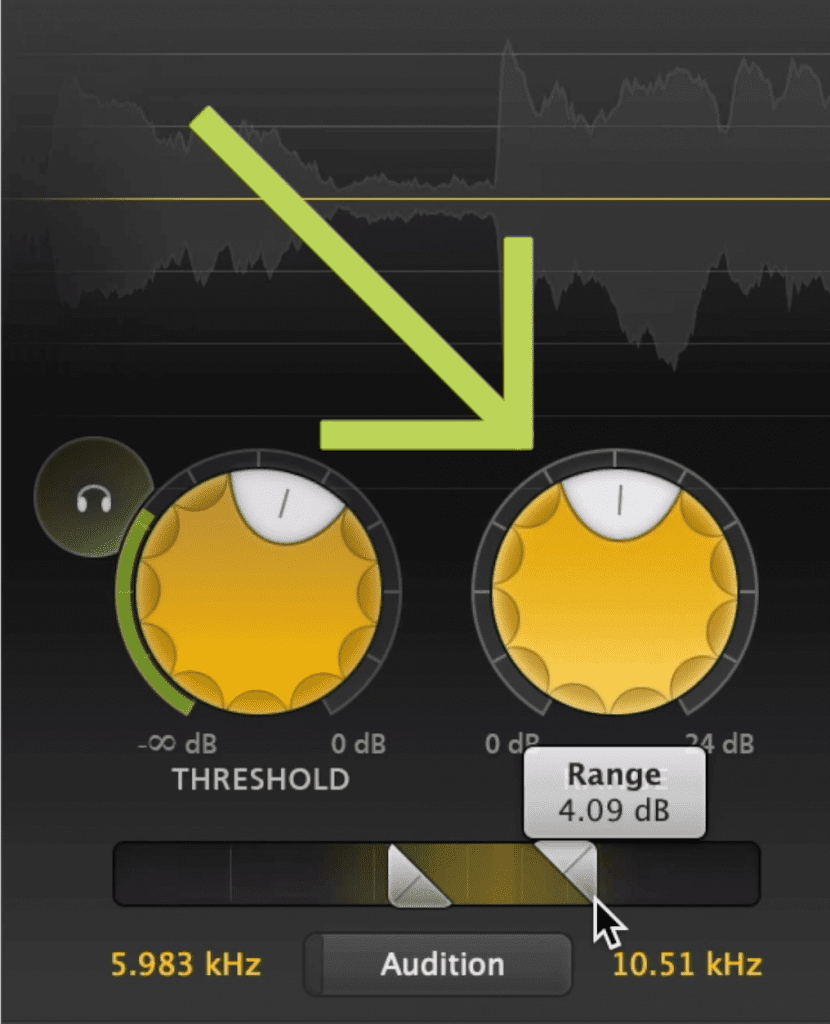
Range determines how much compression can occur.
This plugin also lets you determine how it measures the signal. It has 2 modes, single vocal and all around; use "single vocal" if you’re inserting this plugin just on a vocal. Use all-around if you’re using it on a stem or a mix.
If you use a wide-band setting, then the entirety of the signal will be attenuated whenever the compressor is triggered. I’d recommend using a split band setting to only attenuate the sibilance, not the full frequency range.
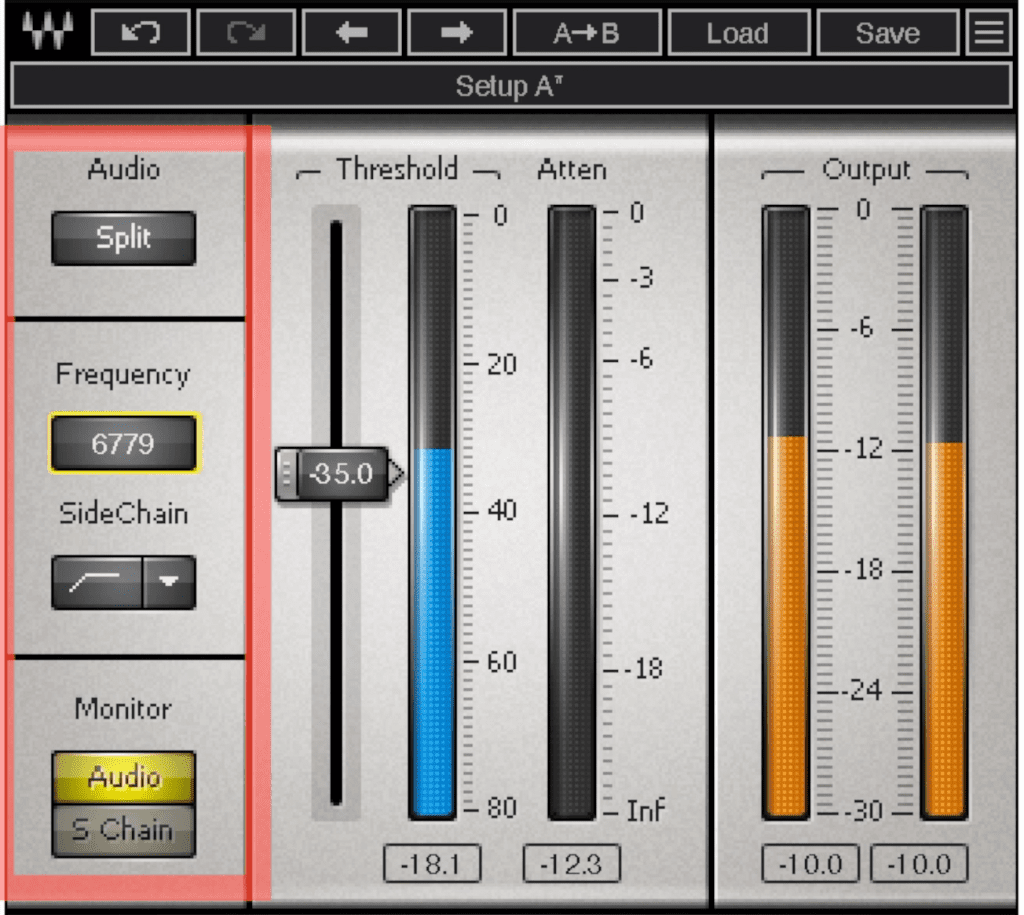
The Waves de-esser offers simple but useful functionality.
The Waves Audio De-esser is even easier to use. Simply reduce the threshold until attenuation begins, which can be observed with the meter on the right. You can switch this attenuation between Split and Wideband, as well as adjust the frequency range being attenuated.
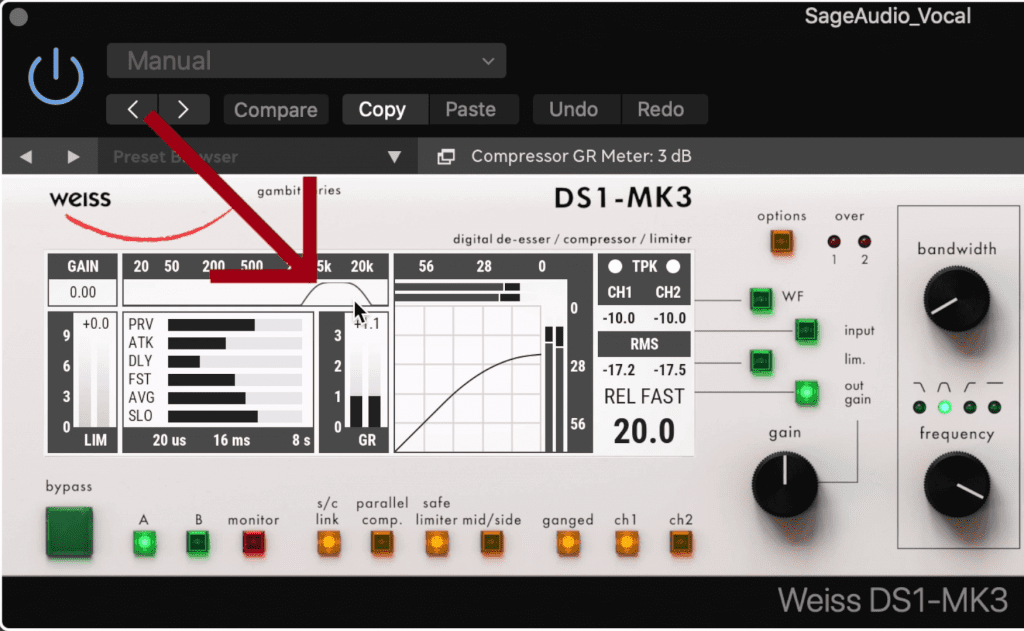
Notice the narrow bandwidth used for this compression.
If you’re looking for the best-sounding de-essing that you can accomplish with a plugin, try the Weiss DS1-MK3. By using a narrow bandwidth and centering it on your sibilance, you can create transparent de-essing.
Let's listen to these 3 plugins.
Let’s listen to these 3 de-essers, set to nearly identical amounts of attenuation, and see if we notice a difference in the tonality.
For more information on vocal production, check out this video:
The Best Sounding Way to De-ess Vocals
The best-sounding way to reduce sibilance is perhaps the most time-consuming and includes identifying each sibilant section of the vocal comp and utilizing clip gain to attenuate that section. Although this takes a fair amount of time, it’ll result in the most transparent de-essing possible.
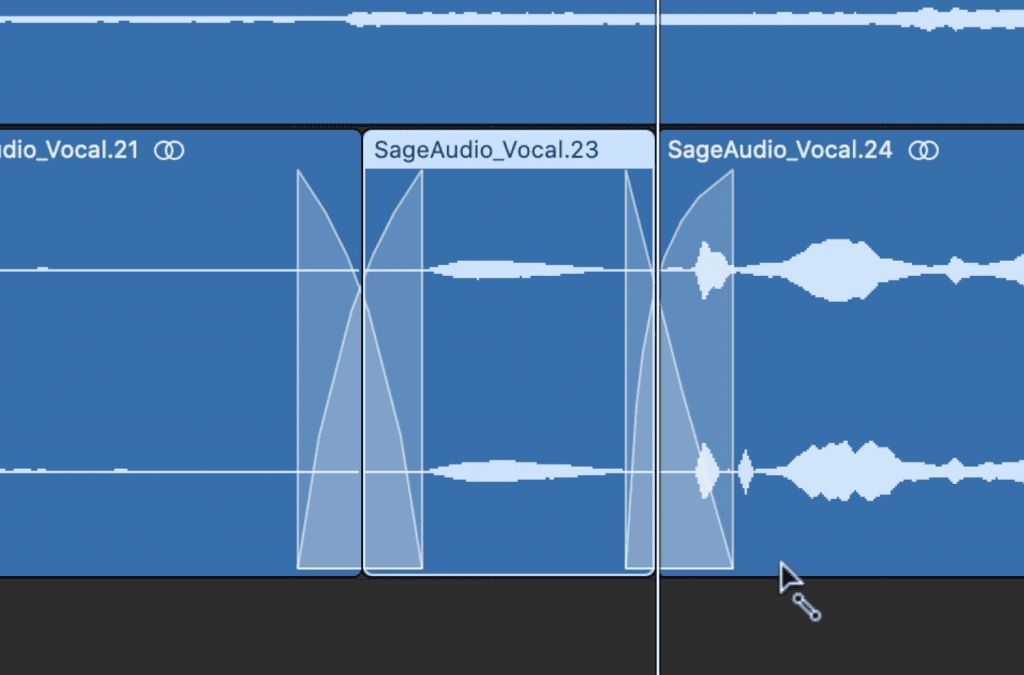
Clip gain can be used to attenuate sibilance.
Understandably, this probably isn’t the most popular option - but, if you’re looking for the cleanest way to reduce sibilance in your track , and you have nothing but time on your hands, try using clip gain to de-ess vocals.
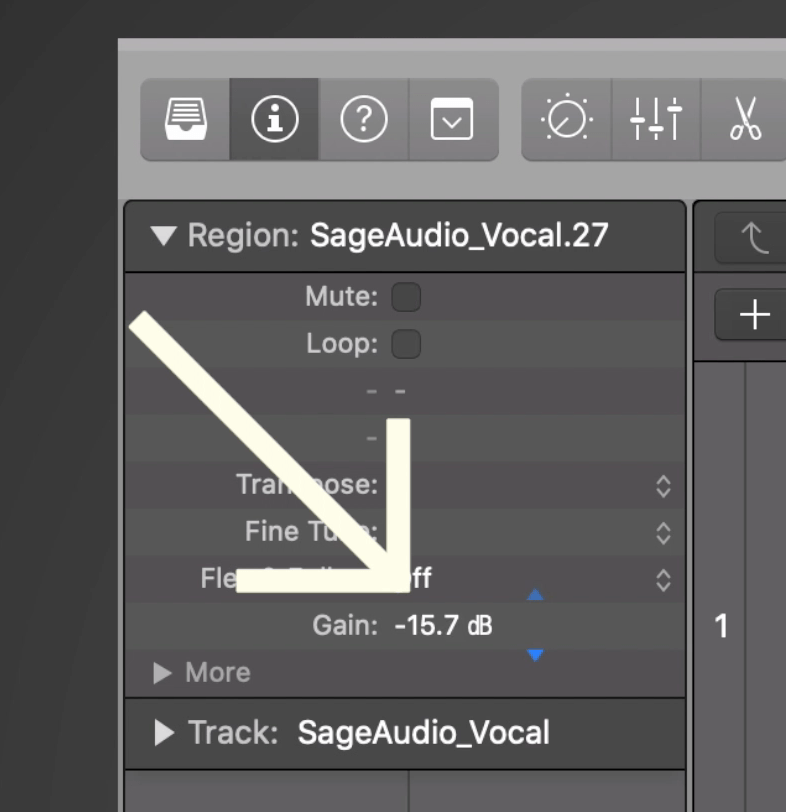
Decreasing the gain of the clip decreases the sibilance.
Essentially, you listen to vocal and methodically isolate sibilant sections of the performance. You then create a new clip that isolates this sibilant section and use clip gain to reduce it.
As you can imagine, doing this to an entire vocal may not be feasible, but it avoids compression and the artifacts that come along with it.

This may be too time consuming of a process.
If you do use this method, just be sure that you don’t affect other aspects of the vocal, and that you use fades to blend in the changes.
A Natural Sounding Way to De-ess Your Vocals
My favorite way to reduce sibilance is by using dynamic equalization; this way you can control exactly which frequencies are attenuated, when they’re attenuated, how much they’re attenuated, and how this attenuation affects the phase of the signal. It isn’t a common solution, but it offers a lot of freedom.
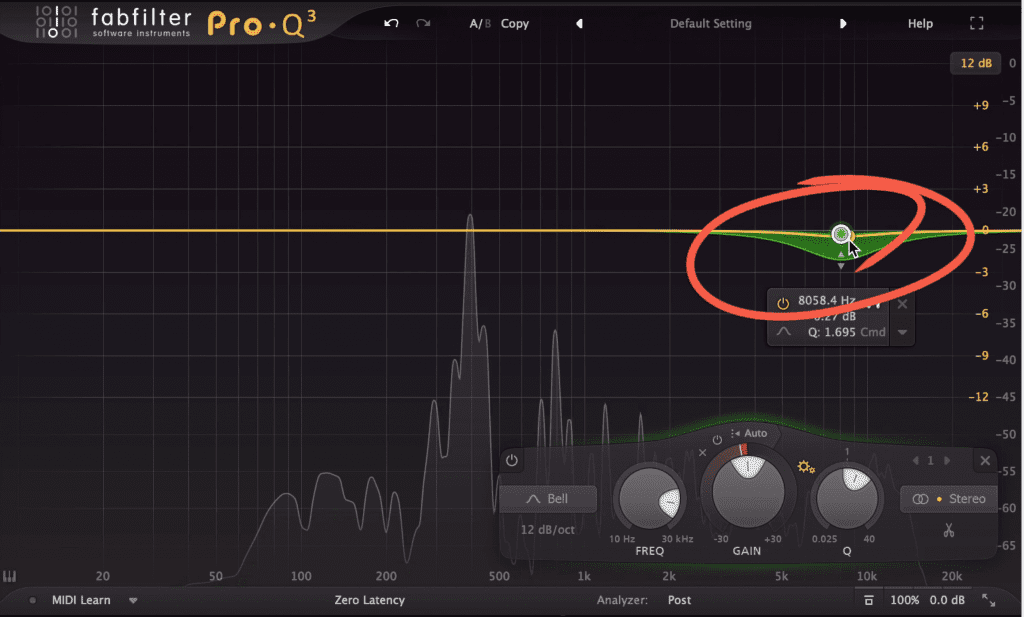
Dynamic equalization offers a lot of flexibility when de-essing vocals.
For this example, I’ll use the FabFilter Pro-Q 3 and create a dynamic band over my sibilance frequencies. By clicking and dragging the filter underneath the band, I’m adjusting the range of the attenuation.
I can even increase the level of these frequencies, but then increase the amount of attenuation. This way I create a clear vocal, but, whenever sibilance occurs, the vocal doesn’t sound harsh or too aggressive.
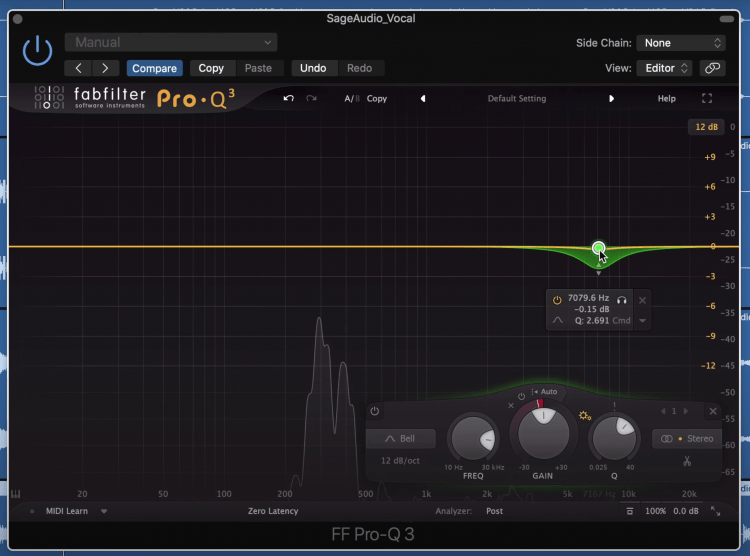
The range can be set by dragging the section underneath the dynamic band.
Additionally, if there are multiple frequencies where sibilance is occurring, you can create multiple bands to address the issue. These bands can be made incredibly precise , so if you really want to hone in on those frequencies, this is a great option.
Lastly, if you alter the phase settings you can create very accurate adjustments to your high frequencies. For example, zero-latency will alter the phase of your signal, and in turn, the amplitude of the frequencies.
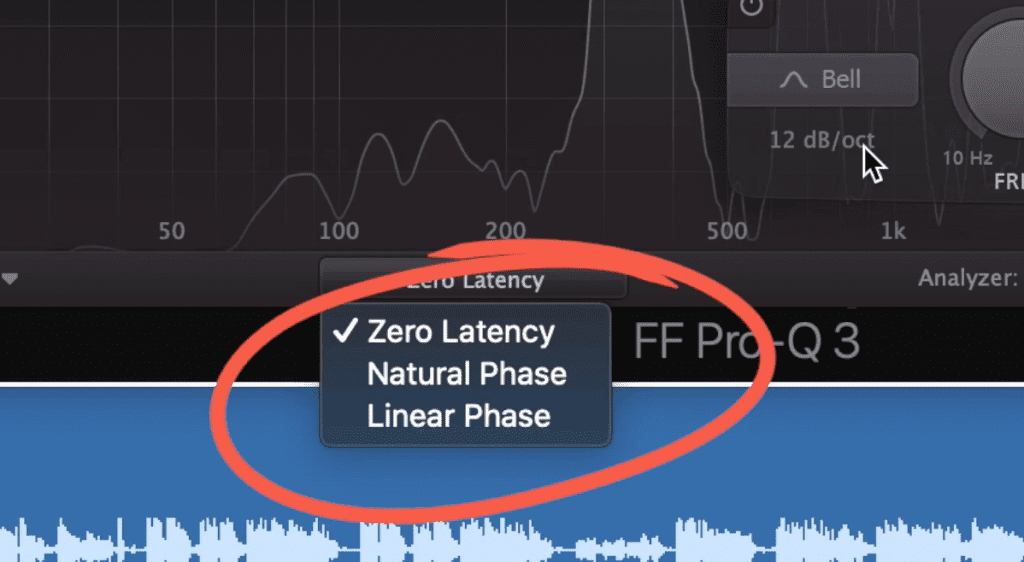
The phase of the equalizer will change the amplitude of the signal being de-essed.
Natural phase will emulate the effect that physical components have on a signal, and linear phase will significantly reduce the effect that these changes have on the phase, in turn creating very accurate attenuation.
So, if you’re looking for a method of de-essing that offers an immense amount of flexibility, and offers very accurate attenuation, I’d recommend dynamic equalization.
Let’s listen to dynamic equalization, and compare it to regular de-essing. We’ll use a nearly identical amount of attenuation, and cycle between different phase types to see if we notice a difference.
For more information on dynamic equalization, check out this video:
Conclusion
There are a few ways to de-ess your vocal. Some are as easy a using a de-esser and reducing the threshold, and others are incredibly time-consuming.
Let’s consider the pros and cons of each.
De-essers
Pros:
- Very easy to use
- Saves you a lot of time
Cons:
- Not always to most accurate
- Can Produce artifacts
Clip Gain
Pros:
- Most effective way to reduce clip gain
- No artifacts
Cons:
- Incredibly time-consuming
- Requires precise cuts
Dynamic Equalization
Pros:
- Lots of flexibility
- Very accurate de-essing
Cons:
- Potential Phase changes
Each type of de-essing presents unique challenges and benefits, but, the one you pick will most likely depend on what you care about most.
Try each one out to see what is best for your workflow, and to determine which you think sounds the best.
If you have a mix that you need mastered, send it to us here:
We’ll master it for you and send you a free sample for you to review.


