How to Thicken Your Lead Vocal
You have a great mix - it's balanced and you’ve finally gotten the instrumentation to sound loud and full. Only problem, when you listen to the chorus, your vocal is getting lost.
Turns out your instrumentation can sound too full for it’s own good. The moment your song becomes too big for your lead vocal, it may be time to pay more attention to how your vocal is cutting through your mix.
The perceived thickness, or density of a vocal sound results from the use of time based effects, such as reverb and delay. Use these effects with short settings to accomplish a thick vocal sound.
With that in mind, let’s take a look at a step by step process, which you can make your vocal sound dense, and cut through even the most heavy instrumentation.
Double the Vocal:
By double I mean use a doubler plugin, not copy and paste your vocal onto another track, or overdub another vocal.
The Wave’s Doubler is a great option for an inexpensive, and effective doubler.
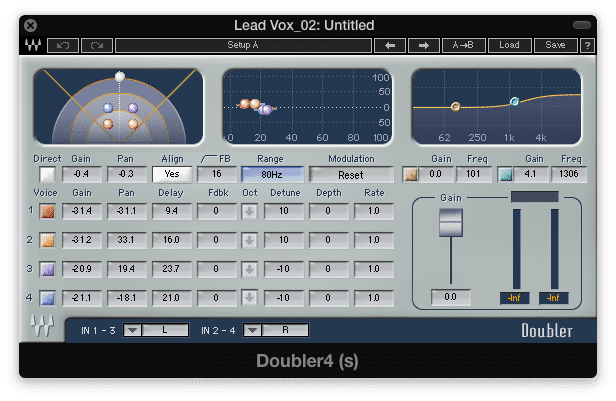
Create up to 4 additional voices with the Wave Stereo Doubler
Step 1: Create 4 voices, and pull back on their gain and pan in the stereo field to the top left. This creates a full but balanced sound, in which your added voices can be heard but are not overpowering. Align the voices, by clicking the align function above the delay, so that all signals play simultaneously.
Step 2: Detune the voices up to 10 cents. This changes the fundamental frequency of the recording, and the harmonics that result from it. In turn the overall bandwidth of the vocal is expanded, and the frequency gaps in a vocal recording are filled.
Low Level Compression:
The Wave’s MV2 offers a great and simple way to accomplish low level compression. The goal with low level compression is to take the quietest and often hidden aspects of a recording, and increase their amplitude until it can be perceived.
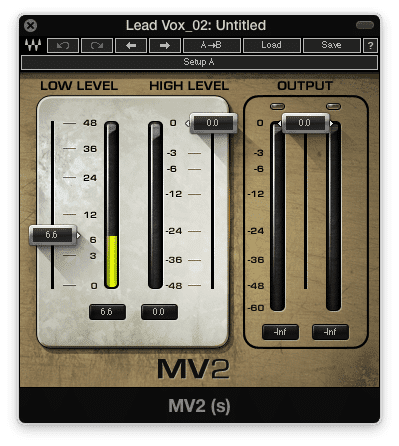
Subtly increase the quieter aspects of your vocal with a low level compressor
Step 1: Increase the level of the low level fader until you can hear details in your vocal you couldn’t hear before. Too much and it may become distracting, so like with most things in audio, find a good balance.
Since we’re placing the MV2 after the Doubler, the quieter aspects of the newly added voices will be accentuated.
Reverb Send:
This is where things become more familiar. At this point you may be thinking, ‘I already use reverb, adding more will make it sound washed out.’
Well, it really depends on the size of the reverb and the time of the reflections.

Create a concise reverb with quick reflections and a short reverb time
Above you can see a short time and quick reflections. This causes a dense sound, as opposed to a wide and spread out sound often associated with reverberation.
Step 1: Send your vocal to a reverb with a bus or aux send. A vocal plate offers quick reflections. Reduce the time to roughly one second.
Step 2: Blend the send back in with your original signal using your auxiliary track's channel fader.
Delay Send:
Similar to the reverb send, the idea is to create a concise and dense temporal effect. Again we’re not going for a large, or a spacey sound. We want reflections that arrive quickly, adding density and thickness to the vocal.
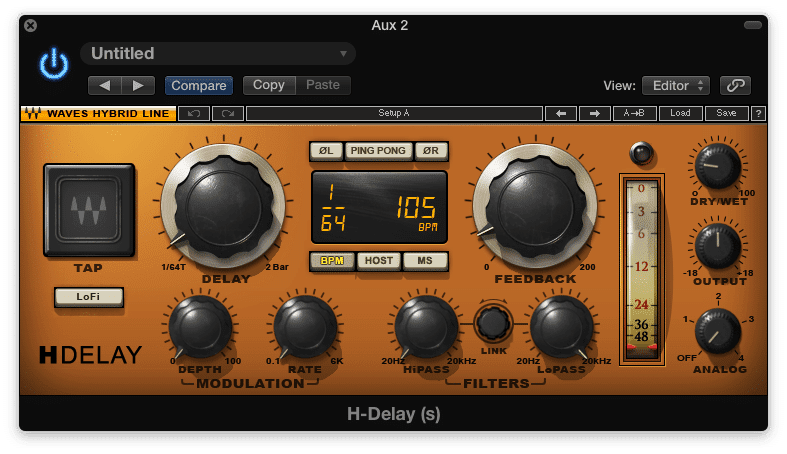
Notice the Waves H-Delay allows for delay based on the bpm
Step 1: Send your vocal to a delay with a bus or aux send. Reduce the delay time to 1/64 note.
Step 2: Set the delay to the bpm of the track.
Conclusion:
Use temporal, tuning, and low level compressing effects to create a vocal that sounds thick, and dense enough to cut through your mix. The idea is to create multiple reflections and voices, that can be combined with and augment the original signal. Ask yourself when following this process, why you are doing what you’re doing, and if it serves to thicken and augment the vocal.
How do you thicken your vocal tracks?


