Top 5 Advanced Mixing Techniques
1. Record an Effect Using a Midi Environment
2. Use Inverse Equalization to Clear Space in a Mix
3. Introduce Plugin Automation to Create Varied Effects
4. Use Kick and Bass Ducking to Separate the Two
5. Use Groups or Auxiliary Sends to Organize Your Session
If you’ve been mixing music for a little while now, you’ve probably gotten a hold of the basics. That said, you’re probably looking for some techniques you haven’t come across yet.
Although mixing fundamentals are always important, let’s look at 5 advanced mixing techniques that you can use to affect your mix in a unique way. These techniques vary in the forms of processing used and the routing that’s involved.
Some are more complex like recording an effect using a midi environment, and some you may have come across before like using kick and bass ducking.
Regardless, hopefully, these techniques inspire some new mixing ideas or can help you solve a problem in your mix.
If you have a mix that you’ve been working on, send it to us here:
We’ll master it for you and send you a free sample for you to review.
Record an Effect Using a Midi Environment
So I admit, this first one isn’t technically a mixing technique, but it does heavily affect mixing and can greatly improve your mixes if you’re working in a digital work station.
Also, it does include processing that would occur during mixing so we might as well cover it.
This particular technique is great for any engineer that’s working on a computer that cannot handle a significant amount of processing.
You can use your midi environment to record effects on your track
Maybe you’re working on a laptop or an older computer (or both), and you’re running into constant errors, freezing, or crashes - if so, this technique is a great way to use all of the effects you want without clogging up your computer’s processing power.
In short, you can use a certain section of your DAW, known as the ‘Midi Environment’ to record processing like EQ, compression, reverb, or whatever you’d like directly onto your recorded signal.
It works by routing your incoming signal through another channel strip prior to the digital signal actually being recorded into your DAW. Here’s how to accomplish this routing in Logic Pro X.
First, you’ll need to enable the Advanced Tools setting. To do this:
Step 1: Click ‘Logic Pro X’ in the application menu bar, then scroll over ‘Preferences,’ find ‘Advanced Tools’ and select it.
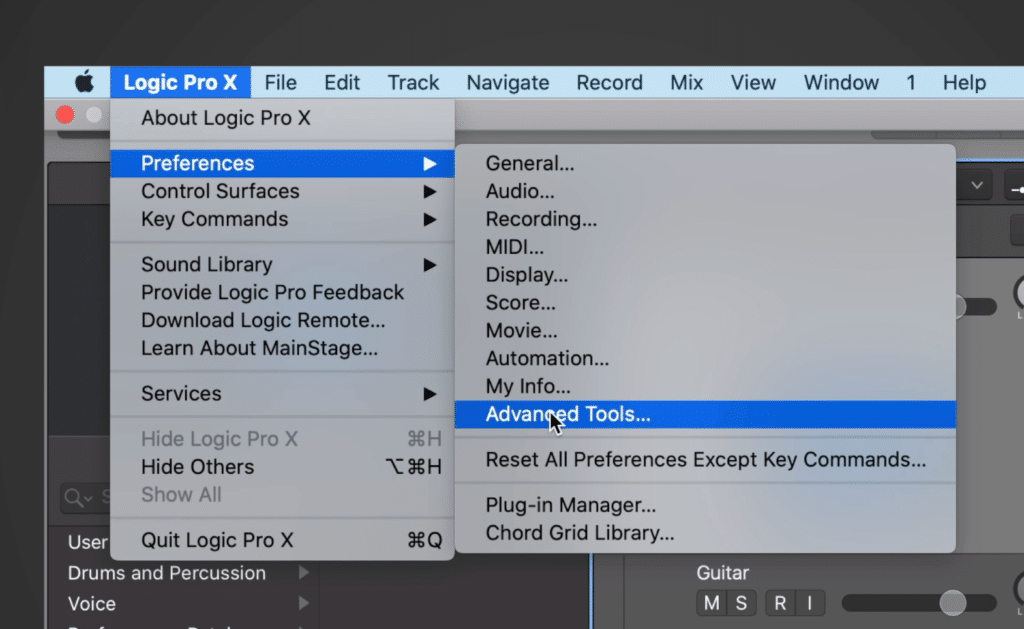
Logic Pro X > Preferences > Advanced Tools
Step 2: Enable ‘Show Advanced Tools.’
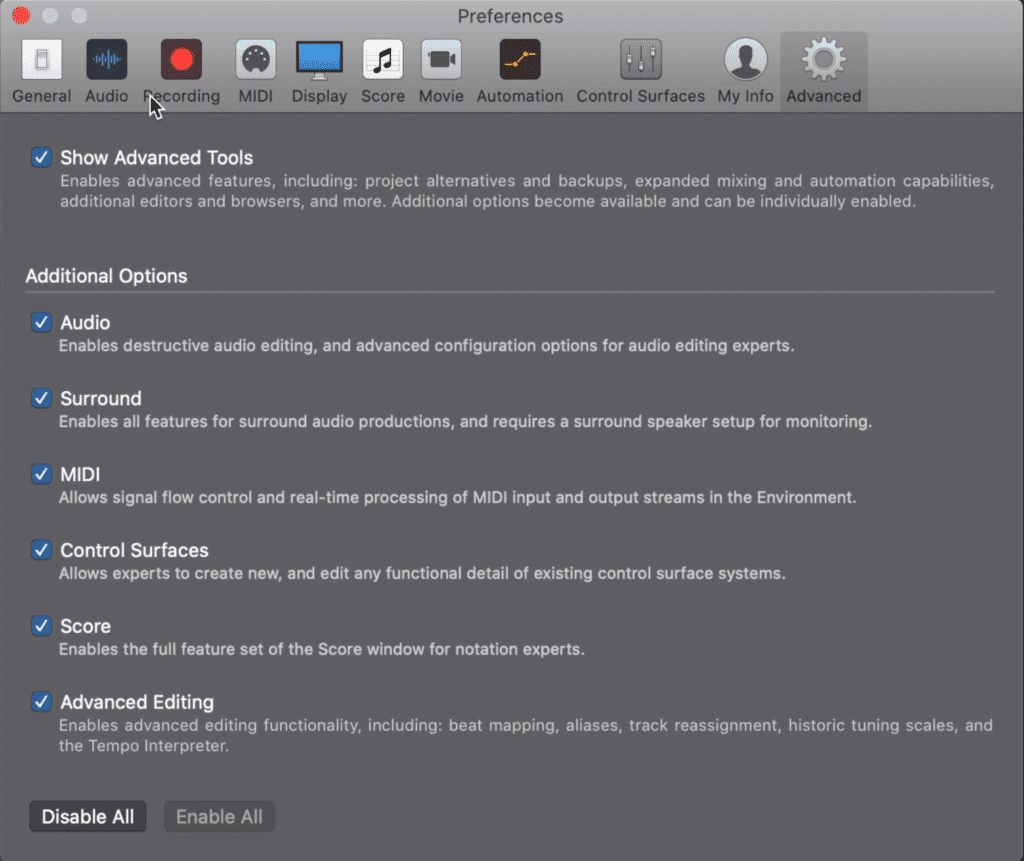
Enable Show Advanced Tools
You should now be able to access your Midi Environment and perform the technique.
To find this Midi Environment and Perform the technique follow these steps:
Step 1: Using the application menu bar at the top of your screen, find the section titled ‘Window,’ scroll down and click on ‘Open Midi Environment.’ Alternatively, you can press ‘Command + 0.’
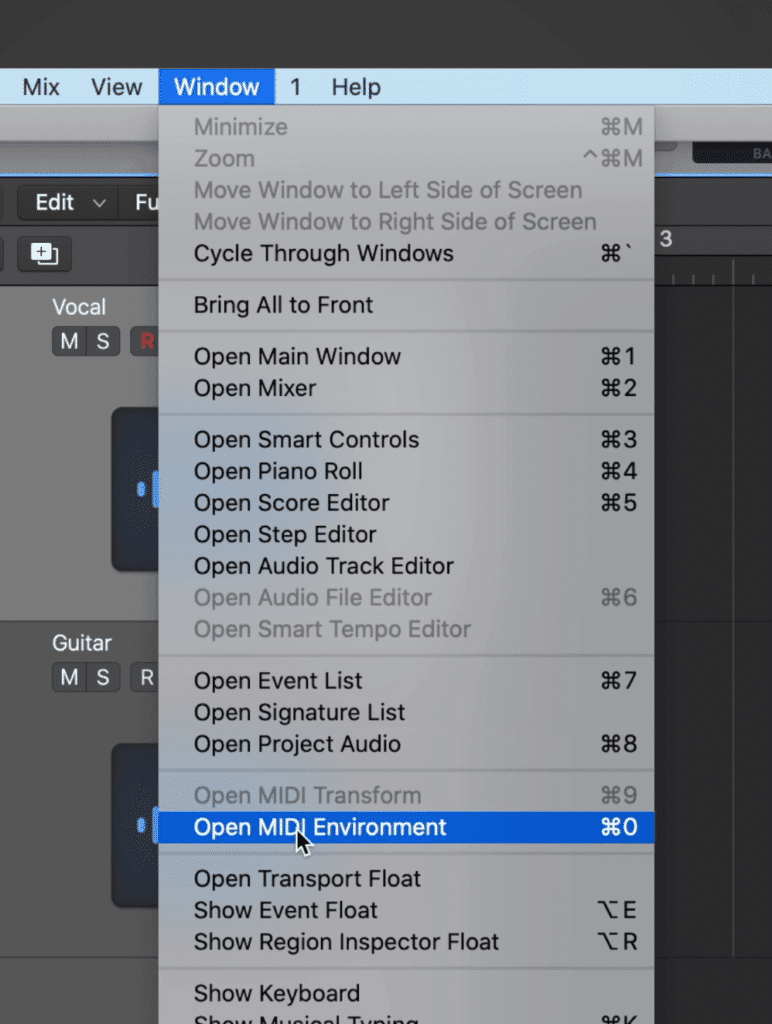
Window > Open MIDI Environment
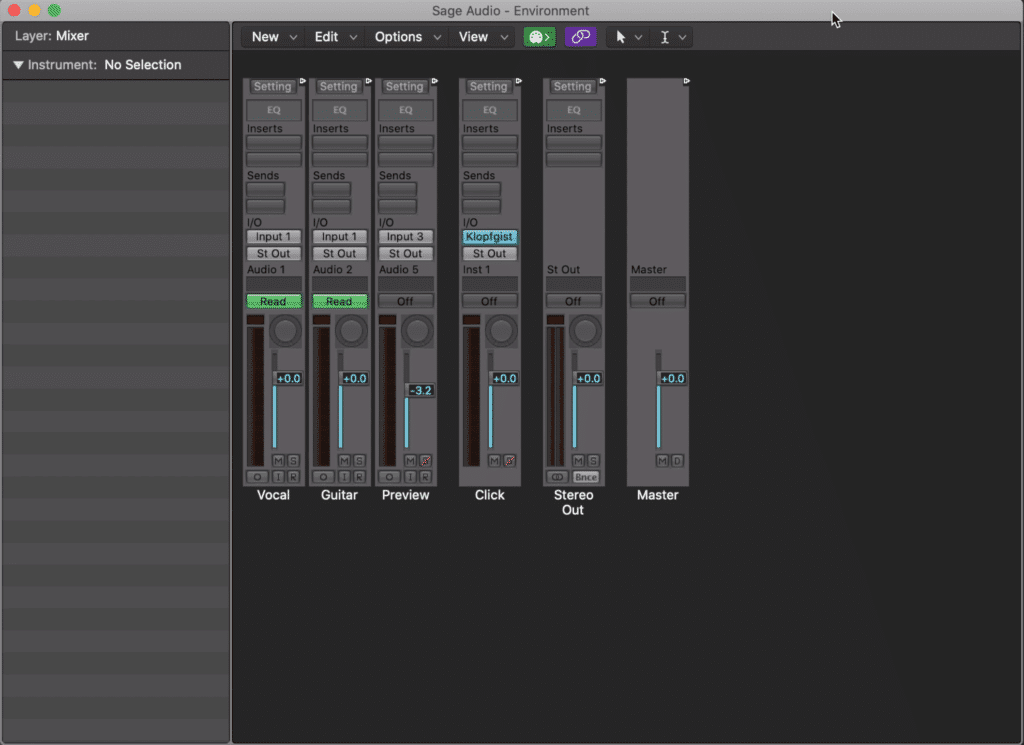
With your Midi Environment open you should see what looks a lot like your mixer - this includes your tracks, outputs, click tracks, and any other track that you’ve created. From here you need to create an input track.
Step 2: To create an input track click ‘New’ above your Midi Environment mixer, and scroll down until you see ‘Channel Strip,’ From there select ‘Input.’
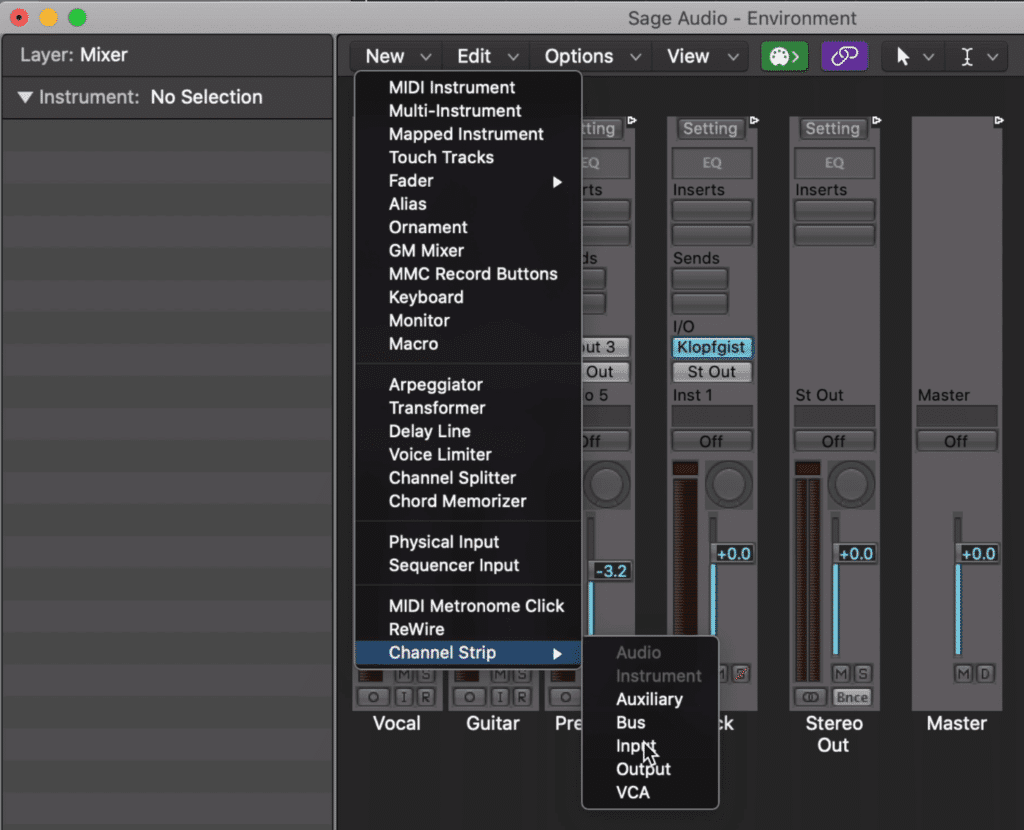
Within Midi Environment Window: New > Channel Strip > Input
This will create an input channel that routing wise, is between your track and your incoming signal.
Step 3: Insert a plugin on your new input channel strip. You can now record your incoming signal with this processing included, meaning when you playback your recorded signal this effect will be included.
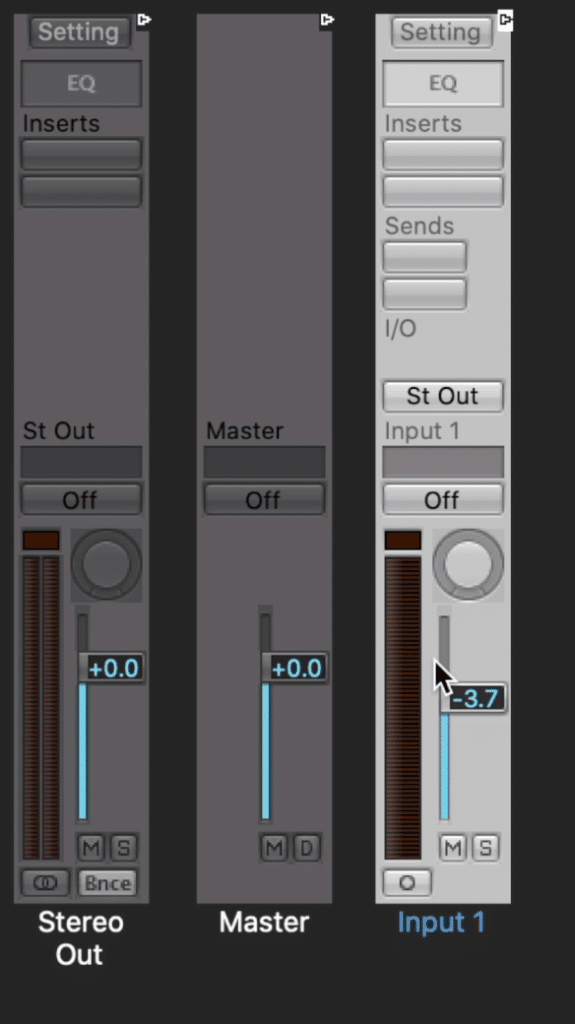
Insert plugins on your new input channel fader
Your first question may be, ‘Doesn’t this mean I need to commit to this processing?’
Yes - if you record your incoming signal in this way then there is no way to undo the processing that you’ve recorded. With that said, you need to be careful with what processing you choose to record.
One of the best ways to use this technique is to use processing you know that you’ll need but won’t want to alter. 3 forms of processing that you may want to record are:
- Some analog emulation and harmonic generation
- A low pass filter for most instruments and vocals
- Some mild compression to balance dynamics
Perhaps the best choice is to use a channel strip plugin which will include all 3 of these forms of processing.
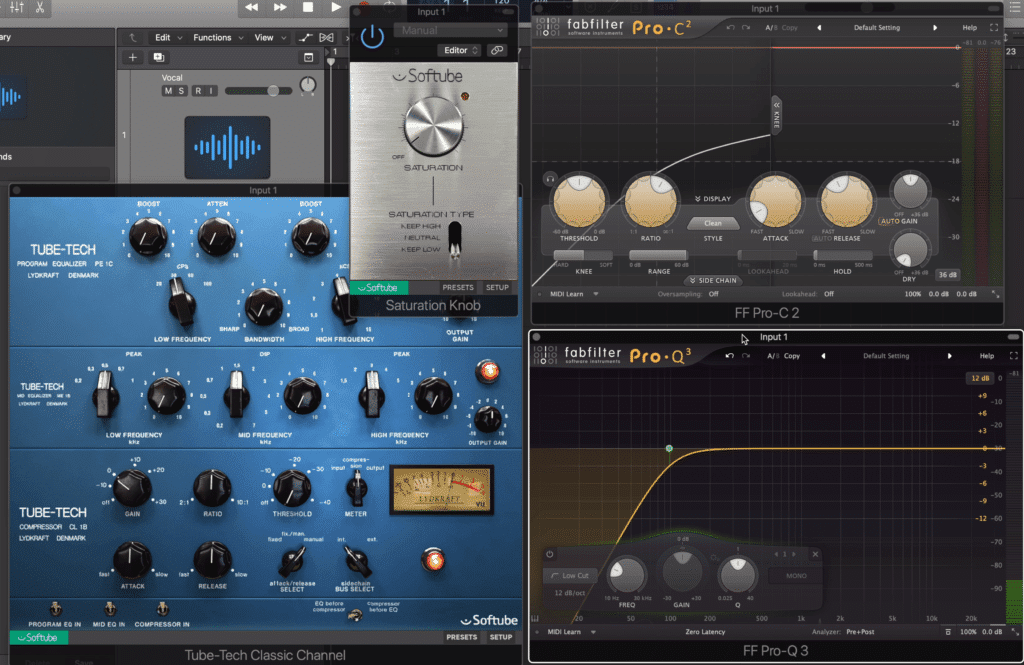
Some of the processing you might want to include is shown above.
Recording your signal in this way closely models how professional engineers record - typically, engineers will record their signal through a compressor, a low-pass filter, and perhaps some mild eq.
Just as important, recording your initial compression and equalization in this manner means you won’t need to use it later on - in turn freeing up some processing power during mixing.
2. Use Inverse Equalization to Clear Space in a Mix
This technique is one of my personal favorites, as the effects are not only easy to achieve, but 9 times out of 10 greatly improve mix clarity.
Essentially, the effect works by matching the frequency response of two similar instruments or instrument groups and then inverting the new frequency curve to create the opposite of matching.
In turn, everything that was similar about the two tracks is attenuated, and everything that sets them apart is amplified.
Let’s look at this process step by step:
Step 1: After picking the two tracks that you’d like to separate, insert an eq plugin capable of eq matching on one of them. For this example, we’ll be using the FabFilter Pro Q 3 , which is a great option for this technique if you’d like to perform it.
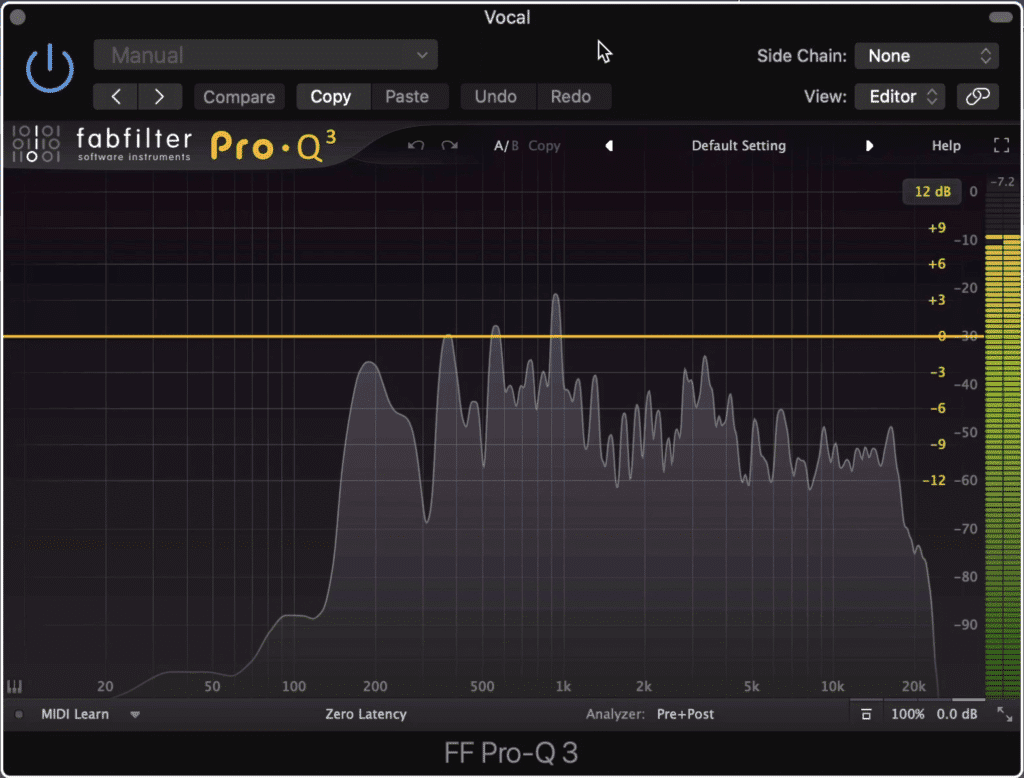
Use an eq plugin that is capable of EQ Matching
Step 2: Enable the eq match function by clicking ‘EQ Match,’ and then change the side chain to the other track you picked out. So for example, if you’re trying to separate your vocal and guitar, and you inserted the eq plugin on the vocal track, then your side-chain input will be your guitar track.
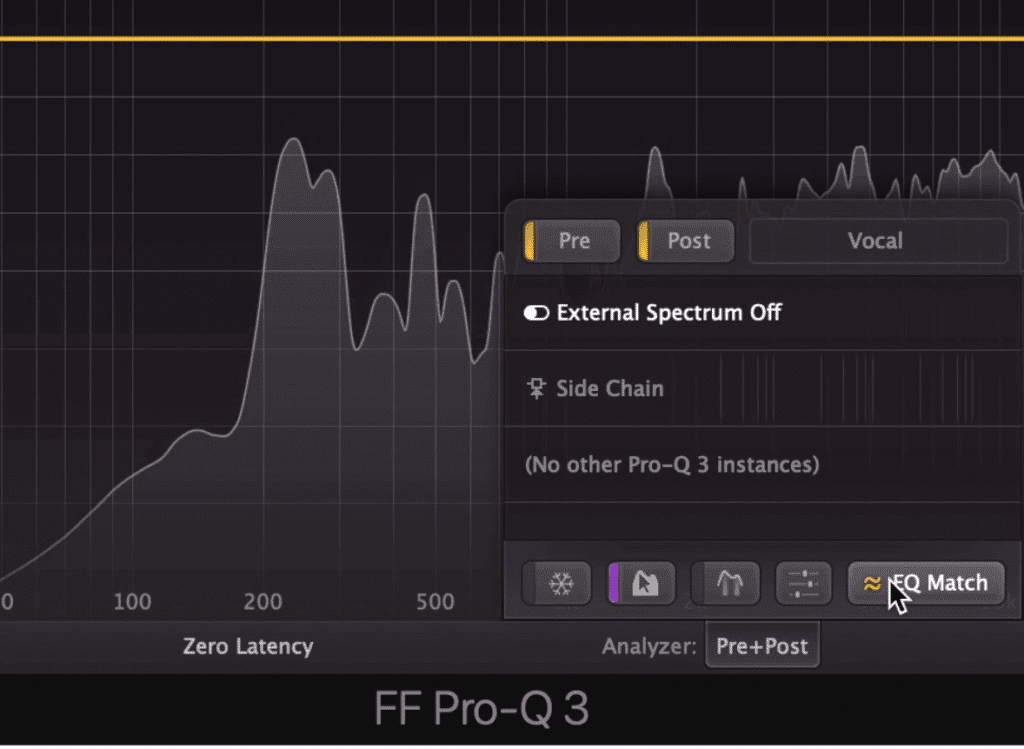
The EQ Match tab pops up after hovering over the Pre+Post tab
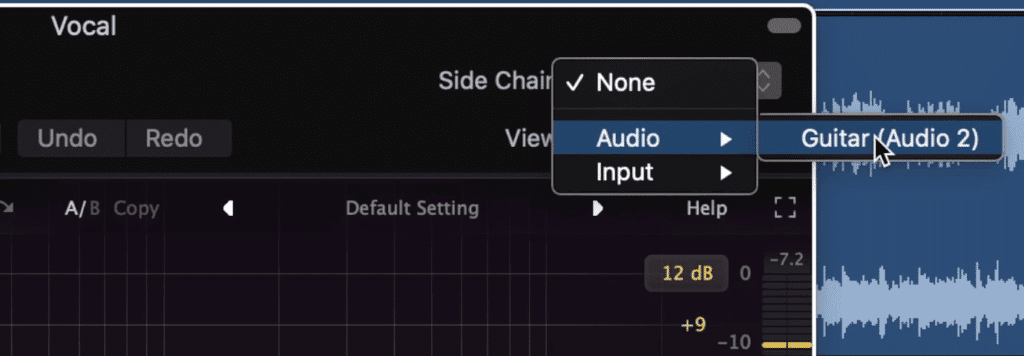
Switch the side-chain to the signal you're matching your signal to.
Step 3: Set your reference as your side-chain and then play your track. The eq matching should automatically begin to take place. After an appropriate amount of time, stop playing the signal, and click match.
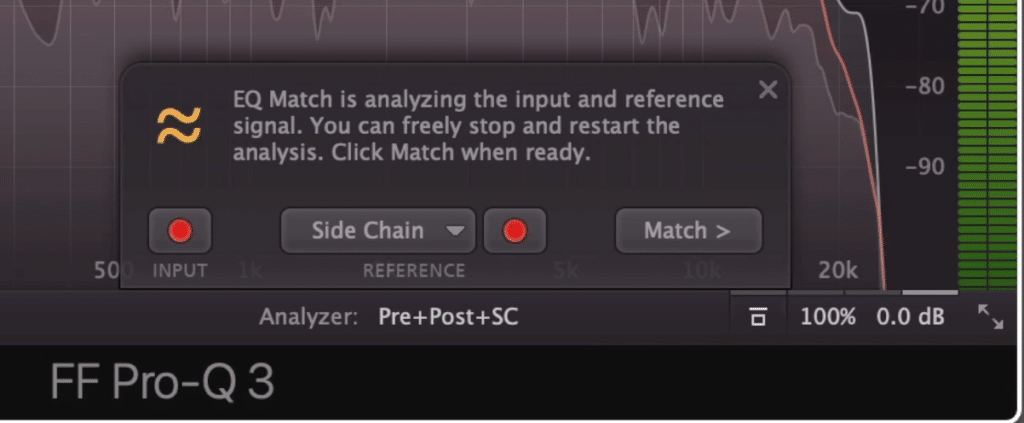
When you click match, you'll be able to determine how many bands you generate. Typically for this technique, more is better.
Step 4: The FabFilter Pro Q 3 will create multiple bands and filters to match the frequency response of this signal with that of the side-chained signal - but this isn’t what we want.
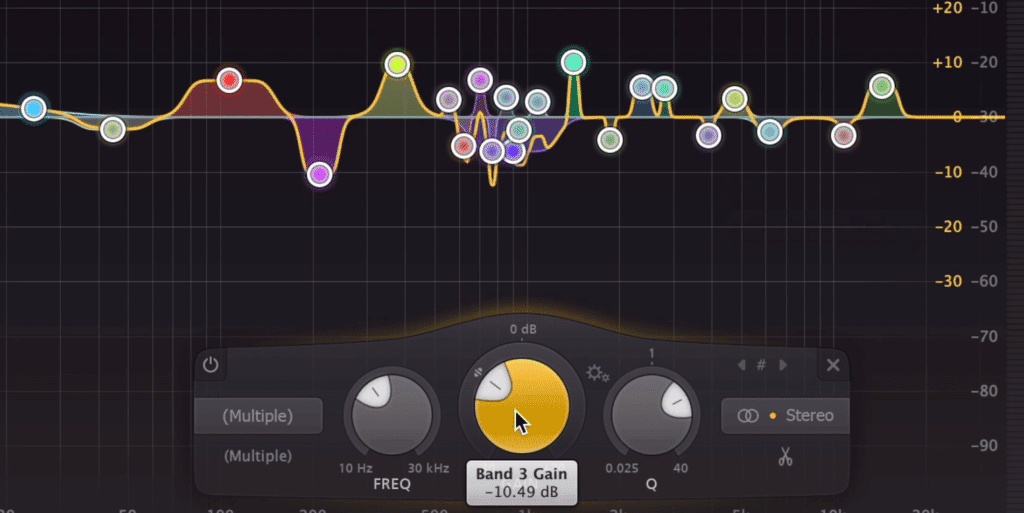
Notice that some bands are too extreme
Because we want these two tracks to sound opposite to one another and not identical, we’ll need to highlight all of the created bands, and using the gain rotary invert them.
Step 5: Some of the bands that were created will most likely be pretty extreme - too much so for our purposes here, so when we invert the created bands it’s best to make the inversion amount 3 to 5dB. See the screenshot below to understand what exactly I mean by this.
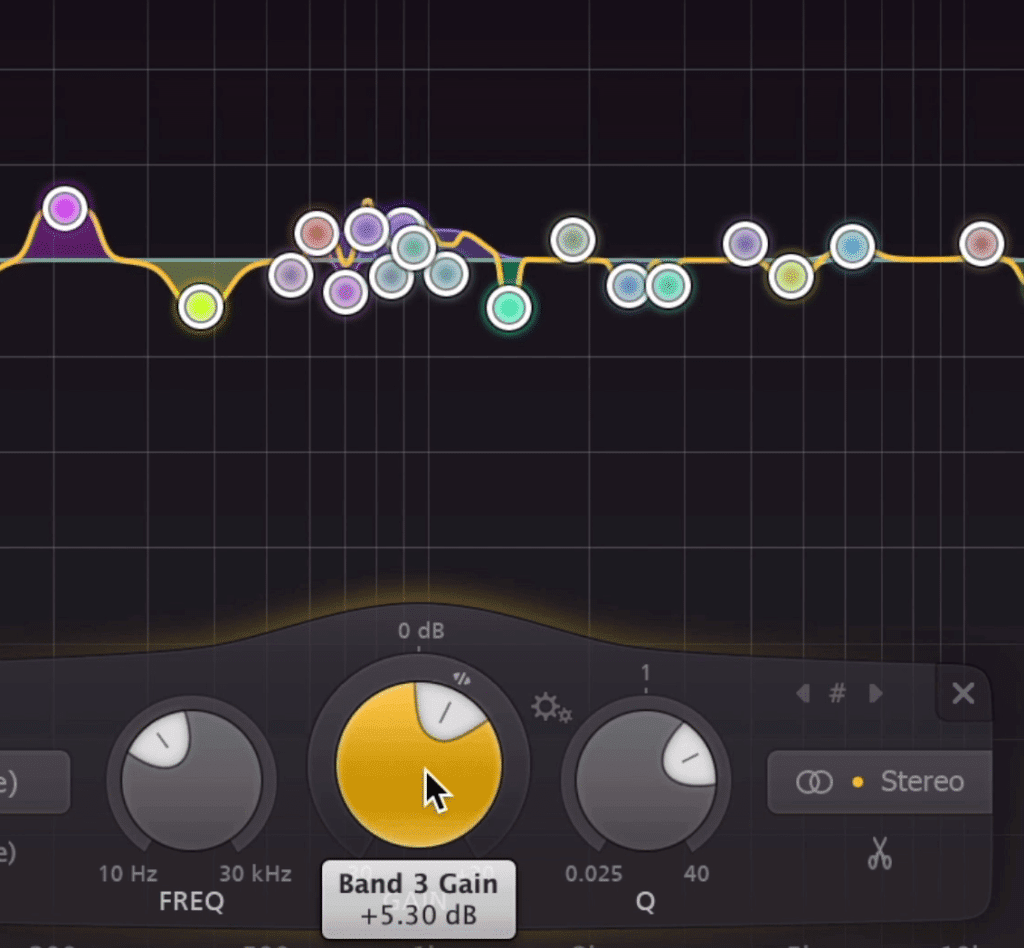
Inversing the gain needs to be done subtly.
You can make this effect as extreme as you want; however, it’s best to keep the gain changes pretty mild if you want it to sound natural in any way.
3. Introduce Plugin Automation to Create Varied Effects
One of the biggest grievances I have with a fair deal of mixes is that the process stays the same throughout the entirety of a song.
When it comes to compression or eq, this is totally understandable - but if a vocal or guitar has the same delay, reverb, or saturation on it throughout the entire track I usually find myself becoming bored with the mix quickly.
Fortunately, plugin automation is an easy way to remedy this , as it allows us to quickly write or program in changes to the functions of various plugin parameters, in turn making this processing variable and unexpected.
Although you can truly automate any functions of your plugins, let’s look at a few valuable examples.
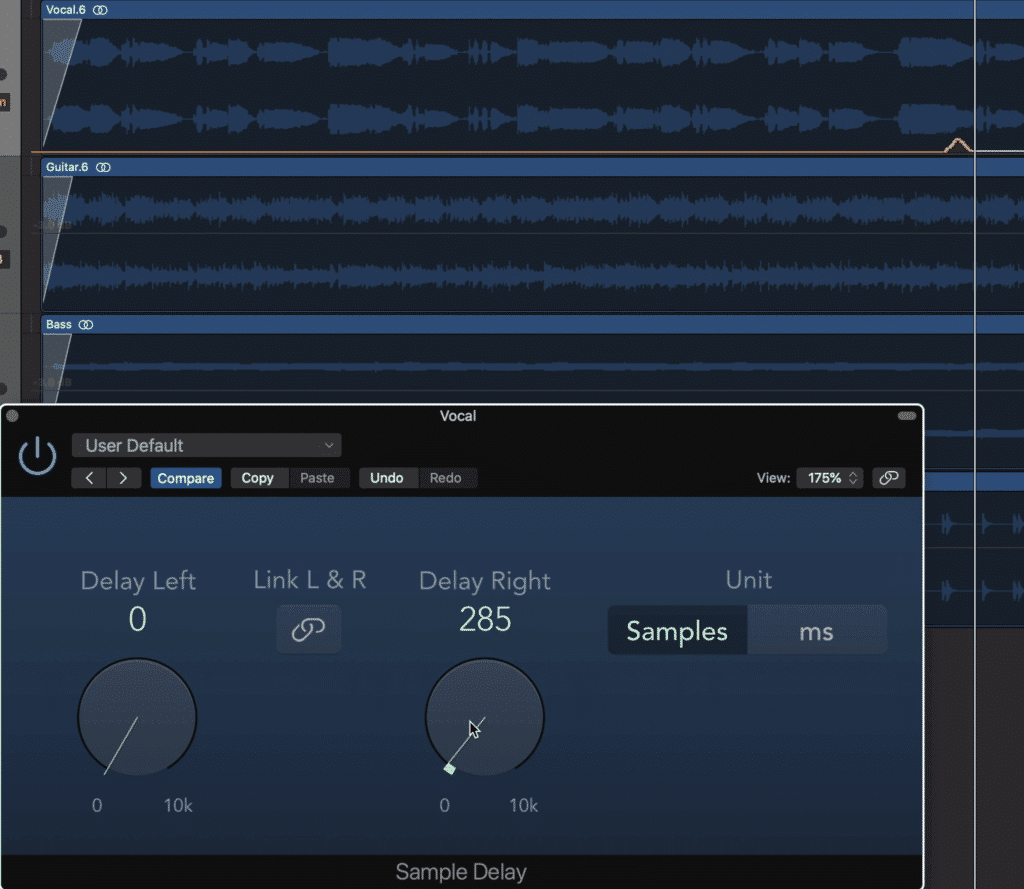
The first is increasing or decreasing the delay time on a vocal or instrument. To accomplish this you could simply follow these steps:
Step 1: Enable Automation
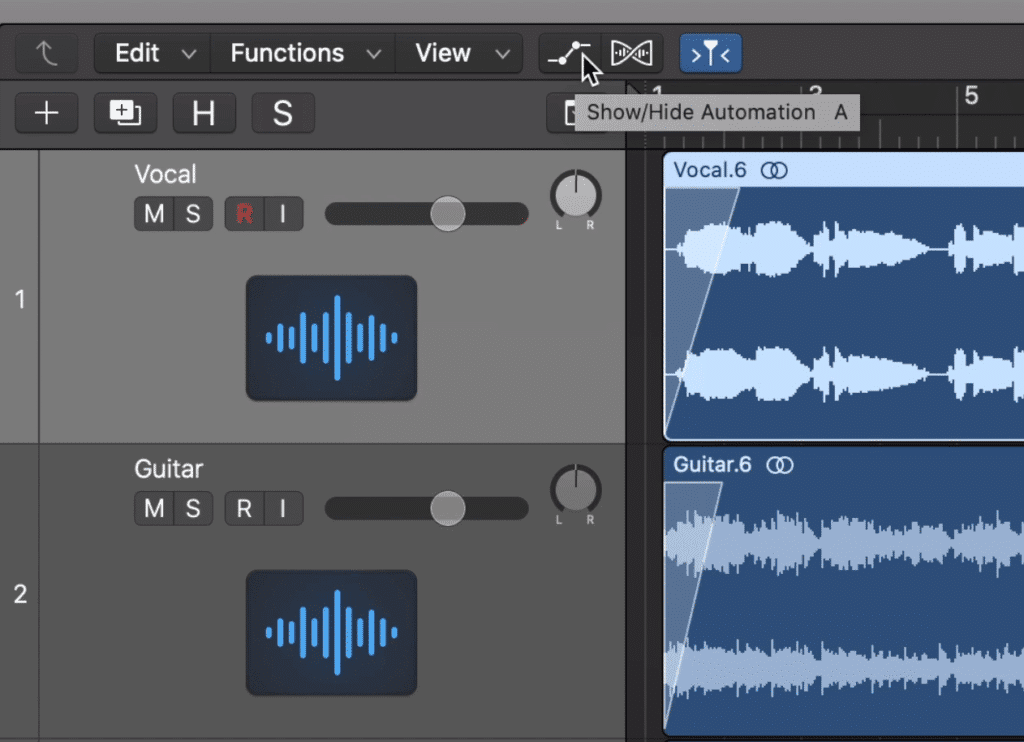
The automation tab is above your tracks
Step 2: Click on the automation type tab and find your delay plugin
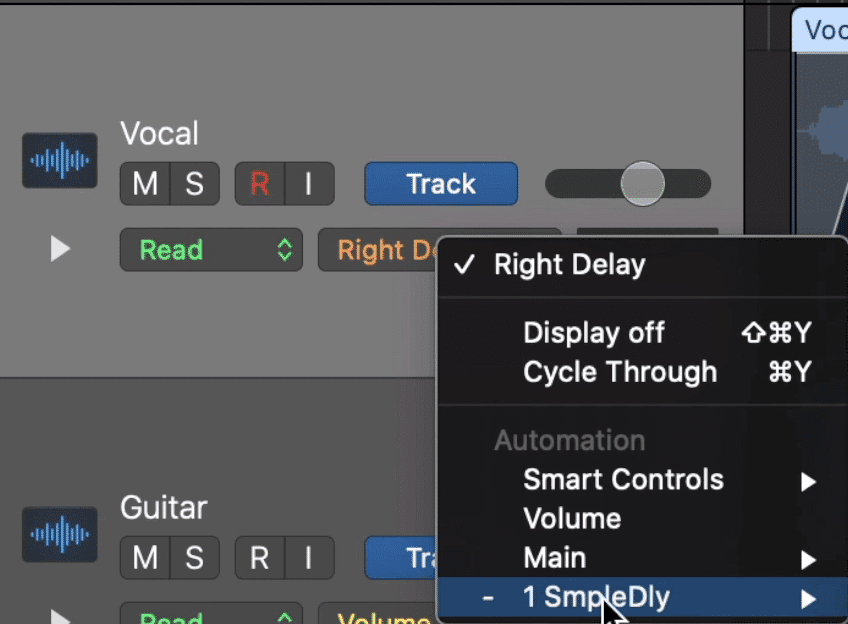
The automation type tab usually defaults to Volume
Step 3: Find the parameter you want to affect, and select it
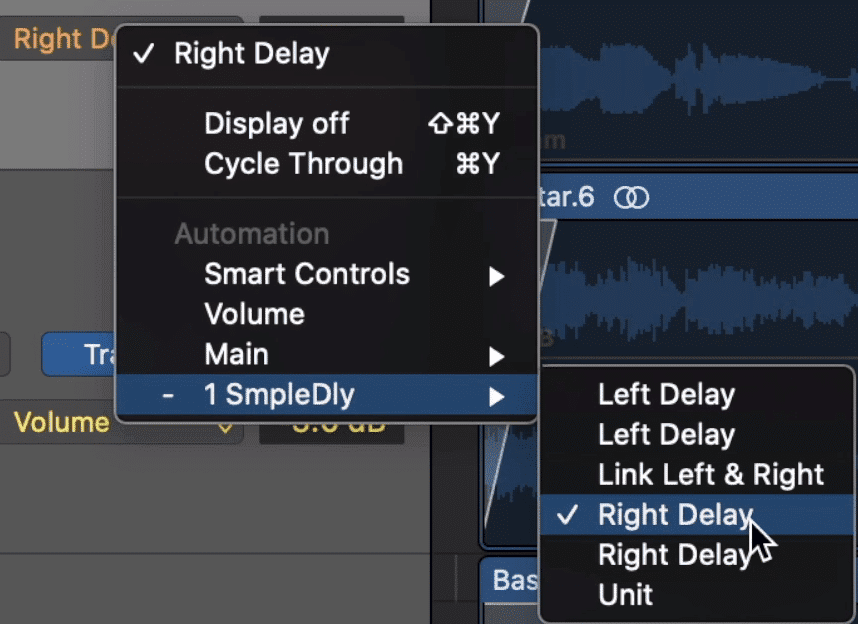
Your plugin will most likely have many parameters that you can control.
Step 4: On your track create your automation points
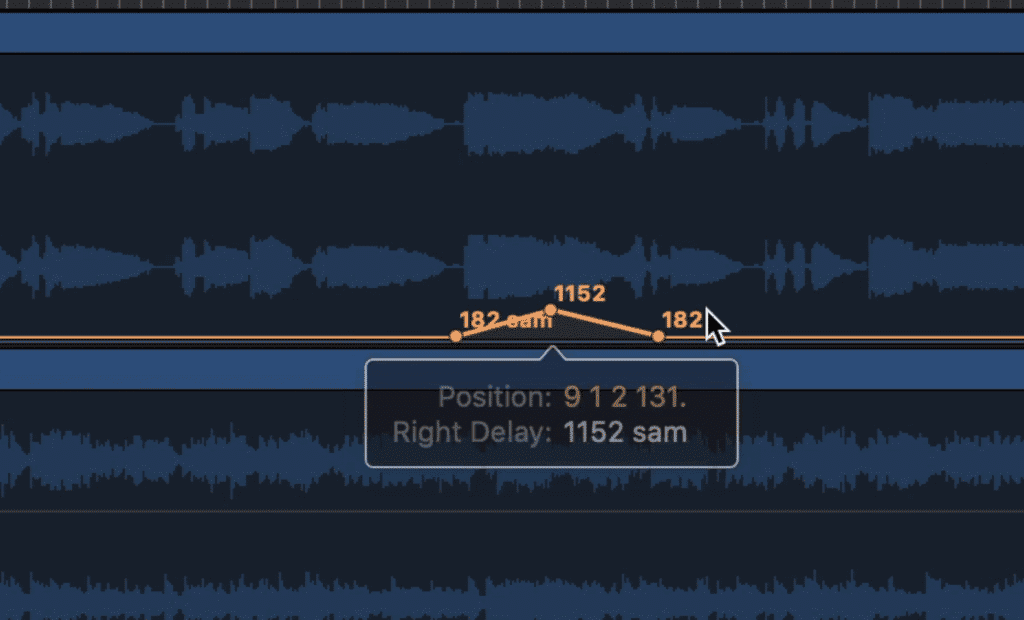
Drawing automation can give you very accurate and precise control over the plugin's parameter.
Once you’ve created your automation, listen to it to review the effect and ensure it’s what you want.
You can follow this process for compression, saturation, and so on. For example, increasing the saturation amount of a vocal in a particular section can be a great effect that creates a unique and unexpected moment for listeners.
You can also enable the latch function and then simply adjust the parameter during playback. This will write the points for you.
If manually entering in automation data isn’t your favorite thing to do, or you find it to be too time-consuming, you can also use the ‘Latch’ function to write this automation data.
Simple switch the automation type on your track from ‘Read’ to ‘Latch.’ With the track playing alter the function you want to automate - this will create automation data specific to that function.
4. Use Kick and Bass Ducking to Separate the Two
Using compression for ducking has been a popular effect for decades. Simply put, ducking allows you to trigger a compressor via another signal.
This effect is used in live or DJ settings when a speaker wants the music to dim when they are speaking. It’s also commonly heard in dance music to create a pumping effect.
For our purposes, we’re going to cover how to use ducking to create some mild separate between the kick and bass tracks. By accomplishing this effect, you can have the kick attenuate when the bass plays, and vice versa - in turn creating some sonic space for both.
Let’s look at this process step-by-step:
Step 1: Insert a compressor on your kick or bass track. This compressor will need to have side-chain functionality.

The FabFilter compressor is a good option for this technique
Step 2: Alter the side-chain setting. So if you’ve put your compressor on your kick, you should side-chain the bass, or if you put your compressor on your bass, you could side-chain the kick.

Set your side-chain input to either kick or bass, depending on how you want to use the effect.
Step 3: On the plugin that we’re using, we need to accomplish one extra step, which is to set the side-chain setting to external . Depending on the plugin you’re using, this may or may not be needed.

For this plugin, you'll need to set the side-chain to external
Step 4: Slowly change your threshold, ratio, and any other setting you want to affect.
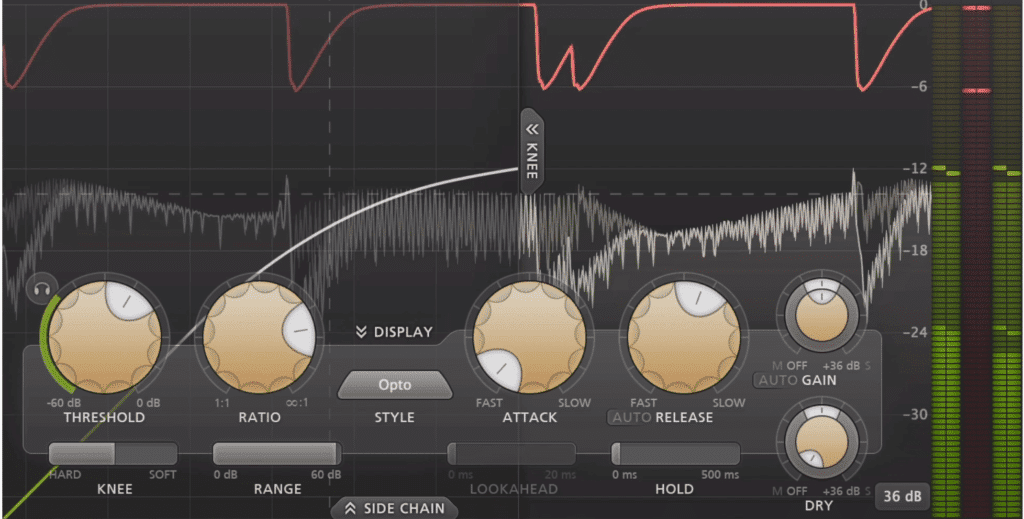
Affect you settings until you achieve the amount of compression that you want.
You’ll notice that the compressor is not triggered by the signal of the instrument on which it’s inserted, but instead by the side-chained signal.
So if you inserted the compressor on your bass track and side-chained your kick drum, then the bass signal will be attenuated whenever the kick is hit. So, the compressor will compress the bass guitar depending on when the kick’s signal is present.
When creating this effect be sure to use it sparingly. Like most things, using this effect in an extreme way will create an undesired and unnatural sound.
With that said, you can use this effect in an aggressive or excessive way for a creative effect.
If you’d like to learn some more compression techniques check out our blog post on the topic:
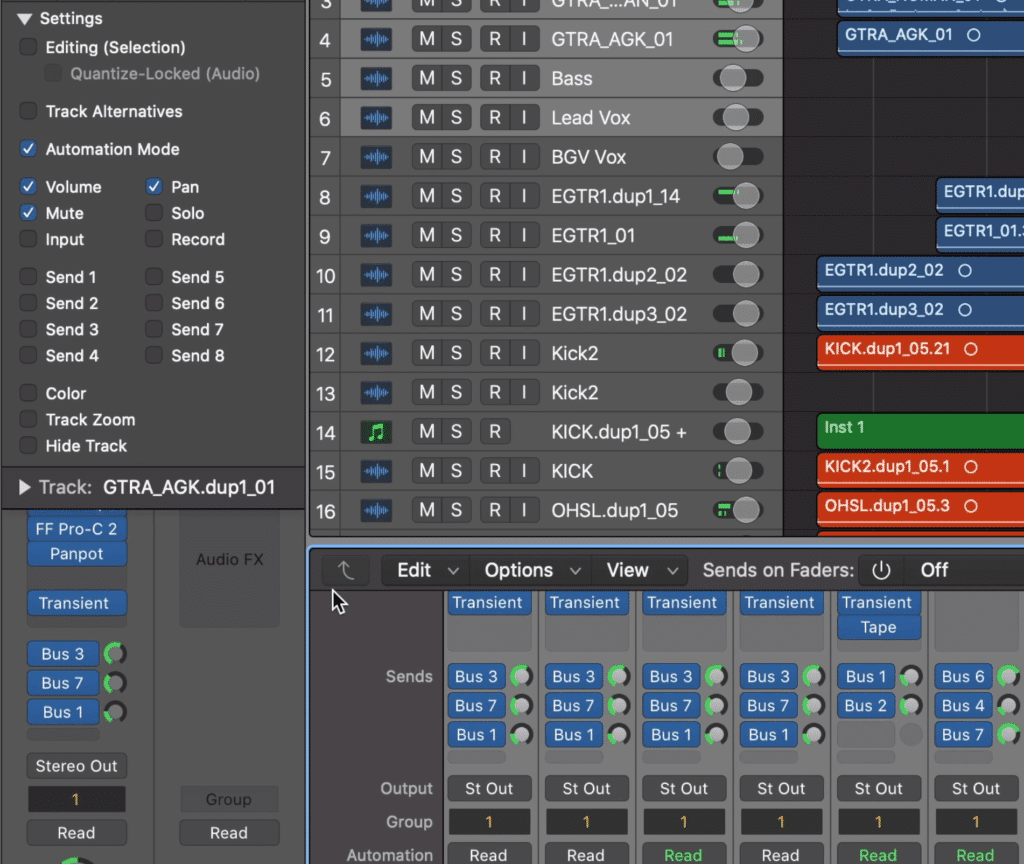
5. Use Groups or Auxiliary Sends to Organize Your Session
Using groups or sends to organize your mixes is one of the best ways to control your mix and to affect it in a professional and time-efficient manner.
Sessions can become daunting pretty quickly if not organized.
Although many engineers like to use groups, I personally enjoy creating stereo auxiliary tracks to group my instruments - but let’s cover both techniques.
If you’d like to organize your sessions with groups, it’s as easy as selecting the group tab on your channel strip, creating a group, and then adding similar instruments to that group.
From there you can choose what collective processing that group will entail - for example, you can make it so a group’s volume is collectively controlled, or it’s pan is collectively controlled, and so on.
You can control all of the parameters shown to the left, via a group.
This technique is great; however, you may notice that it slows you down if you want to affect one channel in a group individually since you’ll need to deactivate the track from the group, make that change, and then put the track back in the group.
Instead, I like to create auxiliary sends for each selection of instruments, and then solo those auxiliary sends.
Let’s look at this step-by-step:
Step 1: Highlight all of the instruments you’d like to group together and send them all to the same bus or auxiliary track. Set the send of these busses to unity . If done right, the auxiliary track will have the exact same volume and effects as all of these individuals put together.
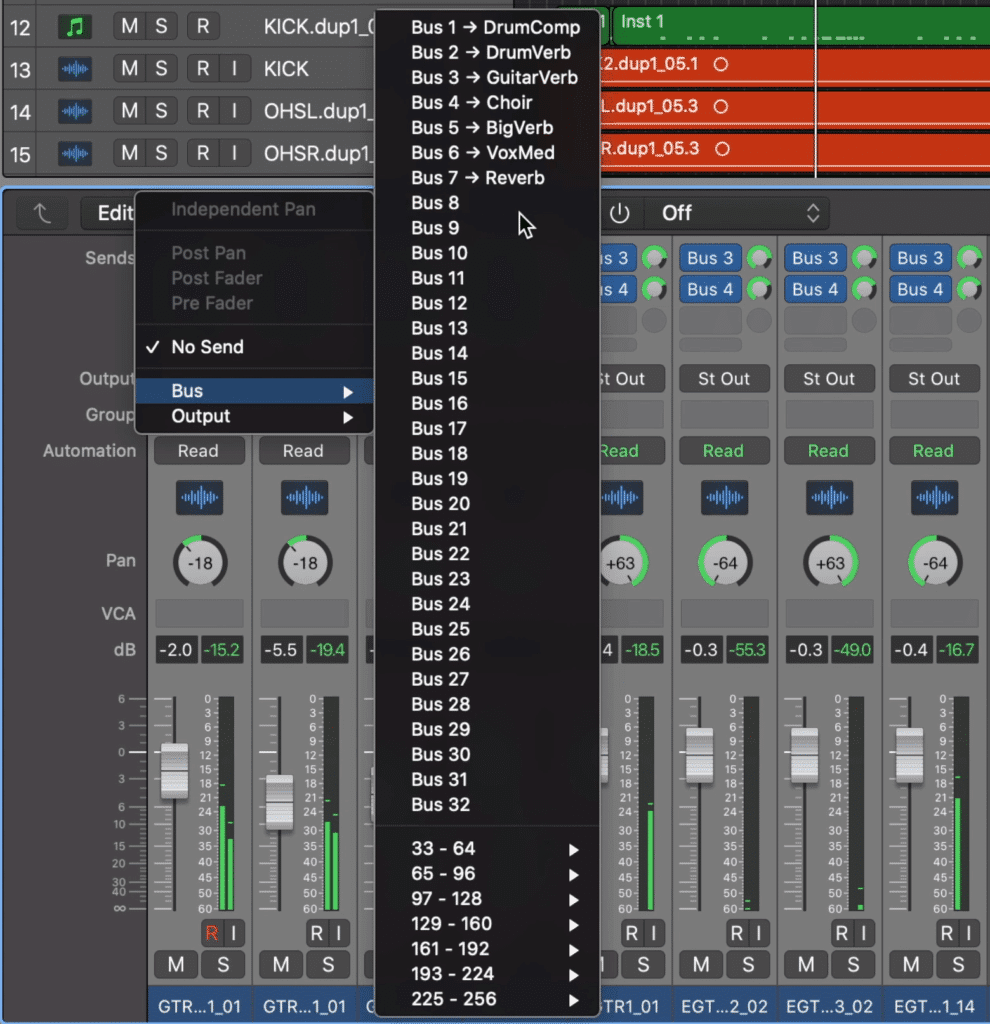
Group similar instruments together and send them to a stereo auxiliary track via a bus.
Step 2: Follow this same process for each group of instruments - for example, you could send all of your synth tracks to one send, and all of your drums tracks to one send, and so on.
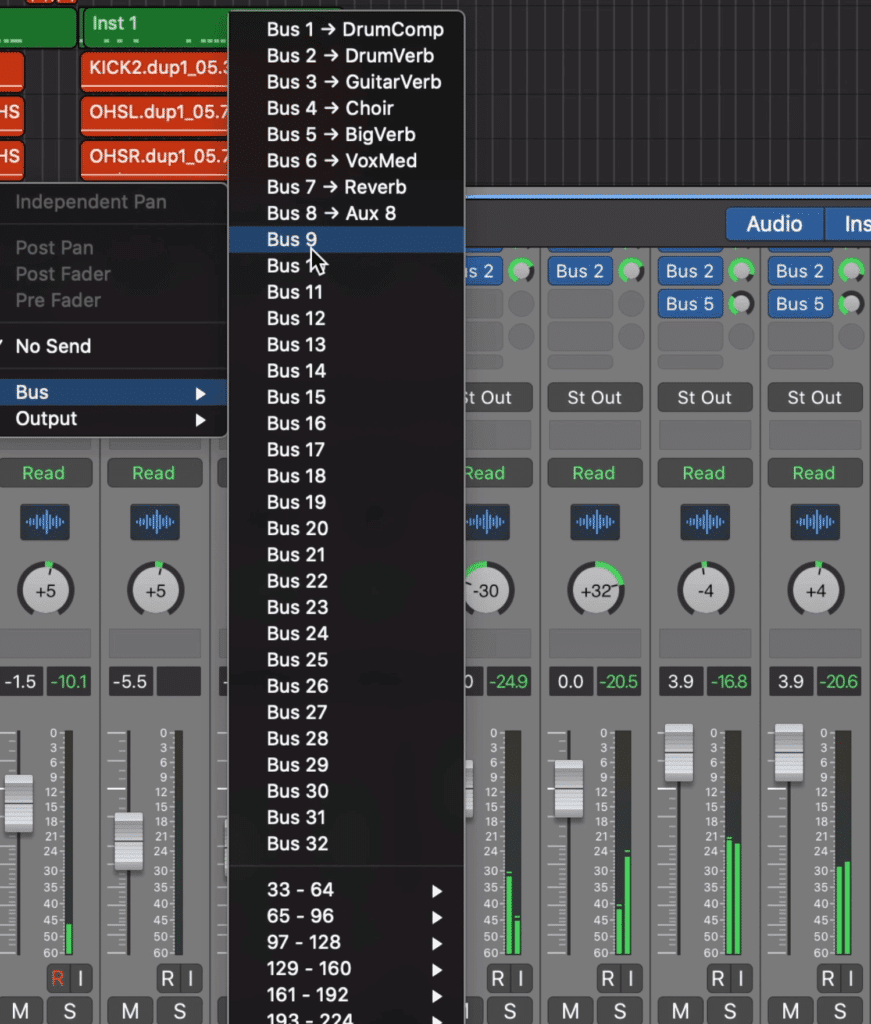
Follow this for each similar group of instruments
Step 3: Once all of your instrument groups have been sent to their respective auxiliary tracks, you can solo these auxiliary tracks and have your full mix play from these tracks.
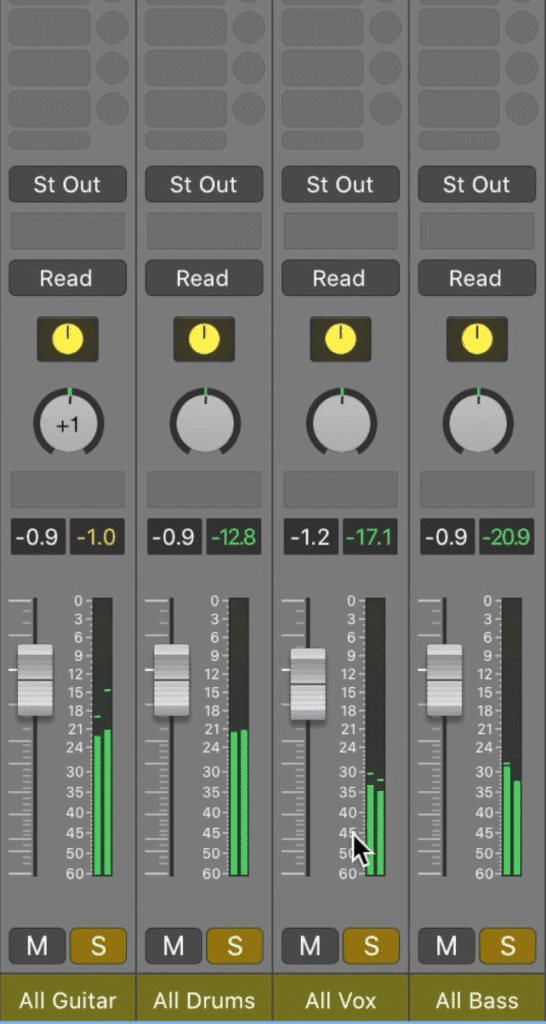
These auxiliary tracks should now contain the entirety of your mix.
Essentially what you’re doing is funneling all of your individual tracks through these auxiliary tracks, which in turn get funneled into your primary stereo output.
By soloing your auxiliary tracks you can easily control the overall volume of your group via the auxiliary track’s channel fader, or you can add processing to the entire group of instruments via these auxiliary-channel inserts, control the pan and so on.
Additionally, you can still affect the individual tracks that make up the auxiliary tracks. You can control any aspect of them and hear these changes in the relative auxiliary channel, or you can simply solo the individual channel if you’d like to hear the changes.
Perhaps the most convenient aspect of this routing is that you can create stems for your mix in an incredibly easy way. Simply solo the auxiliary track that you want to create a stem of and export it.
If you like this mixing set up and want to see why stems may be an important part of mixing, check out our blog post on stem mastering and how it’s beneficial:
It showcases some of the nuances of stem mastering and what makes the process different from typical mastering.
Additionally, if you’d like to hear you mix mastered, send it to us here:
We’ll master it for you and send you a free mix for you to review.
Conclusion
The importance of mixing fundamentals cannot be overstated, but knowing some of these more complex and unorthodox methods and techniques can definitely help make your mix stand out and above the rest.
Try recording an effect via your midi environment, using inverse eq, plugin automation, kick and bass ducking, and grouping your instruments via auxiliary sends to see if they improve your workflow or mixes.
Although each is slightly more complicated than other forms of mixing and routing, they have undeniable beneficial effects on the quality of your projects.
Do you have a mix you want mastered?
We’ll master it for you and send you a free sample of it.
Have you used any of these techniques?


