How to (Actually) Create the Prismizer Vocal Effect
Quick Answer
You can create the Prismizer vocal effect by using the Antares Harmony Engine Evo as a 'Midi-controlled Effect.' Utilizing the Sidechain, you can set the input or a recorded channel to be monitored while controlling the source harmony input via the 'Midi-Omni' setting.
How to Create the Prismizer Vocal Effect in Detail
The Prismizer vocal effect is a unique and recently, highly sought after vocal effect. How it’s created exactly has been a topic of discussion for the past 4 or so years.

Bon Iver and other similar artists use the Prismizer Vocal Effect.
If you’ve attempted to recreate this vocal effect yourself, you’ve most likely encountered various Reddit threads or YouTube videos detailing how it’s accomplished - however, you may have noticed either a lack of information or a sound that varies from what you’re trying to accomplish.

Frank Ocean is another artist that helped popularize the effect. Photo Credit: Per Ole Hagen
With that said, we’ve sought to create the most accurate explanation of how to create the Prismizer effect. By following these instructions you’ll be able to recreate the sound of Bon Iver, Frank Ocean, Francis and the Lights , and other artists that are using this effect for their vocal and instrument processing.
We’ll be covering both how to create the effect in the studio, and how it’s accomplished in a live environment. Perhaps some of you have seen Bon Iver’s live version of‘715 - Creeks’ and wondered how they pulled it off - we’ll also be going into detail as to how this was done.

The live performance of 715-Creeks left many wondering how the Prismizer effects were replicated live.
But first, it helps to understand what the Prismizer vocal effect is, and what forms of processing are used to create it. If you’d prefer to simply have the step by step instructions, see the section titled ‘How to Create the Prismizer Vocal Effect’ later along in the article.
If you have a track that you’re looking to have mastered, maybe one that’s similar to the artists mentioned above, send it to us here:
We’ll master it for you and send you a sample for you to review.
What is the Prismizer Vocal Effect?
The Prismizer vocal effect is accomplished by using the Antares Harmony Engine Evo and controlling its pitch-shifted harmonies with a Midi controller. The Prismizer Vocal Effect can be recreated in both a studio and a live setting to create impressive and artistic artificial harmonies.

The effect is created using the Harmony Engine Evo by Antares
When researching this effect, I noticed that many engineers purport that this effect can be accomplished with stock plugins, or with other harmony engines.
This effect cannot be recreated with stock plugins
Although I can’t speak for all of the plugins out there and report on what they’re capable of, the fact of the matter is that the Antares Harmony Engine Evo is the plugin used by these artists to accomplish these effects.
Unfortunately, a stock plugin cannot be used to recreate this effect , as it simply doesn’t have the needed functionality, at least not as of yet.
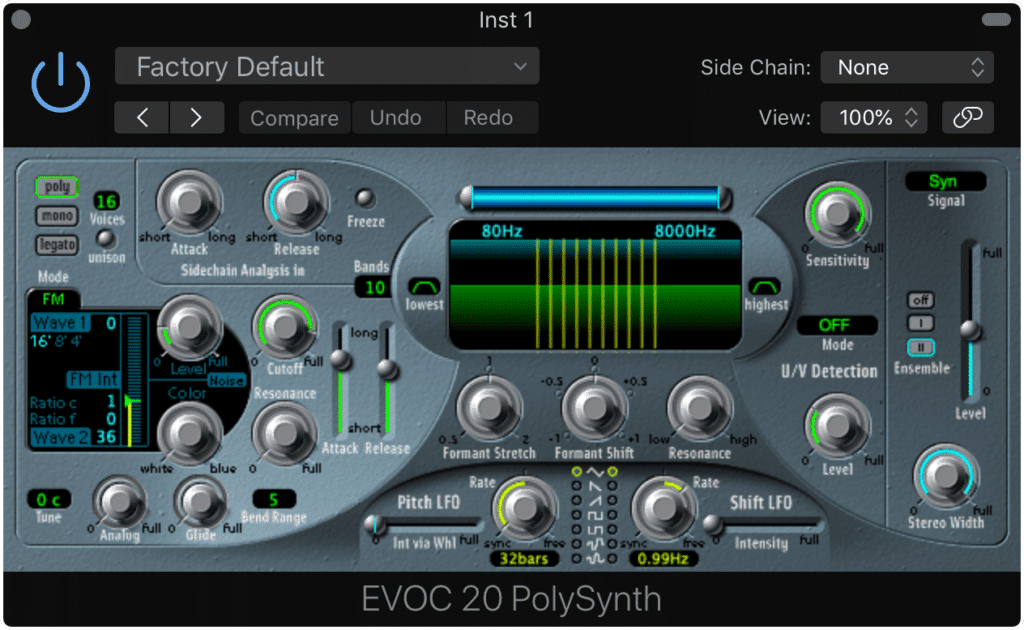
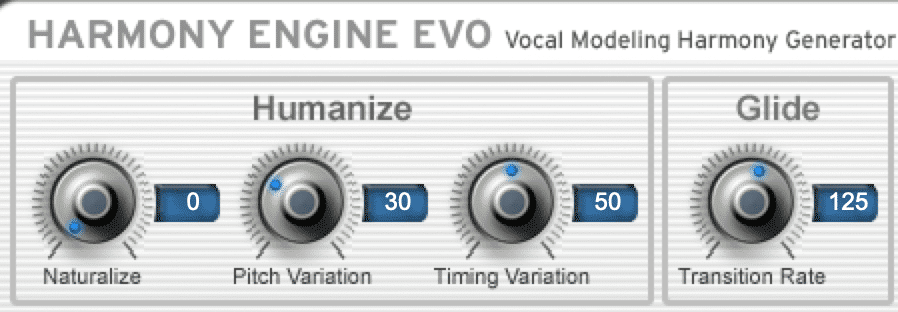
With that said, let’s take a look at the Antares Harmony Engine Evo to familiarize ourselves with some of its more important functions.
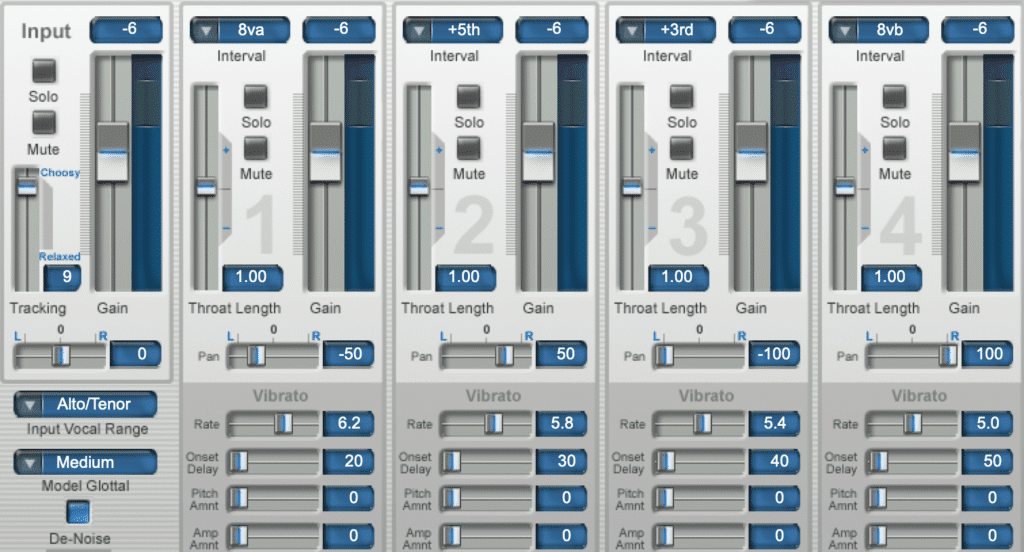
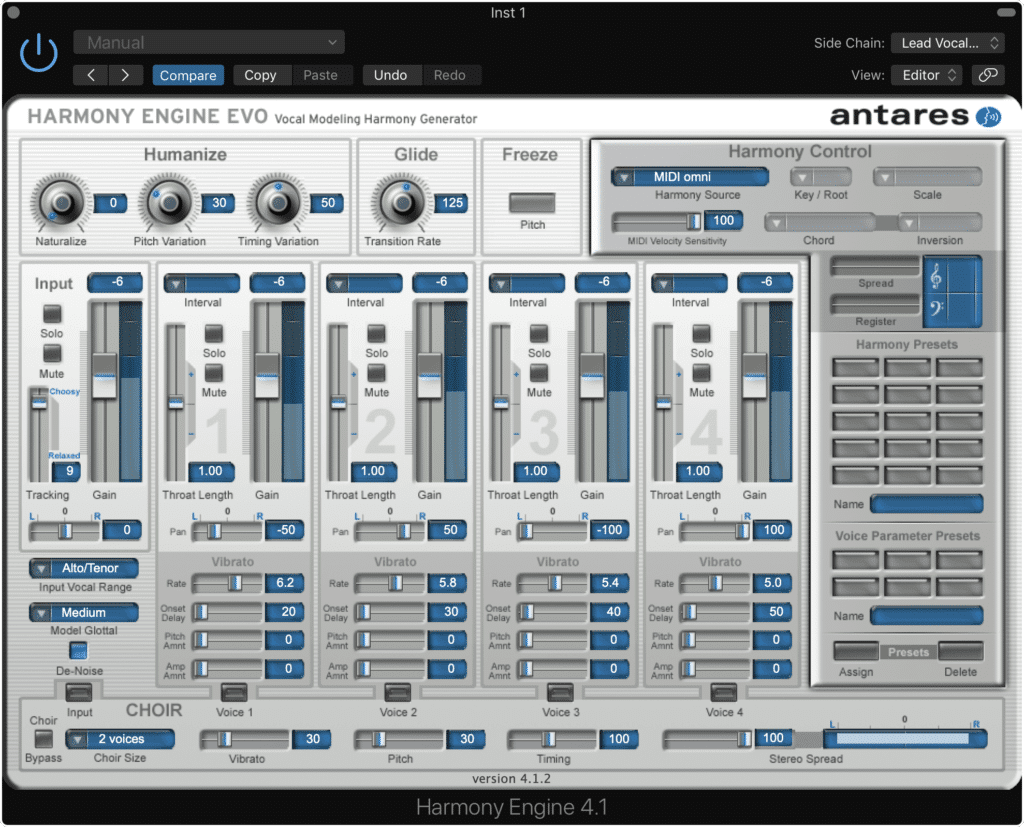
The far left channel is the input, and the subsequent 4 are generated harmonies.
When looking at the plugin, you’ll notice 5 channel strips. The one farthest to the left is your input or the original unaffected source. The subsequent 4 channel strips are all pitch-shifted harmony channels.
Their amplitude can be altered by adjusting the fader, as can their place in the stereo field, their artificial vibrato settings, and other factors.
But the important function to pay attention to is the ‘Harmony Source’ function, which will be used to enable Midi functionality and in turn allow you to control the harmonies using a midi keyboard.
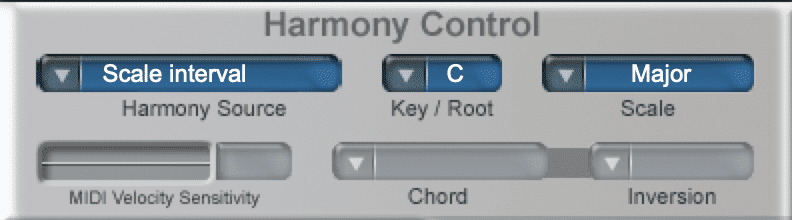
The harmony source function is used to allow for midi-control.
Now, of course, you can still create harmonies without enabling this setting. When this is the case, the harmonies generated will be based on a root note, or fixed to the incoming signal - but this is not the route to take if you want to recreate the Prismizer effect used by Bon Iver and others.
So, enough skirting around the topic - let's look into a step-by-step process for using this plugin to create the Prismizer effect.
Before we do, if you don’t have a microphone with which you can record your vocals (definitely needed to accomplish this effect) check out our blog post on affordable microphones:
It provides valuable information on some of the best, most affordable studio microphones.
How to Create the Prismizer Vocal Effect
Step 1: Create an audio track and monitor your incoming signal. Establish proper gain staging to have an adequate signal. Do not add additional processing, as this will make it more difficult for the Antares Harmony Engine Evo to recognize the pitch of your signal.
You need a clean and clear signal when performing this effect.
Step 2: When monitoring your signal, be sure to create as clean of a performance as possible. For example, if you’re singing, too many breaths or excessive sibilance will negatively affect the harmony engine’s processing.

Using a pop filter will help reduce unwanted pops and sibilance.
Step 3 : Create a new ‘Software Instrument’ track.
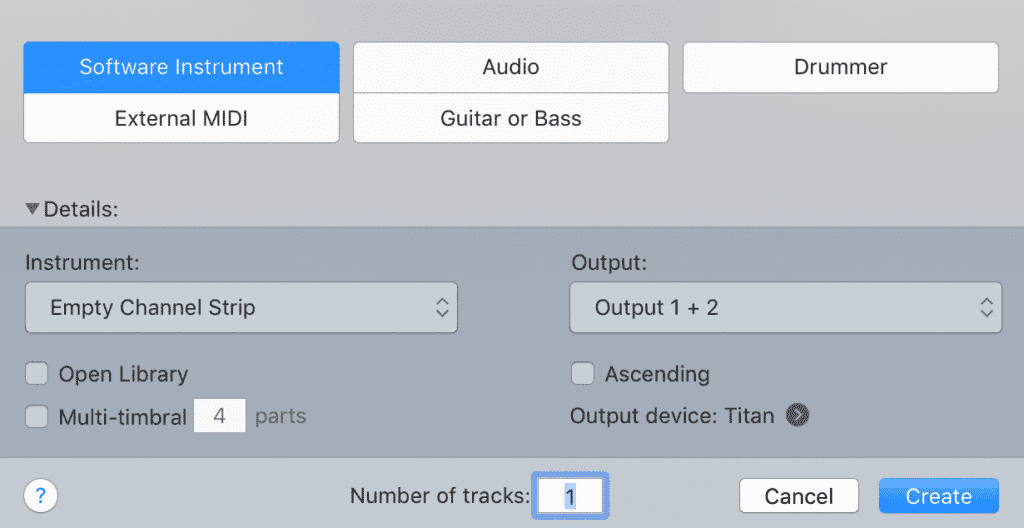
Create a new software instrument track, just as you would an audio track.
Step 4: Click the ‘Instrument’ tab in your software instrument’s channel strip and scroll down to ‘Midi Controlled-Effects.’ Find the Antares Harmony Engine Evo and select it.
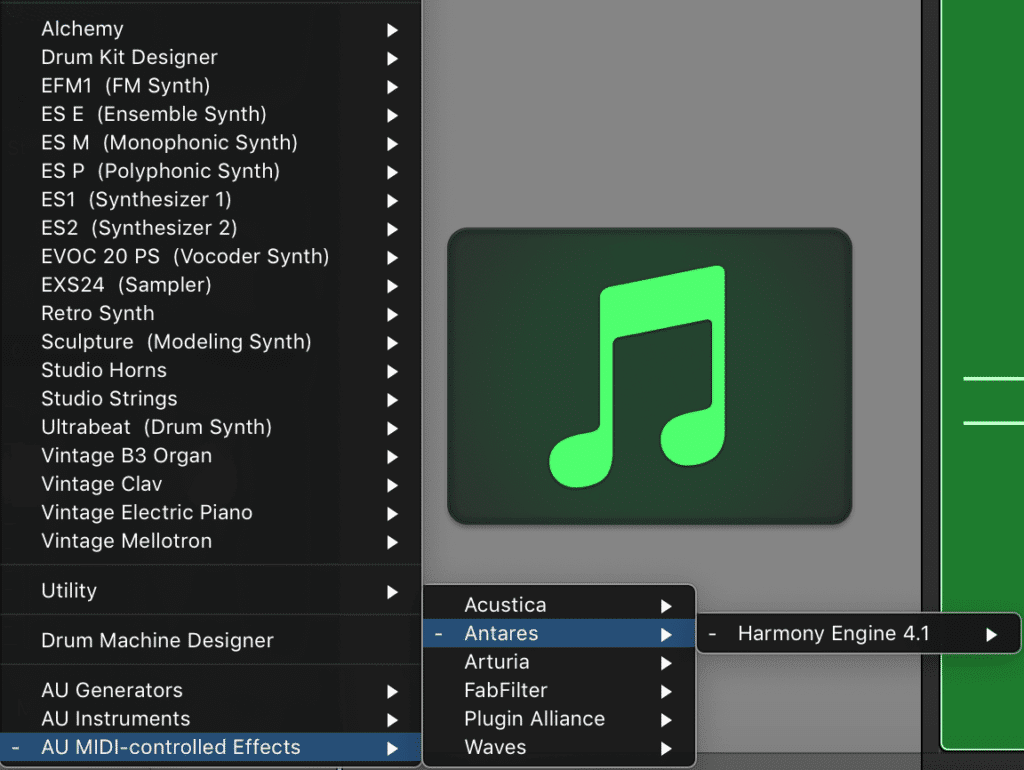
Insert the Harmony Engine Evo as a Midi-controlled effect
Step 5: In the Antares Harmony Engine Evo find the function titled ‘Harmony Source’ and change it from its default setting to ‘Midi Omni.’This will allow you to control the harmonies via a Midi-controller . Notice that the channel strips can no longer be edited or have their pitch settings changed. This is because these pitches will be determined solely by what is played on a Midi-controller.
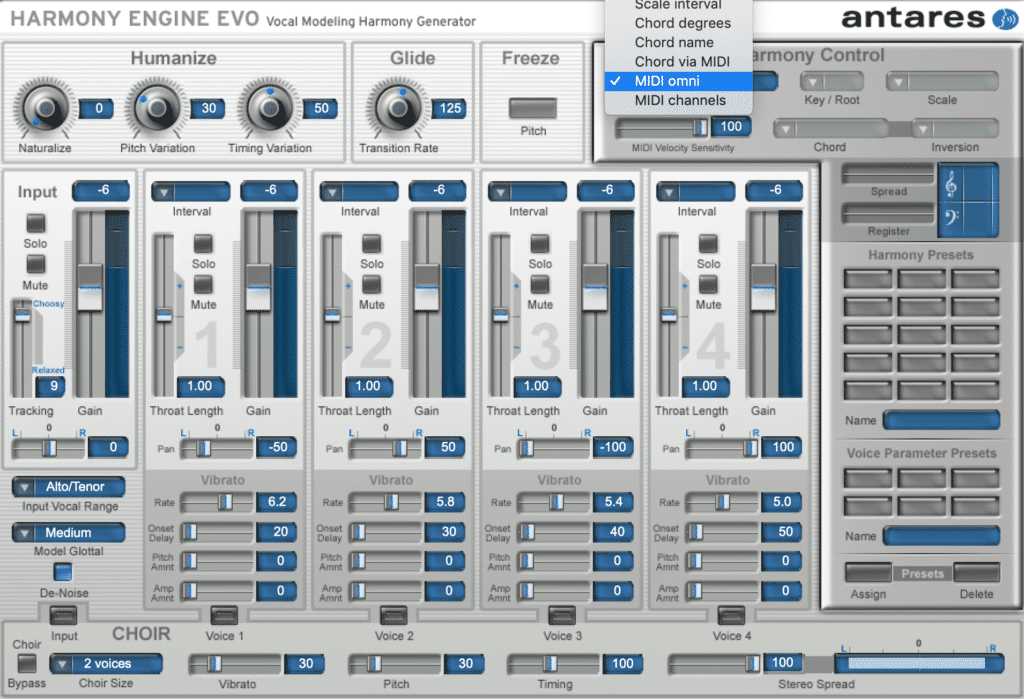
Changing the harmony source to midi-omni makes it possible to control the harmonies with a keyboard.
Step 6: Record a sample of your vocal or instrument.
This can be a test, or you can use your actual vocal.
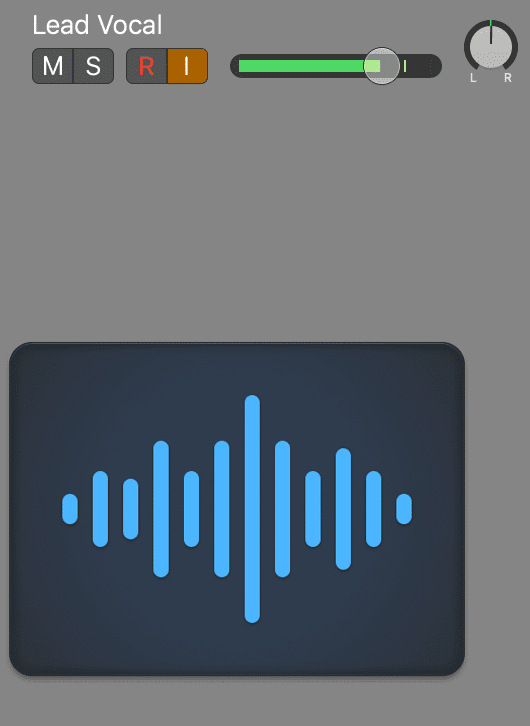
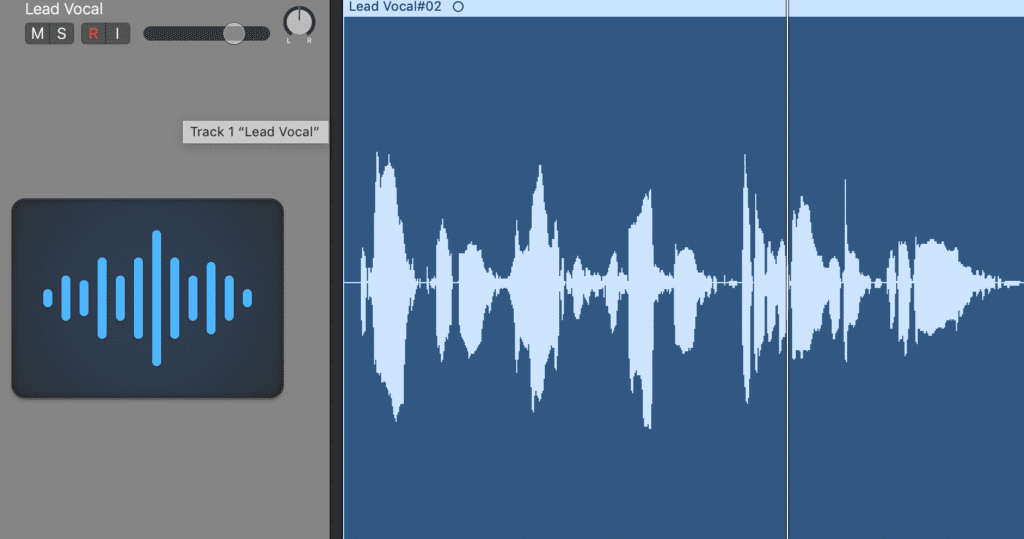
Step 7: Notice the ‘Side Chain’ setting in the topic right of the Antares Harmony Engine Evo, and set it to the track onto which you just recorded. For example, if you’ve named your channel ‘Lead Vocal’ then select ‘Lead Vocal’ in the side-chain menu.
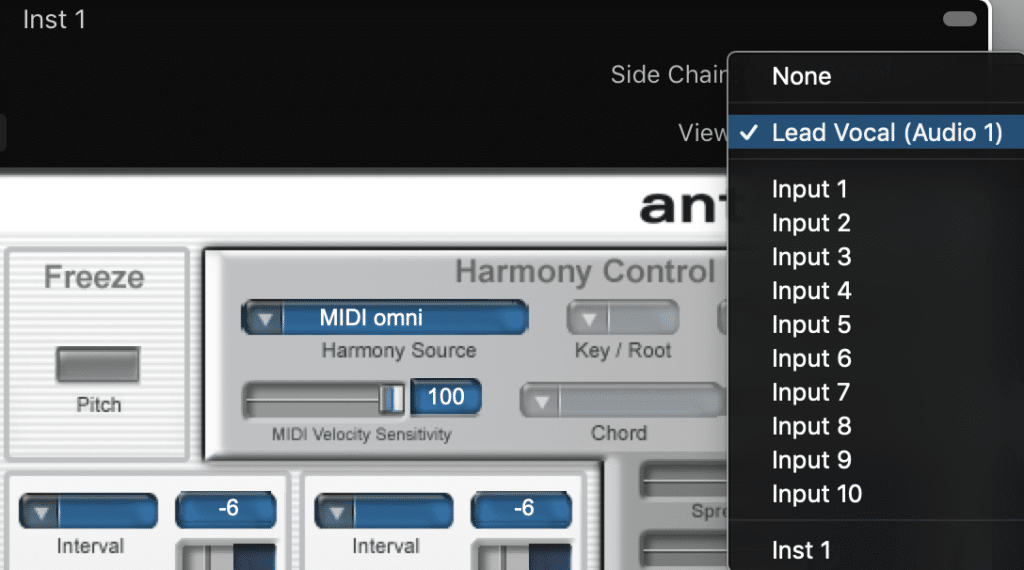
Use this test vocal or lead vocal as the side chain input
Step 8: With the lead vocal’s signal now being fed into the Antares plugin, you should be able to affect the harmonies generated by playing on your Midi controller as the recorded signal is being played. Keep in mind that the recorded signal will need to be played when performing this processing - otherwise, the Harmony engine will have no input, and there will be nothing to pitch shift.
Play the audio track and affect the harmonies with your midi controller.
Step 9: If you do not have a Midi controller, and are using a Mac computer, you can push ‘Command+K.’ This will enable a Piano Roll display that can be controlled via your computer’s keyboard . When pulled up, this Piano Roll display will act as a Midi controller, with which you can control the harmonies generated by the Antares Harmony Engine Evo.
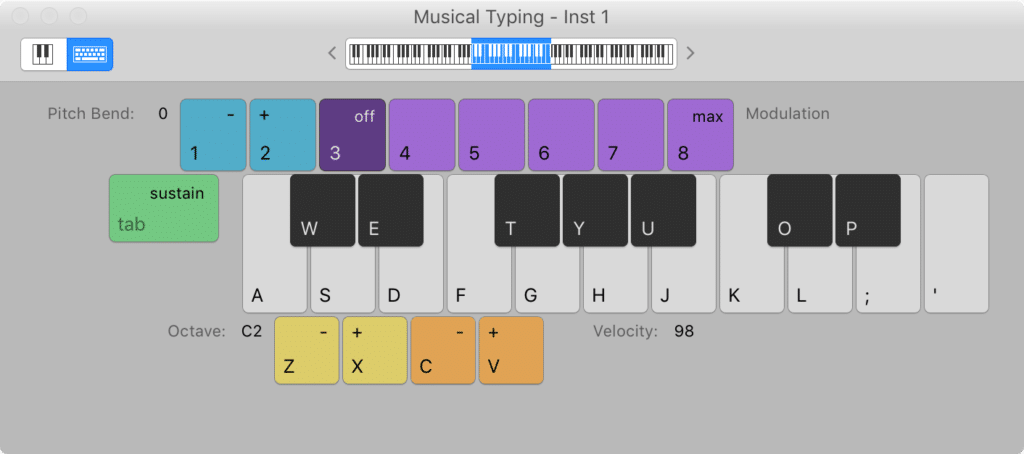
Command + K will pull up a keyboard. Use this if you don't have a midi-controller
Step 10: Once you’ve created a performance that you enjoy, you can record enable the software instrument track and record your Midi notes. When played back in conjunction with your audio track, the harmonies that you ‘wrote’ will playback.
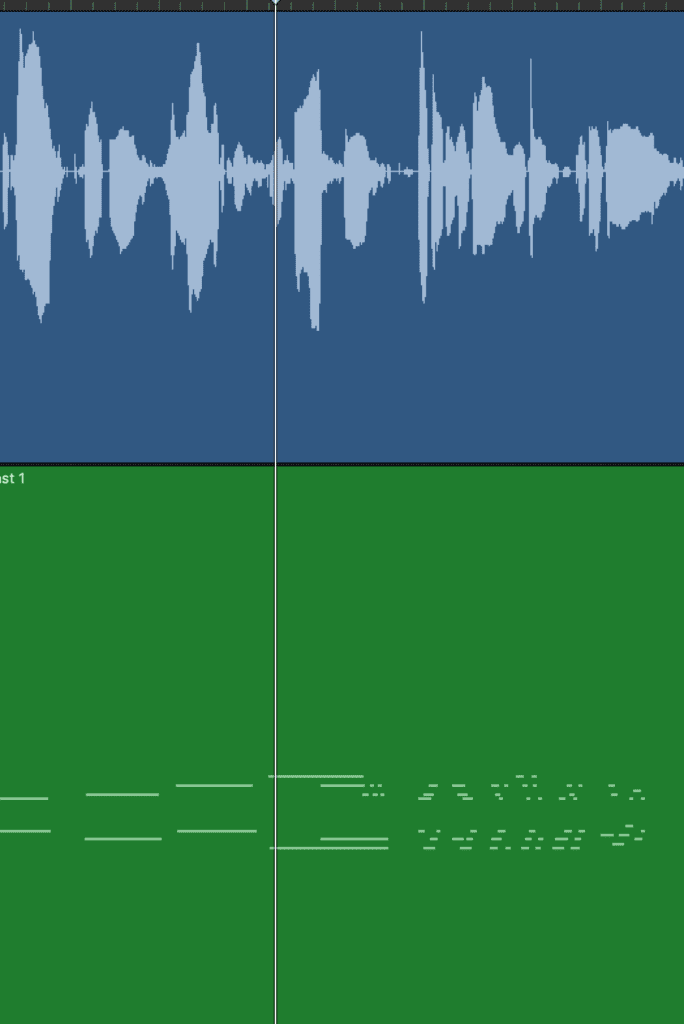
Next, record your midi notes
Step 11: Adjust the parameters and various functions in the Antares Harmony Engine Evo to affect the harmonies generated, and to balance the various harmonies.
Alter the harmony engine's settings to create an effect you like
Keep in mind that this same processing cannot be accomplished if the Antares Harmony Engine is used as a plugin. It needs to be used as a software instrument that can side-chain the audio while recognizing Midi data.
If you’re working in a DAW other than Logic Pro X, this setup will look slightly different, but the general idea will remain the same.
What Harmony Engine Settings are Used for the Prismizer Vocal Effect?
Once you’ve recorded your Midi data and generated your harmonies via your midi controller, now is a good time to adjust the Harmony Engine’s settings to more accurately emulate the stylings of Bon Iver or Frank Ocean.
The main function to pay attention to is the ‘Glide’ or the transition rate function located in the top middle of the plugin. This function adjusts how long it takes for the notes generated to change over to the newly generated notes.
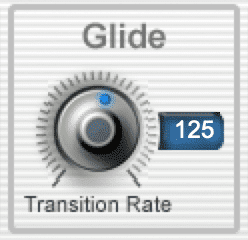
Increase the glide function to create an effect similar to the Prismizer.
Setting a longer or larger glide function setting will mean that it takes longer for the notes to change over.
This glide function should be set a little longer if you want to more closely achieve the sound of the Prismizer vocal effect. This will result in more artifacts that contribute to the occasional distortion or “freaking out” sound that the Antares Harmony Engine can create.
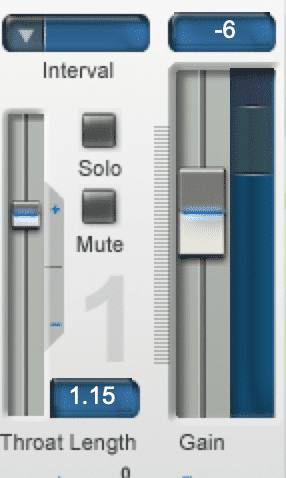
Adjust the throat length to alter the harmony's sound.
Another function to pay attention to is the ‘Throat Length’ slider to the left of each amplitude fader. A shorter throat length (pulling the slider downward) sounds more artificial or cartoonish.
Shorten this function for higher pitch settings to create a unique artificial sound associated with the Prismizer effect . The opposite can be said for pitched down harmonies - a longer throat length (pushing the slider upward) should be used.
So to recap:
- Use a longer transition or glide setting
- Use a shorter throat length for higher pitch harmonies
- Use a longer throat length for lower-pitch harmonies
With these settings in mind, adjust the other settings including amplitude and vibrato to personal taste. Although the Prismizer effect may not use these effects excessively, experiment with settings to make the effect your own.
If you want to know more vocal effects, perhaps some more practical or rudimentary ones, check out our blog post on the topic:
It showcases a simple method for establishing an upfront vocal sound.
How to Create the Prismizer Vocal Effect in a Live Setting
Recreating the Prismizer vocal effect in a live setting is incredibly similar to creating it in the studio, only with a couple of changes.
The effect will still need to be accomplished in a DAW or software host , from which the output will be used. This means you’ll need an audio interface - one that is capable of microphone amplification, A to D conversion, and D to A conversion.
This functionality is present in just about every recording interface so you should be able to accomplish this with the equipment you currently own.
Steps 1 - 5 listed above in the section titled ‘How to Create the Prismizer Vocal Effect’ will still be followed in their exact order.
Step 6: Instead of recording a sample of your input, simply enable this input’s monitoring. With this accomplished, you’ll be able to hear your input via your stereo output. You most likely already accomplished this step when setting your gain.

Again, monitor your input, but there's no need to record this time.
Step 7: Take notice of the ‘Side Chain’ setting in the top right of the Harmony Engine and set the side-chain to the input you want to effect. So for example, if you’re monitoring your vocal from input 1, select ‘input 1’ in the side-chain menu.

Choose your input as the Side Chain input for the harmony engine. Do not select your track as you did before, select your input.
Step 8: You should now be able to control the harmonies generated by the Antares Harmony Engine Evo via a Midi-controller, in a live manner - meaning the input of the vocal will be able to be affected in real-time.
You can now control the harmonies of the input with a midi-controller
Step 9:If you notice a significant delay between the input of your signal and the effects processing created by the Harmony Engine, check the size of your buffer and decrease it if its longer than 128 samples. A higher buffer setting will reduce CPU but will increase latency - which is not ideal.
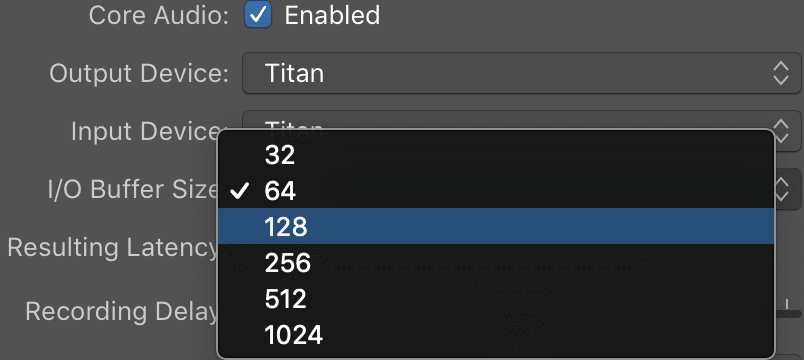
A lower I/O buffer size is helpful when performing this live.
Step 10: If your computer is struggling to recreate this effect in realtime, then change the number of your ‘processing threads’ to the highest number possible. For example, if it is set to ‘automatic’ change this to the highest number available.

To increase computer performance, increase the Processing Threads to the highest number.
Step 11: Use the output of the audio interface you’re using for your A to D conversion and send that to the PA system or speaker system you’re using for your live performance.

Send the output of your signal to the PA
Step 12: If you desire additional processing, such as reverb or delay, be sure to insert these effects on your output, not on your vocal or instrument channel. Ideally, this can be done via the soundboard used for the PA , and not on the computer you’re using for the harmony generation.

Addition processing is ideally handled by the sound board.
Note that this may not be the exact method used by Bon Iver in his live performances, but it certainly results in the same signal processing and final sound.
In addition to this setup, it may be possible that Bon Iver is using the Auto-tune Live plugin on his vocals - the reason I suspect this might be the case is when he briefly sings 3 tuned notes without pressing any keys.
As we’ve discussed, the Harmony Engine Evo set to Midi-Omni mode only works when the midi-controller is dictating the notes . So if no notes are being played, no harmonies are generated.
For this reason, it’s possible that Bon Iver uses a tuner in addition to the harmony engine, as it wouldn’t be possible to have these tuned notes without midi-input.
If you have a live performance that you’ve recorded, and you’d like to hear it mastered, send it to us here:
We’ll master it for you and send you a sample for you to review, completely free of charge.
How to Make the Prismizer Vocal Effect Sound Even Better
Midi Fx can be used to make the Prismizer Vocal Effect or any software instrument sound better and more natural. Various Midi Effects work in a similar fashion as plugins except they process and alter how the incoming Midi data is received by the software instrument.
Some of the useful effects that can be introduced, at least in Logic Pro X, are the ‘Randomizer’ and the ‘Chord Trigger.’ Let’s look at these effects individually to better understand them and how they relate to the Prismizer vocal effect.
The Randomizer
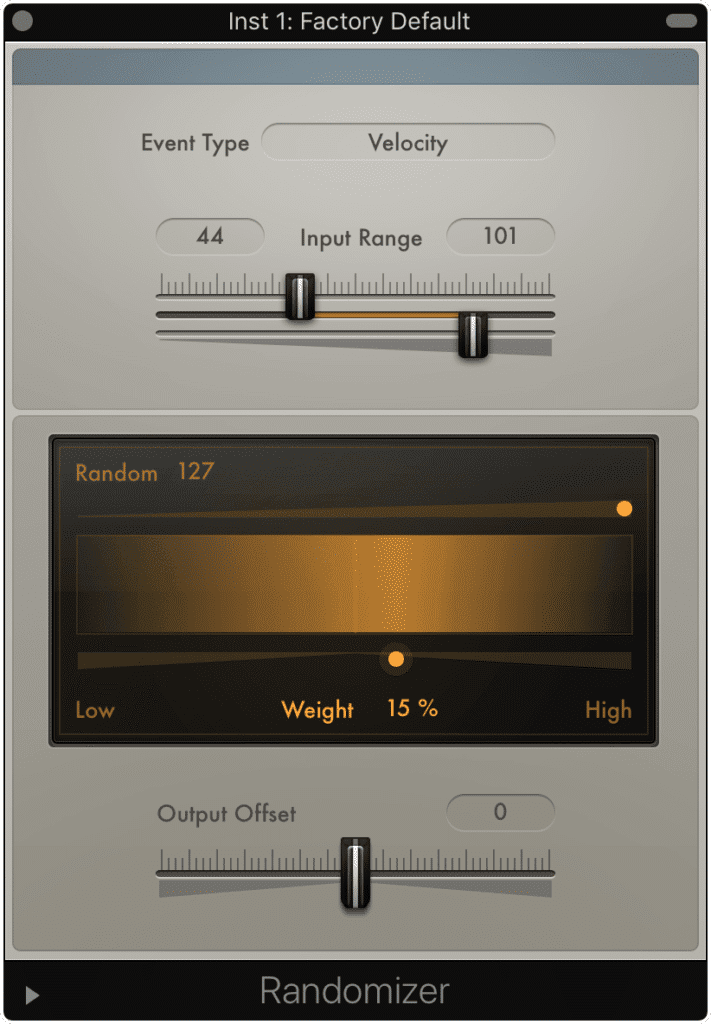
This Midi Fx randomizes your midi note's velocity.
As the name suggests, the Randomizer makes the incoming Midi data have a random velocity. The Velocity ranges from 1 - 127 , and represents how hard or intensely a note is hit - which the software instrument uses to determine the sample it should play.
A higher velocity results in a louder sound, whereas a lower velocity results in a quieter sound.
So for example, if the velocity of a note is 120 and the software instrument used is a drum machine, then it will play a sample of a snare being hit with a fair amount of force . If the velocity of a note is 20, then the software instrument will play a sample of a snare being struck gently.
When using the Randomizer in conjunction with the Prismizer vocal effect, narrow the range of the velocities (as a velocity of 0 may not be desired) and choose the weighting that you feel is appropriate for your performance.
The Chord Trigger
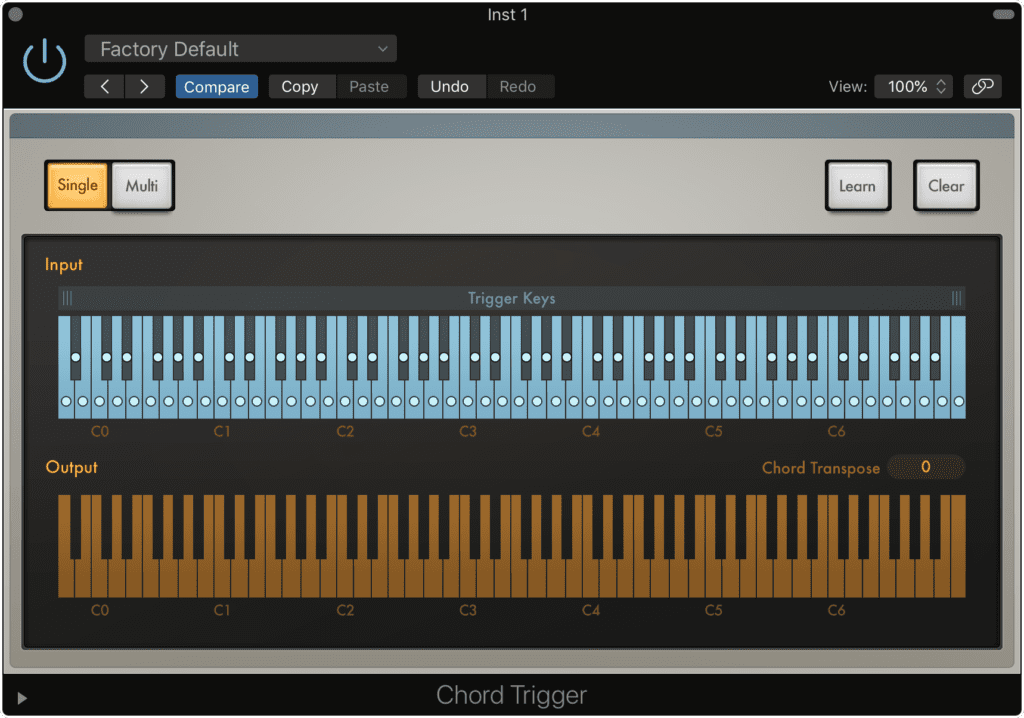
Chord Trigger allows you to play full chords with just one key.
This Midi Fx is useful if you have a smaller keyboard that doesn’t offer a full range, or if you’re like me and can’t play to the keyboard too terribly well.
Simply put, the chord trigger uses one note to create a full chord. Using the presets , you can pick which types of chords are generated when you click on just one key of your Midi-controller.
This effect is very helpful if you’re using the Prismizer effect in a live setting, and you don’t want to have to play full chords, or you’d prefer to keep things a bit simpler or foolproof.
If you find midi-controllers interesting, and think the idea of computer data affecting analog signals is fascinating, take a look at our blog post that covers a similar topic:
In it, you’ll find info on some of the latest analog processors that can be controlled digitally.
Conclusion
The Prismizer vocal effect is definitely a creative and unique way to affect your vocals and other instruments. Although how to create the effect may have seemed convoluted or incapable of decoding, the actual set up is relatively simple.
If you have a Midi-controller, an audio interface, a microphone and the Antares Harmony Engine Evo plugin (used as a software instrument) you can easily recreate this effect. It boils down to using your input or your vocal recording as a sidechain and then enabling midi control on the Harmony engine.
When performing this effect, be sure to limit all additional processing to after the Harmony Engine affects your signal.
If you end up using this method, share your results and let us know how it worked for you!
If you end up making a track using this effect, and you need it mastered, send it to us here:
We’ll master it for you and send you a free mastered sample for you to review.
Have you tried the Prismizer vocal effect on your music?


