Free vs. Cheap vs. Expensive Tape Machine Plugins
Tape machine emulations have become an important cornerstone of digital processing. They provide some of the character and distortion that’s so desperately missed in a DAW.
After-all, a DAW is really a modern multi-track tape machine (with a lot more functionality of course).
If you’re looking to add some harmonic distortion, subtle stereo imaging, and noise to your recordings or masters, it definitely helps to have a great tape machine emulation plugin.
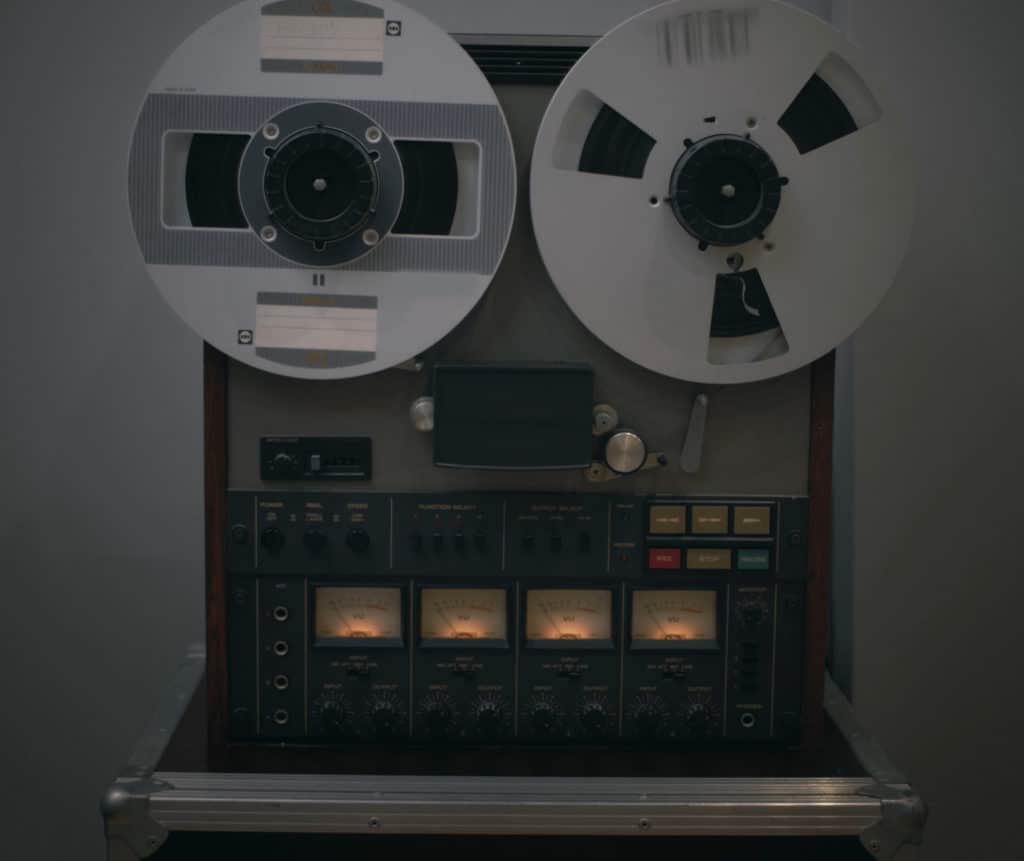
Tape machine plugins add some of the distortion missing from digital processing.
With that in mind, we sought to compare some of the best options we found. We’ve broken these 3 plugins up into 3 categories: Free, Cheap, and Expensive.
We’ll compare these plugins with one another as we try to uncover which one is the best. Granted, some of this decision will be subjective; however, we’ll give you enough information to make an informed decision for yourself.
The 3 plugins we’ll compare are:
- Free: ReelBus v4 by Toneboosters
- Cheap: Kramer Tape by Waves Audio ($49.99)
- Expensive: Tape by Softube ($99.99)
At the time of writing this, it looks like Tape by Softube is on sale for $39.99 at PluginBoutique.com - I’ll leave a link in the description box of the video.
We’ll look at their functionality and design, as well as discuss the use of certain functions. We’ll also take a listen to each plugin on a stereo mix (in the video embedded above) so be sure to check that out if you’d like to hear the plugins.
Lastly, we’ll choose 1 plugin we think is the best of the 3, and is worth your time and money.
If you have a tape plugin that we didn’t mention here that you think is great - let us know in the comment section of the video - we’d love to learn more about the plugin’s you’re using.
Also, if you’re an artist or engineer, and you have a mix that you’d like to hear mastered - send it to us here:
We’ll master it for you and send you a free mastered sample for you to review.
Before we start looking at the plugins, it might help to briefly discuss what Tape Saturation and Emulation is, and what makes it unique from other forms of distortion or emulation.
What is Tape Machine Distortion and Emulation?
Tape Machine Distortion is the saturation of the electrical and magnetic components of a tape machine - this includes transistors, transformers, potentially tubes, and the magnetic tape itself. Tape machine emulation is the recreation of these multiple distortions through digital processing and is often a complex, multi-stage affair.
The different electrical and magnetic components will cause unique forms of harmonic distortion. Furthermore, soft-knee compression will occur once saturation begins, causing a gradually lessened dynamic range.
Tape saturation consists of harmonic distortion and soft-knee compression.
The stereo image of a signal can be affected by tape machines through a process known as “crosstalk” in which part of the left signal shows up on the right and vice verse.
This will result is both constructive and destructive phase interference, which will either widen or narrow the stereo image depending on what’s in the channels.
Hysteresis is another word for the memory of tape, or its inclination to retain information of previous recordings.
Wow, and Flutter are variations of amplitude and frequency that can be used to achieve a lo-fi sound.
Keep these elements of tape machine distortion and emulation in mind as we discuss these different plugins, as the concepts will pop up from time to time.
Free Tape Machine Plugin: ReelBus v4 by Toneboosters
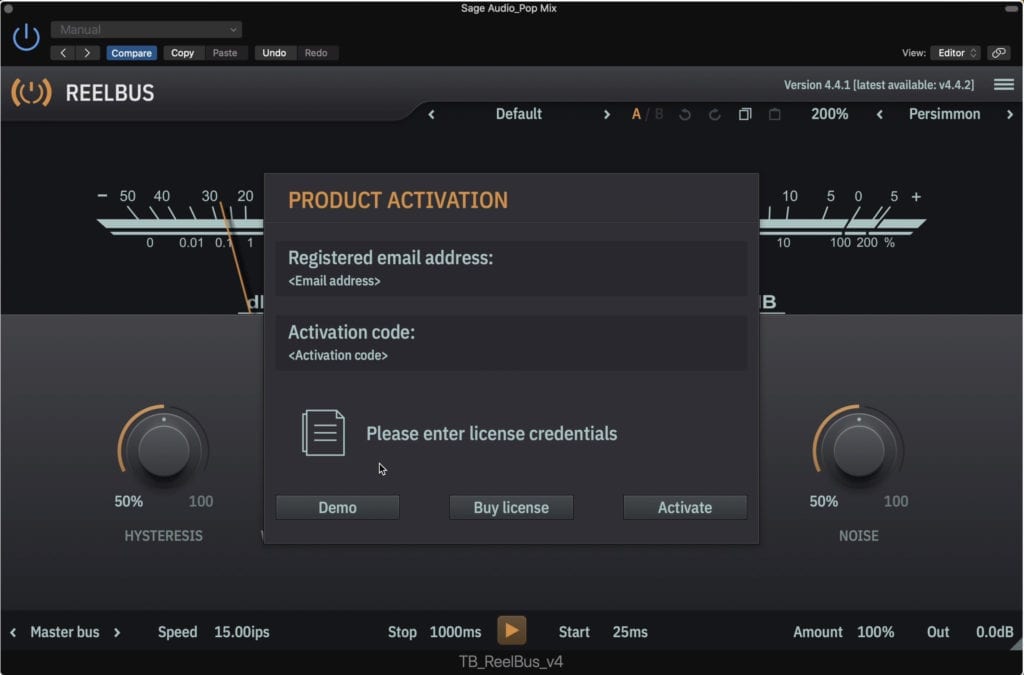
ReelBus is a demo, but can still be fully utilized.
Something that’s worth mentioning before we delve into this great plugin, is that the free version is just a demo; however, it offers the full functionality of the paid version, and never expires.
The main difference is that it won’t always save the plugin’s settings when you close your DAW; however, this can be remedied by saving the channel strip setting.
That said, if you do love this plugin it would be best to purchase it, but for all intents and purposes, you can use the free demo to accomplish everything you would with the paid version.
There’s a lot to cover with this plugin so let’s get started.
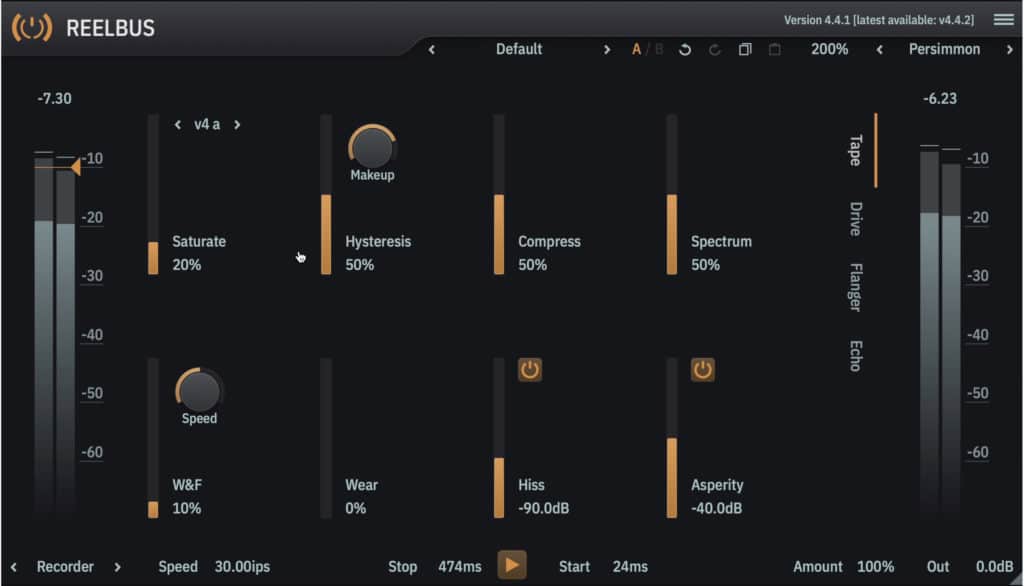
When you open the plugin you’ll be greeted with the Master Bus interface which includes a dual dB and VU meter, as well as 5 functions.
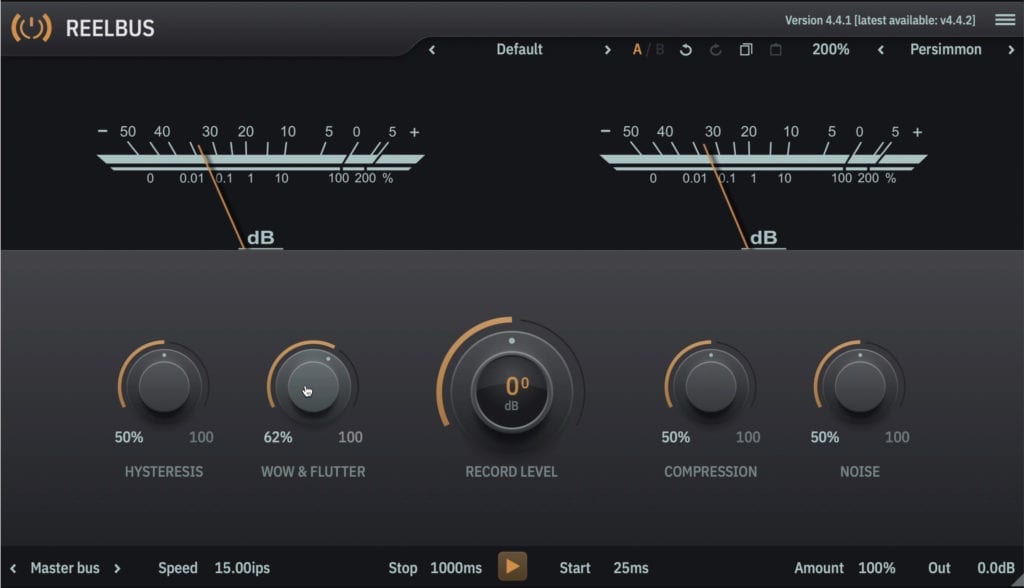
The main window is a 2-track master bus section.
These are:
- Hysteresis
- Wow and Flutter
- The Record Level
- Compression and Saturation
- The Noise Level
If you’re using this plugin for mastering, it’s best to use lower Hysteresis, Wow and Flutter, and Noise Settings. How you’d set your record and compression levels would depend on the mix and what you’re trying to accomplish.
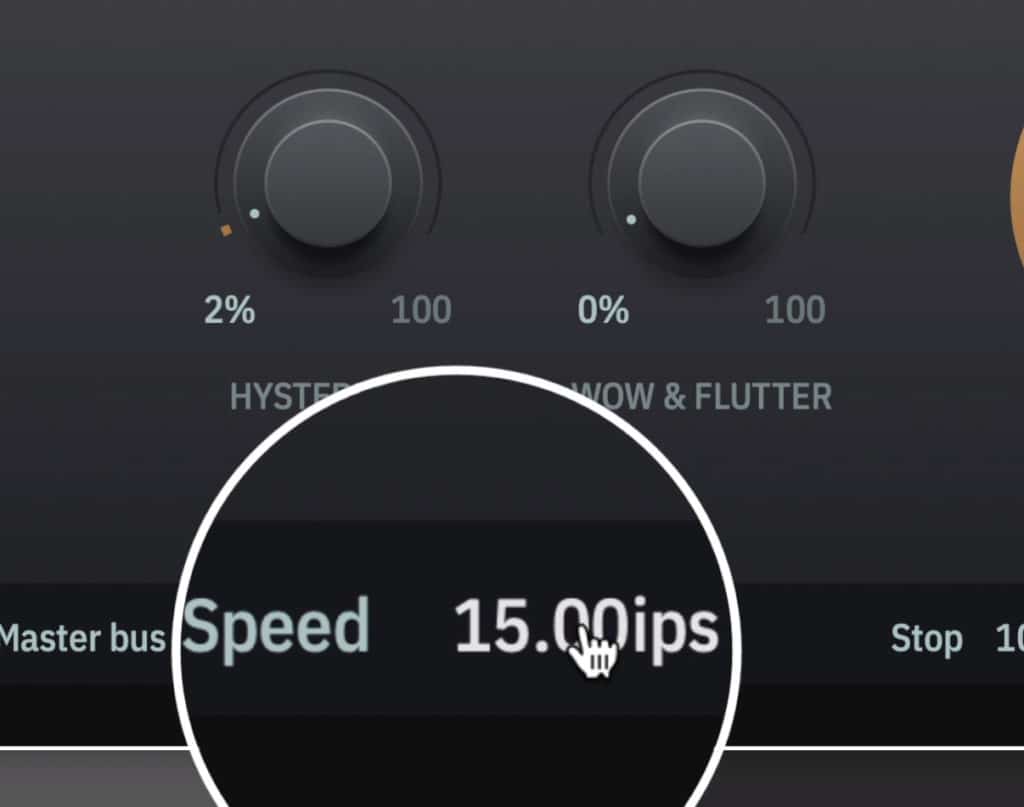
The tape speed can vary from 3.75ips to 30ips.
In the bottom bar, you can affect your tape speed - a function that will greatly affect the tone and timbre of your signal. Lower tape speed is going to result in an attenuated high-frequency range, and a smoother more full low range; this makes it great for a lo-fi or classic sound.
Higher tape speed is going to sound cleaner and clearer , with the full frequency spectrum present, but maybe a slight attenuation in the low frequencies.
To the right, you can change the start and stop time of the tape to create a slowdown and speed up effect when you click the play button. Farther to the right is the wet/dry mix and output level.
By selecting another tab, you access more sections of the plugin.
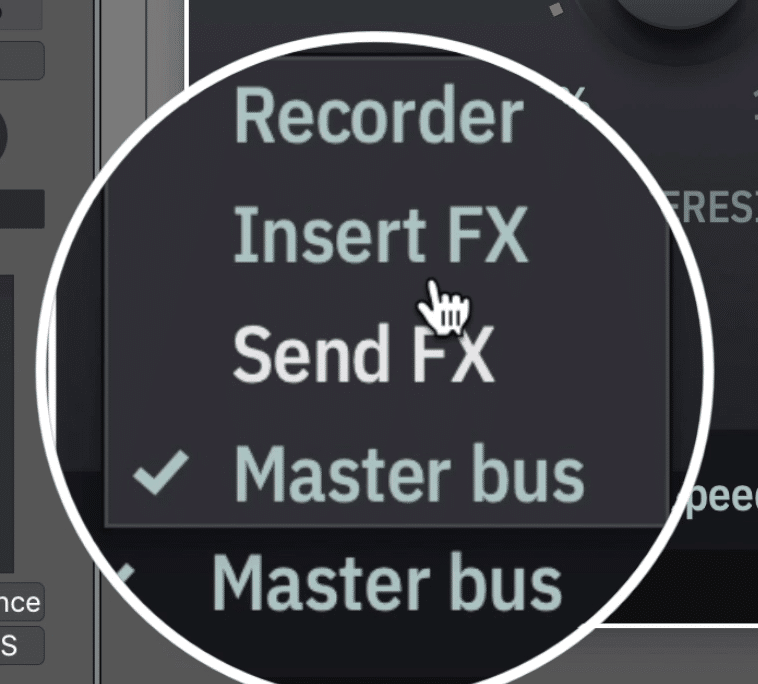
Now, you’d think that this was enough to make this plugin useful, but this is just the start of what this plugin has to offer. If you click the ‘Master bus’ text, you’ll see a menu of 4 options.
For more free plugins, take a look at our video on free saturators:
The Recorder Section of ReelBus
When you switch over to Recorder, you’ll notice that a slew of new functions become available. The first window you’ll see if the Tape window, which is 1 of 4 newly available tabs.
Shown here is the Tape tab of the Recorder section.
On the left is your level and Threshold , which needs to be lowered to engage your saturation and compression options.
TheSaturation slider introduces compression and harmonics and can be switched between 7 different distortion types.
Hysteresis is to the right, as well as a make-up gain dial which compensates for some of the high frequency that’s lost from higher hysteresis levels. Compression introduces some additional compression in tandem with the saturator's compression.
Spectrum makes minute changes to the frequency spectrum to more closely mirror that of tape.
Wear emulates the shedding of tape particles.
In the lower row, we have Wow and Flutter , as well as its speed. We also have Wear , which mimics how magnetic particles shed from tape, and the effect this has on the fidelity of the signal - this is great for achieving a lo-fi sound.
Hiss is high-frequency tape noise, and Asperity is low-frequency noise created due to imperfections in the physical surface of the tape.
To the right, you have your output level in dB.
The Drive Window
The drive window provides the opportunity to utilize an emphasis technique. In other words, you can amplify or attenuate specific frequencies prior to saturation and compression either emphasize or de-emphasize specific frequencies.
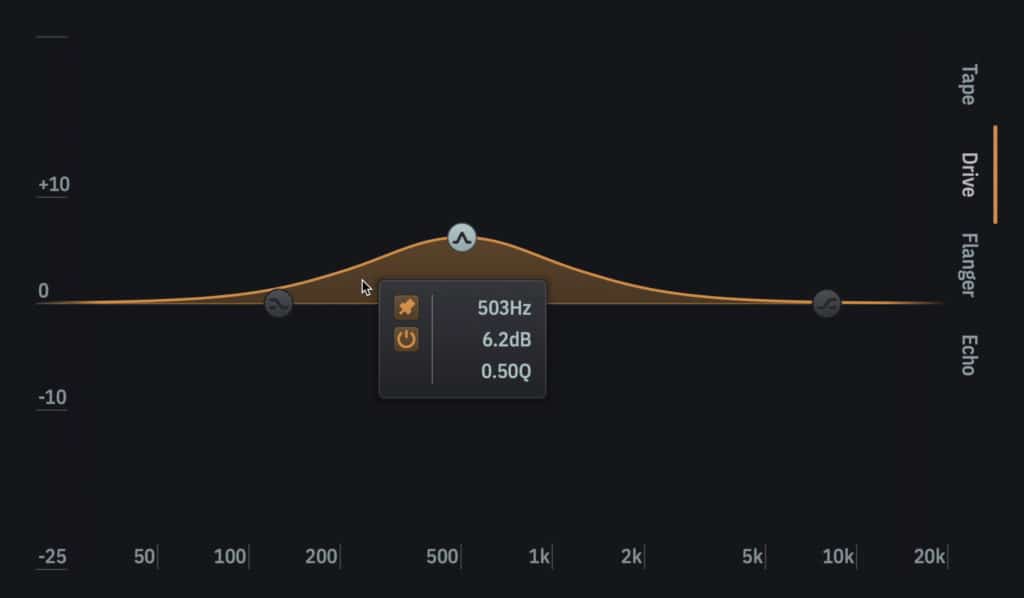
The drive section let's you feed frequencies into the saturator.
For example, if I boost 500Hz, the distortion that occurs is much more likely to occur at 500Hz and the surrounding frequencies due to it being more present prior to distortion.
The Flanger Window
The Flanger effect works by duplicating the signal and delaying one slightly to moderately with a modulating amount of delay.
The earliest flanging effects were created by using 2 tape machines to play to identical signals and then altering the speed of one of the signals.
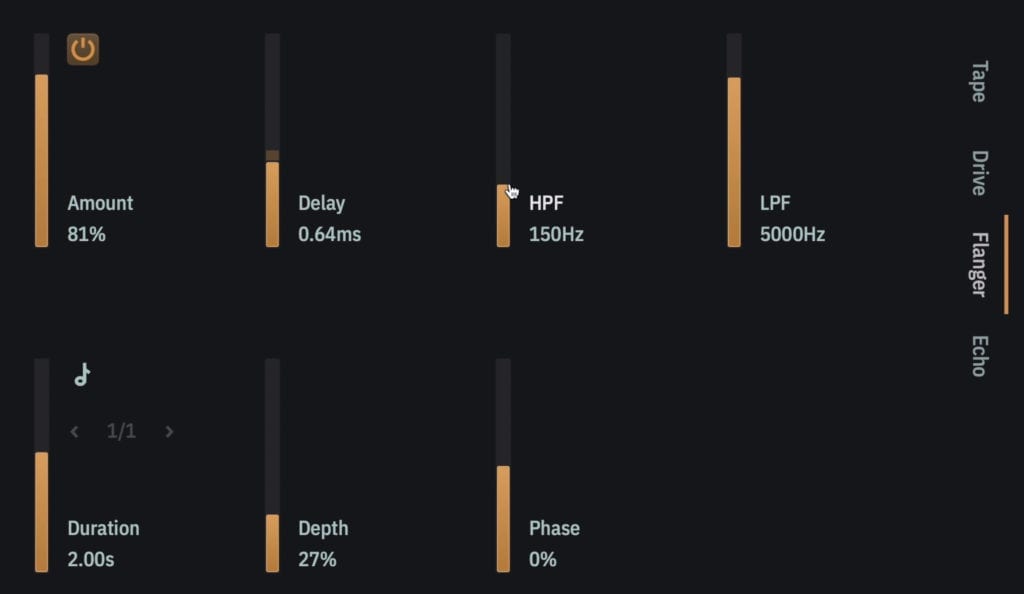
Show here is the flanging tab, which can be controlled with multiple parameters.
The Amount slider is your wet/dry for the effect. The delay is the time difference between your two signals. Beneath it, you’ll notice the depth slider, which will affect how much this delay modulates.
A high-pass and low-pass filter can be adjusted to focus the flanging into a more narrow frequency band.
Duration is the amount of time between flanging cycles - a concept that is much easier to understand when you hear the effect (check this out in the video above). The duration can also be synced to your BPM by clicking the quarter note symbol and adjusted by cycling through note types.
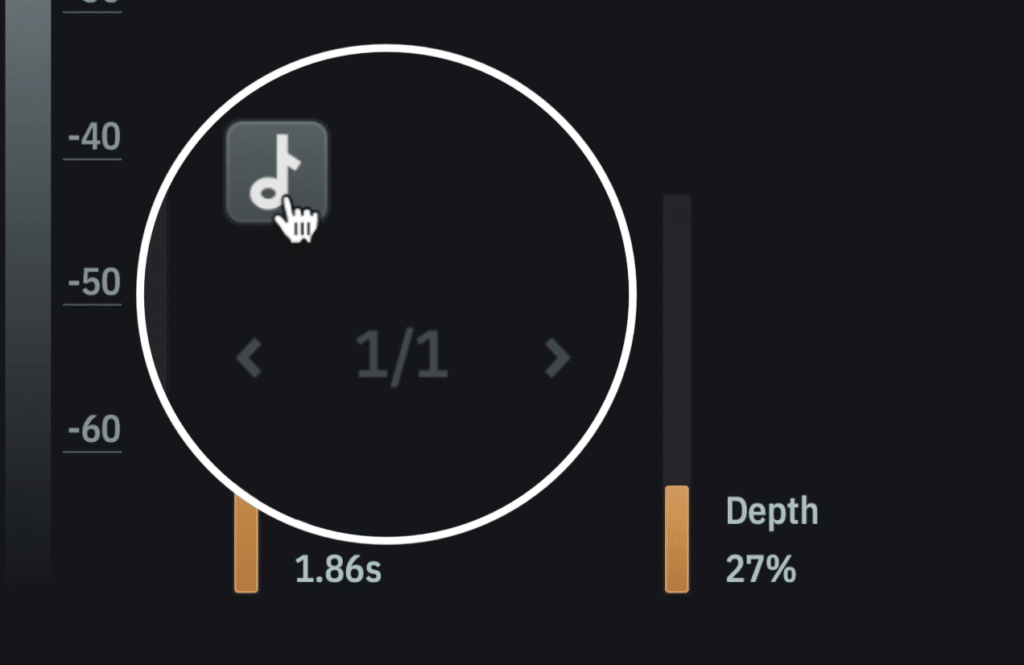
The duration of flanging can be synced to your host BPM.
Lastly, phase introduces additional phase cancellation which can widen or narrow the stereo image, as well as reduce or increase the amplitude depending on the other settings.
The Echo Window
Similar to Flanging, some of the first artificial delay and echo effects were achieved by manipulating tape signals. Instead of varying tape speeds, multiple write and read tape heads were positioned to create the effect.
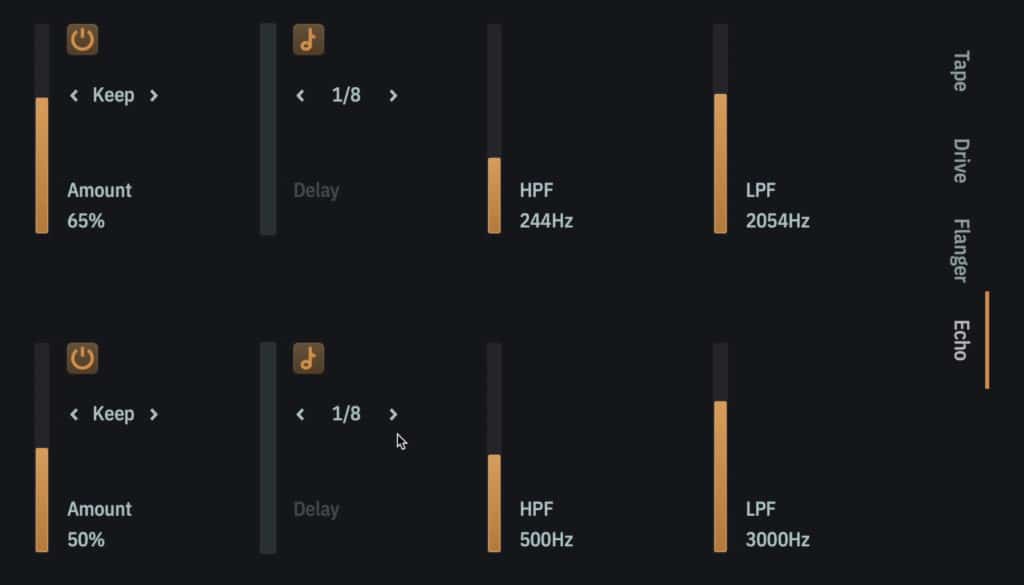
The echo window is similar to the flanging window, but without modulation or depth.
In this section, you can affect the left and right channel of delay to create an emulated tape echo effect.
Like the flanger, you can affect the Amount, the delay time, and the frequency range of the left and right channels by using high and low-pass filters.
The Insert and Send FX Options of ReelBus
When you’re using the Insert FX option, only the Flanging and Echo functions are being used. These are combined the original unaffected signal and then output.
When you’re using the Send FX option, again only the Flanging and Echo functions are being used. Only the flanging and echo is being output - the original signal is not present.
Cheap: Kramer Tape by Waves Audio ($49.99)
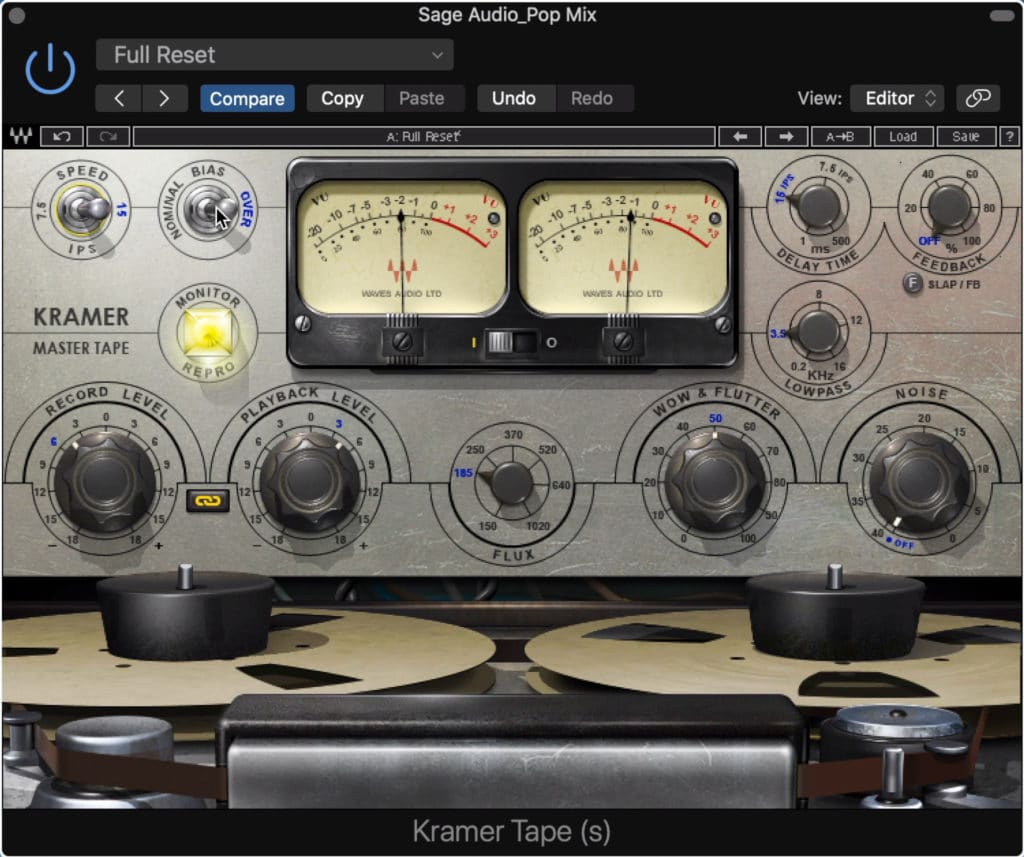
Kramer Tape by Waves models itself off of a rare tube tap machine.
For a straightforward yet surprisingly versatile tape emulation plugin, Kramer Tape is a great option. For a reasonable $49.99, you get access to a digital recreation of Eddie Kramer’s rare 1/4” tube-based 2-track tape machine.
This plugin lets you achieve both tube and tape saturation, making it great for achieving an impressively warm and full sound.
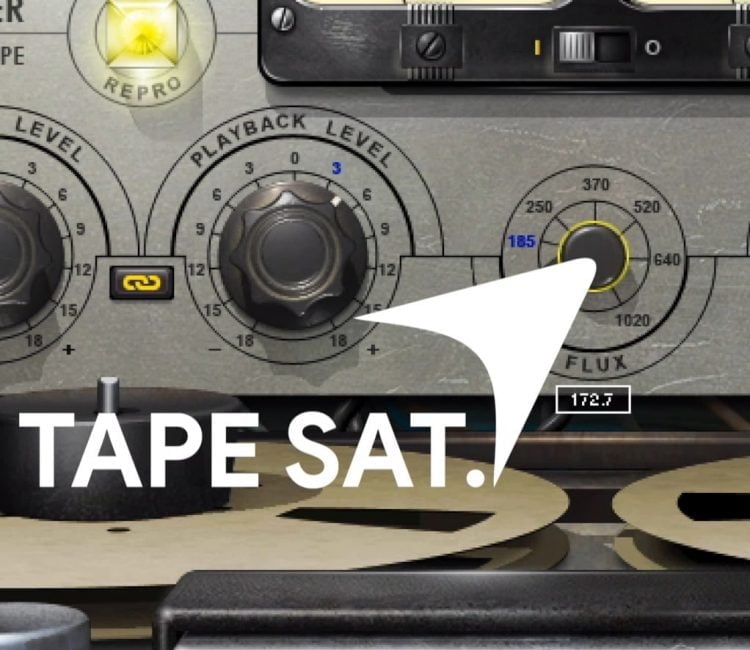
Flux controls tape saturation.
The main feature of the plugin is the record level, which affects the input and output of the signal, in turn increasing or decreasing the amount of tube saturation.
These can be linked or controlled independently.
To the right is theFlux dial, which is the gain of the signal as it gets transferred onto tape. Increase this to increase tape saturation.
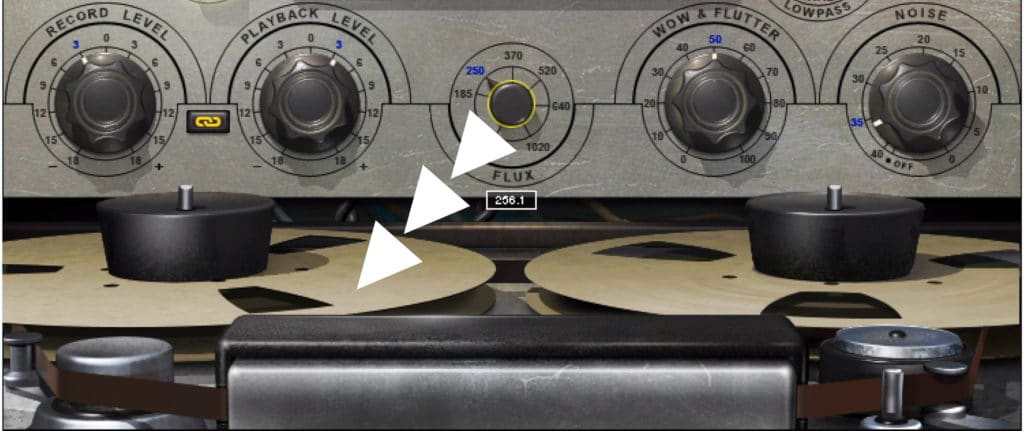
The flux function controls how much signal is being fed onto tape.
There’s a wow and flutter dial - it’s default setting emulates the tape machine it’s based on.
The noise dial lets you introduce a high-frequency noise recording from the afore-mentioned machine.
To the top left, you can switch the tape speed between 7.5ips and 15ips, which makes the signal clear and cleaner, or warmer with an attenuated high-frequency range.
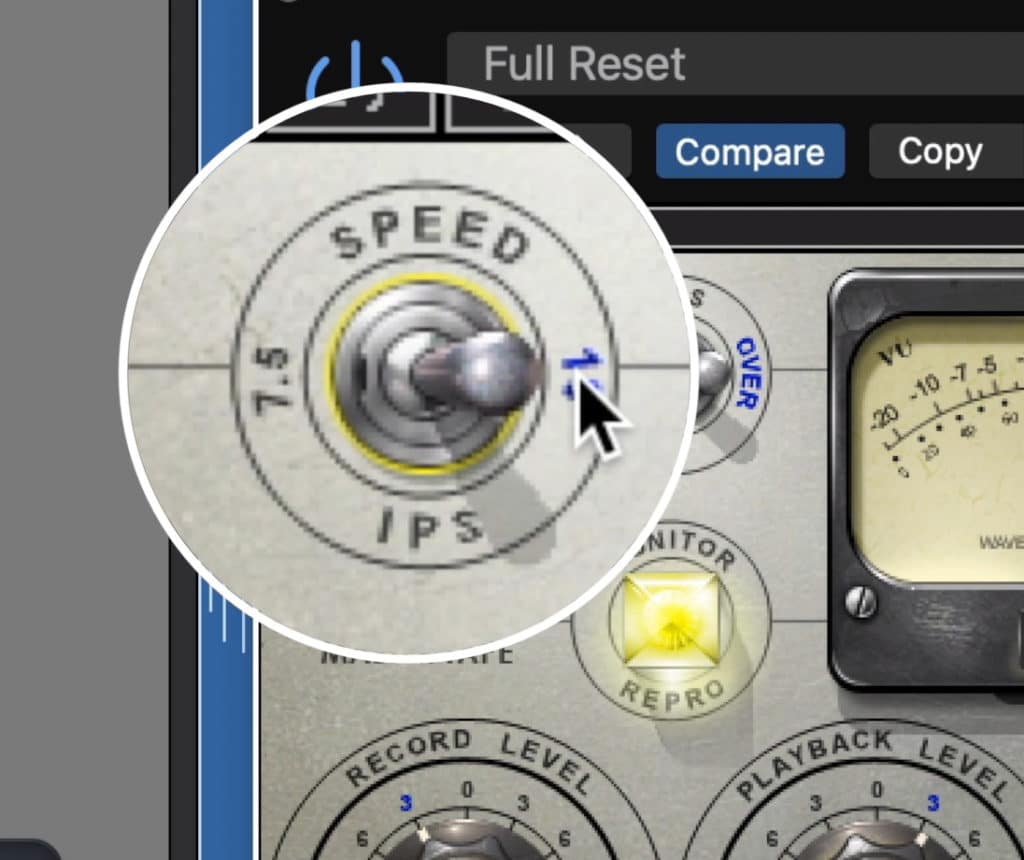
Altering the speed changes the timbre of the recording.
Bias can be switched between the nominal or recommended operating level, and 3dB over this level. Using a higher level offers a different timbre by affecting how the transfer occurs.
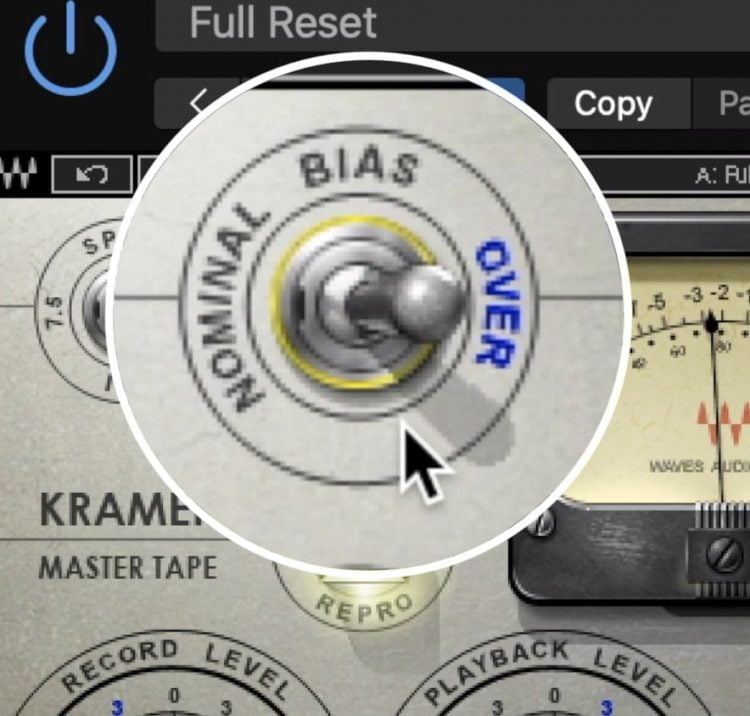
Bias can be changed between nominal and 3dB over.
Your left and right VU meters are calibrated to -18dBVU and can be adjusted with the screw dial underneath the window.
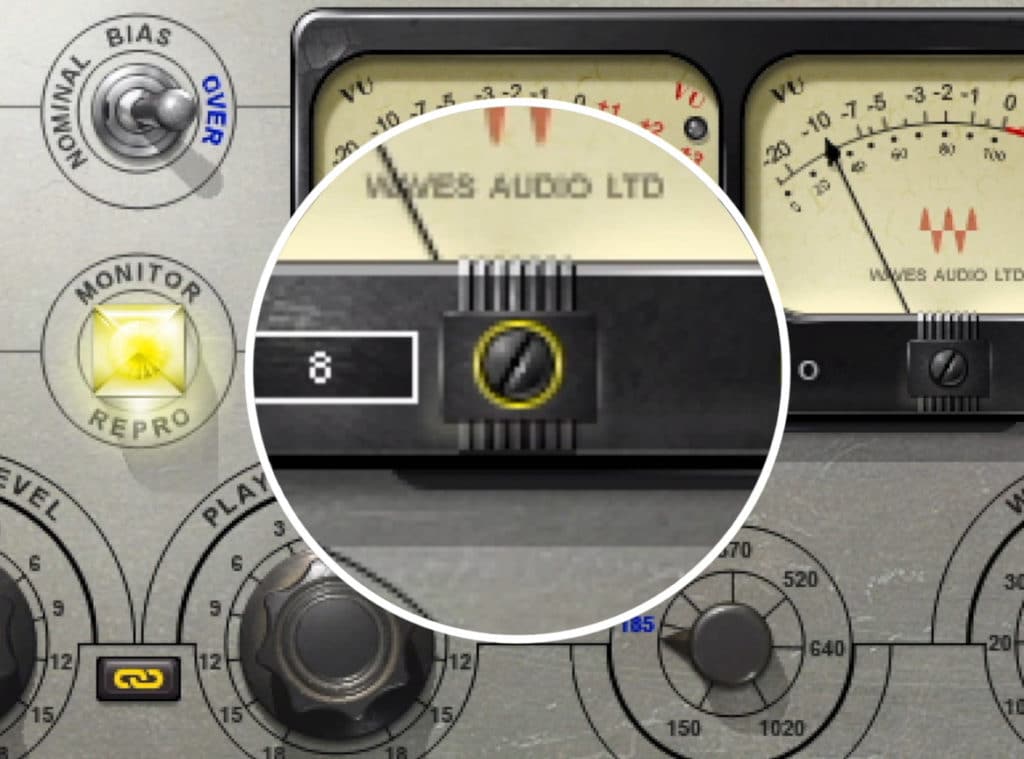
This dial alters the dBVU calibration of the meters.
Lastly, a delay is available which can be switched from a slapback to feedback. The dial above the slapback or feedback option is your wet/dry for the effect.
To the left, you can affect your delay time, and below this is a low-pass filter for the delayed signal.
If you want to learn more about tape and saturation, check out our blog post on the topic:
Expensive: Tape by Softube ($99.99)
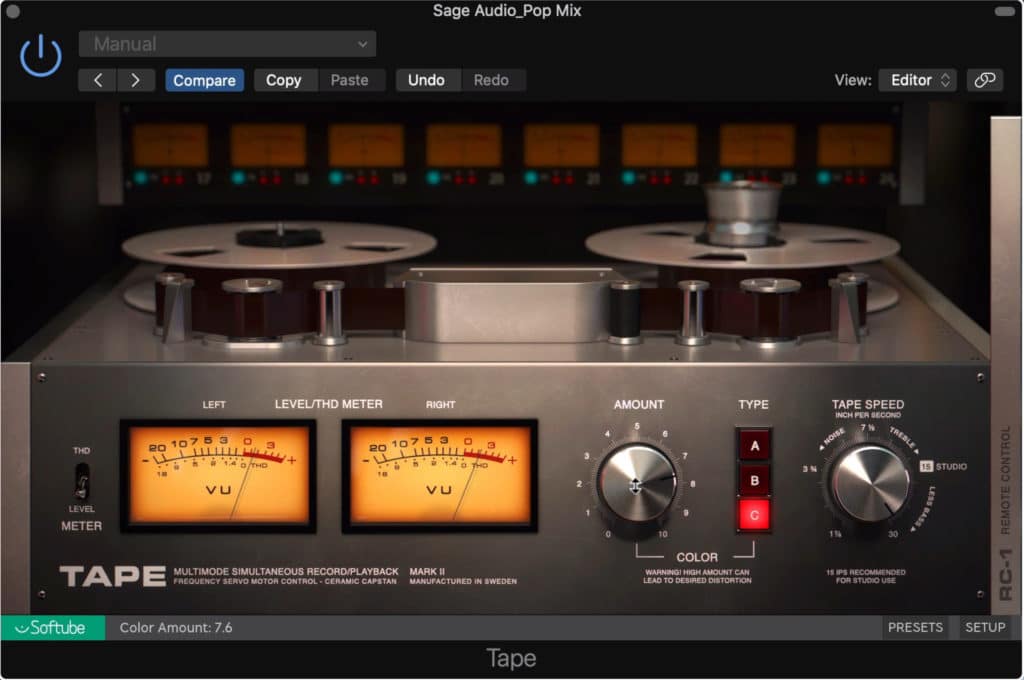
Tape by Softube is the simplest of the 3 plugins on this list.
Surprisingly, the most expensive plugin on this list is the simplest. Despite the limited number of ways to affect the signal, Tape by Softube provides a great sound and timbre with an incredibly accessible interface.
If you’re looking for a great tape sound, and you don’t want to spend 20 minutes affecting multiple parameters to achieve it, then try this Tape plugin.

A THD meter lets you see how much distortion is occurring.
Starting on the left we have a Meter switch that alters the VU meters from Level to THD or total harmonic distortion. This makes it easy to know how much distortion you’re imparting onto the signal.
In the middle of the plugin is the amount rotary which introduces increased amounts of compression and distortion. 0 - 5 is appropriate for masters, and higher levels are best reserved for creative or lo-fi mixing techniques.
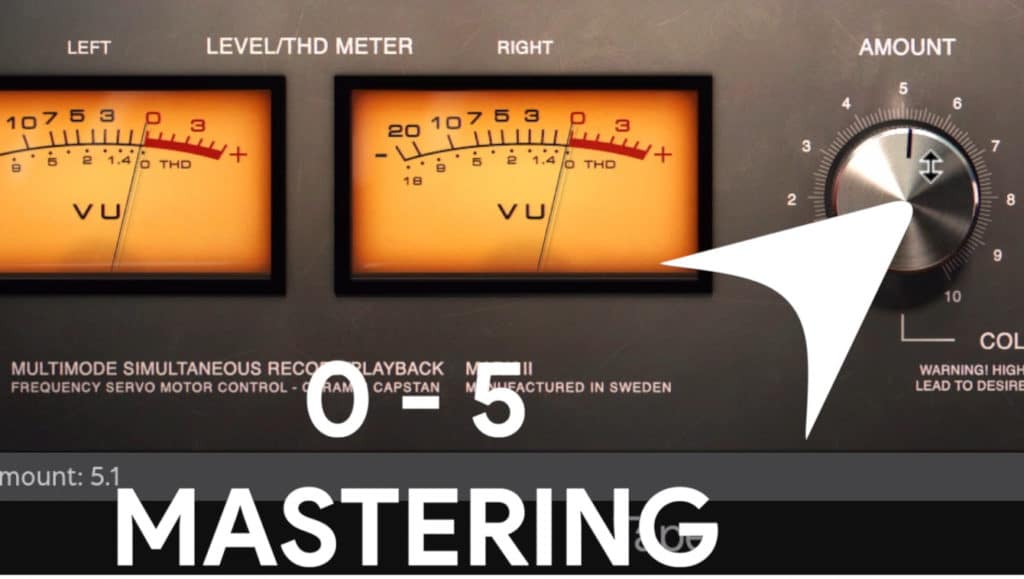
Lower levels are better to use for mastering.
To the right, you have 3 options for the type of tape machine you’re emulating. Button A is a “popular Swiss tape machine” according to Softube - this means it models a Studer Tape machine.
The second emulates a “machine with a transformer-based circuit.” This is most likely a Mara 2-track tape machine.
And the last option, C , “was inspired by a British tape machine with a distinct vintage vibe.” This one could be a few different things, but it’s probably Studer’s J37 which was popular in Britain and used in Abbey Road Studios - but this can’t be said for certain.
The tape speed can be varied with 5 different settings. Was special about this plugin is the tape speed can be lowered to 1 and 7/8”.
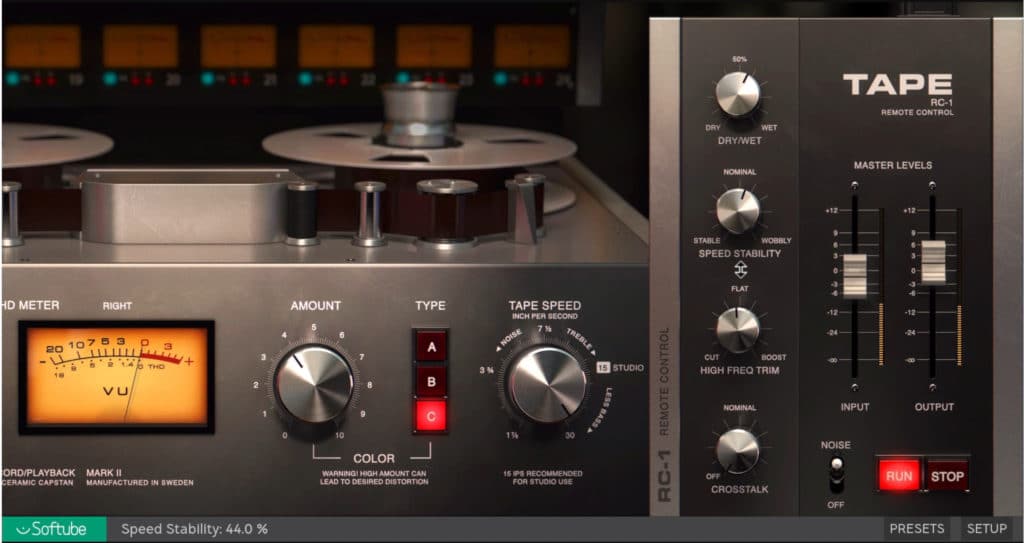
By clicking RC-1 on the right you'll open up a new tab.
If you click the RC-1 banner on the right you’ll find more options.
Up top is a dry/wet blend. Underneath it is Wow and Flutter, which is combined into 1 effect called speed stability.
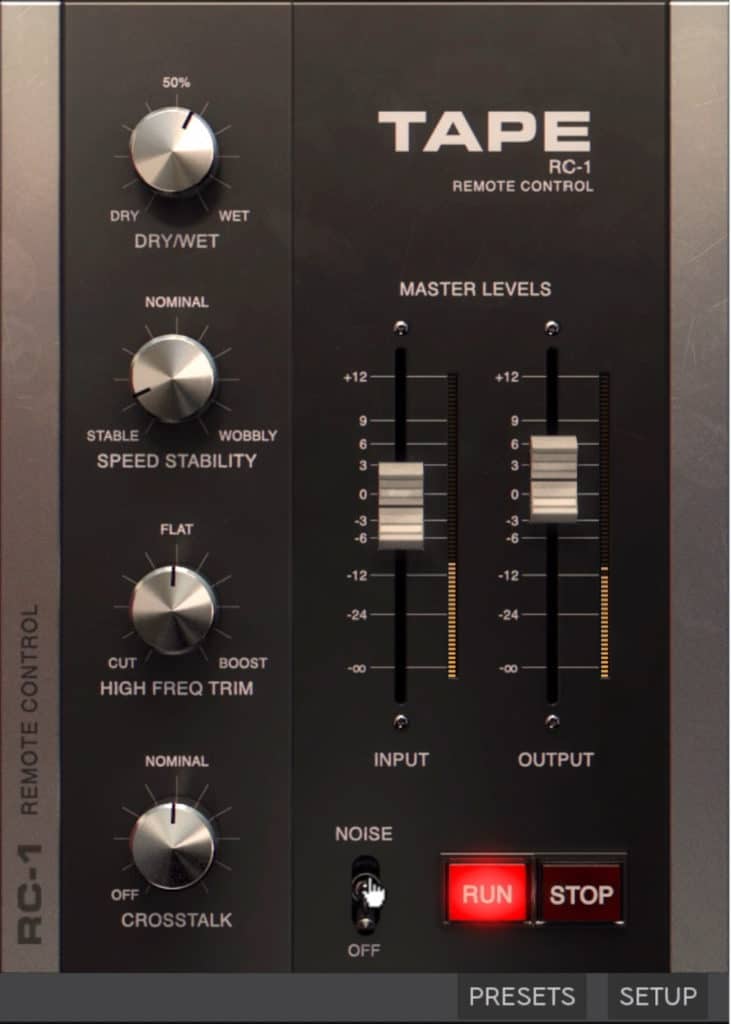
Shown is the tab that opens with additional features.
There’s also a high-frequency shelf that can be used to amplify or attenuate frequencies above 3kHz.
The crosstalk lets the left and right channels bleed into each other’s feed. You can introduce noise with the noise switch and create a tape slow down and speed up effect with the Run and Stop buttons.
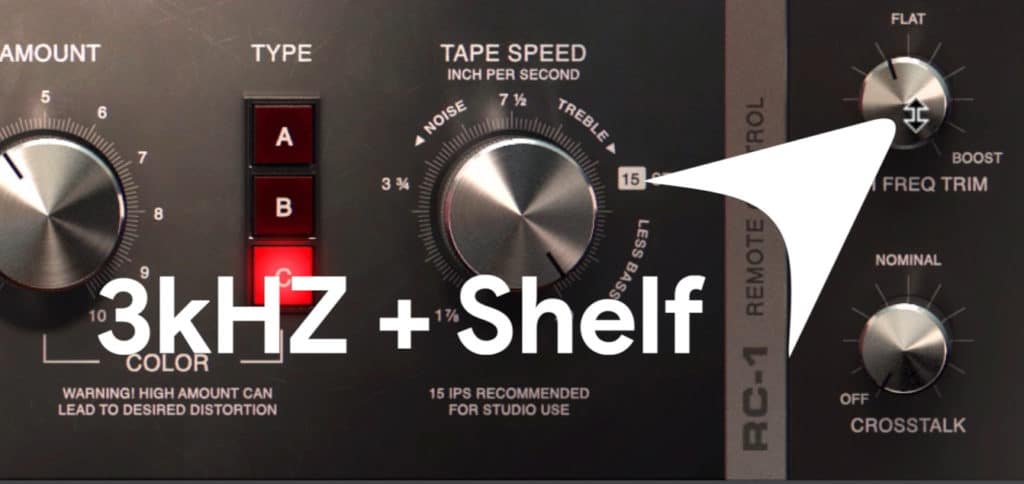
The high frequency trim is a shelf above 3kHz.
Lastly, up top are your master input and output levels.
For a blog post like this one, take a look at another plugin comparison we made:
Winner: ReelBus v4 by Toneboosters (Free)
Although the other plugins are modeled off of great tape machines of the past, ReelBus offers users immense flexibility.
Like the other 2 plugins, it can be used as a master bus tap machine - but it also offers so much more.
Our pick for the winner is ReelBus by Toneboosters.
The recorder section of the plugin includes additional saturation controls and types, as well as complex tape characteristics like wear, and asperity.
Furthermore, the basic but useful drive eq is a great touch that many other plugins could benefit from having.
The flanger and echo, although much better suited for mixing than mastering, offer a great way to add character to individual instruments.
The more time you spend with this plugin, the more you find to appreciate - everything has been well thought out and planned, providing users with the most comprehensive tape emulation experience of any tape plugin I’ve used.
Its flexibility and complex functionality make it a great plugin.
Whereas most tape plugins try to simplify things, the fact of the matter is that tape machines are not simple. ReelBus seems to understand this with its advanced functionality.
The fact that this plugin is free, or at least can be used freely, is amazing. It goes to show how far independent plugin developers have come from the first stages of digital processing.
Do you agree with our pick, or do you think one of the other plugins should have won? Let us know in the comment section of the video.
Also, if you’re an artist or engineer and you have a mix you’d like to hear mastered, send it to us here:
We’ll master it fo you and send you a free mastered sample of your song.
Have you used any of these plugins before?


