Free vs. Cheap vs. Expensive Saturation Plugins
Saturators have become increasingly important over the past couple of decades. As digital processing became the norm for audio engineering, producers and artists soon discovered that something was missing from their recordings.
The small imperfections and distortions that engineers had worked so hard to get rid of for the sake of having a “clean” signal, were missed. Not only did these distortions and imperfections add something to the sound, but they also helped define genres and even musical eras.
Today, we've remedied digital audio’s lack of distortion with analog emulation plugins - these plugins are used to add some of the tonality and timbre that analog equipment caused. When used properly, they make a mix or master sound full, impressive, or in the right context, completely distorted, and obscured.
Saturation plugins are often used to emulate classic analog hardware.
Picking a saturation plugin can be difficult, especially today with the number of options. With that said, we aimed to make that decision a little easier by delving into a free, cheap, and expensive saturation plugin.
We’ll cover their functionality and design, as well as listen to some examples of each (in the video embedded above). We’ll also take a brief look at some of the harmonics these plugins create and how the plugins compress the signal.
We’ll also compare the CPU usage of the plugins - this will help us understand if the plugin is best suited for large or small sessions.
Once we’re done comparing all of the plugins we’ll come to a conclusion about which plugin we think is the best one, and is most worth your time and money.
If you think another plugin should’ve been chosen as the best one, let us know in the comment section of the video!
Also, if you have a mix that you want to hear professionally mastered, send it to us here:
We’ll master it for you and send you a free sample for you to review.
Free Saturator: PreBox by Analog Obsession
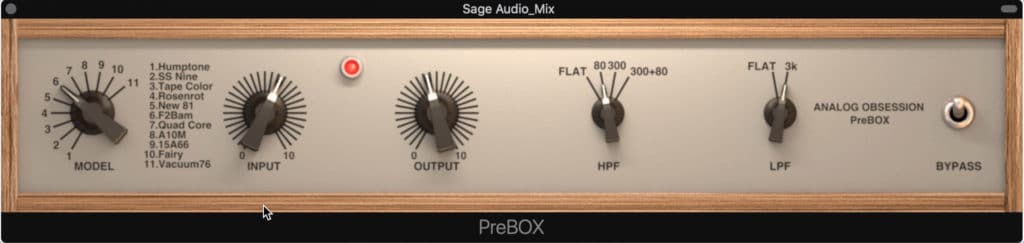
Pictured is PreBox by Analog Obsession.
The PreBox offers a surprising amount of versatility for a free plugin - whereas most free saturation plugins only offer 1 or 2 options for your saturation, the PreBox includes 11 different settings.
By switching through them, you’ll create uniquely ordered harmonics, in turn creating a specific timbre for your recordings.
Harmonics
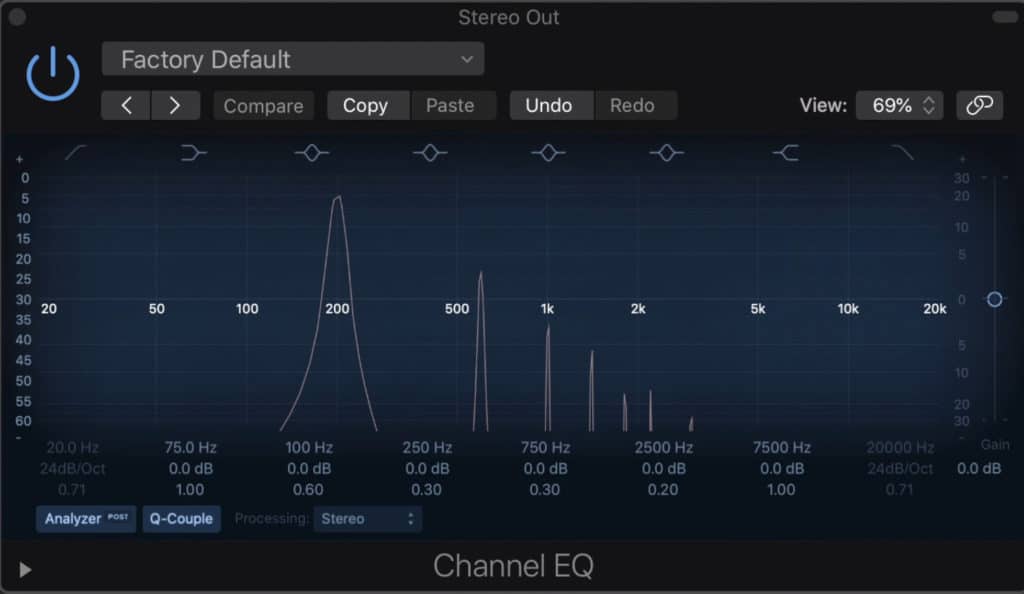
Let’s observe the harmonics that these settings create by running a 200Hz sine wave through the plugin, and observing the harmonics with a frequency analyzer.

Using a 200Hz sine wave, we can measure the harmonics that this plugin creates.
We can see that, depending on the setting, the PreBox creates various 2nd, 3rd, and on occasion 4th order harmonics - these also vary in amplitude. These harmonics will also increase in their order and will vary in amplitude the closer the signal gets to clipping.
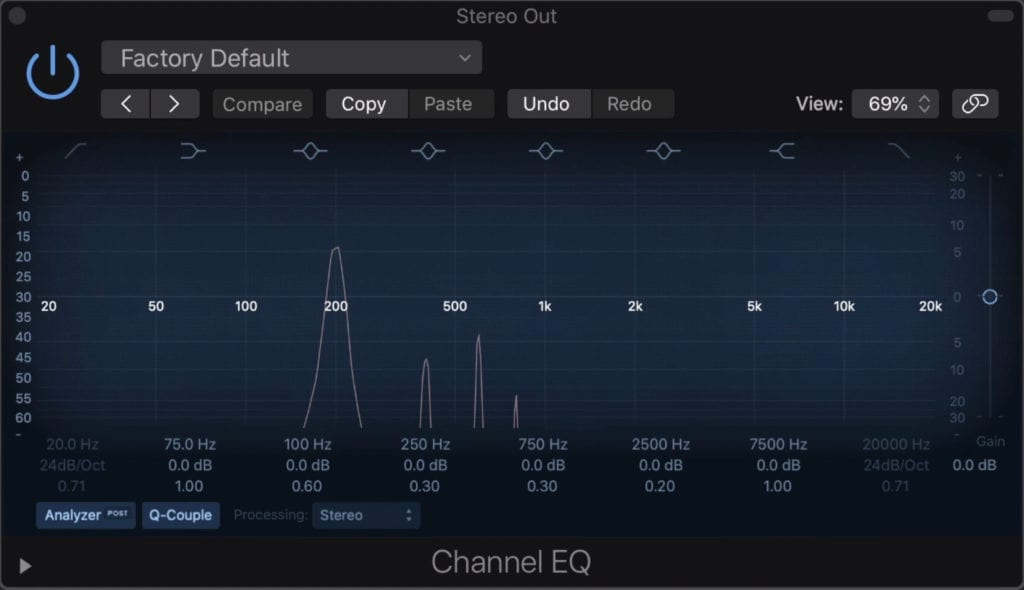
PreBox creates various 2nd, 3rd, and 4th order harmonics
Functionality
The interface of the PreBox is pretty simple, with only a few major functions being available.
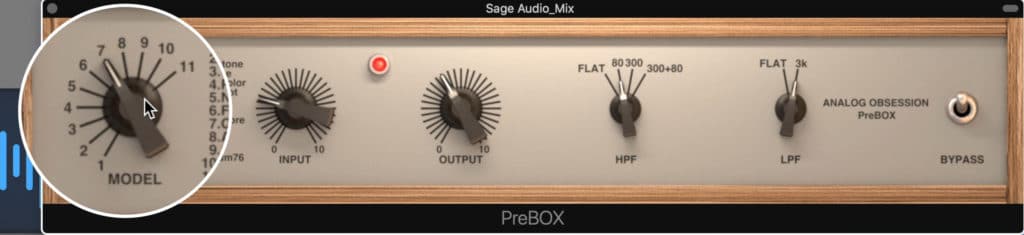
The harmonic orientation and amplitude is changes with the model type.
On the far left, we have our amp emulation dial, which lets you switch between various application settings like we were doing just a moment ago. The amps that these are modeled off of are listed to the right of the dial.
To the right of this dial, you’ll notice an input rotary -above it is a light which indicates when the input is at a safe level with green, when it’s approaching clipping with yellow, and when it’s clipping with red .
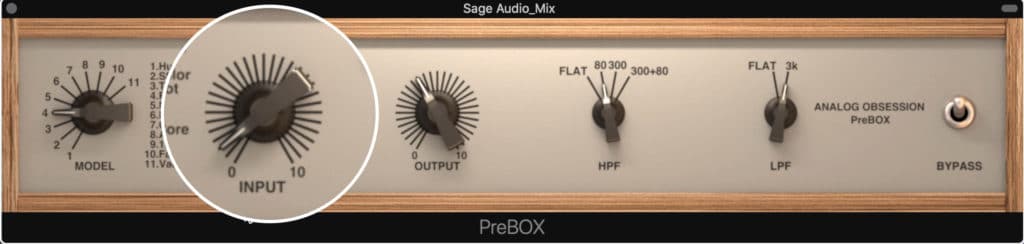
The input can be altered to make the distortion and saturation more noticeable.
The output is to the right and can be used to amplify the signal after it has been distorted. By increasing the input but decreasing the output, you can create compression, which is another important aspect of saturation.
When doing so, even more harmonics will form - due to the addition of soft-clipping distortion. Although you’ll still have an input signal is the dial is set to 0, setting the output to 0 will mute the signal.
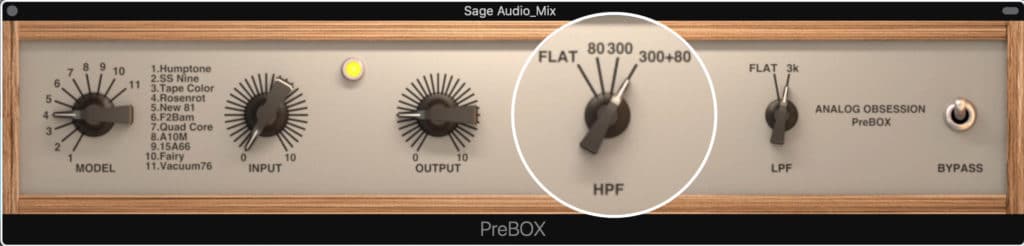
High pass and low pass filters can be enabled.
This plugin also has a high-pass filter with settings of 80Hz, 300Hz, and 380Hz. A low-pass filter is to it’s right which will attenuate signals above 3kHz. The slope of both of these cutoffs seems to be pretty subtle .
Lastly, on the far right is a bypass switch for the plugin.
If you’re looking for some more free plugins, check out our video below:
CPU Usage
When using the PreBox on our system, Logic Pro X’s CPU hovered around 20%.
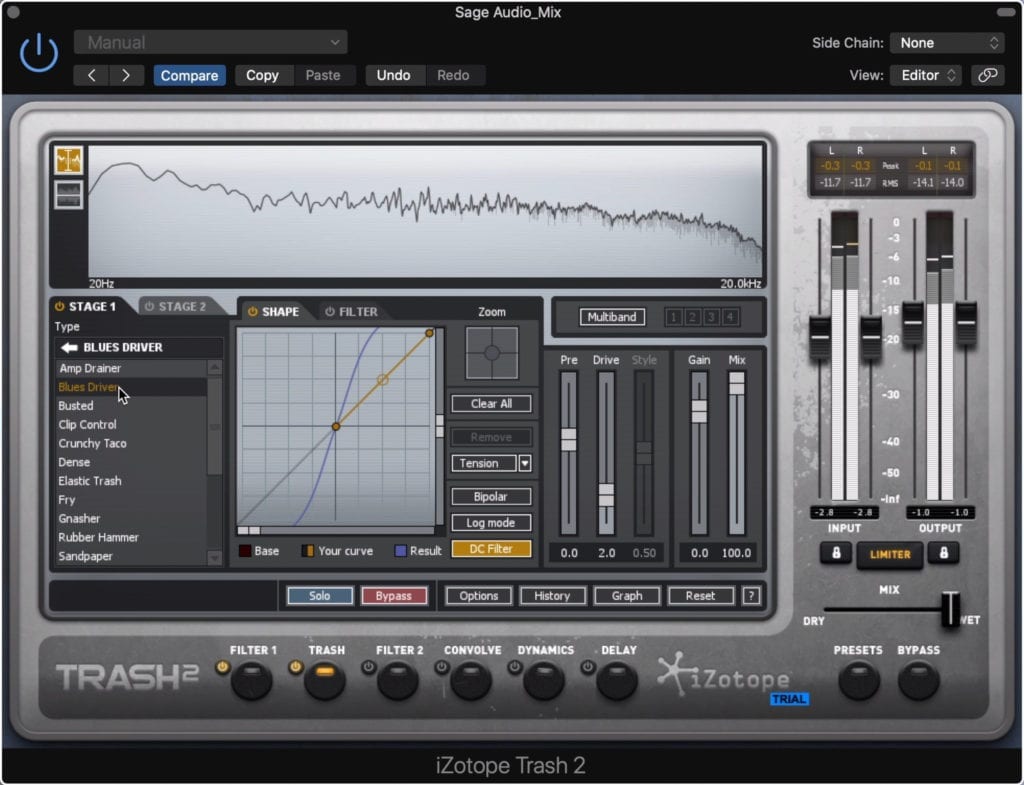
Cheap: Trash2 by Izotope
Trash 2 is an unconventional yet highly versatile distortion and saturation plugin.
Trash2, although a little more expensive than some of the cheap plugins we’ve covered in previous videos like this one, offers an immense amount of functionality.
It includes multiple types of distortion, compression, filtering, and even convolution reverb to emulate the impulse response of various objects and amps.
You can even shape your own distortion type by editing a waveform.
Harmonics
When it comes to harmonics, this plugin can create just about any variation possible. Using the same 200Hz sine wave that we did in the previous example, we can observe the harmonics that the plugin generates.
Here are some of the harmonics that this plugin can generate.
In the top window of the plugin is a frequency analyzer , where we can see how the plugin is shaping the sound. These harmonics can be subtle or incredibly noticeable and will range from traditional 2nd and 3rd order harmonic distortion to a complete overdrive of the signal.
Functionality
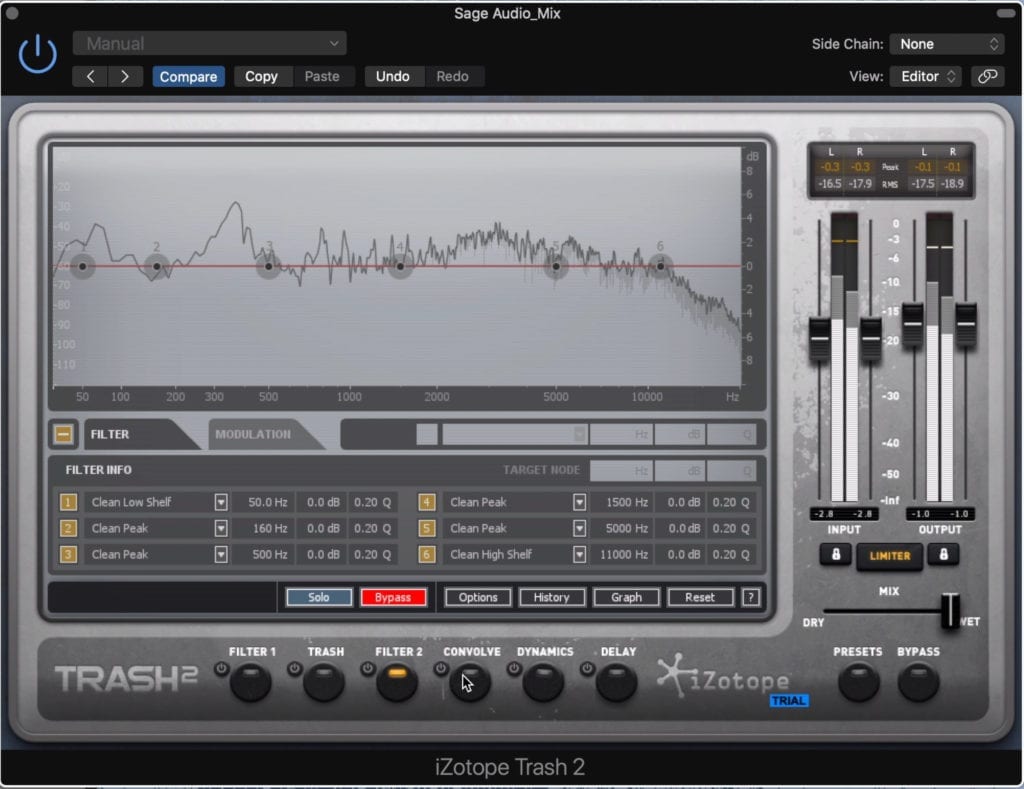
The functionality of this plugin is impressive - it’s both complex and easily accessible. By organizing all of the functions in a logical left to right progression, it makes it easy to understand how your signal is being affected step by step.
Although we won’t cover every single option that can be created here due to how many there are, we’ll cover some of the more important ones.

At the button of the plugin you can access 6 modules.
At the bottom of the plugin, you’ll notice 6 different tabs - these can be enabled or disabled, as well as opened by clicking the larger button.
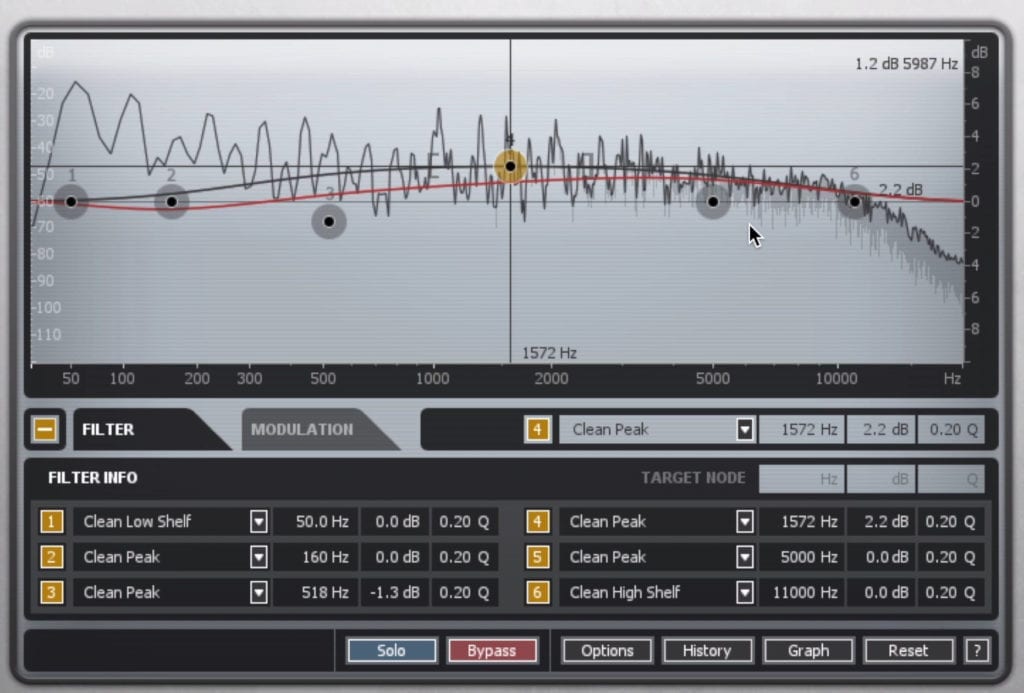
Starting from the left we have our first filter - which is essentially and equalizer with additional functionality. We can affect up to 6 bands, and change their type between peak, high pass, and many others based on various EQ type categories.
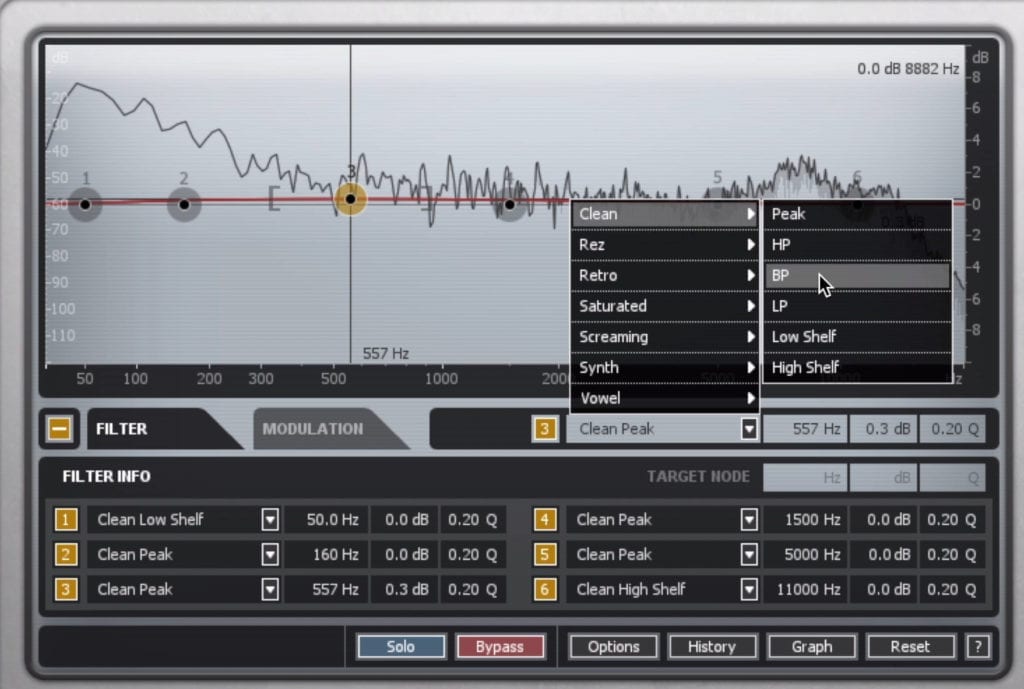
The first module is an EQ with additional functionality.
Each of the 6 bands can be modulated, which will either make them dynamic with the envelope option or create oscillation with the LFO option.
Next, the trash function is your distortion section. This distortion can be either 1 or 2 stages, meaning you can run multiple types of distortion at once.
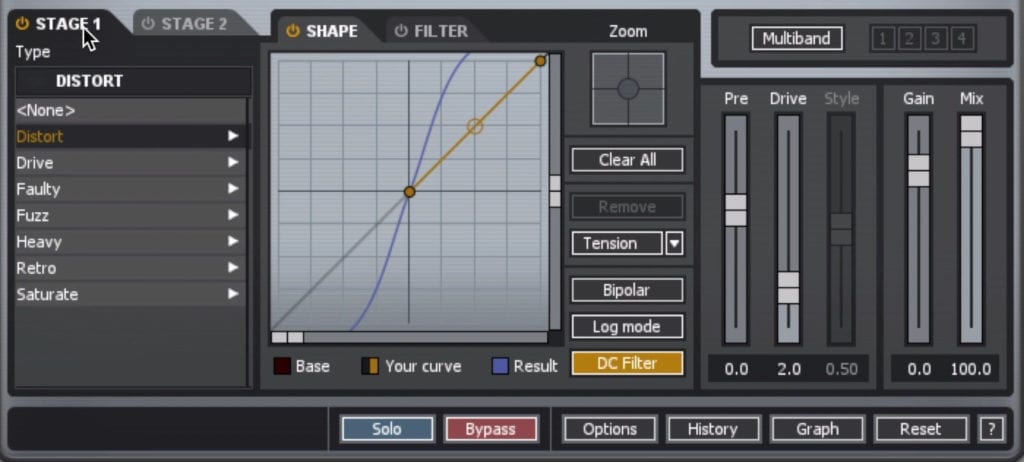
The distortion module lets you heavily or subtlety distort the signal
If this wasn’t cool enough you can separate the signal into bands using the multi-band option - this means you can create distortion that’s relative to a particular band; this too can 1 or 2 stages, so you have a lot of options.
Looking at the actual distortion settings, these can be switched between 7 categories:
- Distort
- Drive
- Faulty
- Fuzz
- Heavy
- Retro
- Saturate
Each opens up multiple other pre-created distortion types that you can use. If you don’t like the options they give you, you can manually affect the waveform in the center window.
To get specific forms of distortion you can alter the linearity of the graph between:
- Linear
- Tension
- Square
- Triangle
- Sine
- Stairs
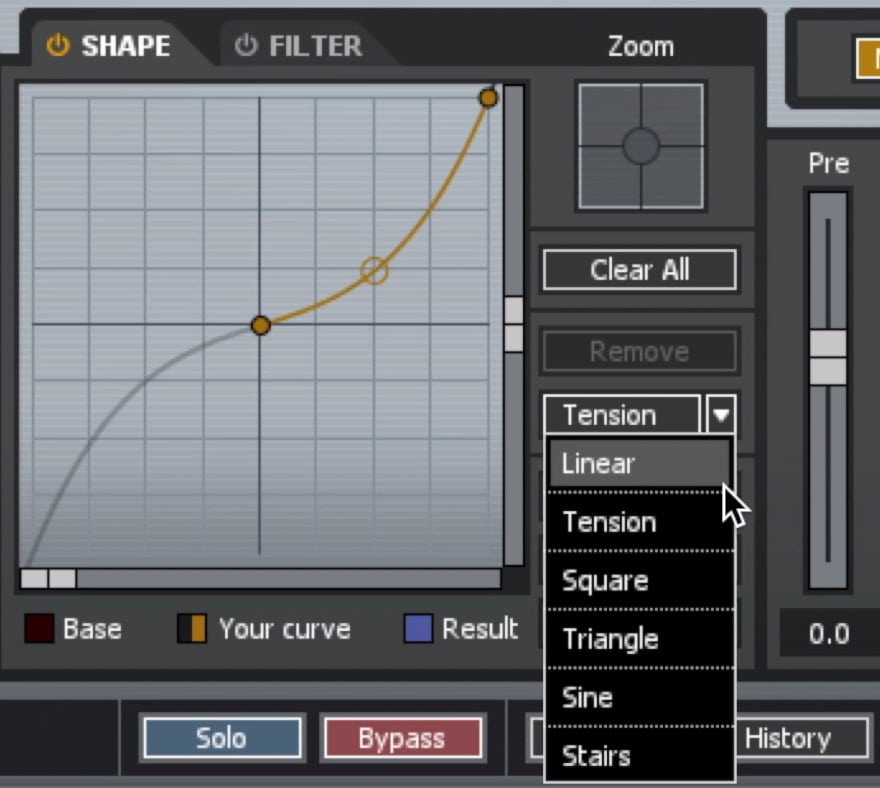
You can edit the waveform to customize the distortion you create.
These will cause different forms of distortion; for even more control, Zoom in on the section of the graph to get a better view of its details.
To the right, you can affect the PreGain, Drive, Style, Gain, and Wet/Dry Mix. A 2-band Filter is also available after your distortion .
Next in the signal chain is another Filter - this is identical in its functionality to the first Filter, except this one comes after your distortion routing-wise.
After the distortion section is another equalizer.
Up next is the convolution section, which offers multiple pre-recorded and loaded impulses which will alter the timing and timbre of your sound.
So if you want your signal sound as if it’s being played from an amp, or maybe in a fishbowl, or from inside a random device, there’s at least one setting here you’ll enjoy.

A convolution impulse response module comes next.
Furthermore, you can record and load in your own impulses, making it a truly creative tool.
Once you’ve selected the impulse, you can select if it was recorded with a dynamic microphone, condenser, or ribbon mic, which changes its timbre greatly.
For some options, you can also cause greater stereo separation and increase or decrease the stereo width. The gain and mix of the effect can be altered on the right of this section.
The dynamics section is your basic compressor, with which you can attenuate the signal. This can be used to gate the signal as well and can be made multi-band for even greater flexibility. Up top, you can alter the metering to show either the frequency response or the gain reduction over time.
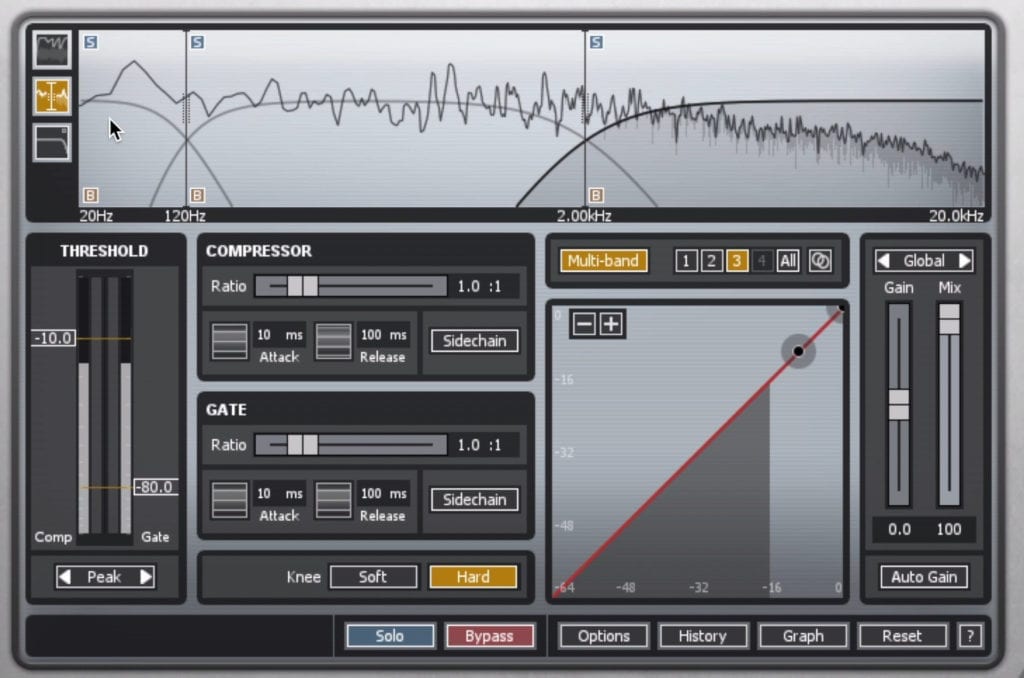
A multi-band compressor can then be used to control the dynamics of the distortion.
Whereas most other saturators include the compression as part of the saturation, Trash 2 lets you control is separate, which I think adds something unique.
Last up on the far right is the Delay setting, which can be used to add a delay that’s indicative of various processing types. The amount of delay, feedback, amount of distortion, width, and dry and wet delay signals can be altered in this section.
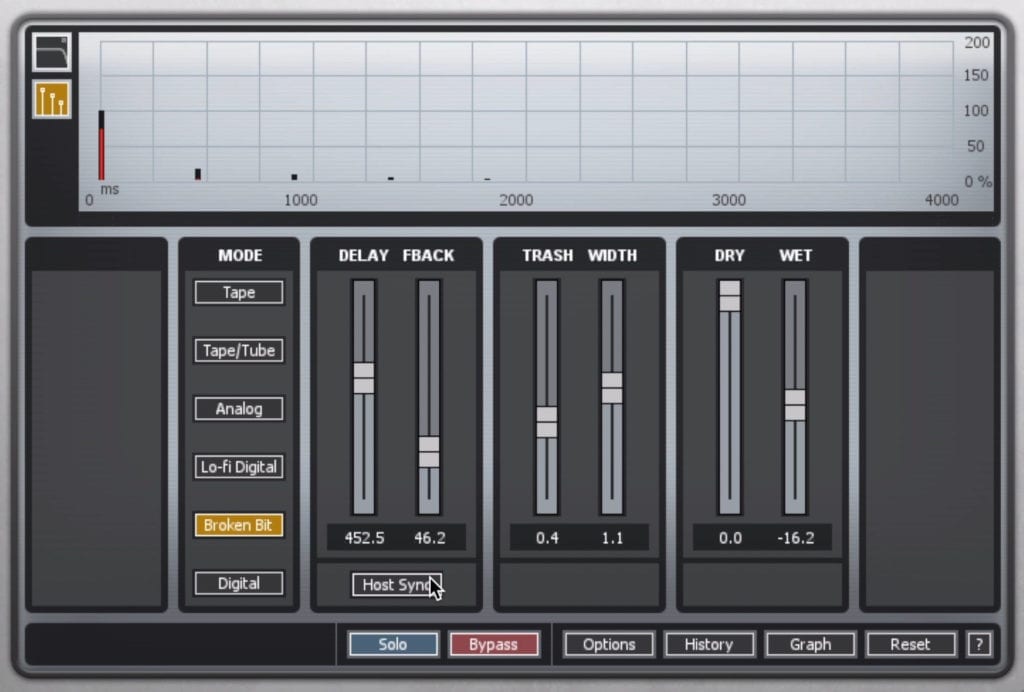
You can introduce delay that's indicate of particular processing types, like tape and tube.
You delay can also be synced to the host BPM.
At the bottom of the plugin, you can click the Graph button, and then rearrange the routing which is really useful to quickly change your sound. Additionally, the history button lets you revisit the various changes you’ve made.
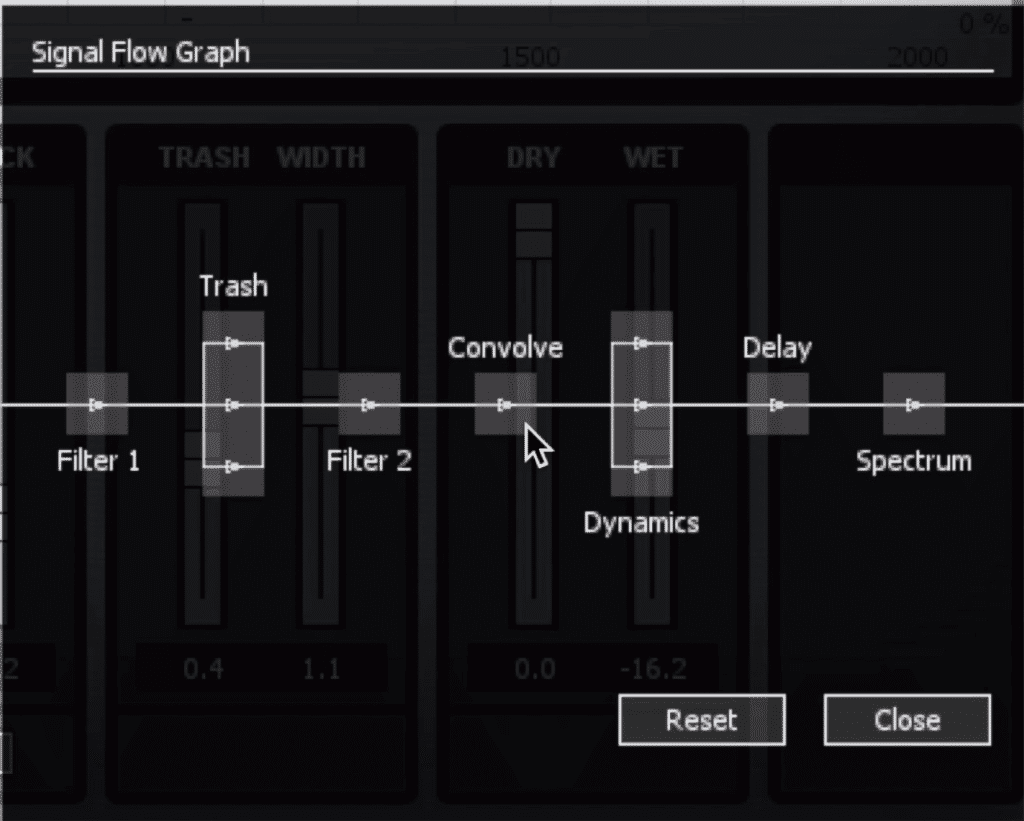
The routing of the plugin can be rearranged as well.
A button to completely reset of the plugin is also available.
On the far right is your output with which you can alter the amplitude of your input, your output, your wet/dry mix, and enable a limiter to protect from clipping.
If you find this plugin a little daunting, or you’d like to hear what the developers came up with, you can check out the preset section where there are hundreds of well-crafted settings.
For a free mastered sample of your mix, send it to us here:
We’ll master it for and send you a sample to review.
CPU Usage
When using the Trash 2 on our system, Logic Pro X’s CPU hovered around 50%, which is significant for 1 plugin.
However, Trash 2 does house about 6 plugins in 1.
Cost
This plugin retails for $99 USD, which seems a bit on the higher side for what can be called a cheap plugin, but when you consider how much you get with this plugin and how much it can be used for, it truly is a low price.
You’re essentially getting an EQ with modulation, complex and customizable distortion functionality, convolution impulse responses, a multi-band compressor, and analog emulation delay for that price.
Expensive: Harmonics Analog Saturation Processor by Softube
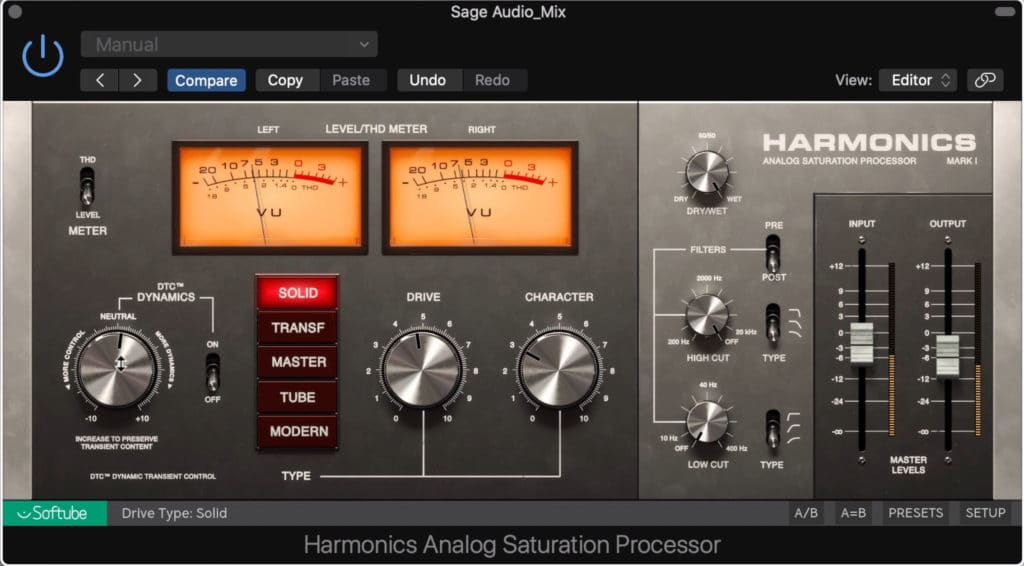
The harmonics analog saturation processor is a simple but great sounding plugin.
The most expensive plugin on our list has gotten a good amount of attention since it came out in 2019 - and for good reason. It has an incredibly refined user interface and can create some fantastic tones.
It’s an easy to use plugin that can seriously improve the timbre and fullness of both individual interments and full mixes.
Harmonics
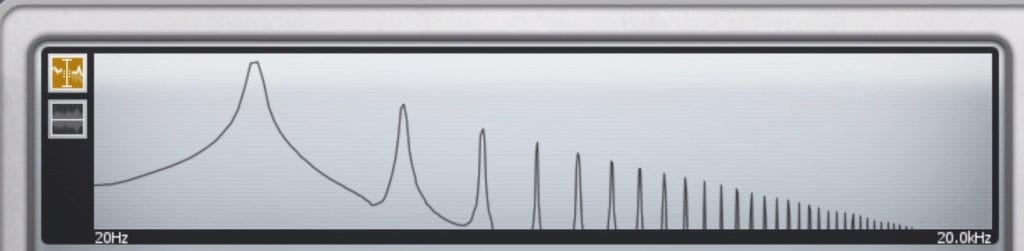
The harmonics that this plugin generates depend on a few factors - the first is the type of distortion, the amount of drive, the character, and the DTC dynamics section.
We can see that by filtering through the different distortion types, we create various harmonics with diverse amplitudes. These harmonics can be altered and increased by increasing the drive rotary, and by pulling back on the character dial.
These are some of the harmonics that can be generated by using the plugin.
Additionally, the dynamics rotary can compress the signal, making these harmonics louder relative to the fundamental frequency, in this case, 200Hz.
Functionality
Compared to the Trash 2 plugin, navigating the Harmonics Analog Saturation Processor is simple. The functions are easy to understand and pretty straight-forward in their design.
Up top, we have 2 VU meters for the left and right channels. The measurement can be switched between the level of the signal, and the amount of THD or total harmonic distortion that the plugin is adding to the signal.
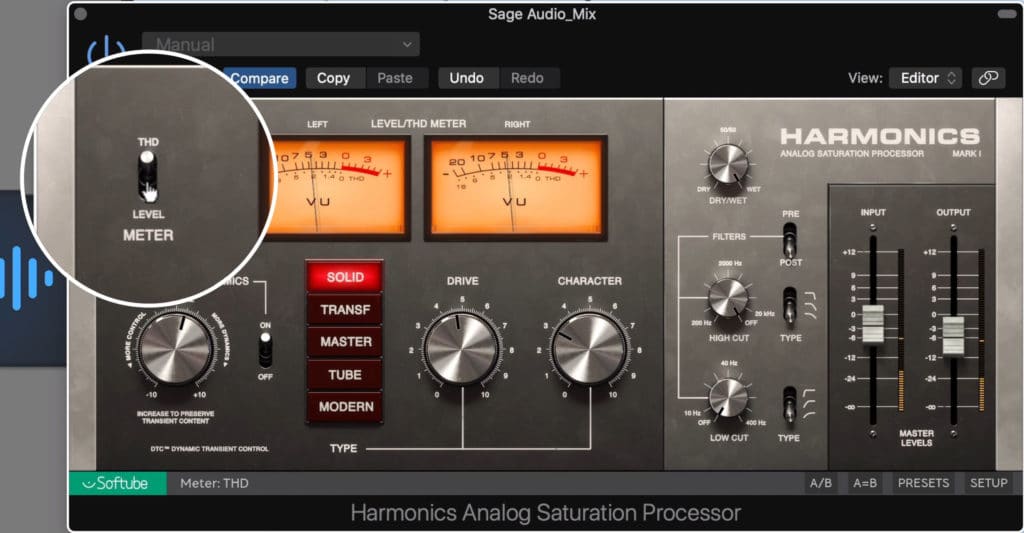
The VU meters can be switched between level and THD.
Looking again at the Dynamics dial we see that by turning it to the left we compress the signal. Doing so also appears to introduce automatic make up gain to the compression.
By turning it to the right we introduce expansion, which is really useful considering the distortion will naturally compress the signal by removing some of its dynamic range.
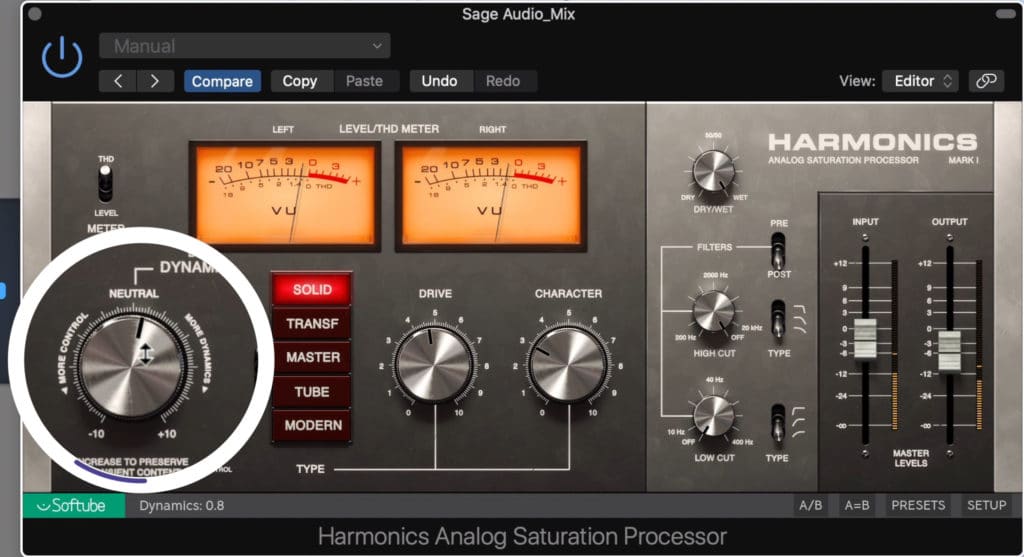
The dynamics section can compress the signal or cause expansion.
The drive function increases the amount of distortion, whereas the character rotary seems to make the harmonics more varied. I notice that when set to 0, the amplitude of the harmonics s the greatest.
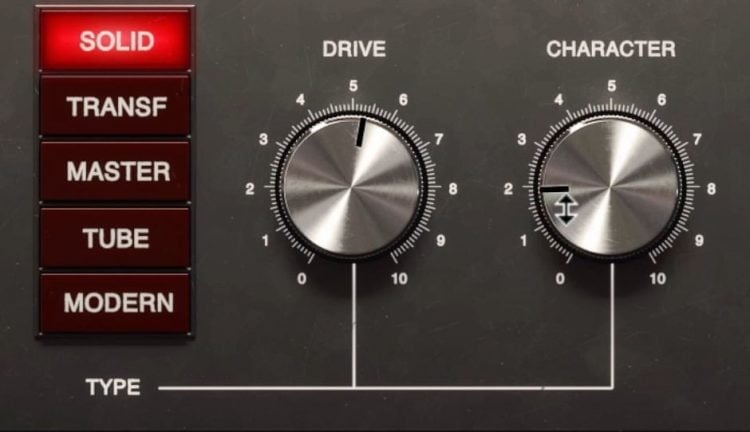
The distortion amount and type can be edited with the type, drive, and character functions.
To the right, we have a wet/dry mix knob as well as some filters. There’s a high cut or low pass filter, and a low cut or high pass filter. The slopes of these filters can be altered as can the routing by making the filtering occur either prior to or after distortion.
Lastly, we have an input and output slider. Like the PreBox these functions can be used to create more distortion by increasing the input and decreasing the output.
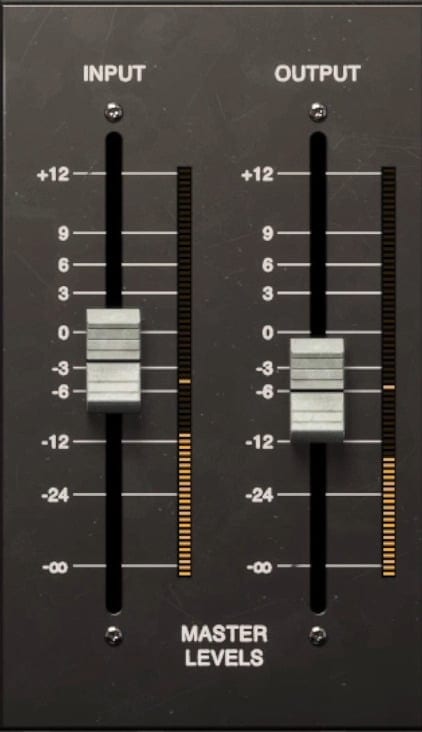
The input and output master levels are available on the right side of the plugin.
If you want to learn more about saturation, check out our video and blog post on the topic:
CPU Usage
When using the Harmonics Analog Saturation Pro on our system, Logic Pro X’s CPU hovered around 25%.
Cost
For there amount of functionality that this plugin offers, it’s pretty expensive. To download the plugin it’ll cost you $149 USD. It’s a great plugin for sure - the tone it can create and the simplicity of its design are fantastic, but it is surprising how expensive it is given the lack of extra functionality.
Winner: Izotope’s Trash 2
Although it’s a little on the pricier side for what can be considered a “cheap” plugin, and its CPU usage is high, the Trash 2 plugin offers immense flexibility and an easy to understand design despite its complexity.
Our pick for the winner is Izotope's Trash 2.
The number of options may take some getting used to, but once you do, this plugin could easily take the place of 10 other plugins.
With that in mind, this plugin truly is the best value for your time and money - once you understand how it operates, and its unique routing, Trash 2 can be used for both mixing and mastering.
Whether you can to heavily distort a signal, add subtle harmonics, or even emulate a unique acoustic space, Trash 2 has something for almost every element of saturation.
Furthermore, its customization settings allow you to create forms of distortion that wouldn’t be available on the other 2 plugins we covered.
If you’re in doubt, try the 10-day trial and see if it augments your mixes and masters.
If you wanted to hear your mix professionally mastered, send it to us here:
We’ll master it for you and send you a free sample for you to review.
Have you tried any of these plugins?


