Top 10 Free Stereo Imaging Plugins
Doppler Dome - Aegean Music
Panagement 2 - Auburn Sounds
Width Knob - Boz Digital Labs vs. Wider - Infected Mushroom
Ozone Imager 2 - Izotope
Vocal Doubler - Izotope
MAutopan - MedlaProduction vs. PanCake2 - Cableguys
MSED - Voxengo vs. StereoImager V2 - Flux
Stereo imaging isn’t thought about too terribly often, but it is an incredibly important aspect of creating modern music.
To fully understand stereo imaging, the complex phase relations, and how it all works would take some time - fortunately, knowing how to operate a plugin is a bit more accessible.

Free plugins are a great way to become introduced into new forms of processing.
With that in mind, let’s take a look at 10 different stereo imaging plugins, all of which are free and can make your mix or master sound great.
For this list we’ll be doing something a little different - there are definitely plugins on this list that are unique enough to stand alone, but there are some that do similar things just with some small changes in plugin design.
With that said, we’ll showcase the unique plugins by themselves, but do more of a compare and contrast with the similar plugins so that you can choose which one you’d prefer to try.
If you watch the video above, be sure to leave a comment telling us which plugins you like, which you don’t, and maybe which one you’d pick during the plugin comparisons.
If you have a mix that you’ve been working on and you’d like to hear it professionally mastered, send it to us here:
We’ll master it for you and send you a free sample to review.
Doppler Dome - Aegean Music
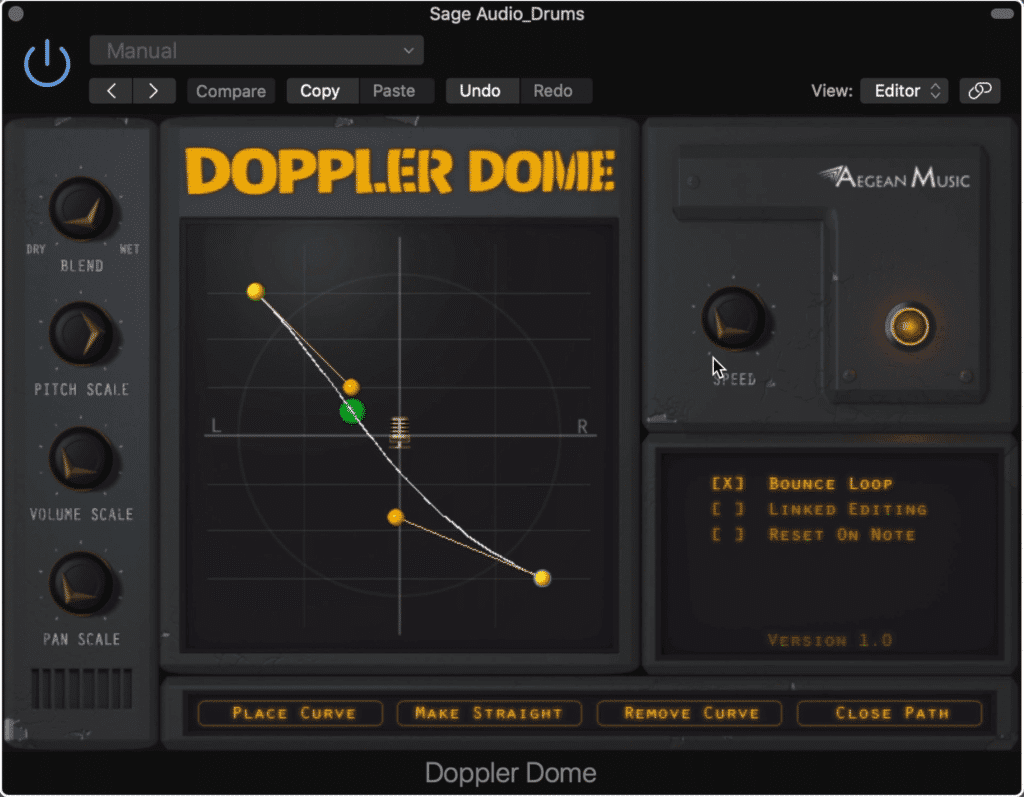
The Doppler Dome emulates the doppler effect, and can be easily altered.
When I think about stereo imaging, my first thought isn’t about the doppler effect - an occurrence that is typically thought of as more of a cinematic or virtual reality type effect.
However, the Doppler Dome is not just an amusing plugin, but a useful and highly creative one that can augment mixes with unique and unexpected panning.
The plugin has 5 primary rotaries, 4 functions, 3 variables, and an interactive display with which you can alter the path of your signal.
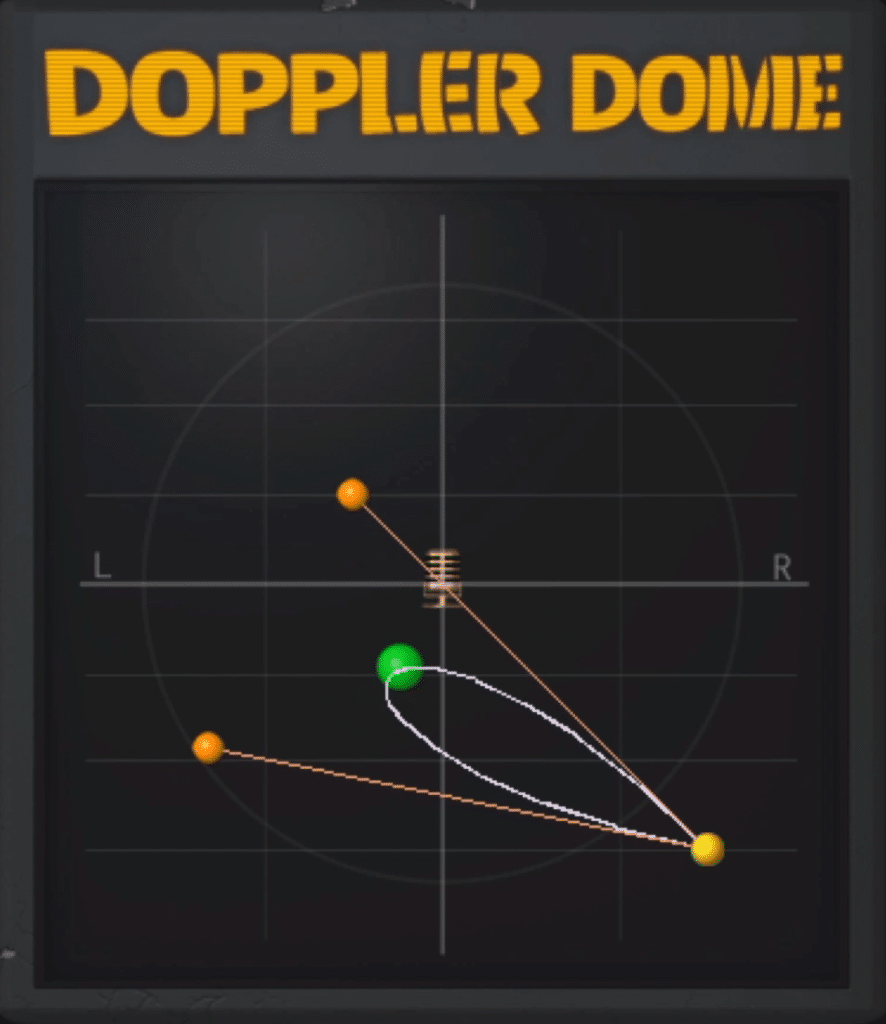
Notice the green circle, this is the signal's spatial location, and it moves within the loop.
The blend rotary is a wet/dry knob, the pitch scale is the rate of pitch shifting ranging from 0 to 1 with 1 being the most aggressive pitch shifting.
The Volume and Pan scale rotaries affect the volume and panning respectively, and determine how much volume automation and pan automation is present in the signal.
Lastly, the speed rotary determines the rate at which the Doppler effect occurs.
By dragging the points on the display you can affect the path of your signal, both left and right, and up or down in amplitude.
By clicking Place Curve you add a new point on the scale, Make Straight you straighten the path, Remove Curve you remove your last added point, and Close Path you create a loop with the two closest points.
The bounce loop variable causes the signal to be routed one full direction and then reverse directions. Linked Editing causes a smoother sound between points, and reset on note allows midi input to alter the functionality of the plugin.
Panagement 2 - Auburn Sounds
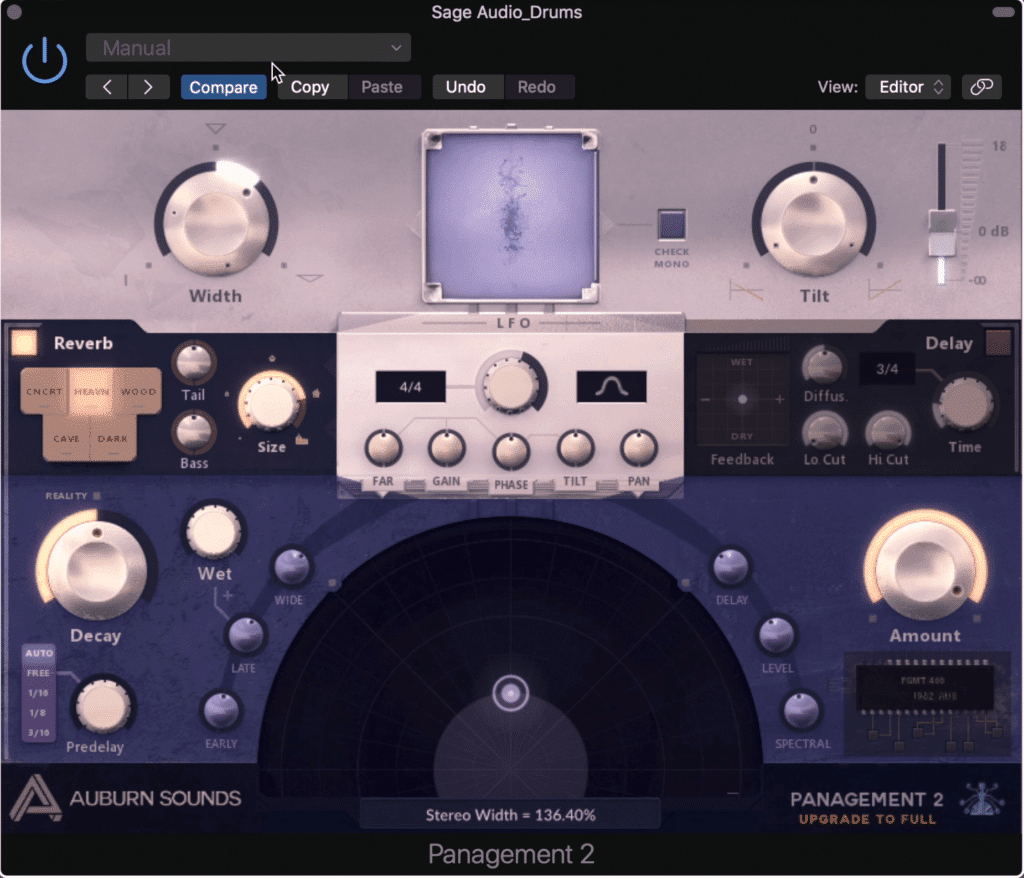
The Panagement Plugin is an incredibly powerful spatial design and LFO plugin.
Management 2 by Aubn is an incredibly powerful and versatile plugin with immense flexibility. Even though this free version doesn’t include the delay section, there is more than enough that can be accomplished.
Let’s look first at the width and tilt rotaries - these are the easiest way to quickly achieve a noticeable difference in your stereo width. As you can imagine, width increases or decreases the stereo width from mono to a 180-degree spread.
Tilt is essentially an EQ for the entire signal. To the right of these functions is an output slider with up to 18dB of additional gain.
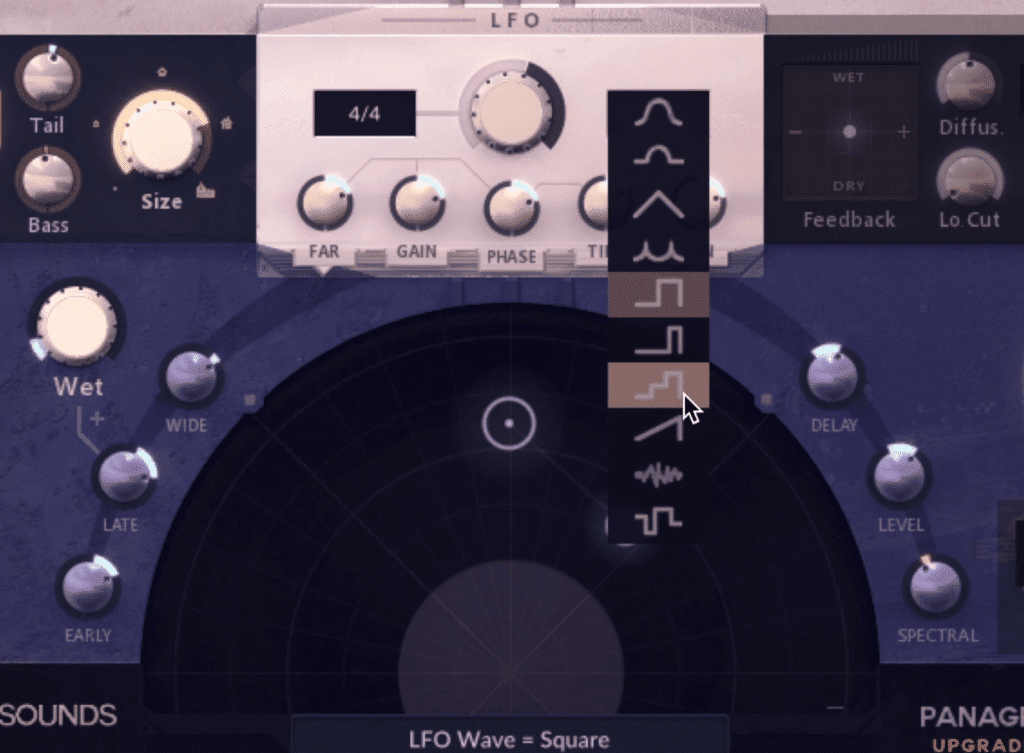
The LFO can be altered with multiple parameters that change the shape and route of the LFO.
On the left side of the plugin is a reverb section - with options for the material of the walls, the tail and low-frequency range of the reverb, and the size.
You can also adjust the decay, the predelay, the wet and dry of the signal as well as the amplitude of the early and late reflections. But what’s a little different about this reverb is that you can affect the stereo width of the reverb using the width rotary.
The most interesting aspect of this plugin in my opinion is the LFO or low-frequency oscillator , with which you can greatly affect your signal.
First, you can position your listening perspective in the 180-degree field, determining its pan and amplitude simultaneously. Then you can affect the LFO’s distance, it’s amplitude, phase, tilt, and pan.
The pan can be altered based on delay, level, and spectral - with the level being your typical panning, and delay and spectral panning being based on psychoacoustic effects.
The motion of the oscillation can be altered with the shape function which ranges from sine wave oscillations to triangle, square, and random.
The LFO can be set to be in tempo with your track at various notes, or you can choose the free option and enable a rotary with which you can choose the exact oscillation.
Lastly, the delay section is not available in this free version.
If you like this free plugins list and you want some more free plugins, check out our other blog posts on the topic:
Width Knob - Boz Digital Labs vs. Wider - Infected Mushroom
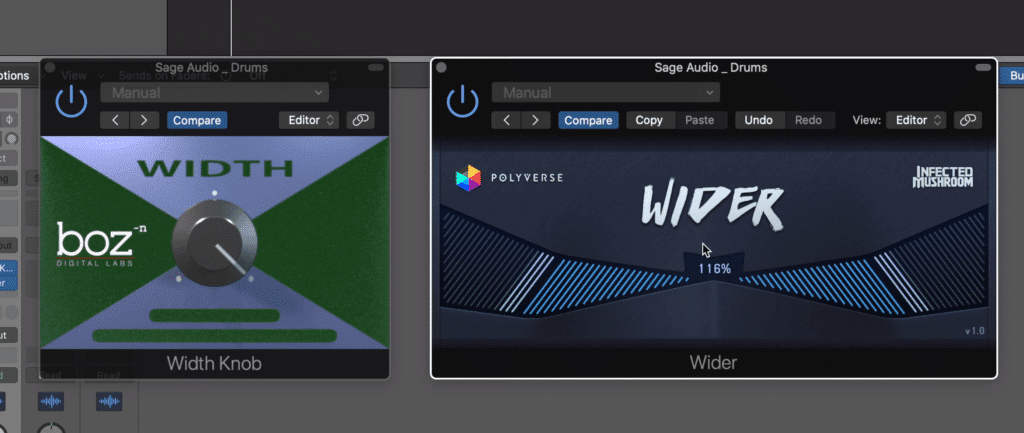
These two plugins, although seemingly similar at first, do different forms of processing.
First off, both of these plugins are great and you can’t go wrong with either one of them, but since they’re so similar, at least at first, let’s do a quick compare and contrast.
At first glance, they appear identical in functionality, since they both just have one function which causes the signal to become wider.
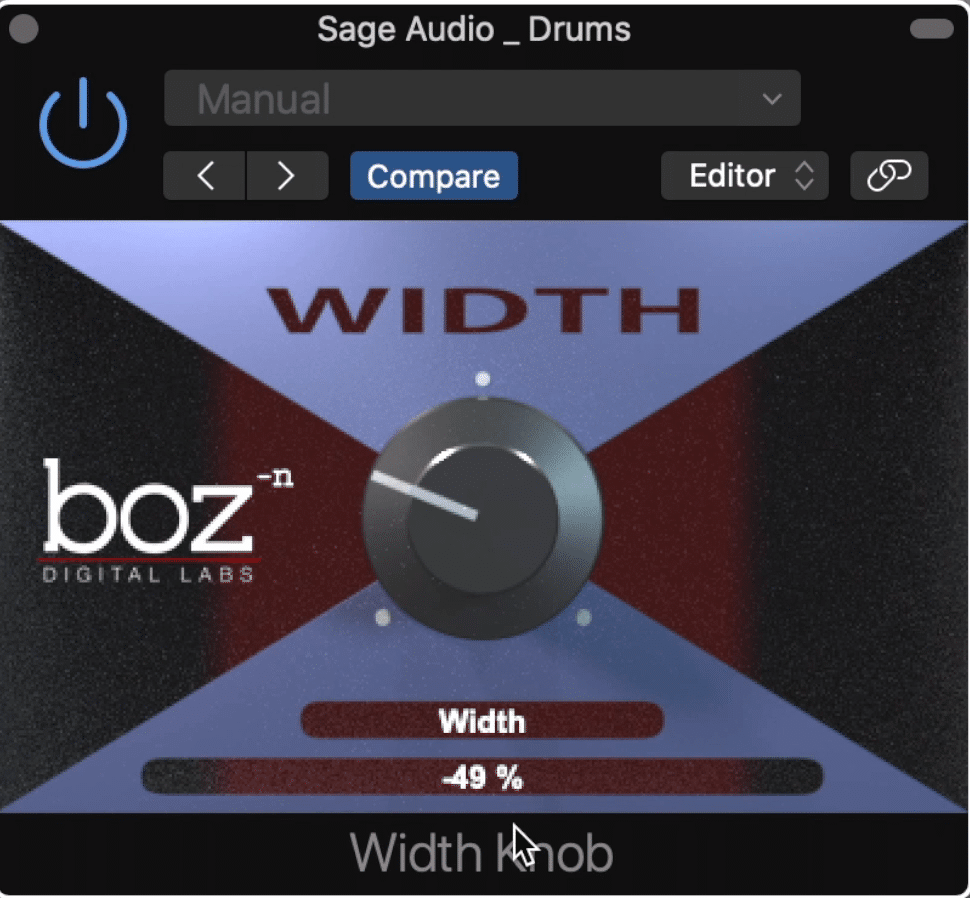
The Width plugin can inverse your signal's phase, and decrease the stereo width, but it can not increase it beyond its original width.
But upon closer inspection of the two - there’s definitely a big difference. Whereas the Wider plugin by Infected Mushroom increases the stereo width within the 90 and 180-degree stereo field , Width only allows you to alter the stereo image of your signal within its already established stereo field.
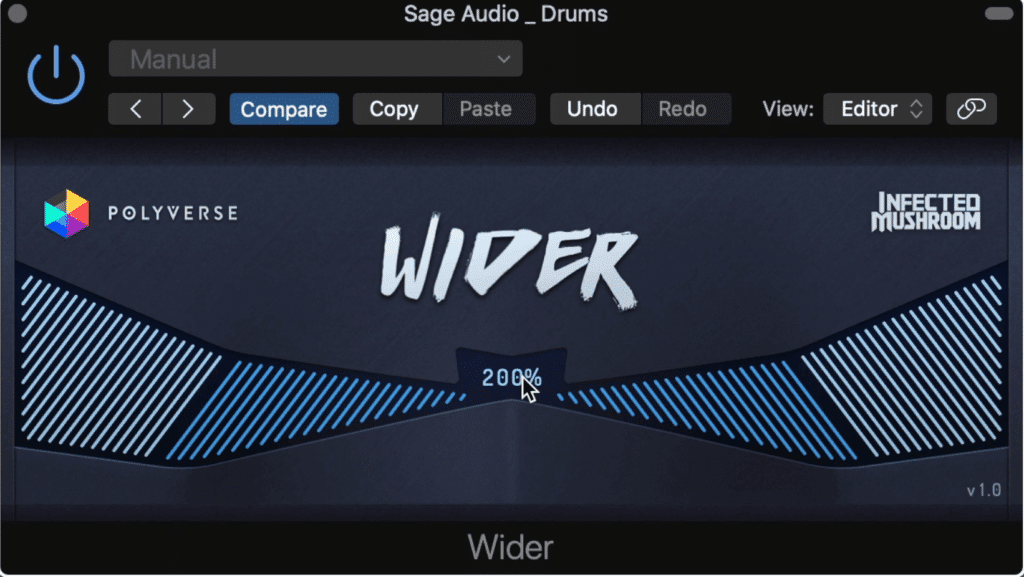
The Wider Plugin expands the width of the image, but cannot make it more narrow.
So with the Width plugin , when you turn the rotary all the way up, you hear your stereo image exactly as it was without the plugin. You can turn it down and narrow your stereo image to mono when the rotary is at unity, or inverse the phase of your signal by going into the negative territory.
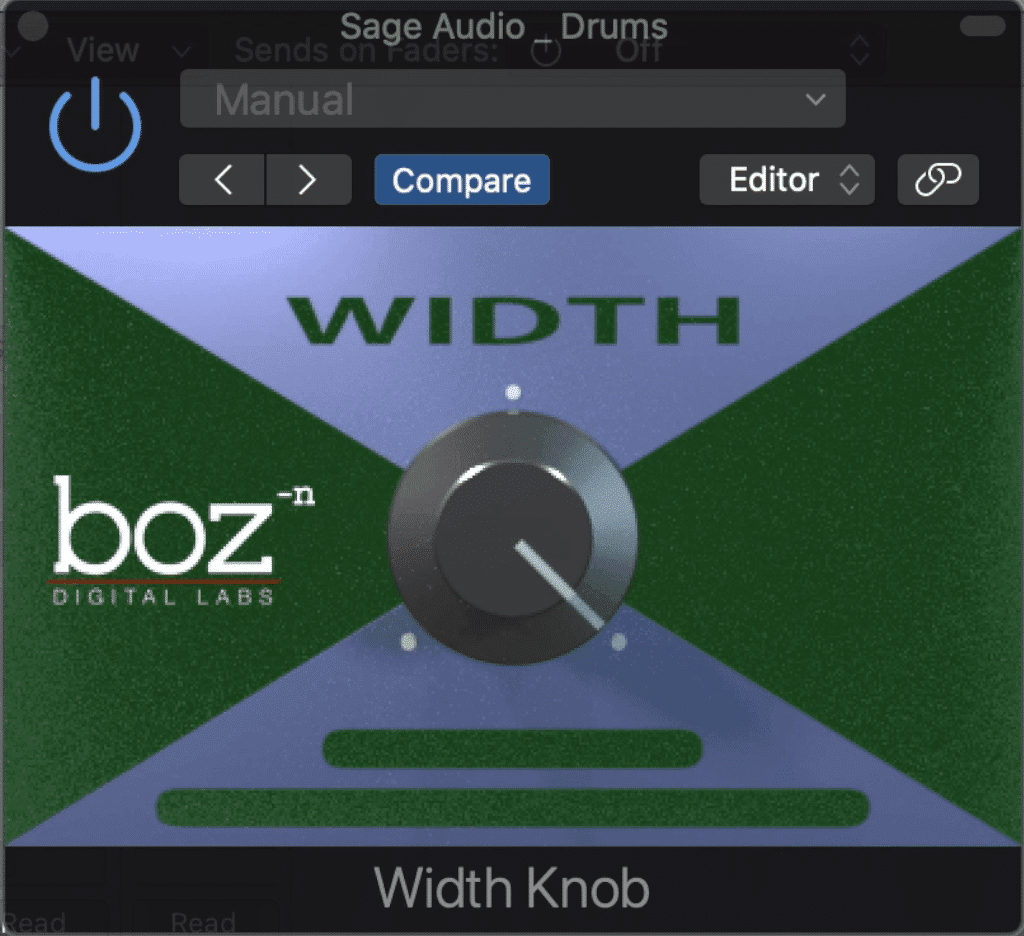
With the width knob to the full right, the plugin is essentially bypassed.
Wider on the other hand allows you to drastically increase your stereo image , without the option of narrowing it. As you can imagine, the larger the percentage on the wider plugin’s scale, the greater the stereo spread.
Let’s listen to both of these plugins, and then let us know which one you’d rather use in the comments section below - do you think Wider or Width is more useful, or would you choose both? Let’s take a listen.
Ozone Imager 2 - Izotope
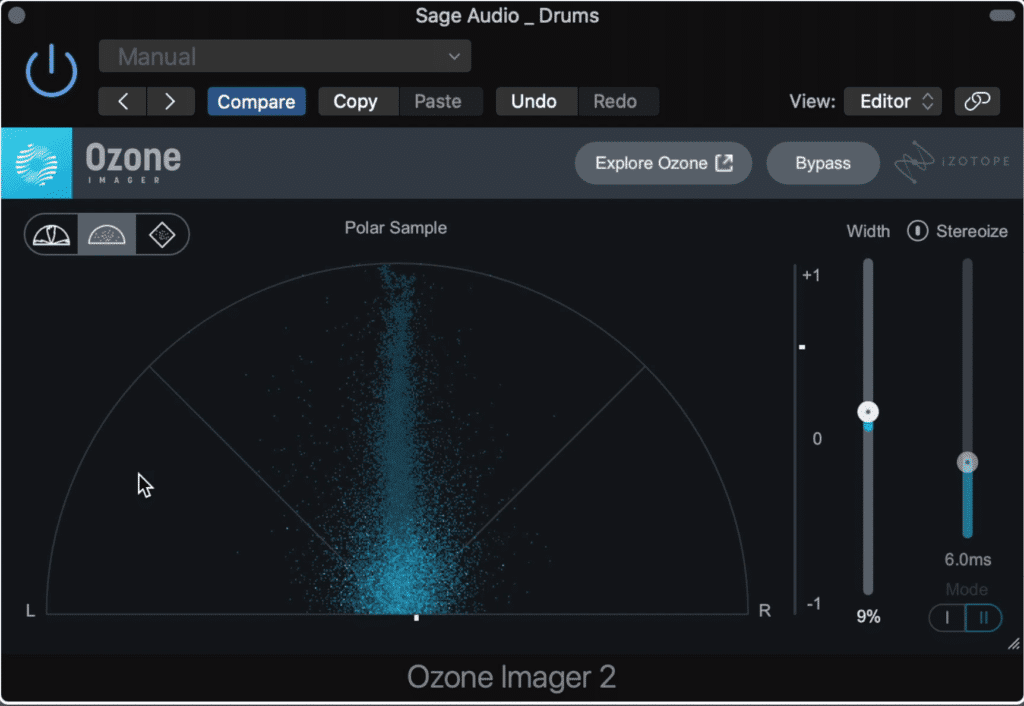
The Ozone Imager is a scaled-down version of the Ozone multi-band imager.
By this point, most engineers and producers have heard about Izotope and their Ozone line of products. Just as popular is their free iteration of their multi-band stereo imager, simply called Ozone imager.
The free version of this plugin allows you to affect the entirety of your mix or master at once, and to alter the stereo image based on a few parameters.
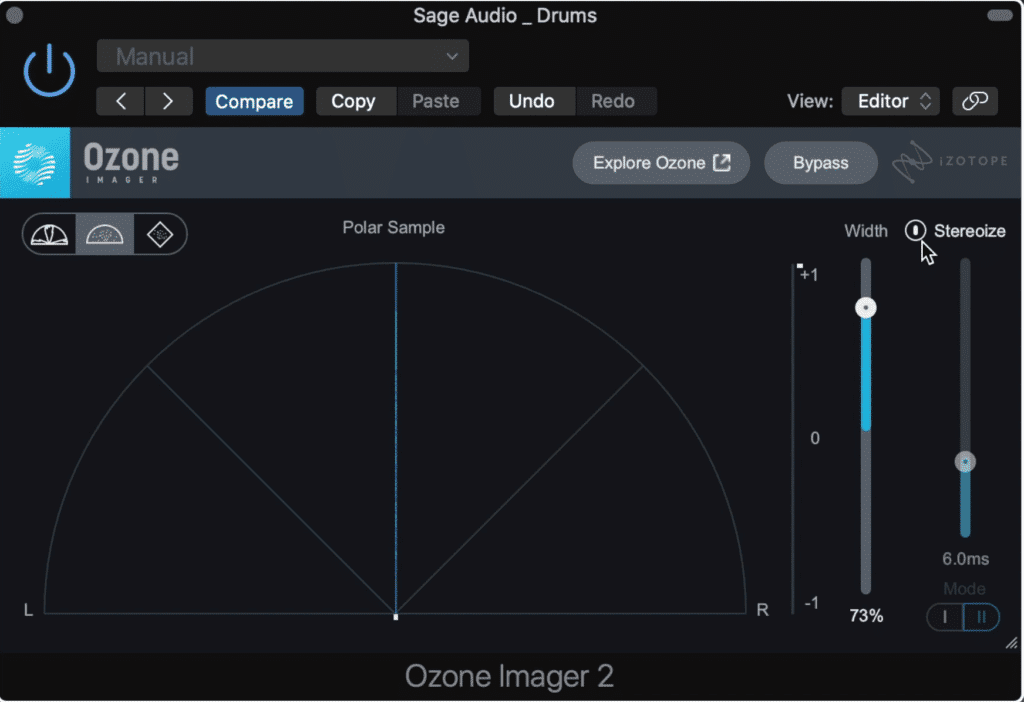
If the image is mono the width function doesn't work, but the stereoize function can be used to establish width.
The first is a Width slider, which affects the width of your stereo image. Keep in mind that your signal cannot be made more stereo if it is mono.
To accomplish stereo imaging from a mono signal, you would need to create two mono images and then delay one slightly. This is exactly what this plugin accomplishes with the Stereoize slider.
With this slider, you determine the delay between your left and right signal in milliseconds. It’s important to note that a greater delay time does not always result in a larger stereo spread.
Three different meters can be used to monitor the signal.
Two modes switch the delay type between a Hass Effect type delay and a noise-based delay which uses impulses to create a more impressive side channel.
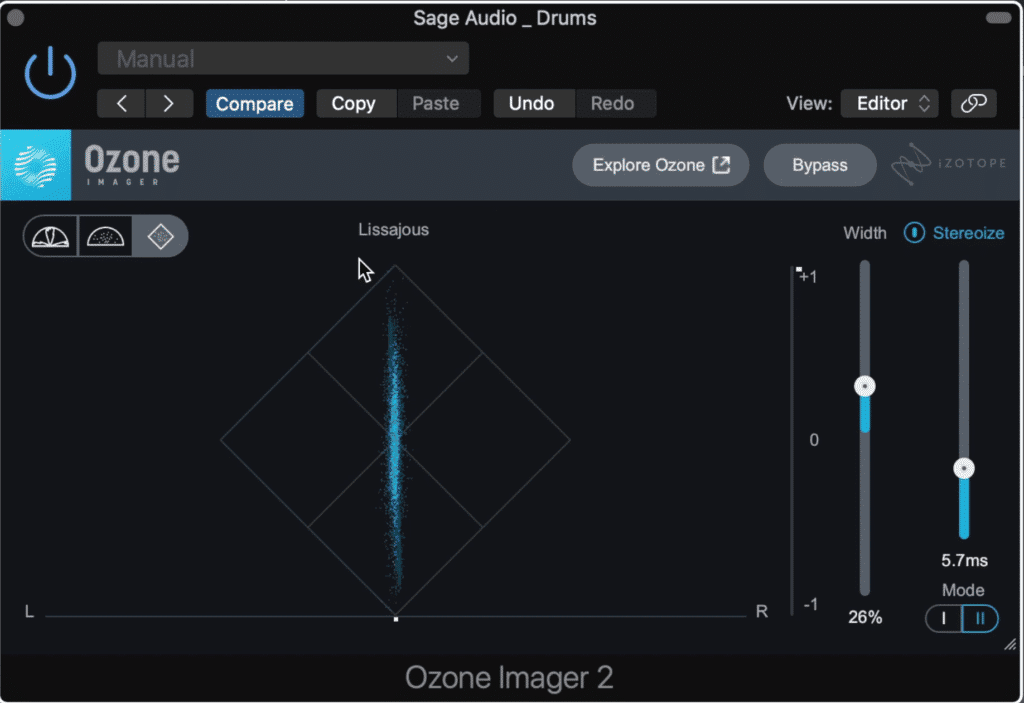
Lastly, you can alter the display between three settings. The first is a polar level which shows the amplitude of the signal within the 180-degree stereo field, the second is a polar sample which does the same thing but with points.
The last one Izotope has called a Lissajous meter, and it shows the correlation between the left and right signal, and whether or not these signals are balanced.
If you have a mix that you just finished, send it to us here:
We’ll master it for you and send you a free sample to review.
Vocal Doubler - Izotope
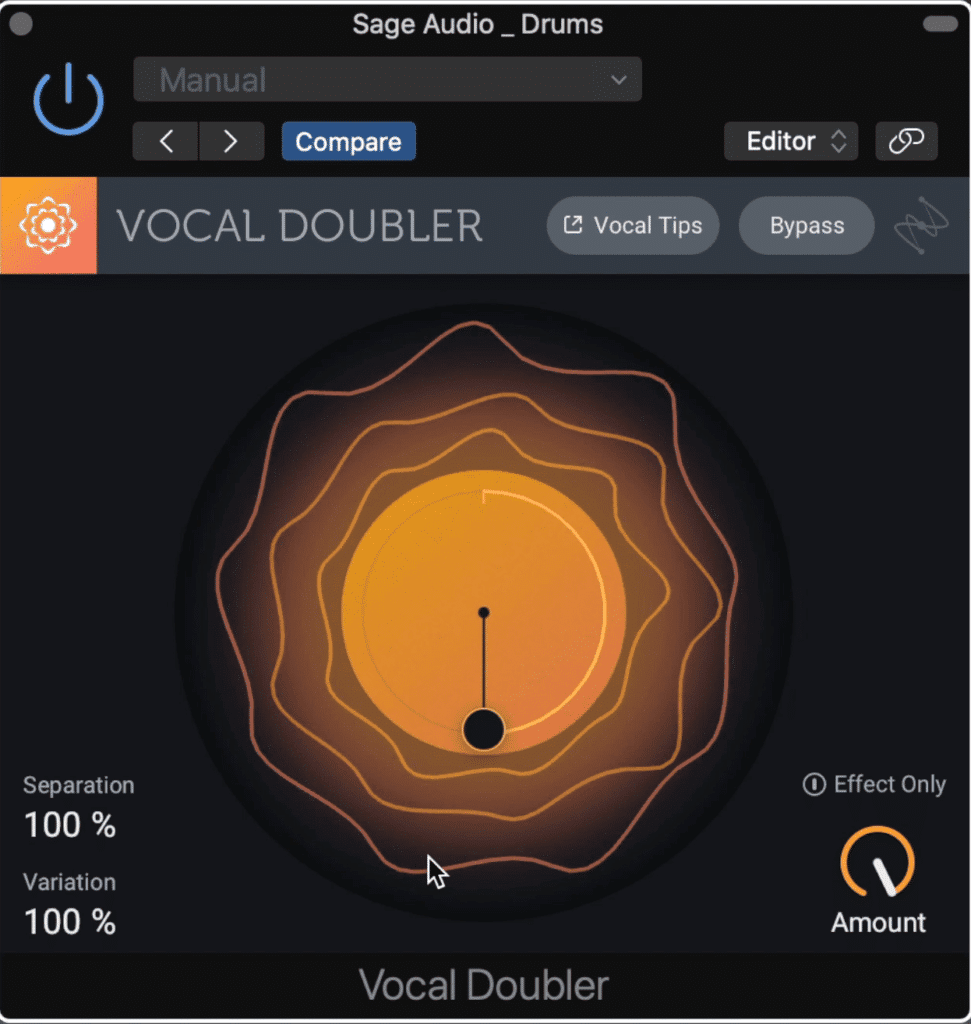
The vocal doubler can be used on various instruments, not just vocals.
Up next is another imager plugin from Izotope that’s used to double, triple, or quadruple vocals.
In the display, the orange circle represents your original signal, while the three outside bands are your delayed or doubled signals.
With the dial in the middle , you can affect their stereo separation and the variation which causes some random phase cancelations, in turn causing a wider overall image.
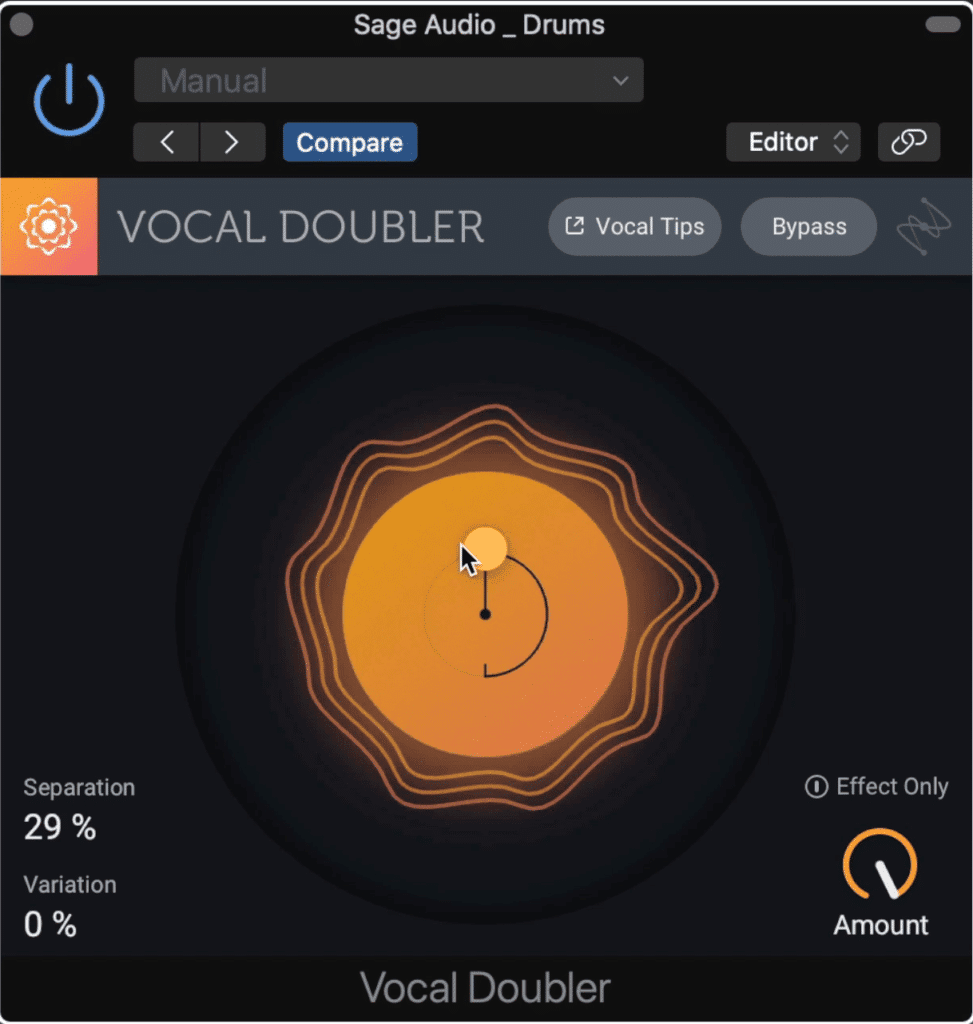
The doubled signal can be made more uniform and tight, or loose and varied.
By pulling the dial inward, or pushing it out you decrease or increase the separation and the stereo spread of the signals. By inverting the dial you cause more or less variation between these three separate and delayed signals.
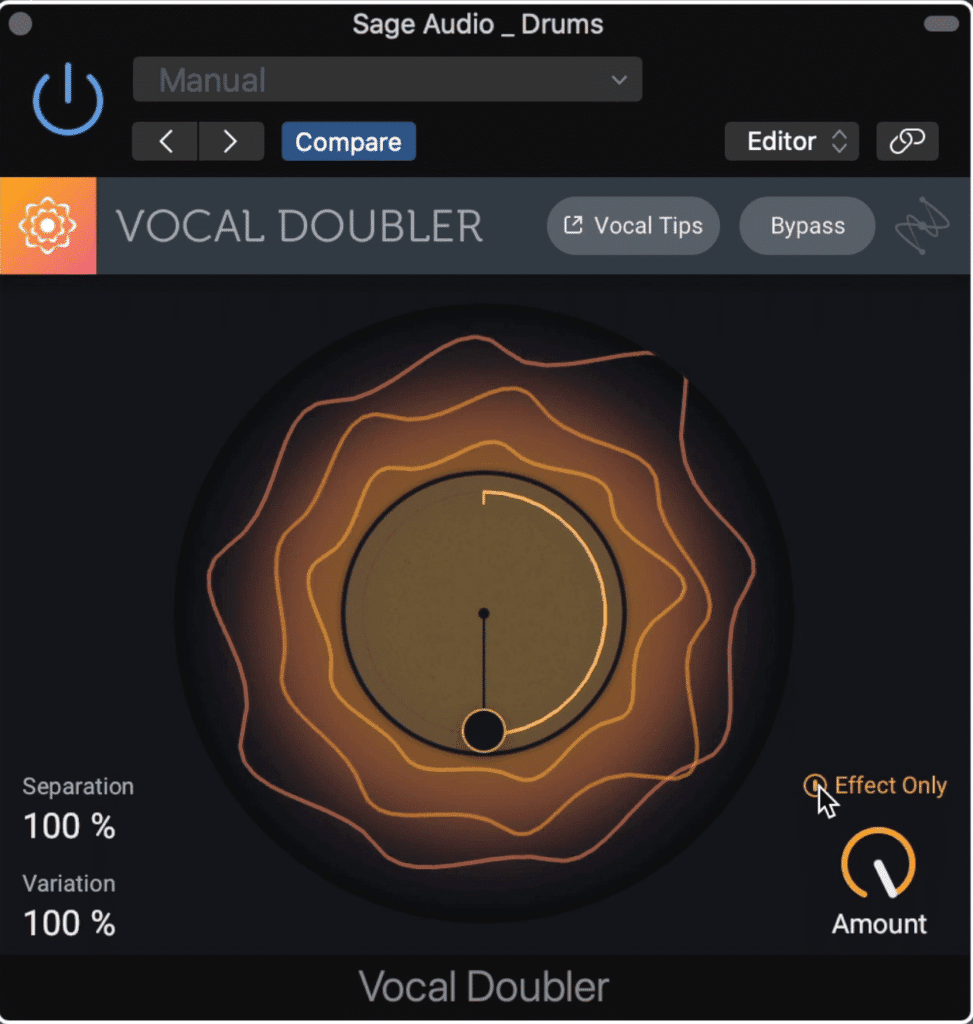
The effect only function allows you to solo your processed signal.
You can also bypass your original signal but keep the delayed signals with an 'Affect Only' function. Additionally, a wet/dry rotary titled amount allows you to control the strength of this effect.
Although this effect is typically used on vocals, try it on other instruments to create some unique and unexpected effects.
If you want to learn more about coal processing, check out our blog post on the topic:
MAutopan - MeldaProduction vs. PanCake2 - Cableguys
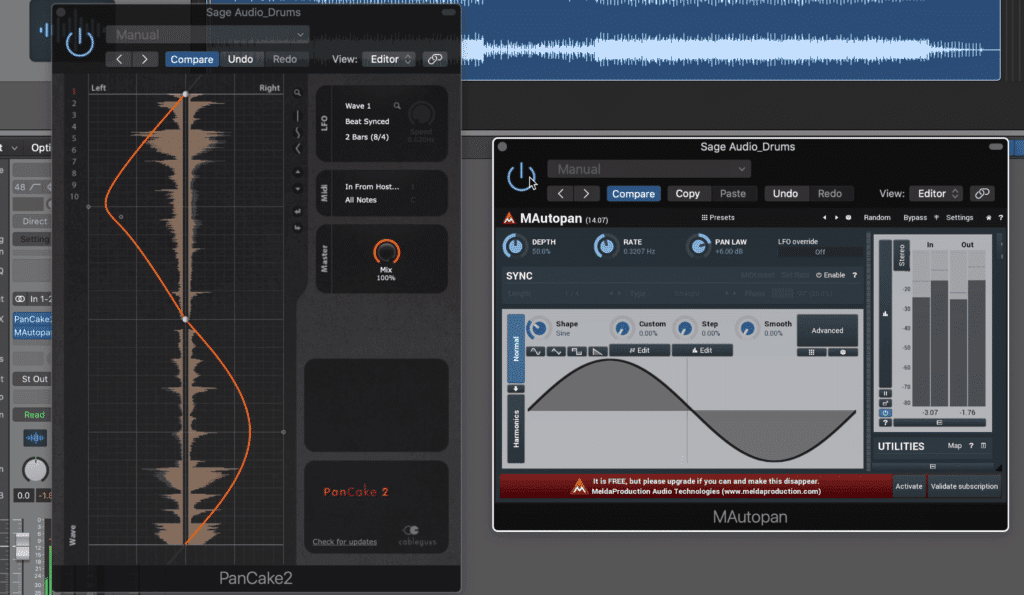
The PanCake2 and the MAutopan both automate pan over time.
Both the MAutopan and the PanCake 2 serve one purpose, which is to allow engineers to write panning over a particular span of time.
Let’s start by looking at the simpler of the two. The PanCake 2 is pretty minimalistic in its control scheme. You can alter your panning between three settings, straight, sine wave, or triangle.
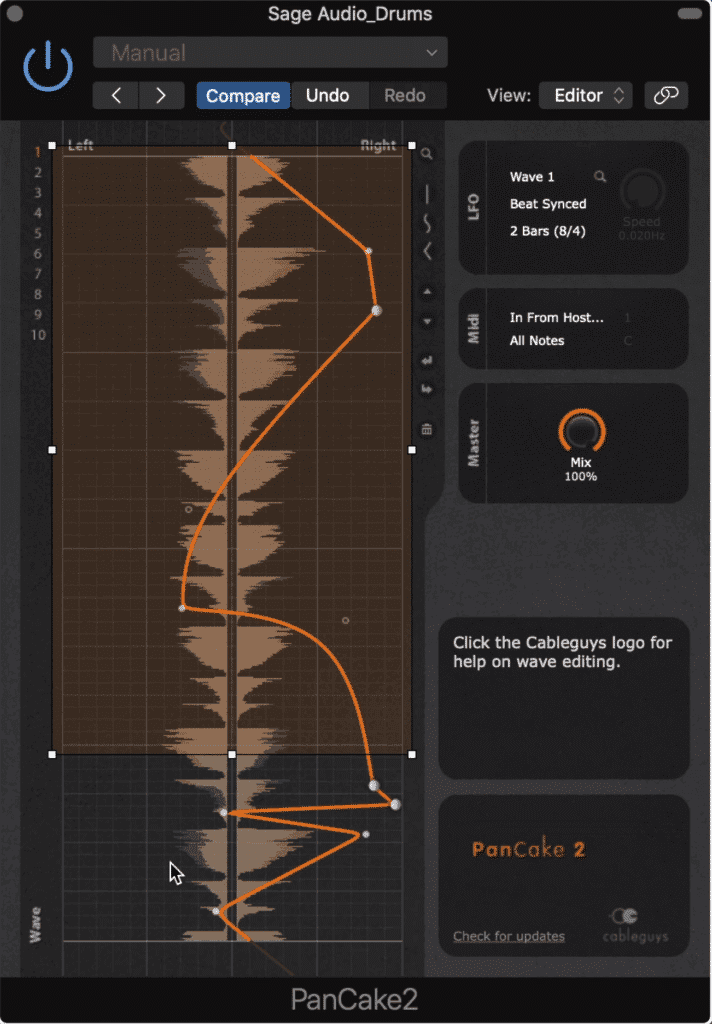
The PanCake 2 allows you to draw in your panning, as well as randomize the pan.
In the display, you’ll notice that the left and right channels are labeled as such. In this display, you can create points, drag them, and create new shapes for your panning.
The rate of oscillation can be set to be in time with the BPM of your track.
You can also right-click to select all of the points you’ve created, invert or mirror your points , and to randomize them which is pretty useful if you want to experiment.
You can also create multiple waves that you can cycle through by selecting the arrows to the right, or clicking the numbers on the left.
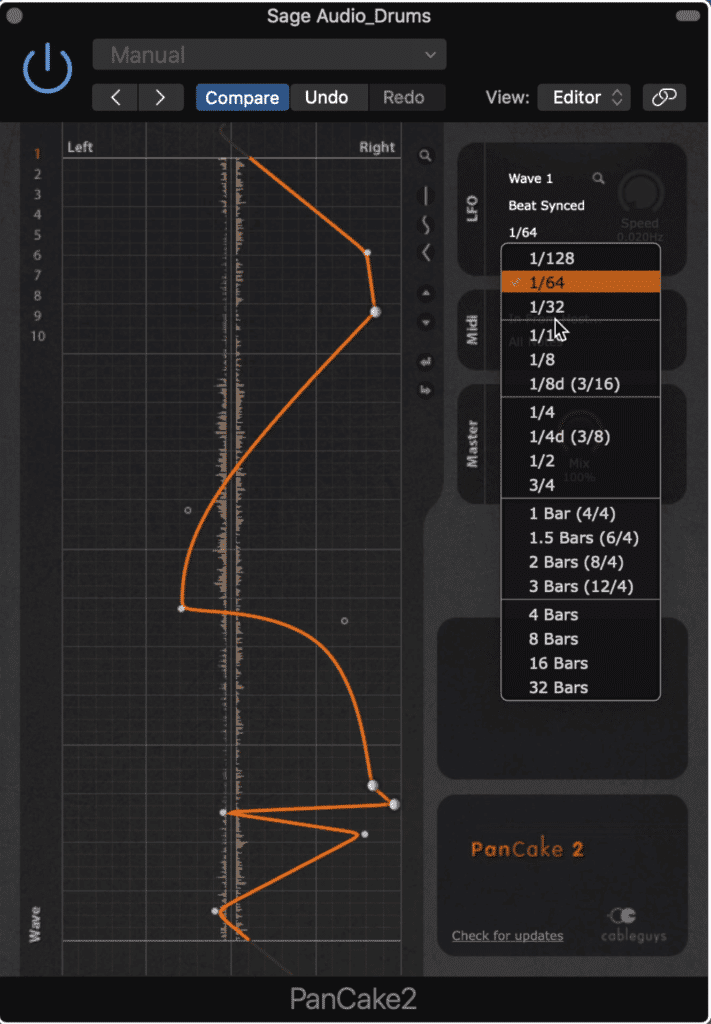
The LFO section allows you to determine the rate at which your drawn panning is cycled through, as well as pick the wave number. By using the Beat Synced option, you can alter the rate of the oscillator while keeping it in time with your host BPM.
Next let’s looks at this plugin's contemporary, the MAutopan.

This plugin also shows a visual indicating where the signal is panned.
Like the PanCake2. You’ll notice a display that demonstrates the oscillators panning cycle - but instead of dragging and dropping points, you can alter the waveform with the shape, custom, step, and smooth rotaries.
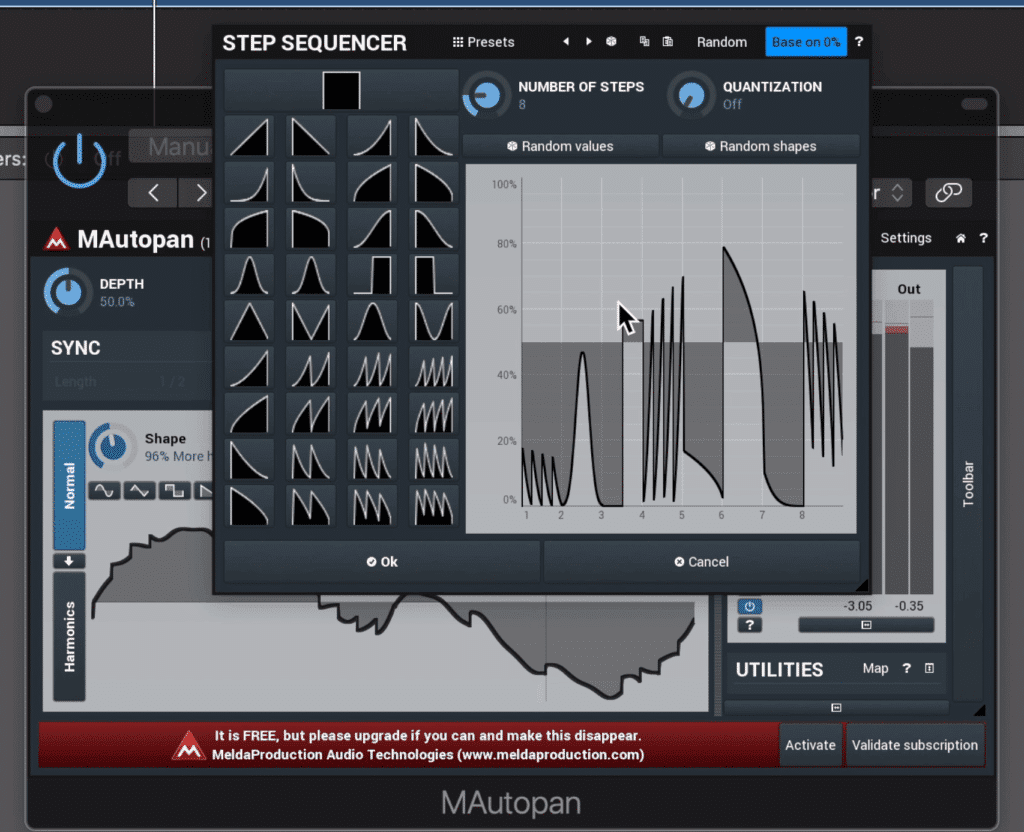
The settings can be made random using a sequencer.
Or, you can select a sine, triangle, square, or saw wave pattern by selecting the icons. Additionally, you can alter the timing of the oscillation with the rate rotary, or you can sync it to the BPM of the track, just like the Pancake 2 plugin.
You can also make things a lot more complex by editing your wave, or creating a sequencer. In this sequencer you can create both a random pattern and a random sequence.
By opening the advanced section you can allow for normalization, invert the phase, enabling crossfades - you can even load a sample and model the panning after it.
If you really want to hone in on your settings and potentially spend hours affecting your signal, you can open up the harmonics section and alter the phases and levels of a multitude of harmonics, including your first order or fundamental.
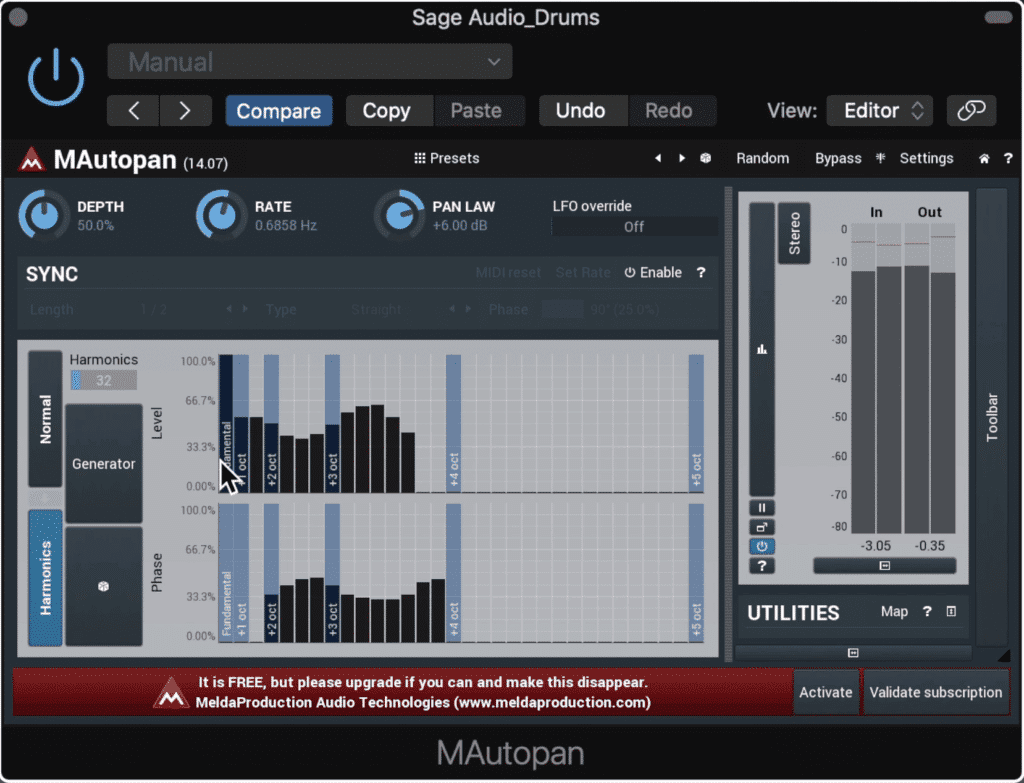
Harmonics can be drawn in using the harmonics function.
Or if you want you can open up the presets and change your settings based on multiple instrument types. In all honesty, it’s a lot to try and understand at once, and it’s a plugin that definitely takes some time and experimentation to get a full understanding of.
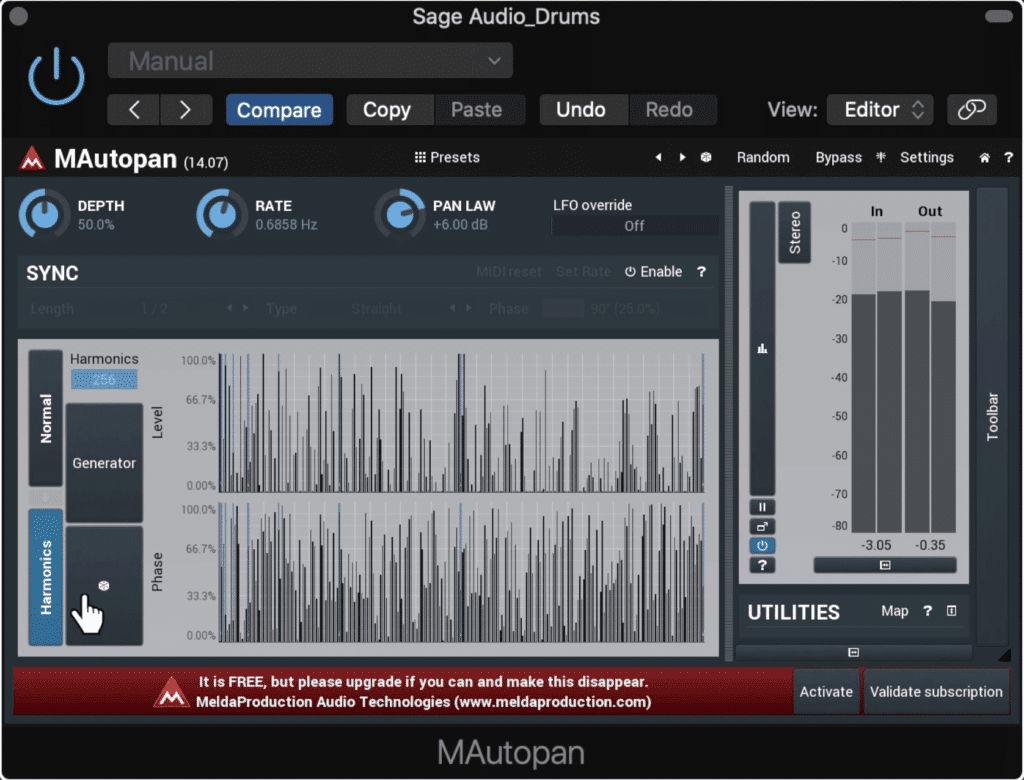
Presets allow for a complex harmonic generation.
And I even bet there’s some functions that I missed which drastically change how the plugin can be utilized - there’s definitely a lot to digest with the MAutopan.
So would you pick the straightforward Pancake 2 or the more complex and nuanced MAutopan - let us know if the comment section below.
MSED - Voxengo vs. StereoImager V2 - Flux
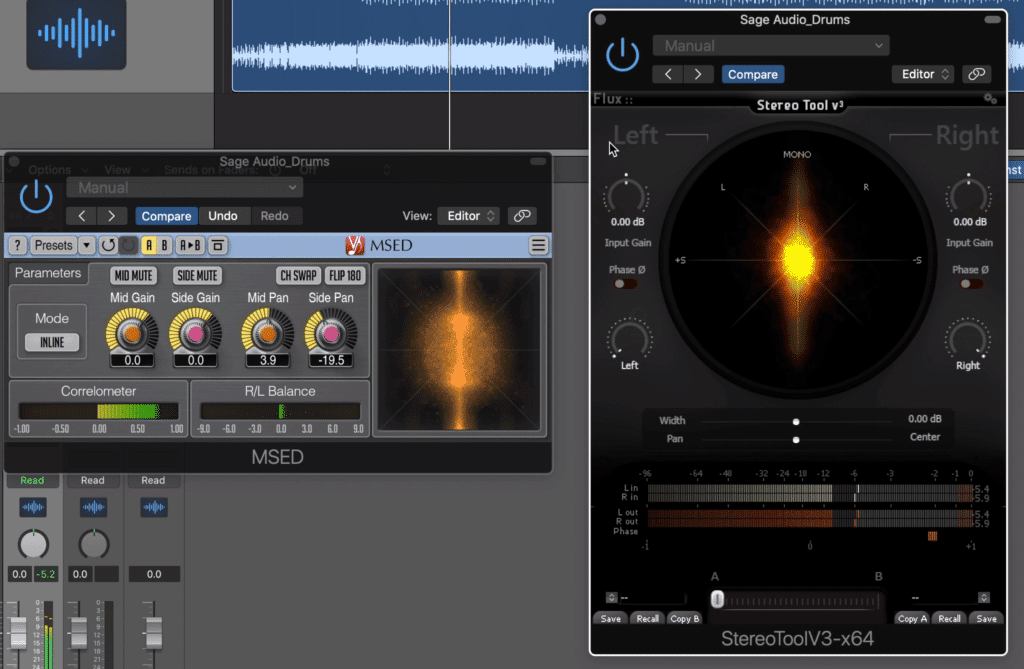
These two plugins are very similar in functionality.
Last up we have two plugins that are thankfully a little simpler than the one we just covered. Both MSED by Voxengo and StereoTool by Flux offer a way to invert phases, introduce mid-side processing, and pan both the mid and side.
Let’s look at MSED first.
The MSED has 4 rotaries with which you can change the gain of your mid image, your side image, and the pan of both of these images.
4 buttons along the top allow you to mute the mid-channel, mute the side channel, swap the left and right channels, or flip the image 180 degrees.
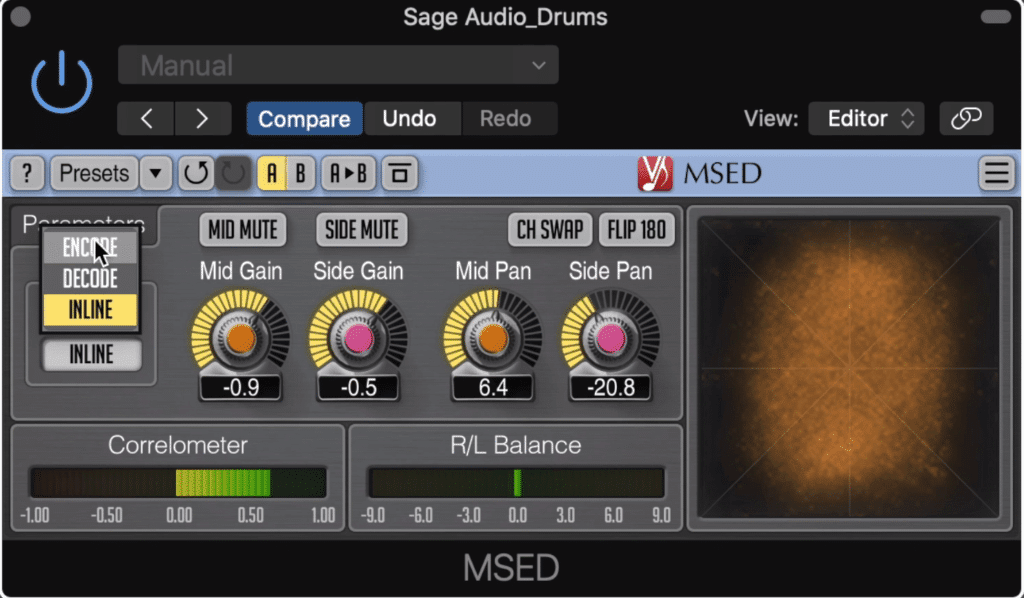
The MSED can control the gain and pan of the side images independently.
You can switch your mode between inline, decode and encode, but you’ll most likely be using the inline setting most often.
At the bottom is a correlation and balance meter, with a spectrogram on the right. Additionally, you can switch between an A and B comparison.
The Flux plugin has some very similar parameters, just displayed differently.
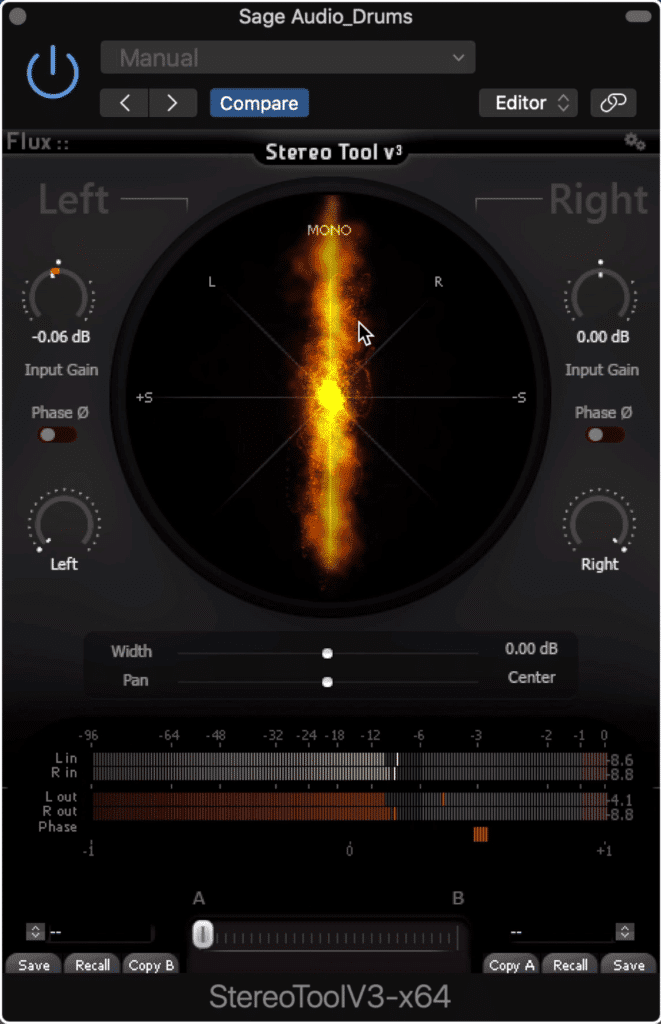
The StereoTool allows for variable input gain of the left and right channels, channel-independent phase inversion, and global widening with the width slider.
With it, you can change the left and right channel’s input, invert their phases and alter their individual pans.
You can also introduce mid-side processing by alter the width slider and then pan this image with the image slider.
You’ll notice a correlation meter at the bottom , as well as a spectrogram on the center of the plugin which shows the full 180-degree stereo field.
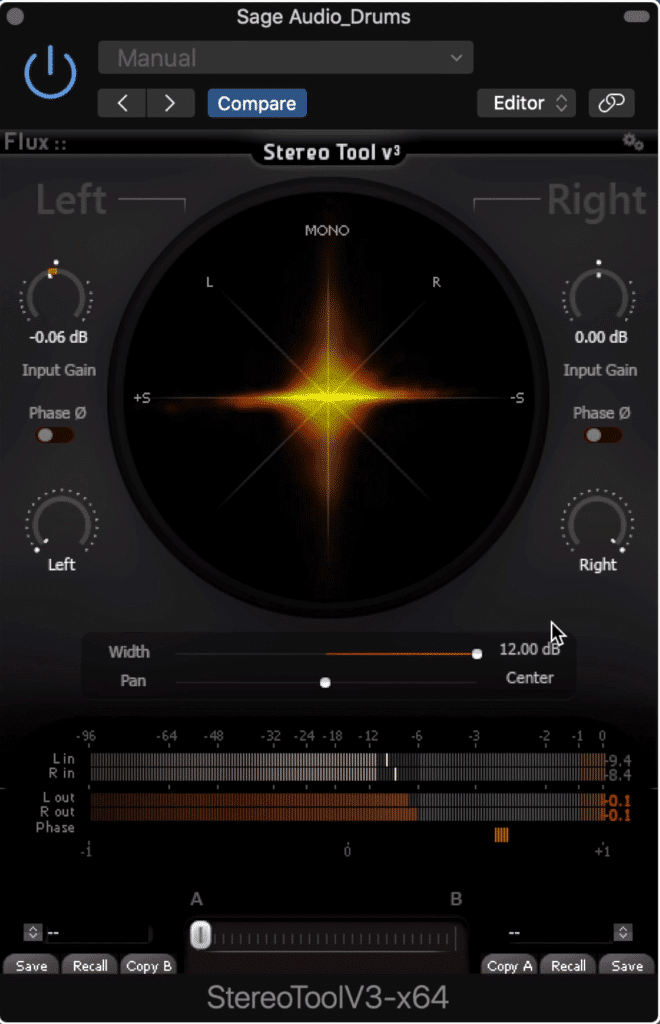
When the width slider is to the far right, the image occupies the 180-degree image.
Like the MSED, switching between A and B settings is an option.
So which of these two would you pick, or do you like them both for different reasons - let us know! Let’s take a listen to them both.
Conclusion
Stereo imaging, although often overlooked, is an incredibly important part of mixing and mastering. The plugins shown here can be used for both mixing and mastering, but use them sparingly if you intend to use to for widening a full mix or master.
If you have a mix that you want to hear mastered, send it to us here:
We’ll master it for you and send you a free sample to review.
Have you tried any of these plugins before?


