Top 6 Free Mastering Compressor Plugins
Compressor 4 - Toneboosters
Dynasaur - Analog Obsession
MSaturator - Melda Audio Productions
OTT - Xfer Records
Enhancer - Toneboosters
Kotelnikov - Tokyo Dawn Labs
The importance of compression is pretty well understood. Whether you’re mixing or mastering, having a good compressor that you know how to operate and achieve tones with is needed.
When you’re mastering, not all compressors will work well. Some compressors are made with mixing in mind and offer lower CPU at the expense of functionality and clarity.
In fact, some compressors distort more easily than others due to the simplicity of their design. With that said, these types of compressors are not well-suited for mastering.
When mastering, you need a compressor that can handle multiple situations - or at the very least, can create a desirable tone.
Some mastering compressors are more transparent, whereas others are better suited for creating a unique timbre. With that in mind, let’s look at our picks for the top 8 free mastering compressors.
We’ll cover their functionality and design, as well as discuss how they might be used during mastering. Additionally, we’ll listen to examples of these plugins in the video embedded above - so check that out if you want to hear the plugins.
Lastly, if there is a great compressor that you use for mastering, and we didn’t cover it here, let us know in the comment section of the video - we’d love to learn about more great free plugins.
If you’re an artist or engineer, and you want to hear one of your mixes mastered with all analog equipment, send it to us here:
We’ll master it for you and send you a free sample for your to review.
Compressor 4 - Toneboosters
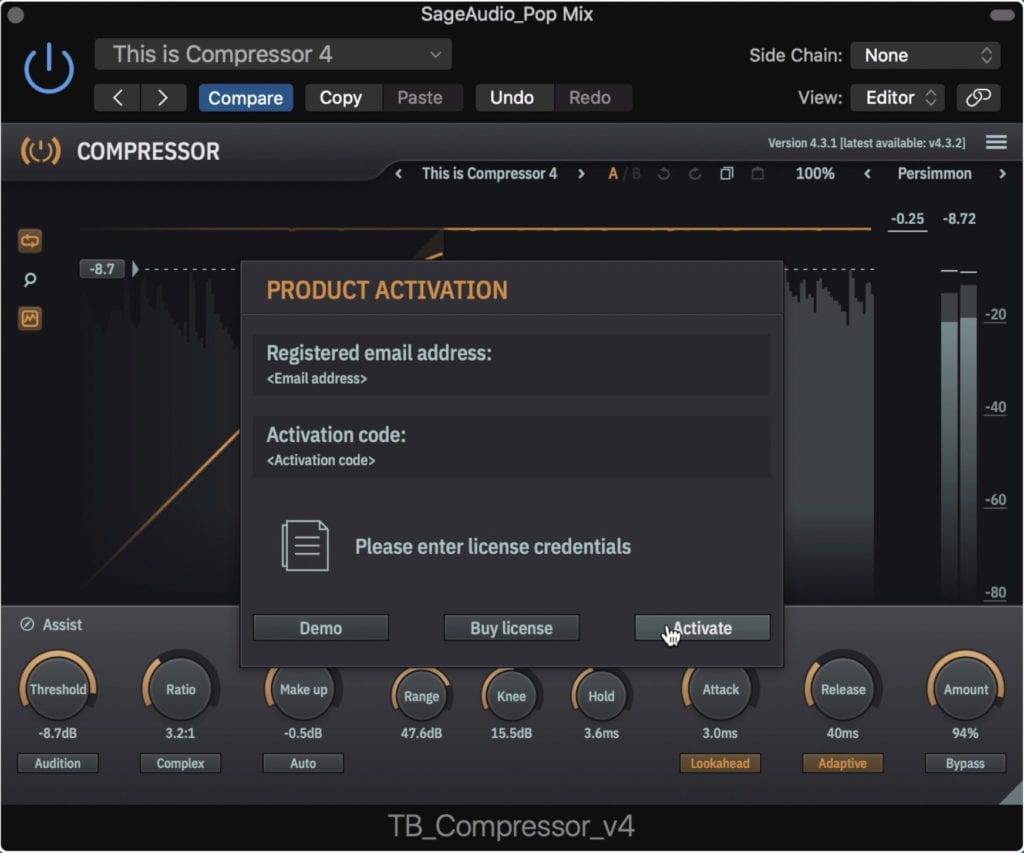
Notice that this is a demo - however, it's of the fully functional plugin with no expiration date.
I have to admit, that although the demo of the Compressor 4 by Toneboosters is free, it is just that, a demo.
However, this demo is of the fully functional plugin, without any expiration date, noise generators, audio cut-outs, or anything like that.
The only caveat is that the plugin won’t save your settings when you close and reopen your session. Now I probably shouldn’t tell you this, and you definitely should buy the plugin if you enjoy it and want to use it on mixes or masters that you export, but you can bypass this limitation is you save the channel strip settings in your session.
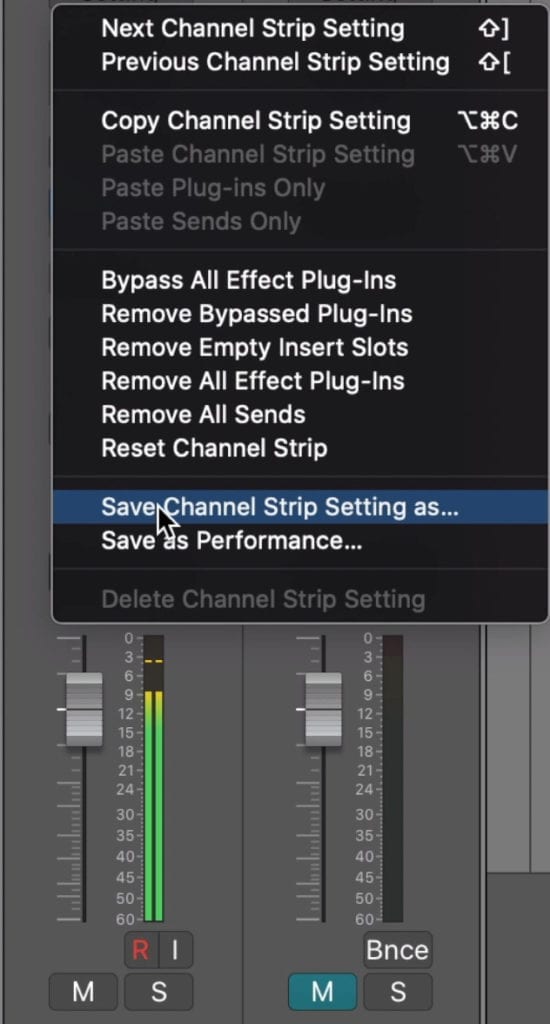
You can ensure that the settings remain the same by saving the channel strip.
Now, normally I wouldn’t include a plugin with this type of limitation on one of these lists, but its such a good plugin that I thought it should be talked about.
So, with that out of the way, let’s look at the plugin’s functionality.
First off, this plugin has a fantastic and modern looking display - similar to FabFilter’s designs.
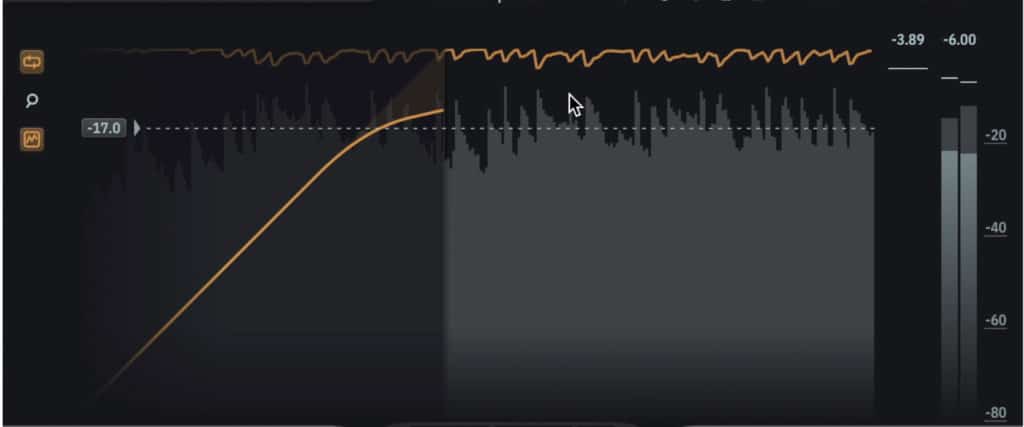
The display is similar to FabFilter's line of great plugins.
In the middle window, you’ll notice the waveform, as well as a graphic indicating how much compression is occurring.
The buttons on the left let you reset the waveform graphic, zoom in on your threshold and ratio settings, and take away the threshold and ratio graphic. In the threshold and ratio graphic, you’ll find a slider for the threshold.
At the bottom of the plugin are the majority of its functions. This includes a dial for the threshold, which ranges from -3dB to -70dB, and includes an audition function that allows you to monitor just the attenuation.
Next is the ratio which ranges from 1:1 to 30:1, and includes a complex mode that splits the detected signal into multiple bands. This lets the compressor attenuate in a manner more closely related to human hearing - or the Fletcher-Munson curve.
The Make-Up gain ranges 60dB and can be made automatic.
Your range is the amount of attenuation that can occur under any circumstance, the knee determines if the ratio is gradual or linear, and the hold determines how long attenuation occurs before the release function kicks in.
Your attack ranges from 0.1ms to 900ms , and lookahead can be enabled to lower distortion. The Release ranges from 10ms to 900ms and can be made program dependent. Lastly, you’ll notice a wet/dry mix rotary with a bypass button underneath.
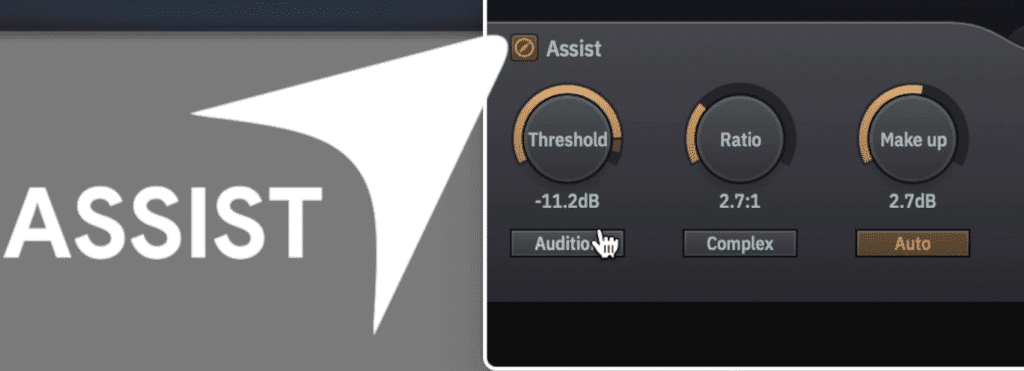
The assist function automatically sets the threshold and ratio for you.
One of the more unique aspects of this compressor is the assist function which measures the signal and the amount of compressor occurring and adjusts it. This probably isn’t great to use for mastering, but it’s an interesting feature nonetheless.
In the window 3 buttons let you access your side-chain EQ, a zone that pulls up a spectrogram with which you can alter the frequencies being affected, and a meter.
1 important thing to keep in mind is that this compressor’s threshold starts at -3dB , meaning it may cause more compression than you want for a master, so keep the amount of attenuation in check with your ratio and knee settings.
Lastly, in the top right, you can change the skin of the plugin.
For more free compressors check out our blog post on the topic:
Dynasaur - Analog Obsession
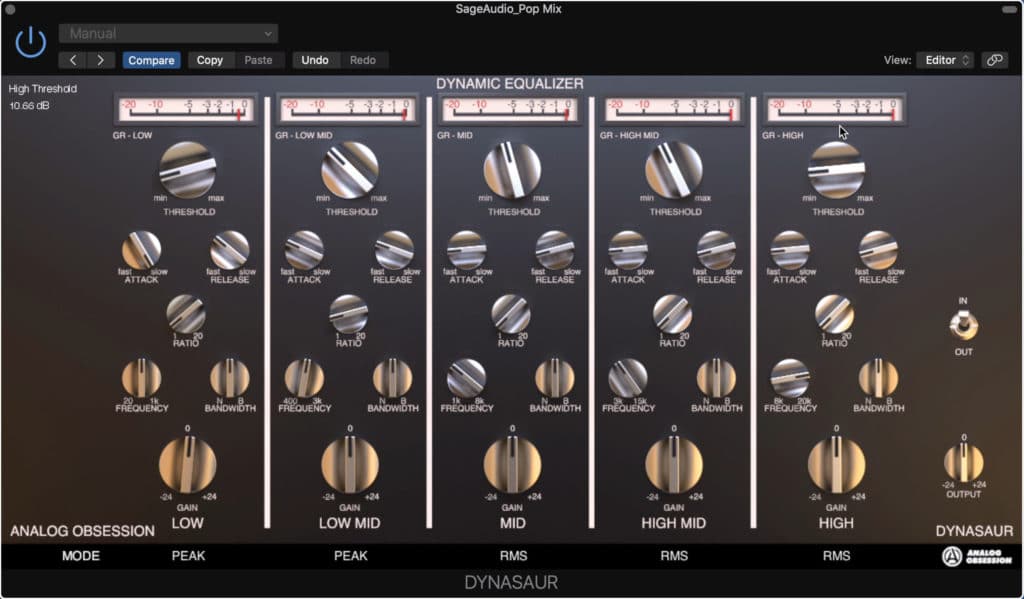
Free multi-band compressors are rare.
We’ve covered Dynasaur on one of our free plugins lists before - and for good reason, it’s a great plugin suited for a lot of different production types.
For this list, let’s consider why it works so well as a mastering compressor.
5 frequency bands let you control your dynamics in a way most other compressors don’t allow. Granted, multi-band compressors are becoming more and more common, however, free ones are still rare.
Up top is your threshold, with which you can determine when compression begins.
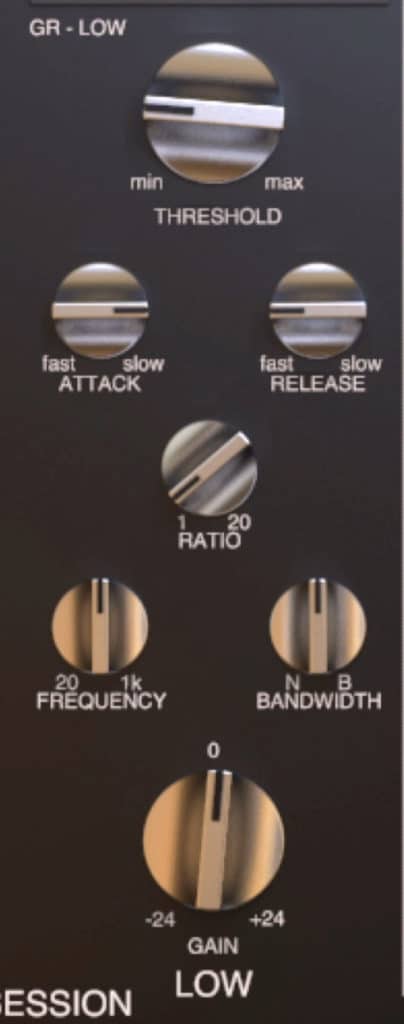
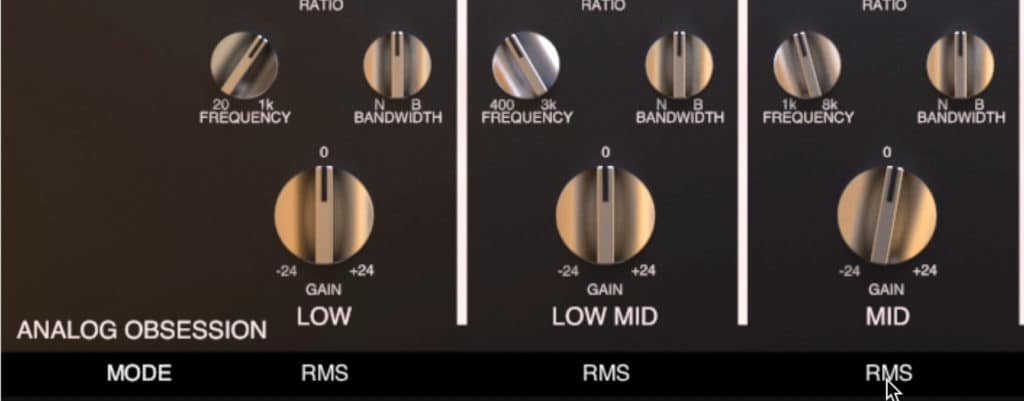
This multi-band compressor separates the signal into 5 bands, each with the controls shown here.
The Attack ranges from 1ms to 30ms , and this is true for all bands. The Release ranges from 30ms to 3 seconds, and this applies to all 5 bands as well.
The Ratio ranges from a 1:1 ratio to 20:1 , meaning you can use subtle compression when mastering.
The frequency range varies for each band, with the band farthest to the left being your low-end, and the one furthest to the right the high-end. Additionally, these bands can overlap meaning that specific frequencies can be given more attention if needed.
The detection mode can be switched from RMS to Peak.
Each band has a gain dial with which you can alter the gain of the respective band by 48dB.
Lastly, at the bottom of the plugin, you’ll notice a Mode section. Use this section to alter the band’s detection between RMS and Peak.
For more plugins by Analog Obsession, echo out or list of free distortion plugin:
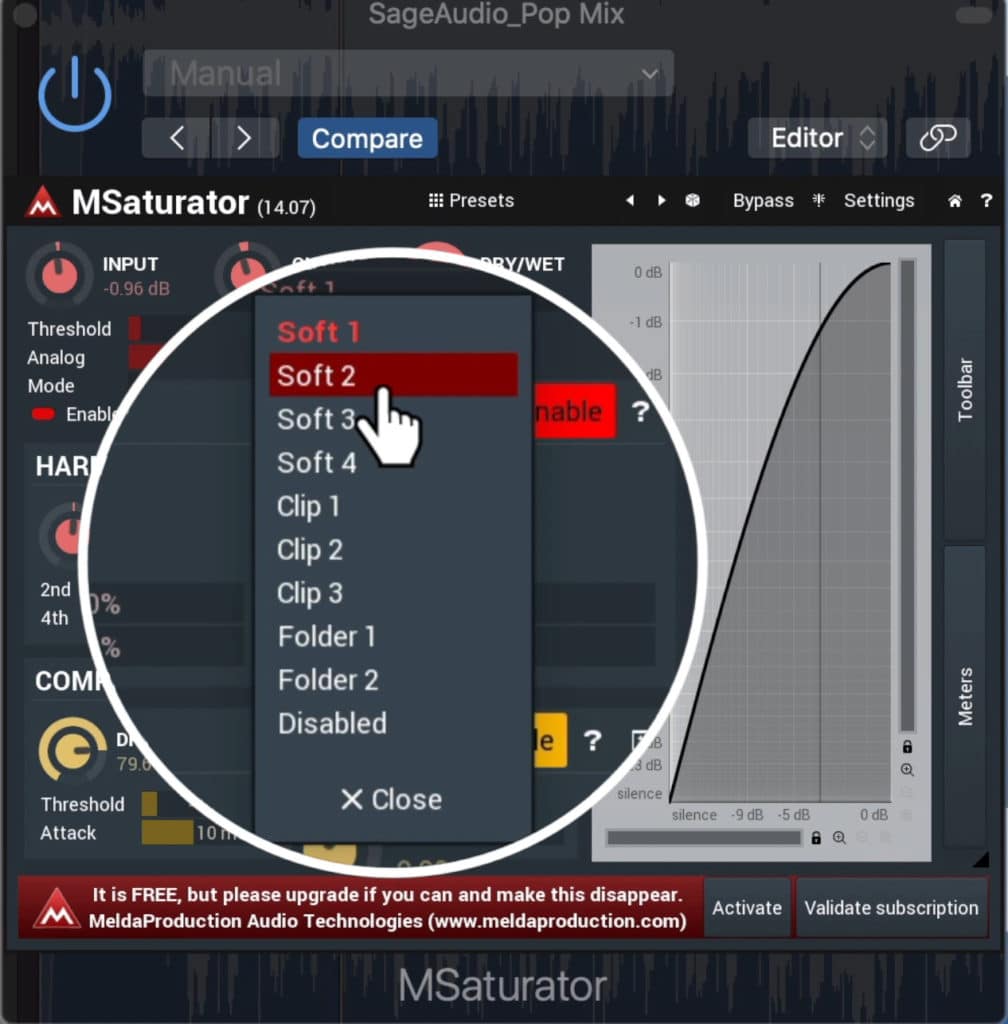
MSaturator - Melda Audio Productions
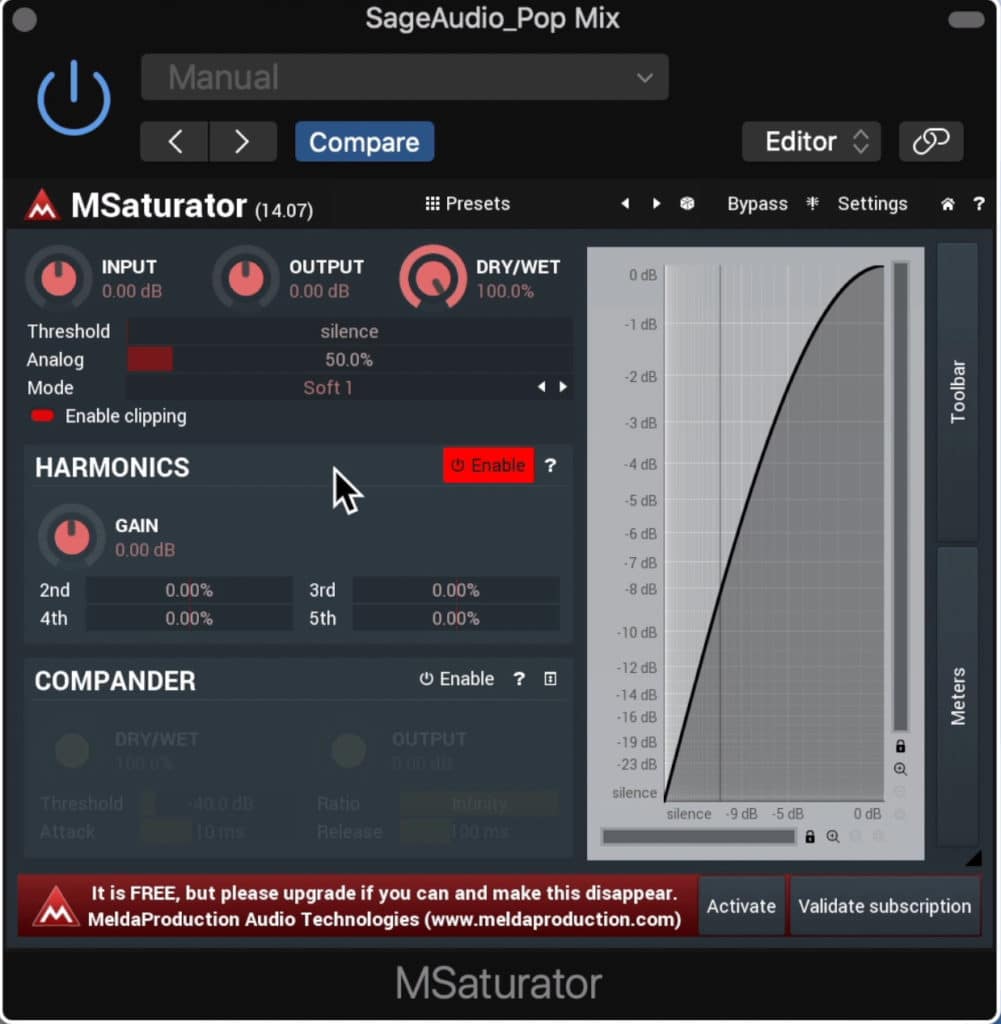
This Saturator was made with mastering in mind, but needs to be used subtly.
You might be thinking, ‘why are we talking about a Saturator on a list about mastering compressors?’
Saturation is a mixture of harmonic generation and compression - when used correctly and sparingly, a little bit of both can sound great on a master.
Use a soft limiter when using this plugin.
In fact, the very act of adding in harmonics or amplifying existing ones is a form of compression, since it reduces the dynamic range - but more on this later on in the list.
When using the MSaturator during a mastering session, we need to be very intentional with its settings . Although this plugin was designed with mastering in mind, it can easily be used excessively and in a way that’s detrimental to the quality of a master.
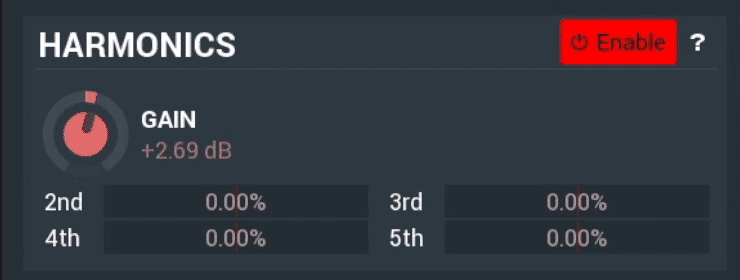
The harmonic sections introduces harmonic distortion.
Let’s look at the plugin’s functionality.
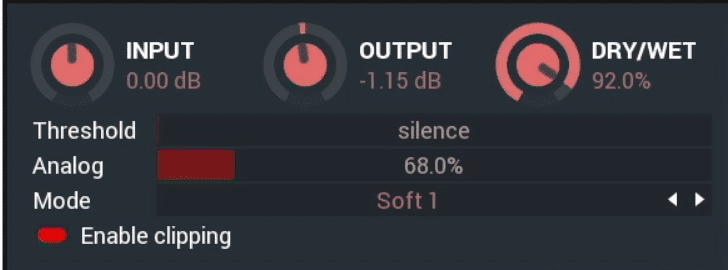
Up top is the detection section, where you can affect your input, output, and wet/dry mix. From there you can affect the threshold of the saturation, which when lowered, increases the loudness and distortion of the signal.
The Analog slider introduces even-order harmonics and should be kept at a lower level when mastering.
The analog slider is in the top section and can be used to generate even order harmonics.
The Mode function introduces a limiter - when mastering a soft-clip limiter is best. It’s also best to disable the clipping option.
In the harmonic section, you can control the harmonic gain with both the dial and the individual harmonica order sliders. It’s best to keep these at a low level as well.
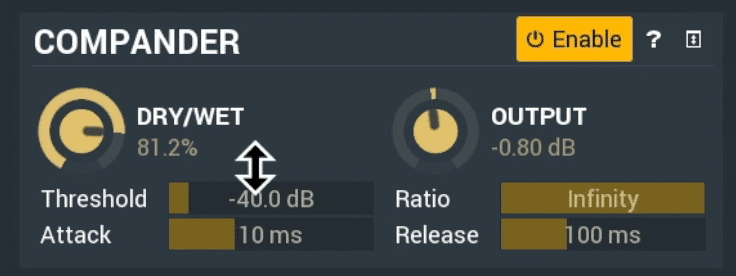
The compressor at the bottom of the plugin compresses before saturation and expands after saturation.
The Compander section compresses the signal before saturation to control the amount of saturation that occurs and then expands it afterwords to reintroduce dynamics.
If you’re having some difficulty establishing settings for mastering, try some of the presets, which offer a great introduction on how to use this plugin for mastering.
If you’re using these compressors on your mix, and you want to hear that mix mastered with all analog equipment, send it to us here:
We’ll master it for you and send you a free sample for your to review.
OTT - Xfer Records
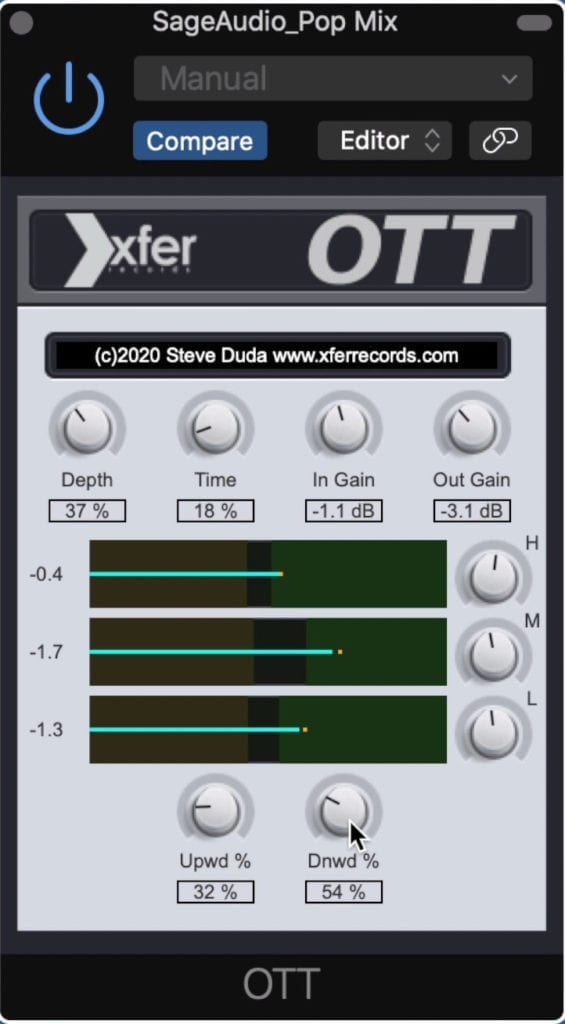
OTT is a unique upward and downward compressor.
The OTT is an incredibly unique multi-band compressor that takes into account both downward and upward compression. In downward compression (which is the typical form of compression) louder aspects or peaks are compressed.
In upward compression, quieter aspects of the signal are compressed and amplified. Upward compression is a great way to bring the often lost details of a recording to the forefront and make them perceivable to the listener.
You'll most likely use this plugin for upward compression.
If you choose to use the OTT compressor on your masters, odds are you’ll be using it for its rare upward compression capabilities.
Depth controls how much of the signal is introduced into the compressor. The Time dial affects both your attack and release settings with lower settings being quicker.
To the right, you’ll notice the input and output gain dials.
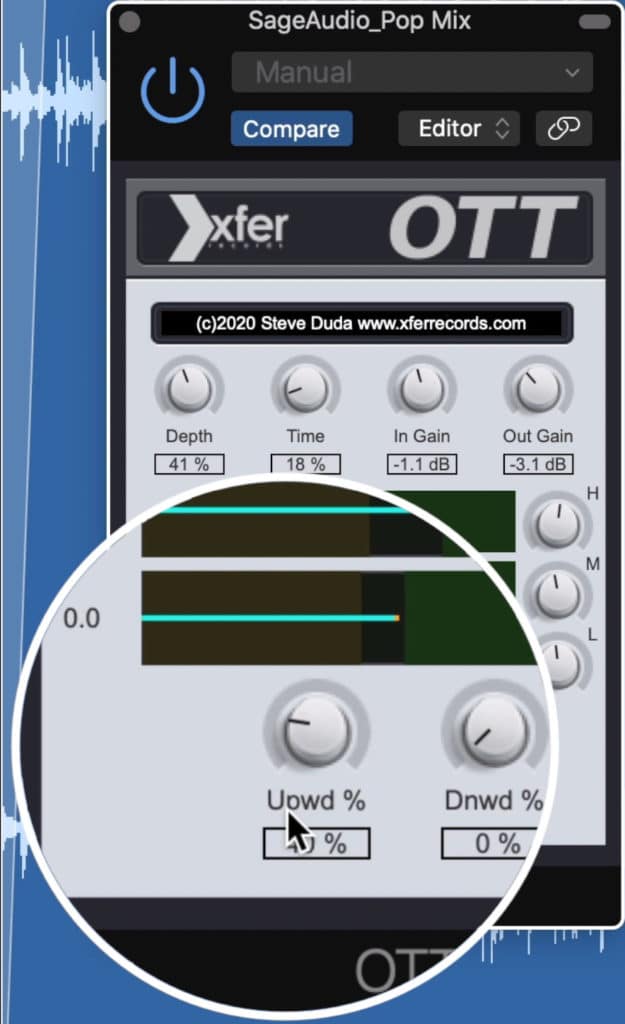
In the middle of the plugin, you’ll notice 3 bars - these represent high, mid, and low frequencies from the top down.
The green box represents downward compression . The more that this green box covers the bar, the more the signal will be compressed downward.
The same concept is true for the brown box. It represents upward compression. The browner the bar, the more that band will be compressed upward.
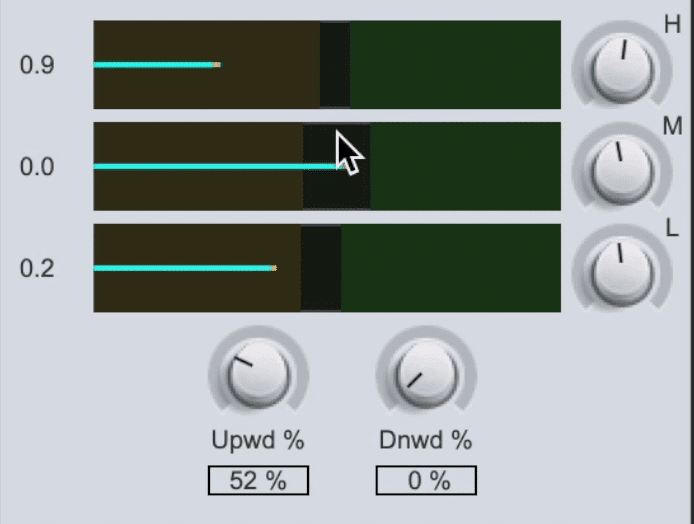
The brown box represents upward compression, the green downward compression. Drag the box in the middle to make one more prominent.
You can drag the darker section in the middle to make upward or downward compression more dominant.
To the right, you’ll notice the H, M, and L knobs, which control the volumes of the high, mid, and low-frequency bands respectively.
At the bottom are 2 wet/dry or mix dials. The one on the left is for upward compression; the one on the right is for downward compression.
You can blend the compressed signals in with the original signal to create the compression and timbre you want.
Use this compressor subtly - also, it may be best to leave downward compression for a different compressor, so my recommendation would be to use this plugin solely for the upward compression.
If you want to learn more about low-level compression, check out our video on another low-level compressor:
Enhancer - Tonebooster
The enhancer doesn't look like a regular compressor.
The Enhancer by Tone booster is a harmonic exciter - its job is to detect and augment harmonics in a mix or instrument.
Although it looks different than a compressor and behaves a bit differently than most compressors , this is in fact an upward compressor.
By leaving the loud aspects of the mix alone, and amplifying the quieter harmonics and subharmonics, you lessen the dynamic range of low-level signals while simultaneously amplifying them.
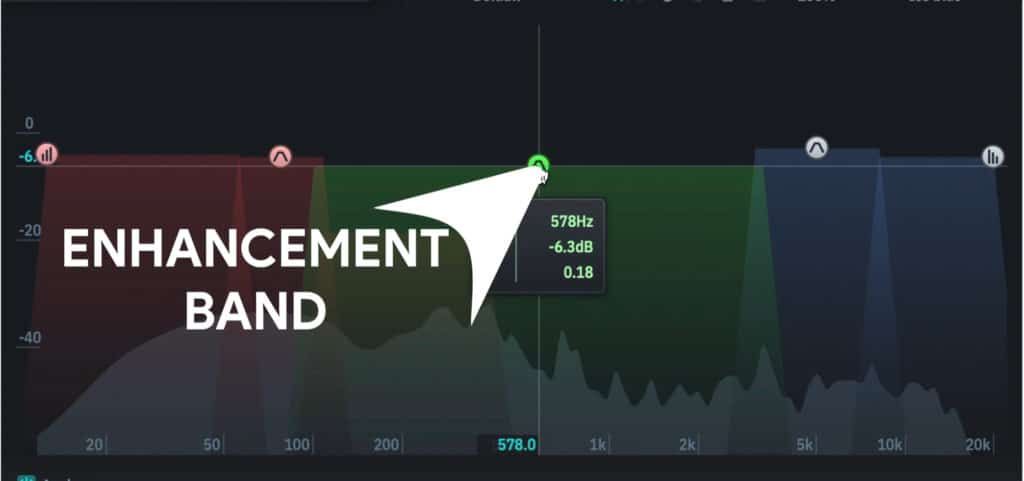
The enhancement band introduce low-level or upward compression.
The majority of functions you’ll need to know are in the main window. The band with the Band-like symbol above it is called the analysis band. The Low, Mid, and High frequencies each have one.
The bands with the Bar-like symbol are harmonic generators. You can increase harmonic generation and compression by increasing the height of these bands.
It should be noted that the low-frequency range has both a sub and supra harmonic generator.
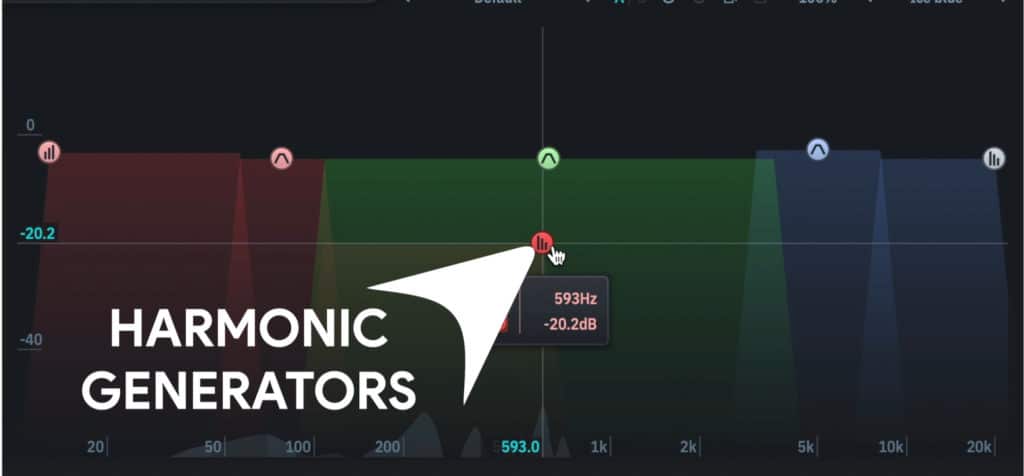
The harmonic generators introduce harmonics and in turn lessen the dynamic range.
Drag the enhancement bands around to select the frequency range you want to affect, and drag the harmonic synthesis bands to determine the frequency range of the generated harmonics.
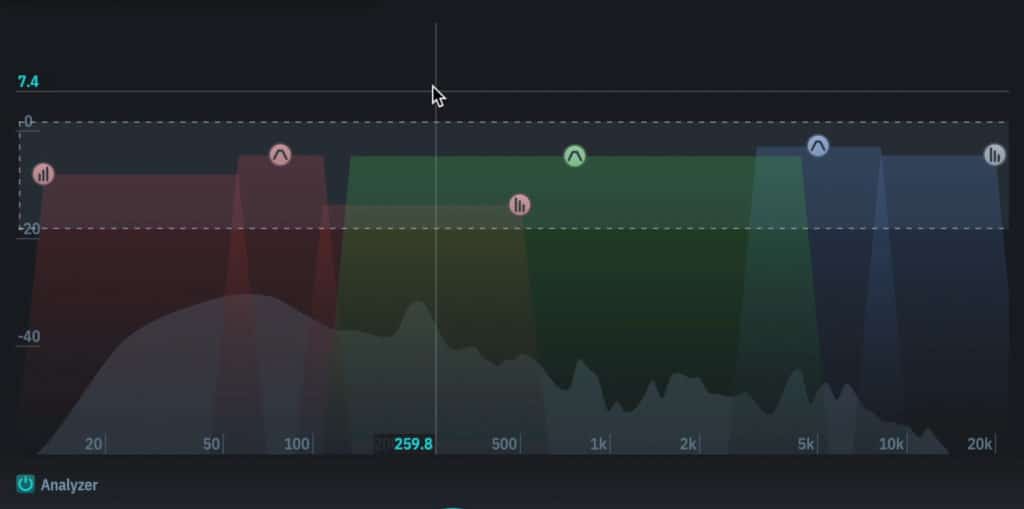
All bands can be selected by dragging a box around them.
If you want to affect all of these bands at once you can drag and box around them and select them all simultaneously.
At the bottom, you can affect the wet/dry of your bass, mid, and treble enhancement bands as well as solo them.
The Mix dial is a wet/dry for the entire plugin . The width determines the stereo width of the harmonics, while the range affects the amount of compression that’s occurring.
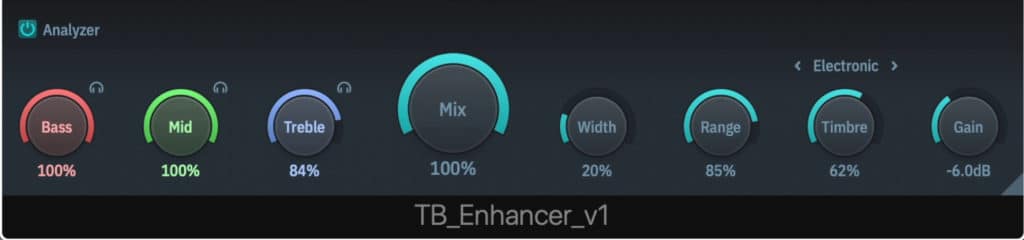
At the bottom of the plugin are the majority of the plugin's functions.
You can alter the timbre of the compression with 5 different settings, and then blend that timbre in. To the right is a gain rotary.
To make things a little simpler, know that on the enhancement bands is where actual upward compression is occurring. By dragging these bands upward you’re increasing the amplitude of the upward’s compressed signal.
By altering the rotaries associated with these bands you’re reducing the amount of compression.
Kotelnikov - Tokyo Dawn Labs
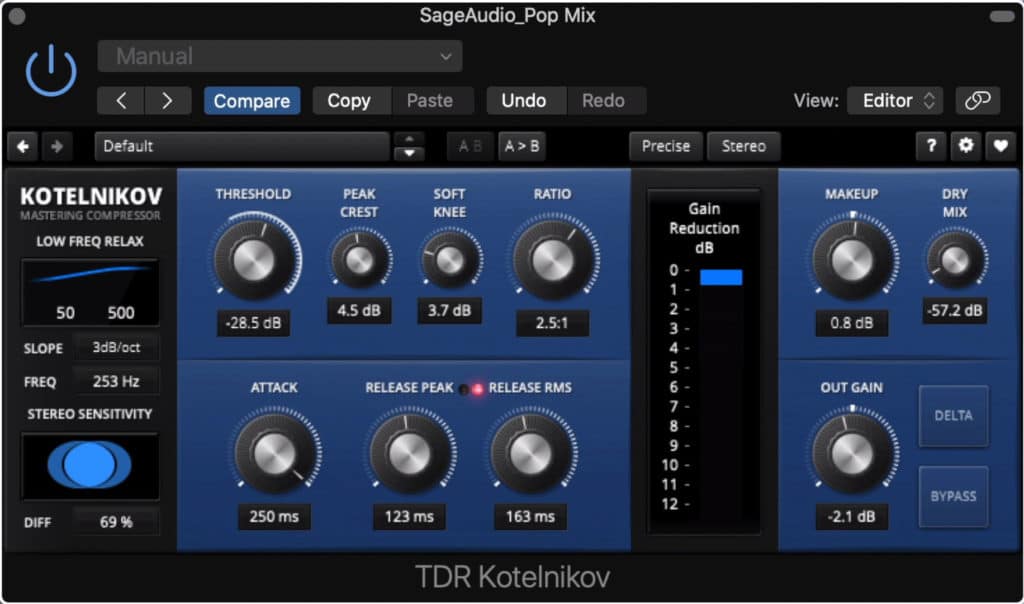
Kotelnikov is an easy to use compressor with familiar functions.
Compared to some of the other plugins on this list, Kotelnikov is a pretty straightforward mastering compressor. If you’re looking for a compressor with familiar features, this is a fantastic option.
Starting on the far left of the plugin we have some control over how the compressor detects the incoming signal. We can affect the frequency range with the low-freq. Relax section and the stereo image with the stereo sensitivity section.
By making the stereo sensitivity ‘0’ you’ll only compress the mid-channel. Up top is your threshold, which compresses based on RMS, or the average loudness of the signal, not peak; however, you can use the peak crest dial to hone in one where peak attenuation begins.
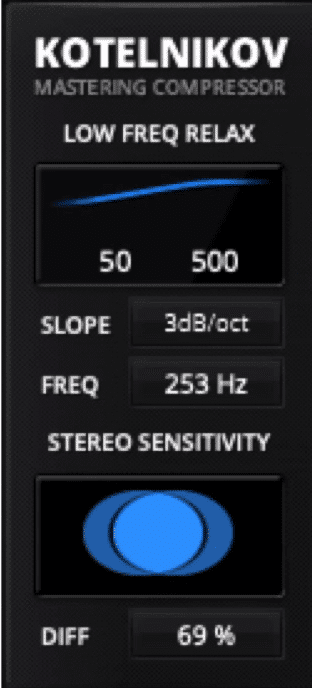
To the left is the input detection section where you can control a high-pass filter and the stereo image detection.
The soft-knee setting and ratio are pretty typical and similar to other compressors.
The attack can be an incredibly quick 0.02ms, whereas the release is broken up into 2 settings - Peak and RMS release.
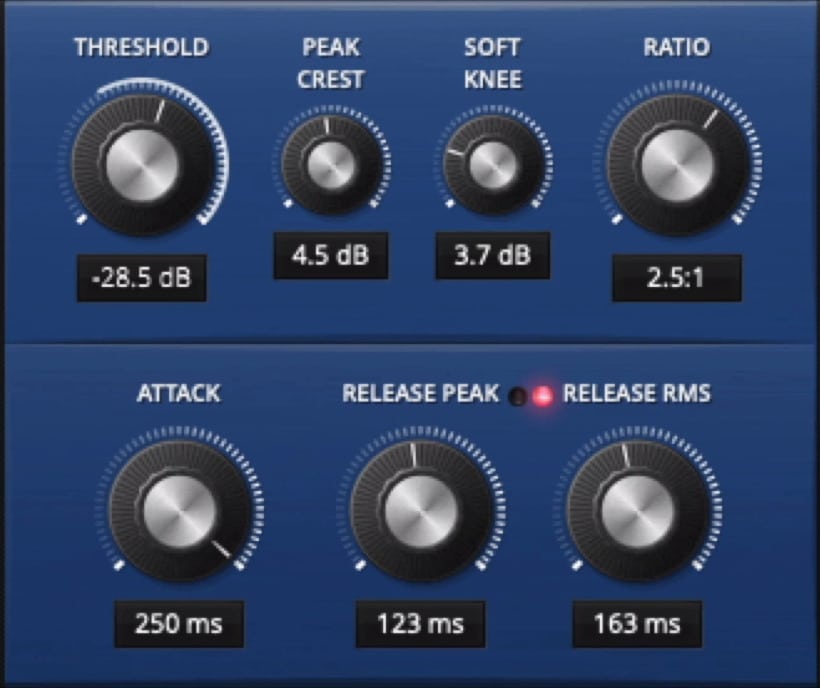
The threshold is broken into RMS and peak, as is the release.
You’ll notice a gain reduction meter in the middle-right of the plugin, which can have its range altered. Above it, the precise mode is the best option when mastering - it’s best not to use the Eco mode when mastering.
On the right are your make-up gain and dry mix dials. Below are the output gain and the bypass button. Additionally, the Delay button allows you to hear just the compression that’s occurring.
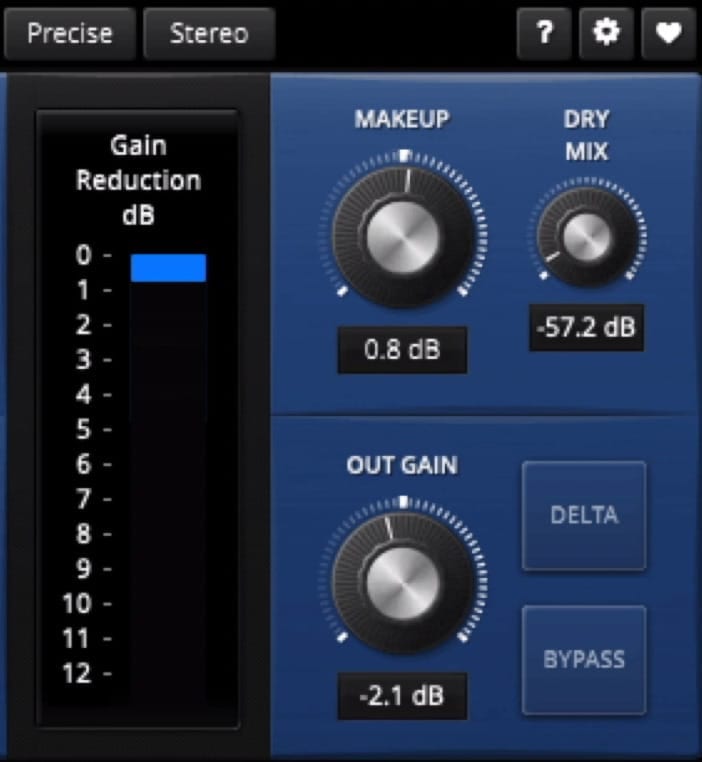
The gain reduction meter's display can be altered as can the makeup gain, and other settings.
If you want to learn more about this plugin, or you don’t want to have to come back to this blog post/video if you forget something about it - the ‘?’ Icon turns on info pop-ups that provide a lot of insight.
Conclusion
These plugins are all great, for different reasons. Each one will help you achieve a particular task during mastering - so it helps to have a summary of what each processor is best for.
Compressor 4 is best for clean compression, and frequency-specific compression. It’s a lot like the Pro-C 2, but without algorithms for different compression styles.
Dynasaur is designed for multi-band compression and can add some great sounding analog emulation to your master. If you’re looking to control your dynamics based on the frequency during mastering, try out Dynasaur.
MSaturator is great at creating subtle saturation and harmonic generation. When used subtly, MSaturator can increase the perceived loudness of your master, while controlling the dynamics.
OTT is the most useful when it’s used for low-level compression which isn’t too common. The design may be a little convoluted, but the sound is great when introduced subtly.
Toneboosters is a complex harmonic enhancer that can generate new harmonics, amplify existing ones, and saturation and compress the signal. Its compression is unique in that the attack and release are nearly instant, yet introduce little unwanted distortion.
Kotelnikov is your go-to mastering compressor with a simple design and real ease of use. You know what you’re getting into with this compressor, and achieving a great sound is not difficult.
If you’re using these compressors on your mix, and you want to hear that mix mastered with all analog equipment, send it to us here:
We’ll master it for you and send you a free sample for your to review.


