Top 8 FREE Mastering Plugins (2021)
1. 2BusControl - MAAT
2. Gōn - MAAT
3. Crack - Surreal Machines
4. Spectral Tilt 2 - TBProAudio
5. Stereo Help - Press Play
6. WaveObserver - Press Play
7. ADC Drive - Audec
8. Chow Tape Model - ChowDSP
Top 8 FREE Mastering Plugins (2021) in Detail
Whether you’re mastering professionally or working on indie projects, there’s a lot to like about some of the newest free plugins.
Free plugins often offer unique functionality not found in paid plugins due to the sheer passion of the developers.
At the very least these plugins offer an alternative to the popular plugins of today.
The plugins that we’re showcasing here are pretty varied. Some are used for measurement and monitoring whereas others are used for affecting the signal.
We’ll take a look at each plugin, discuss the functionality, and listen to it (when applicable) on a stereo mix (in the video embedded above).
If you’re an artist or engineer, and you have a mix that you need mastered, send it to us here:
We’ll master it for you and send you a free sample to review.
1. 2BusControl - MAAT
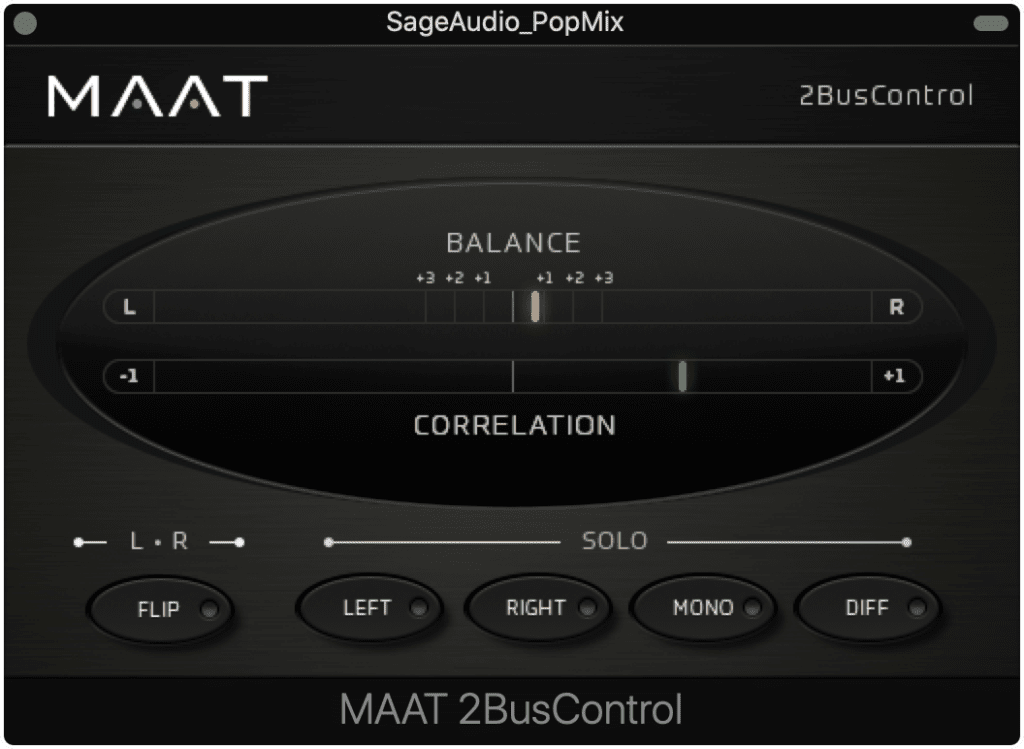
2BusControl lets you monitor your correlation and solo various channels.
2Bus Control is a truly simple plugin used for monitoring the phase of your signal and the polarity of your signal.
Up top is a balance meter and a correlation meter.
At the bottom, you can flip the left and right channels, as well as solo the left or right channel. When doing so these will be made mono to make monitoring them easier.
You can cause the stereo signal to be force mono, as well as listen to the difference between your left and right signals.
For more free mastering plugins, check out this video!
2. Gōn - MAAT
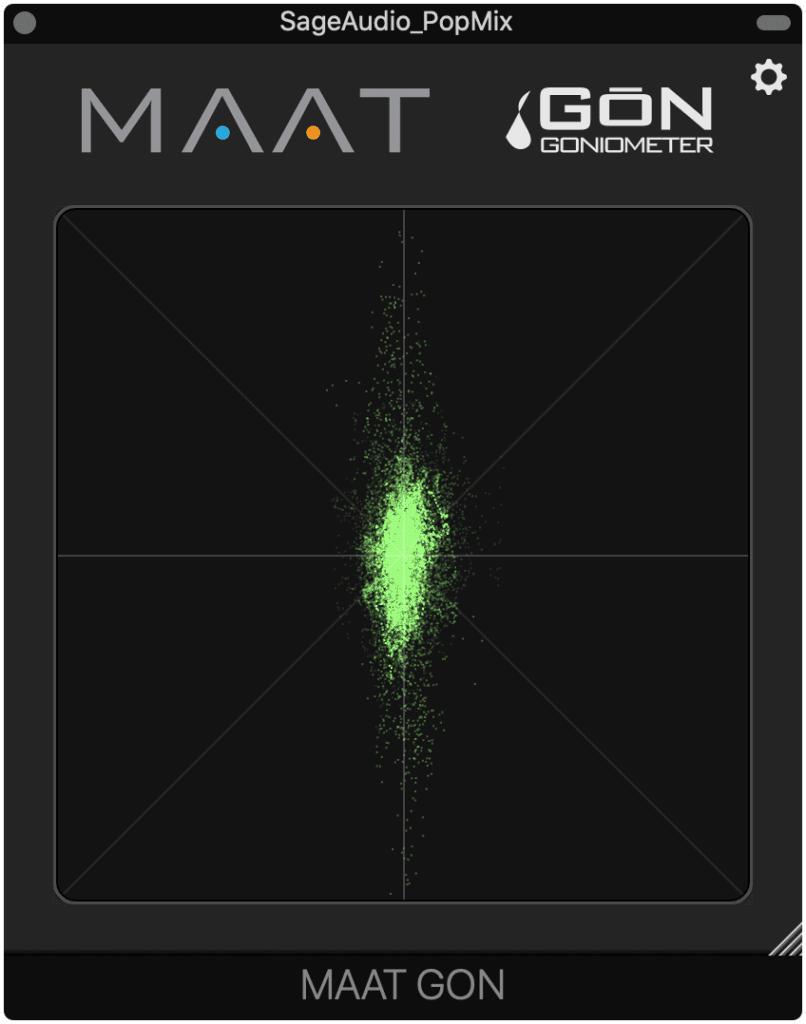
Gōn lets you visualize your stereo image and signal's amplitude.
From the same developer we just mentioned Gōn lets you monitor the stereo image of your signal.
You can resize the plugin by clicking and dragging the bottom right corner. Additionally, you can alter the settings of the plugin.
In the settings, you can change the level, the clarity, the color, and how quickly the image fades away after the signal has been measured.
Using this plugin, along with the previously mentioned 2BusControl gives you a good foundation for monitoring your master.
3. Crack - Surreal Machines
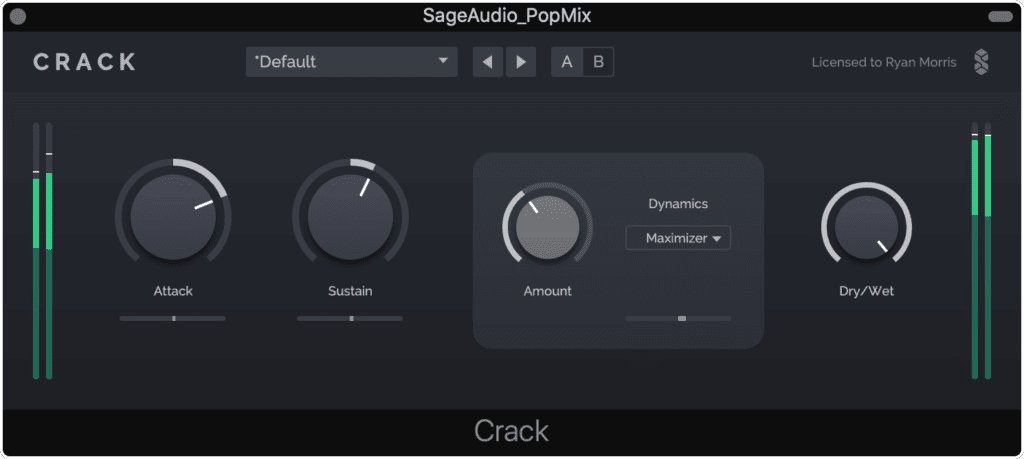
Crack is a fantastic transient shaper and limiter/maximizer.
Unlike the previous 2 plugins, Crack is used to alter the level and ADSR of your signal.
Although seemingly simple, it’s a versatile plugin.
You can expand or compress the attack of the signal’s transients, and do the same for the release. The bars underneath will show you how much you’re amplifying or attenuating the signal.
In the middle of the plugin, you can affect the plugin’s dynamics:
- Thru doesn't affect the signal
- Clip allows for clipping
- A limiter can be used to increase the overall level
- And a maximizer increases the gain of low-level signals
The clip, limiter, and maximizer options all include a brick wall ceiling, so unwanted peaking can’t occur.
Lastly, the plugin includes a wet/dry.
4. Spectral Tilt 2 - TBProAudio
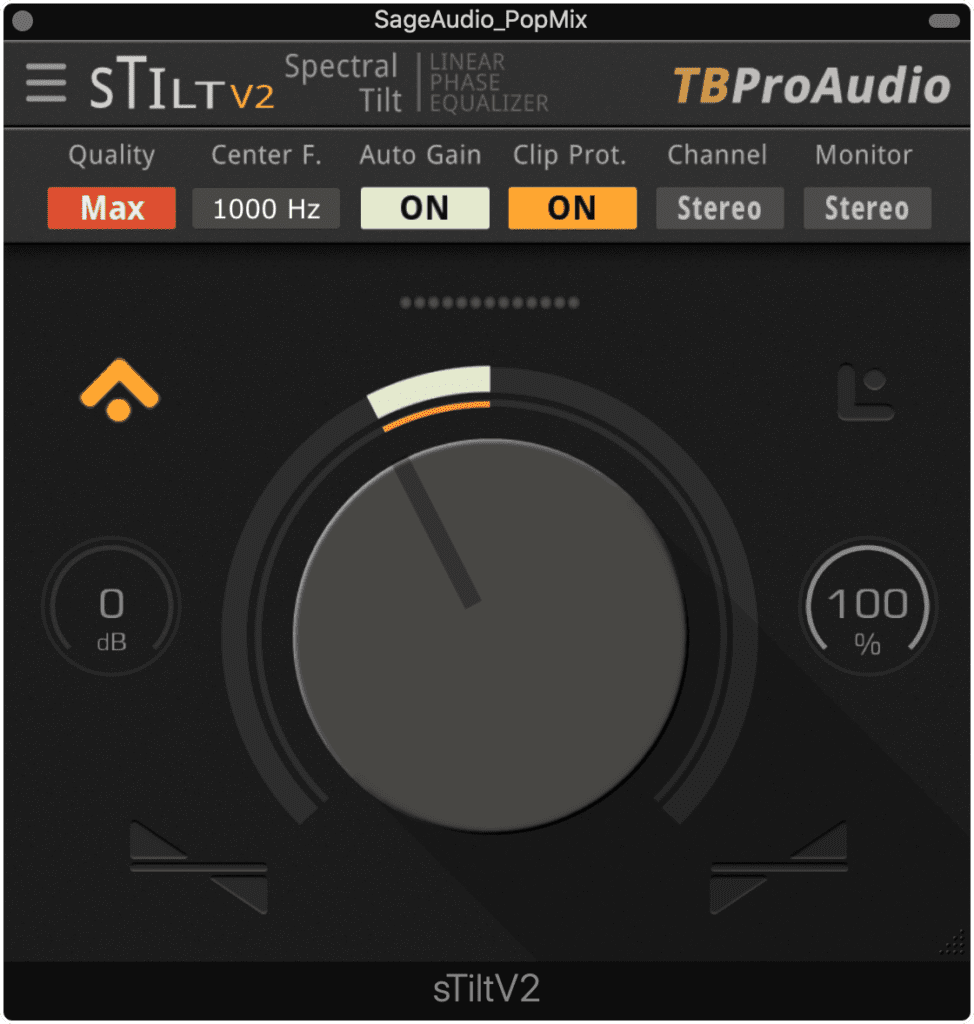
This linear phase tilt filter is great for making small changes to the overall timbre of your master.
If you need to quickly alter the frequency response of a master, a subtle tilt filter is a great option.
What’s better is if this plugin is linear phase and includes oversampling, like the Spectral Tilt 2.
The dial in the middle shifts the frequency spectrum to include more high end or bottom end, with the center-tilt point default to 1kHz . This center-point can be adjusted up top.
The input gain, and wet/dry can be altered with 2 dials to the left and right of the big tilt dial.
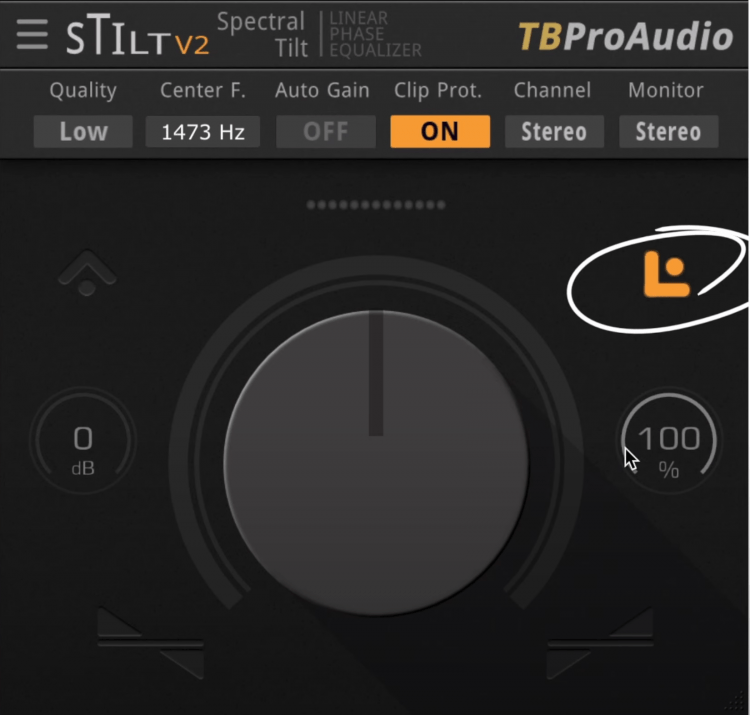
The button on the top right introduces a limiter, and the button on the top left is the bypass.
A limiter can be enabled with the L symbol to the right, and the plugin can be internally bypassed with the symbol to the top left.
Up top we can also enable oversampling, turn on auto-gain, clip protection, and alter what channel we’re affecting and monitoring.
The dots above the tilt dial indicate if clipping occurs and to what extent.
5. Stereo Help - Press Play
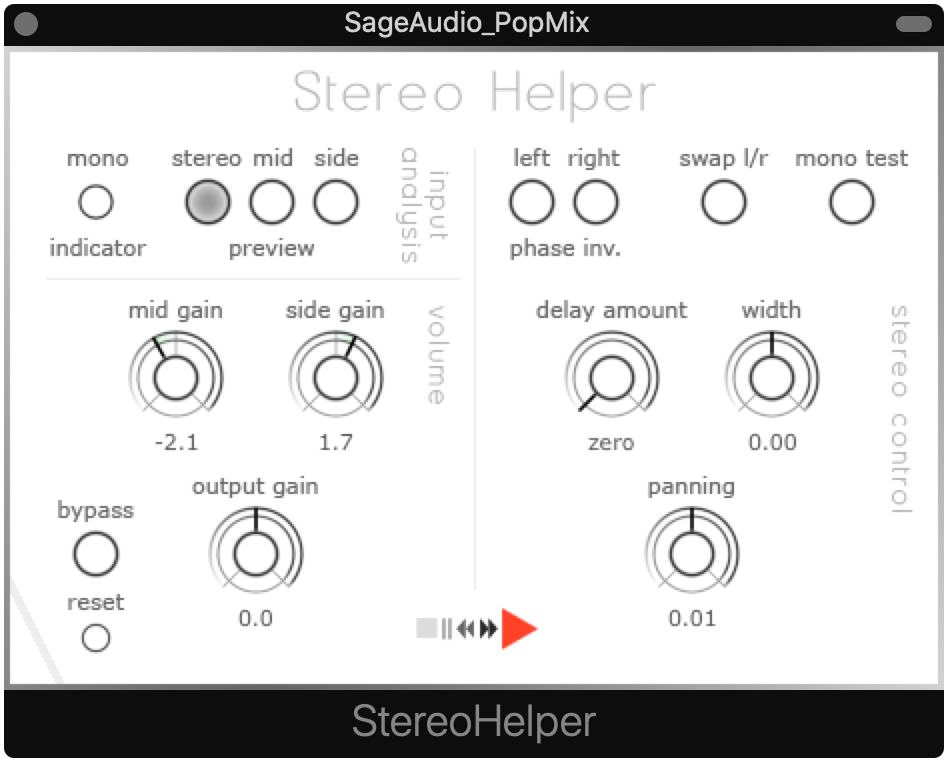
Stereo helper is used to both monitor and solo channels, and to affect the stereo width of your signal.
Stereo Help is a lot like the first plugin we covered, but with some additional functionality that might be helpful.
With it you can preview your various channels, invert channel passes, swap left and right channels, and force mono.
Unlike the previously mentioned plugin, you can also alter the level of the mid and side channels, increase the width which (works similarly to adjusting the mid and side channels), and pan the image.
Additional delay is available for great stereo width, but it’s best to avoid this when mastering.
For more free stereo imaging plugins, check out this video!
6. WaveObserver - Press Play
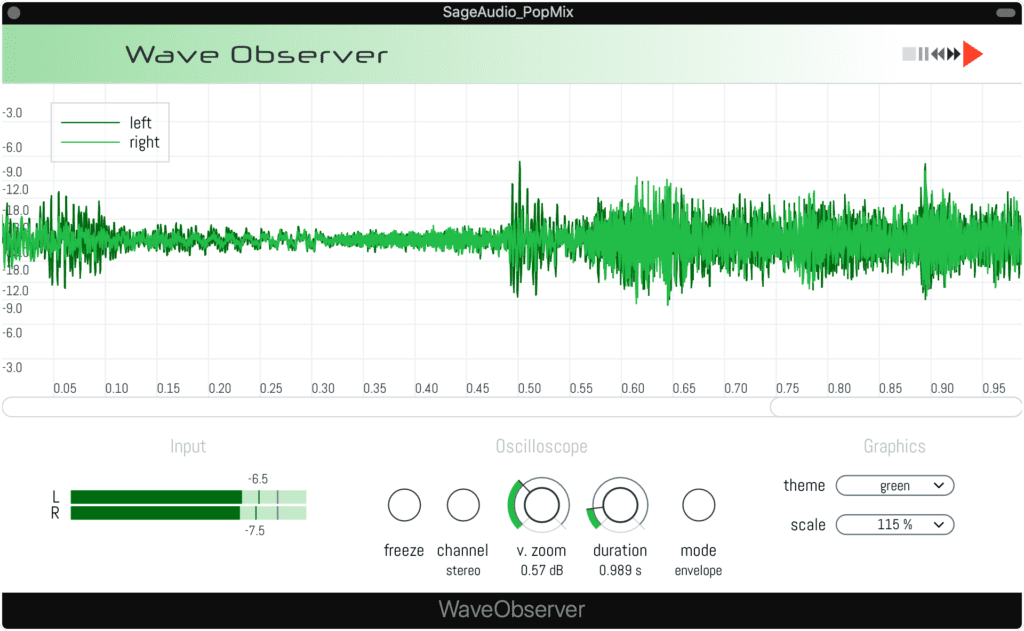
If you want to zoom in on your master's phase and waveform, this is a great plugin to try.
If you need to delve into your waveform to check for mild distortions or phase issues, try WaveObserver.
It allows you to view both the waveform and the waveform’s envelope, as well as monitor either the left, right, or stereo channels.
You can speed up or slow down the measurement window, and enlarge the waveform for a better look.
Additionally, the appearance can be altered by changing the overall color and adjusting the size of the plugin’s window.
Lastly, you can freeze a section if you need to observe a particular section of the song.
7. ADC Drive - Audec
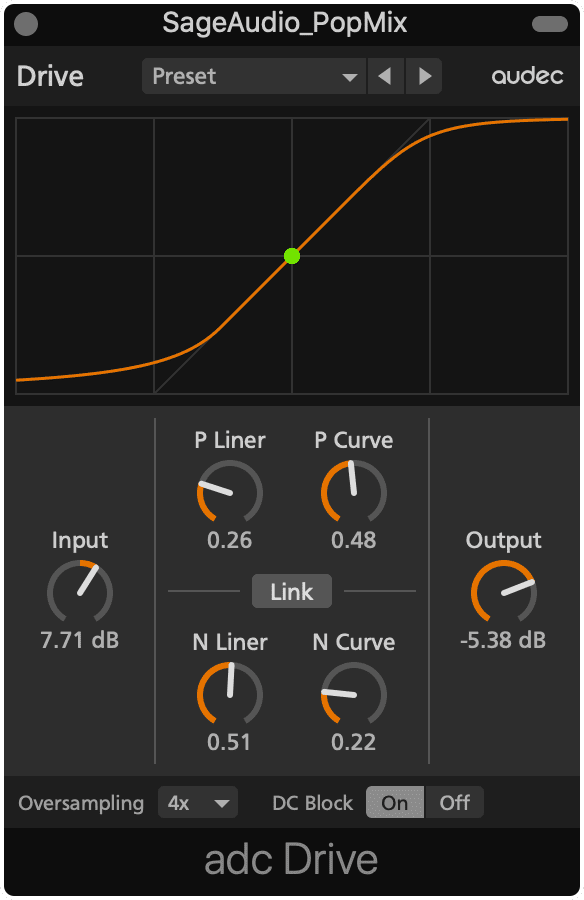
ADC Drive should be used with a limiter to achieve an impressive loudness.
ADC Drive lets you mildly clip or severely clip a signal. In the context of mastering, this plugin is useful for driving the signal to louder levels without enduring hard-clipping.
It’s best when paired with a limiter to achieve a greater LUFS.
Up top is the main window which shows the slope of the compression. These slopes can be adjusted using the liner and curve functions in the middle of the plugin.
The input and output can be altered, as can oversampling.
With a plugin like this, oversampling will be important - otherwise, harmonics generate from any clipping will likely cause aliasing distortion or “fold-back.”
Lastly, so presets can help you get started. Keep in mind it’s best to use this plugin very subtly if you do choose to use it.
8. Chow Tape Model - ChowDSP
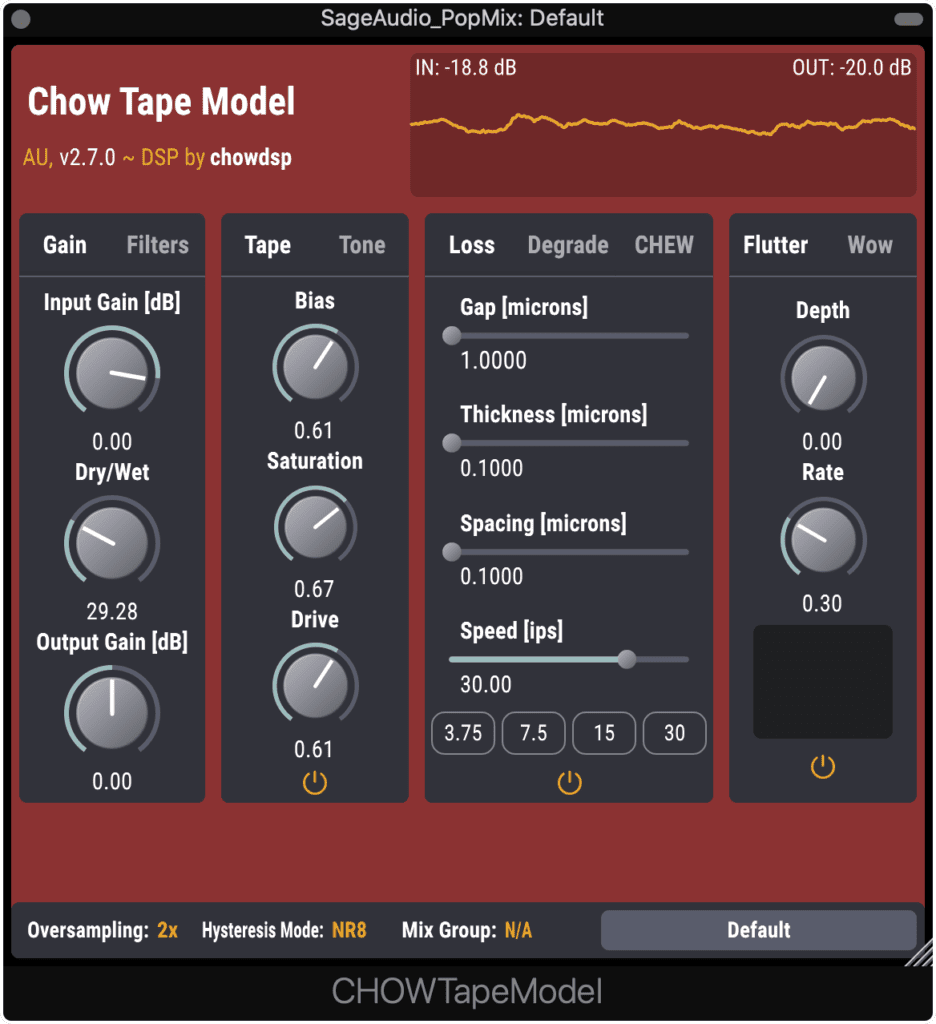
Chow Tape Model is an incredibly realistic sounding tape emulation plugin.
Chow Tape Model is a really impressive tape machine and tape medium emulation plugin. In all honesty, it has more versatility than most paid tape plugins that I’ve come across.
Granted, the tone of this plugin is better suited for mixing, but with the wet/dry dial you can use it for parallel processing during mastering.
In the left-hand window, you can affect the input gain, mix, and output gain. By clicking 'Filter' you can adjust an internal side-chain for the plugin. Notice that since this section isn’t crucial to the functionality of the plugin, you can enable or disable it at the bottom.

The bias, saturation, and drive can be controlled from this middle section.
Tape bias, saturation, and drive can all be controlled in the second main window. This makes it great at compressing and distorting the signal, as well as providing the timbre of tape.
This section correlates to the hysteria option at the bottom of the plugin. When mastering, it’s better to use the NR8 setting since it offers more accurate saturation at the expense of extra CPU.
When we click tone we can increase the treble and bass prior to tape emulation, as well as set the center point between the two, like a tilt filter. The boost or attenuation is matched and inverted after the emulation for an emphasis/de-emphasis technique.
In the next section, we can emulate the gap between the tape heads and the tape, the thickness of the tape, and the spacing or width of the tape head. All of which will affect the frequency response, and cause frequency attenuations or lost frequencies when set to higher levels.
The same can be said about the tape speed which will affect the functions just mentioned, as well as alter the overall frequency response.
Lower tape speeds will result in more low-end and higher tape speeds will result in more high-end and clarity at the expense of lower frequencies. It’s best to use 15IPS or 30 IPS when mastering.
Degrade and CHEW are both used to emulate tape that has shed magnetic particles over time, and has been torn by the tape machine. Variance randomizes this effect for both of these functions.
Wow and Flutter introduces the modulation of frequencies caused by irregularities in the tape machine motor and subsequent tape writing and reading.
Lastly, oversampling is available in the bottom left, and is very useful when the plugin is used for higher levels of distortion.
Conclusion
All of the plugins we’ve mentioned here are great additions for mastering. Some are very simple like some of the monitoring plugin, whereas others are a lot more complex like the one we just covered.
Whatever you’re trying to accomplish, there’s at least one plugin here tp suit your needs.
For monitoring try the 2BusChannel, Gōn, StereoHelp, or Wave Observer plugins.
For Equalization try Tilt.
And for compression, saturation, distortion, and limiting try Crack, ADC Drive, or CHOW Tape.
If you’re an artist or engineer, and you have a mix that you need mastered, send it to us here:
We’ll master it for you and send you a free sample to review.


