De-Essing During Mastering
Quick Answer
De-Essing during Mastering isn’t ideal, as this type of processing is best handled during both tracking and mixing. If De-Essing during mastering is needed, then it is typically handled with various compression and equalization techniques and is always introduced in a minimalistic manner.
De-Essing During Mastering in Detail
De-Essing and Mastering music aren’t often spoken about in the same sentence, but on occasion, de-essing during the mastering process is needed. When this is the case, it best to know how to handle excessive sibilance in a master.

Mastering and de-essing aren't typically thought of together.
Like most things in audio production, certain techniques and understandings can be implemented to best fix this particular issue . As you can imagine, if excessive sibilance isn’t handled during the mastering process, it can be exacerbated by the processing that occurs during mastering.
De-essing can be performed during mastering, and excessive sibilance can be fixed.
Additive equalization, harmonic generation, parallel compression and other popular forms of altering a signal that occur during mastering can each uniquely exacerbate excessive sibilance - this means that mastering can make a bad problem worse if the engineer doesn’t quickly and adequately respond to this problem.
Harmonics will amplify sibilance, so its best to avoid this processing until later.
With that in mind let’s cover a few ways to handle sibilance and perform de-essing during the mastering stage. We’ll be looking at both techniques and some unique plugins that will help with discrete sibilance attenuation.

Excessive sibilance, and the need for de-essing, is becoming more prevalent and relevant in modern music.
Additionally, we’ll be covering why the issue of excessive sibilance is becoming increasingly relevant given the current landscape of music production.
If you have a mix that you need mastered, maybe one that has a little more sibilance than you want, send it to us here:
We’ll master it for you and create a balanced frequency response.
When to De-Ess During Mastering?
De-Essing during mastering should occur before other forms of processing, and should definitely occur before any additive forms of processing that may amplify sibilance. This means that de-essing during mastering should be one of the first, if not the first insert in your mastering signal chain.
Why exactly should de-essing occur first during mastering?
Although it may take a moment to realize that de-essing is needed when mastering (typically after adding other forms of processing), it’s important to apply de-essing relatively early in your mastering signal chain.
Other forms of processing will amplify sibilance. That is why other forms of processing should come after sibilance attenuation.
The reason being, other forms of processing will amplify sibilance and make the de-essing process that much more difficult. Additionally, this de-essing will be much more noticeable , as whatever plugin or processor you use will have to work harder.

You don't want your plugin or processing to work harder than it needs to.
With that in mind, you want to minimize the effect of your de-essing. You don’t want the processing to make a noticeable impact on your master.
In other words, the goal of de-essing during mastering is to be as transparent and as undetectable as possible. If your de-essing can be heard, be it from noticeable equalization or excessive compression, then you haven’t performed it correctly.

De-essing during mastering should occur at the beginning of your signal chain.
Let’s look at the different techniques you can use to remedy sibilance in your master. As stated here, keep in mind that this processing occurs before other forms of processing.
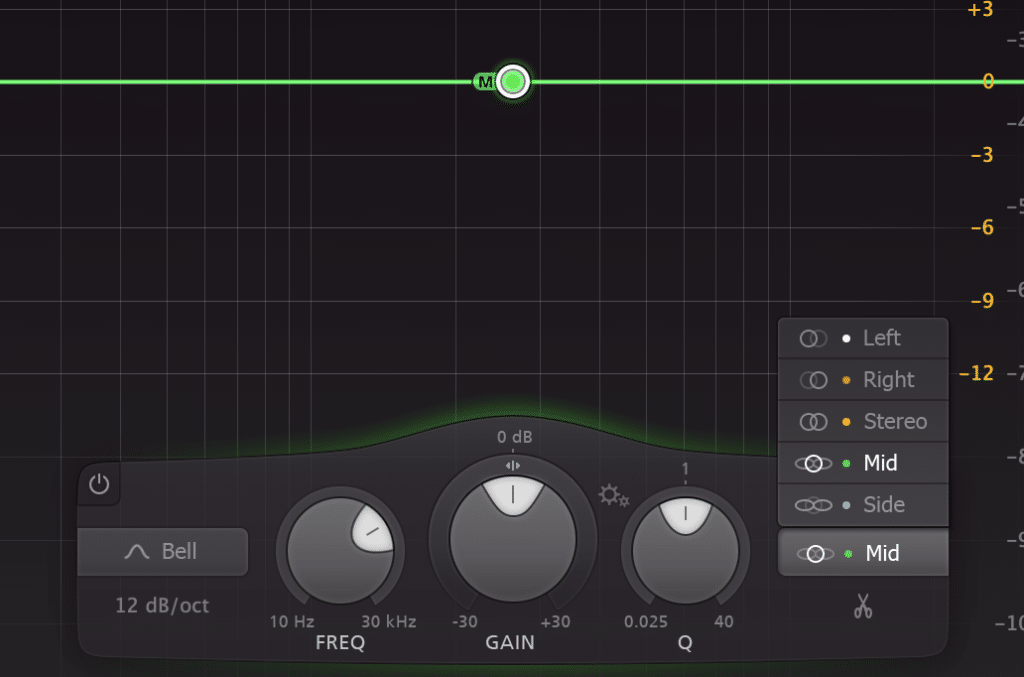
De-Essing During Mastering with Mid-Side Equalization
If you need to perform de-essing during mastering, a great option is to use a mid-side equalizer to attenuate the mid-channel and accentuate or amplify the side-channel. By doing so you’ll be cutting out some of the sibilance in addition to masking sibilance based frequencies.
Let’s look at this in greater detail to better understand it.
Again, this processing is happening first - before any other forms of processing that could potentially amplify sibilance frequencies.
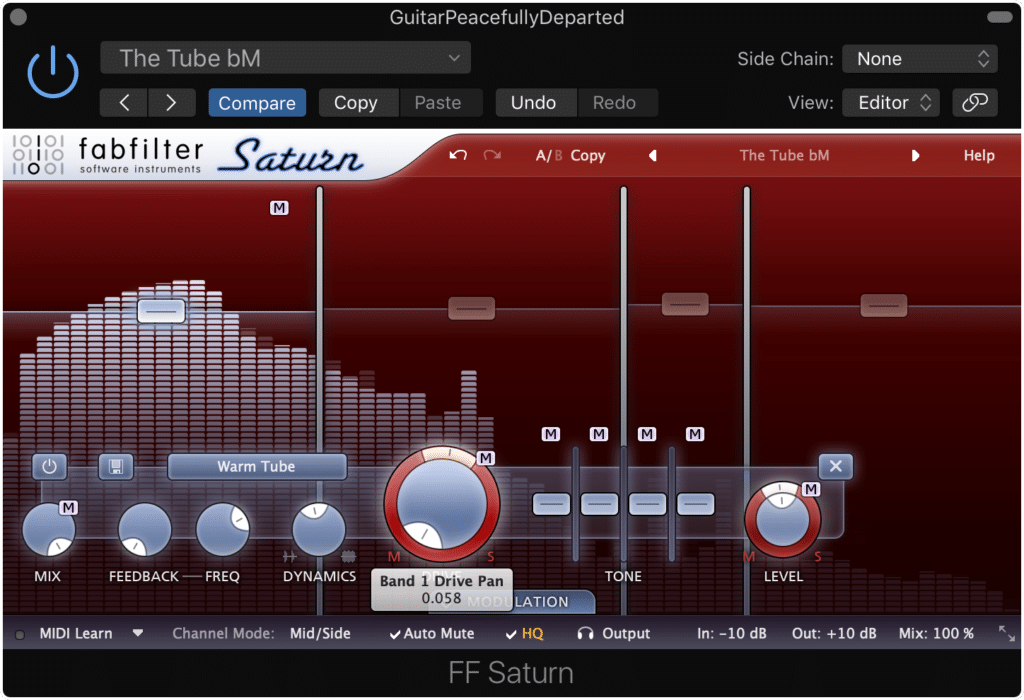
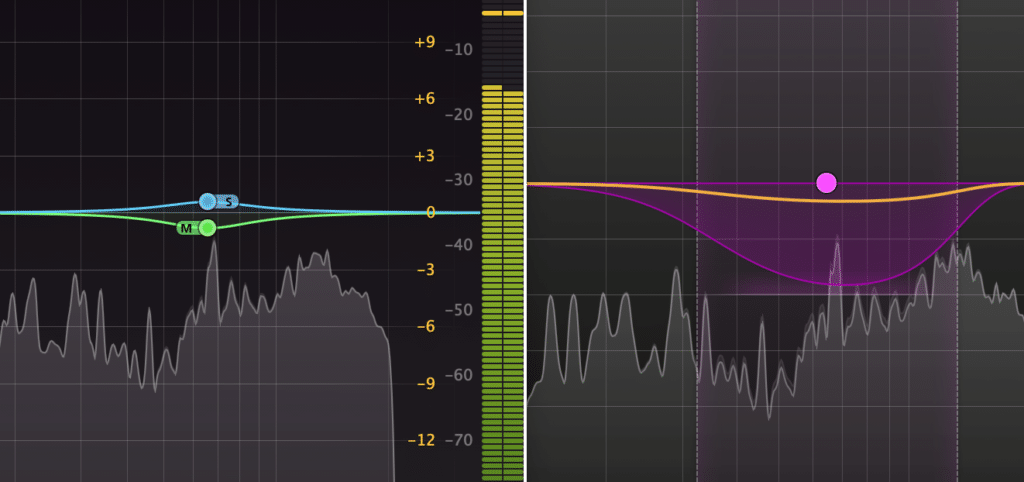
Step 1: Insert your mid-side capable equalizer as the first plugin in your signal chain. For this example, we’ll be using the FabFilter Pro Q 3, but use any EQ plugin you like, so long as it can separate the stereo signal in Mid and Side channels.
Most mid-side equalizers will work well for this technique.
Step 2: Enable the mid-side functionality of the plugin. This will look different from plugin to plugin. For the FabFilter Pro Q 3, I’ll need to create the band and then determine which channel it is affecting.
Enabling the mid-side function of your equalizer may vary for the method shown here.
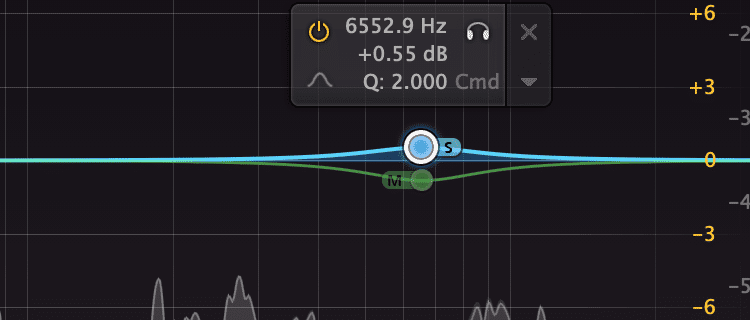
Step 3: Using a Mid-Channel band, listen critically to determine where the sibilance frequencies are. You can use an isolate function to help you set the appropriate Q and to properly identify the frequencies that are causing the issue. If in doubt, sibilance will often cause a frequency spike when sung, so you should be able to notice this spike with a frequency analyzer.
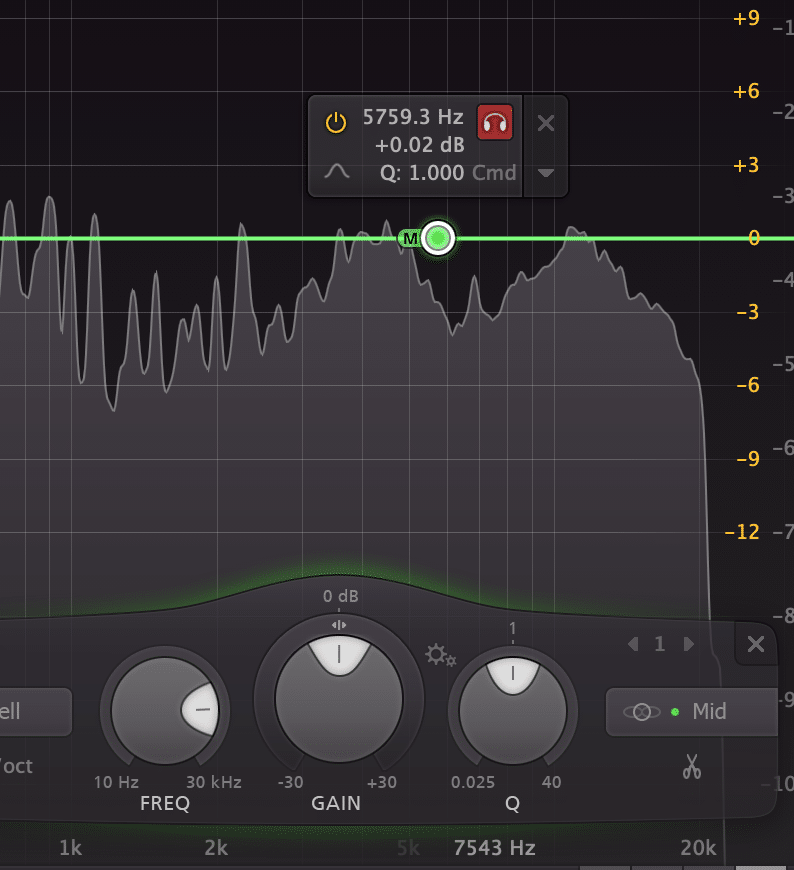
The headphones icon/isolate function will help you to identify the correct frequencies that need to be attenuated.
Step 4: With this Mid-Channel band located over the appropriate frequencies, attenuate those frequencies no more than 1.5dB - 2dB.
Attenuate this frequency band to decrease the amplitude of sibilance.
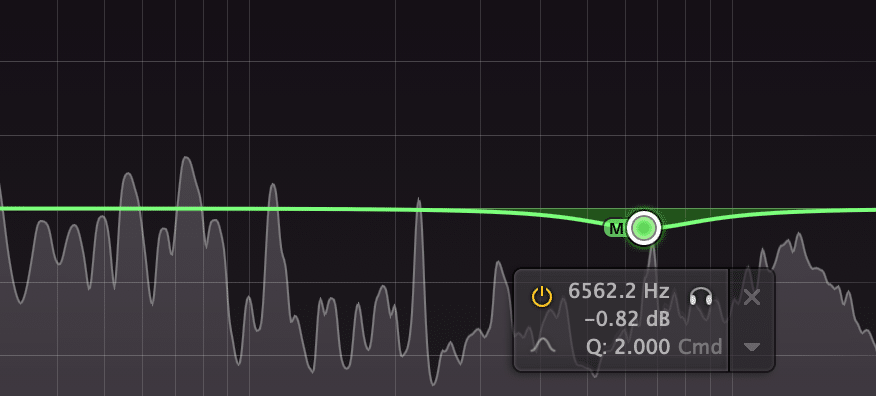
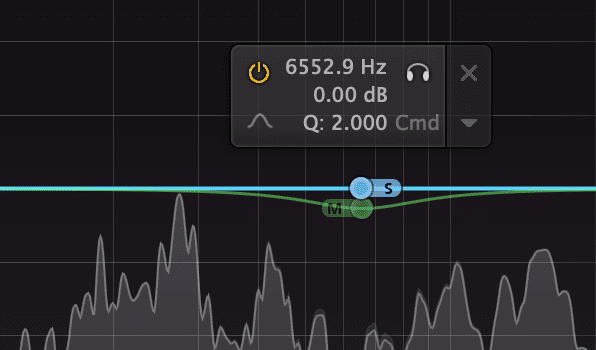
Step 5: Next,create a band on the Side-Channel with the same Q as your Mid-Channel band. Situate this band right below the frequencies that you just attenuated with the Mid Band - so about 10Hz below the center frequency of the band you just attenuated.
Using a side-band, match the first band you create in terms of Q and frequency.
Step 6: Amplify this Side-Channel band no more than 1.5dB - 2dB. Make any adjustments or corrections as needed.
So small changes will probably be needed so listen closely for any needed adjustments.
By attenuating the mid-channel, we’re lowering the amplitude of the sibilance frequencies. This may be noticeable, but, by amplifying the side channel near the same range, we’re reintroducing that frequency on the side image - where the sibilance is not occupying.
This means that the instrumentation in the side image will replace what was attenuated in the mid image.
Additionally, by amplifying the side image right below the center frequency of the mid-band, we’re using the power of masking or phase cancellation to cover up the centered frequencies. This means that the sibilance is being canceled out by louder instrumentation in a similar frequency range.
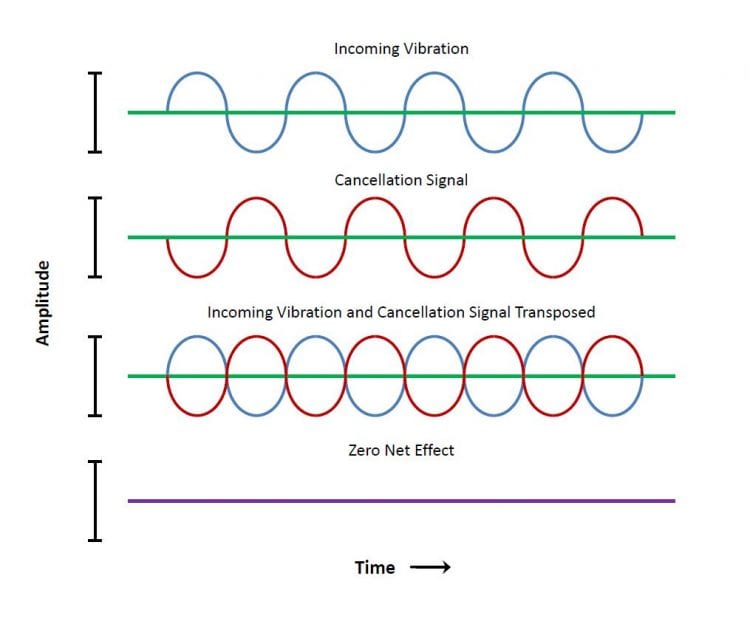
Phase cancellation is a valuable tool to utilize when mixing and mastering.
The reason that we set the Side-Channel band slightly lower than the Mid-Channel band, is because lower frequencies mask the frequencies directly above them. Fortunately, we can use this to our advantage to make sibilance less perceivable, all while making our processing less noticeable.
If you want to learn more about phase cancellation and how it works, check out one of our blog posts that show how it can be used:
It's a great introduction to how phase cancellation works.
De-Essing During Mastering with Multi-Band Compression
Compression can be used during mastering to attenuate sibilance whenever it occurs, resulting in de-essing that isn’t perceivable if done correctly. If you plan on using compression to de-ess during mastering, its best to use a multi-band compressor to isolate the intended frequencies.
Again, because we don’t want to exacerbate sibilance frequencies, its best to perform multi-band compression prior to any other processing.
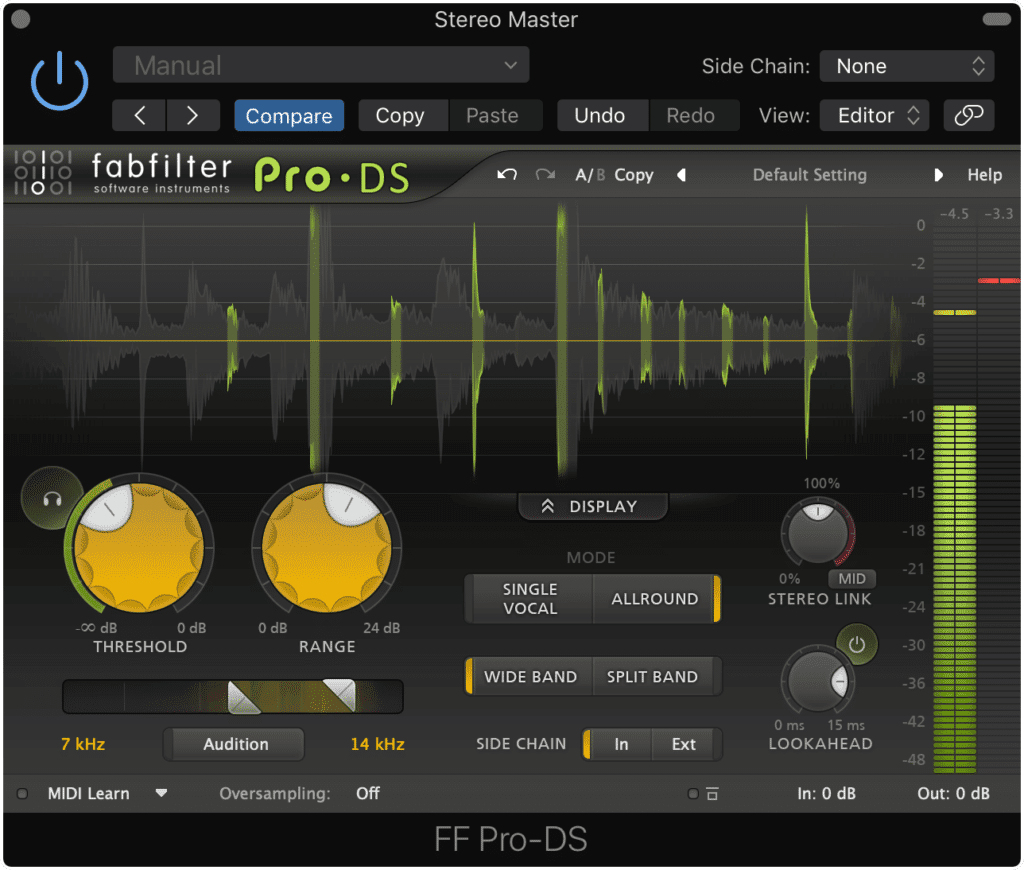
Step 1: Insert your multi-band compressor plugin into your signal chain, ideally first or second. Do not use a stereo compressor, as it will compress uniformly across the entire frequency spectrum. In this case, we only want to compress specific frequencies.
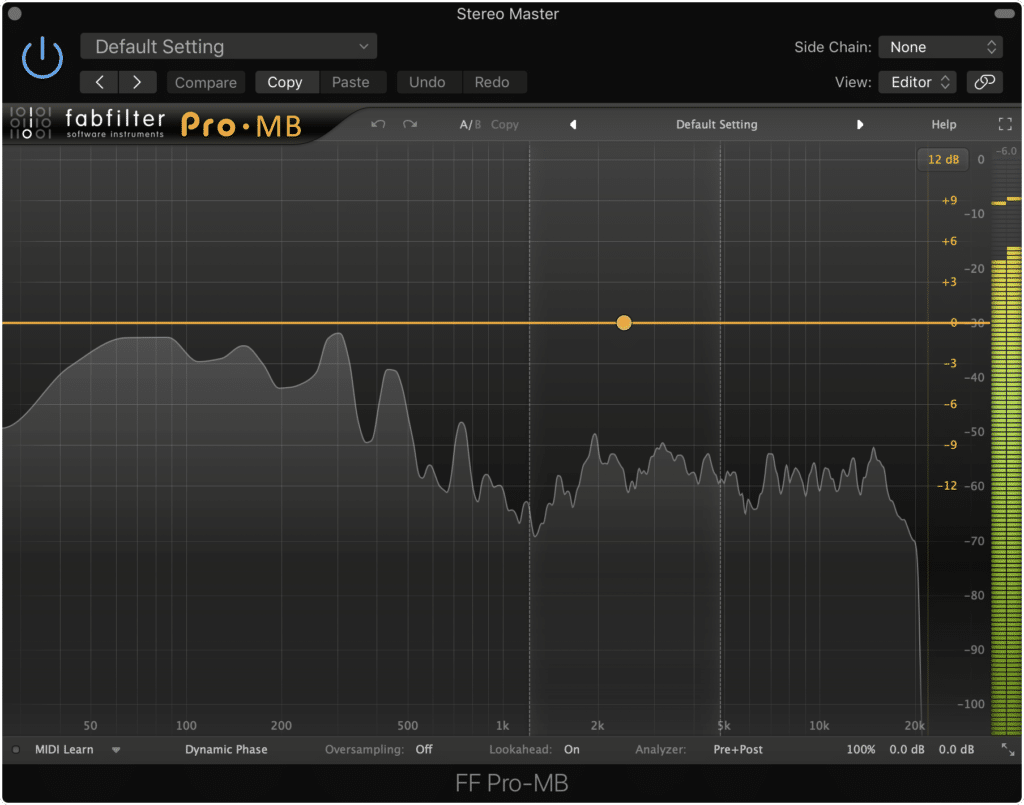
Be sure to use a Multi-band compressor, not a stereo compressor.
Step 2: Find the frequencies you wish to compress. The easiest way to do this is to use an "isolate" function to hear only a signal band. Keep refining your frequency band selection until you find it as accurate as possible. This band will most likely be situated somewhere between 5kHz and 10kHz.
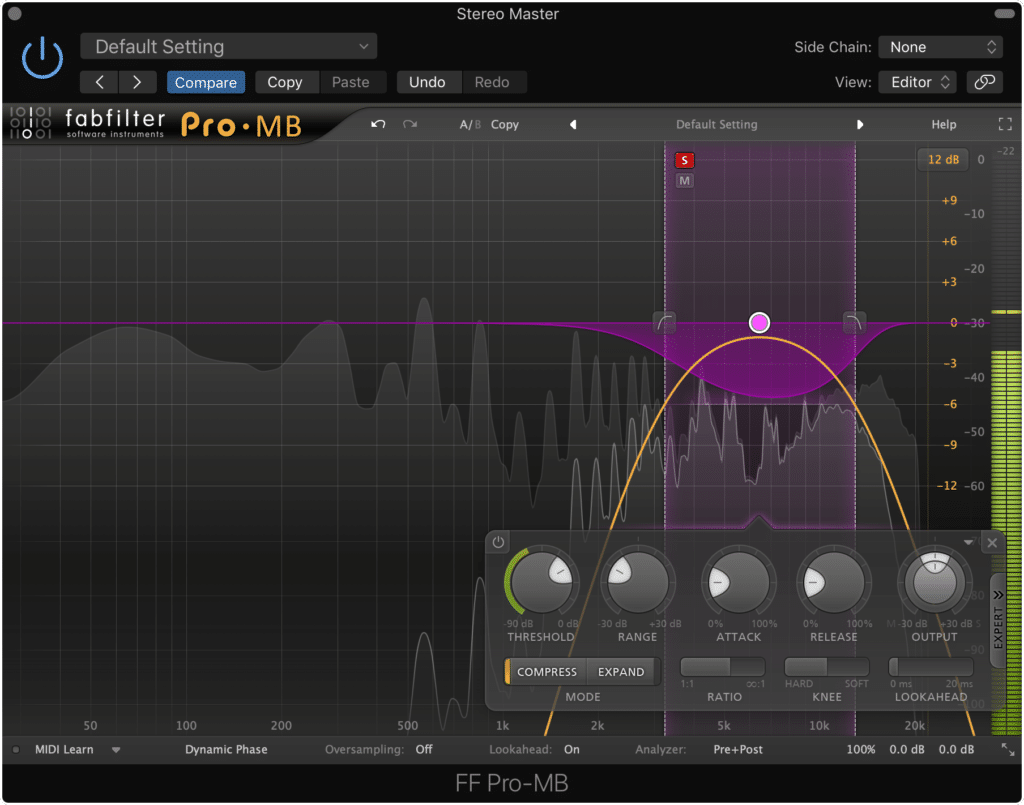
A solo or isolate function will allow you to hone in on the correct frequency band.
Step 3: Set a modest ratio, usually no higher than 2:1, but a higher one can be used in certain circumstances (if the sibilance is particularly strong). Lower your threshold until you notice that the compressor is exclusively or almost exclusively compressing when the “ess” sound or similar sibilance sound is sung.
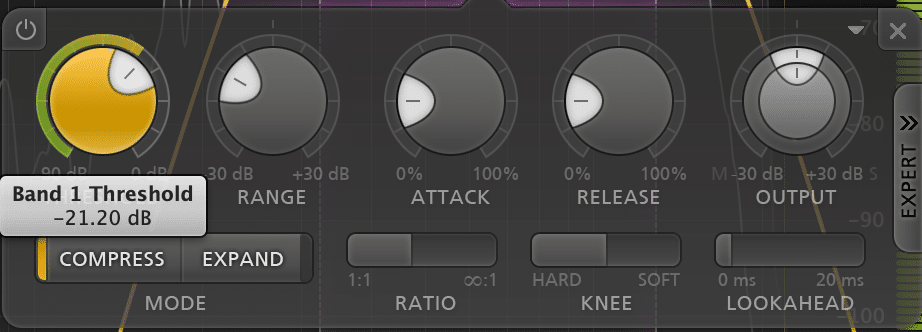
Finding the correct threshold will be the most challenging part of this process.
Step 4: Alter your attack and release times to best compress the sibilance. Typically, a shorter attack and shorter release time will work well. This means that the compressor will begin working right when the transient of the sibilance begins , in turn compressing it more adequately.
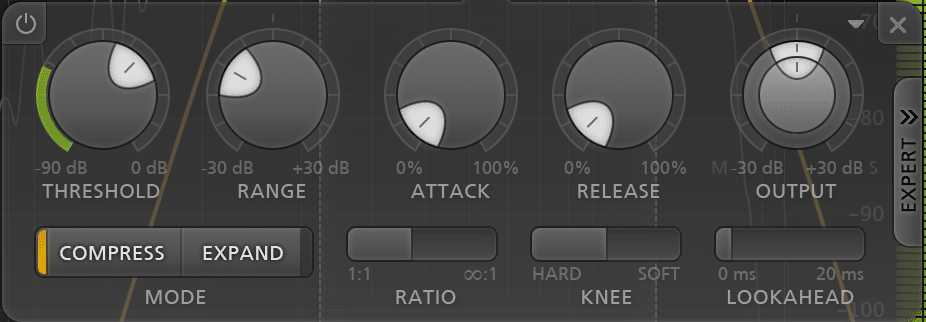
A quick attack and quick release setting will work best.
Step 5: Closely monitor your gain reduction meter to ensure that you are not compressing your signal excessively or in a noticeable way.
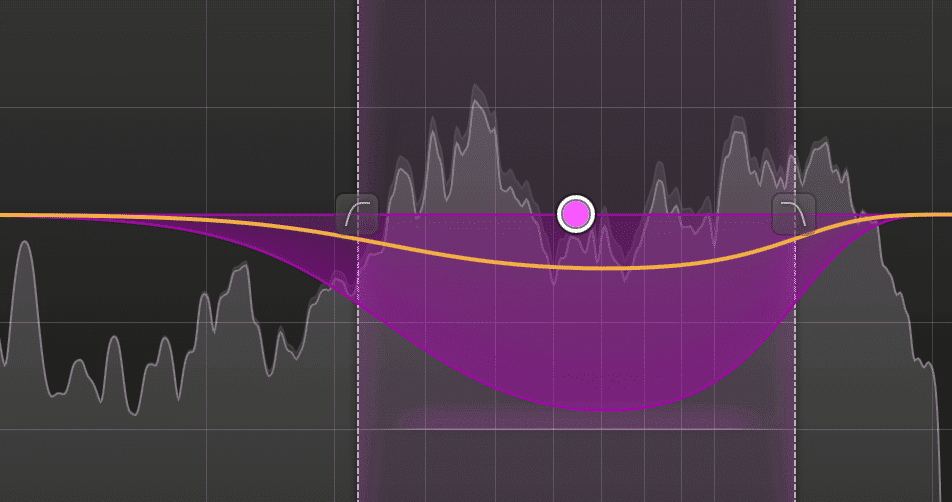
Gain reduction meters look different from plugin to plugin. With the FabFilter MB, the band itself gives the visual representation of gain reduction.
Step 6: If heavier compression was needed, or this compression made a noticeable change to the balance of the frequency spectrum, gradually increase the main-up gain until the balance has been restored.
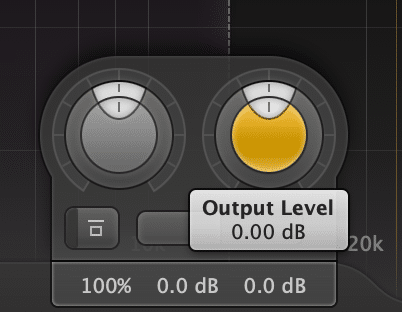
Some compressors don't have a "make-up" gain function, so adjusting the band's gain, or the output will suffice.
Compression typically isn’t as noticeable as equalization , as it only attenuates the signal at specific points. That being said, getting your compressor to compress at the right time and the right amount can be challenging.
Adjust your settings until you find that your sibilance is being adequately compressed, and that irrelevant signals aren’t being compressed.
If you feel that this technique isn’t cutting it, you can combine this multi-band compression with mid-side equalization to accomplish de-essing during mastering. The two can be combined so that each technique “splits” the processing - making each one less perceivable.
Try both of the techniques described if excessive sibilance is present.
If you’d like to learn more about using compression during the mastering process, and how various compression settings affect the signal, check out our blog post on the topic:
It shows how important compressor settings are during mastering. Because you're affecting an entire mix, compressor settings become paramount in shaping the sound of your master.
De-Essing During Mastering with De-Essing Plugins
De-Essing during mastering can be accomplished during mastering using plugins specifically designed for de-essing. Although not all de-essers will be ideal, as many were designed to be used during mixing and not during the mastering process, their implementation is better than allowing sibilance to become excessive.
Although they can be helpful, de-essing plugins that were designed for mixing, don't always translate well when mastering.
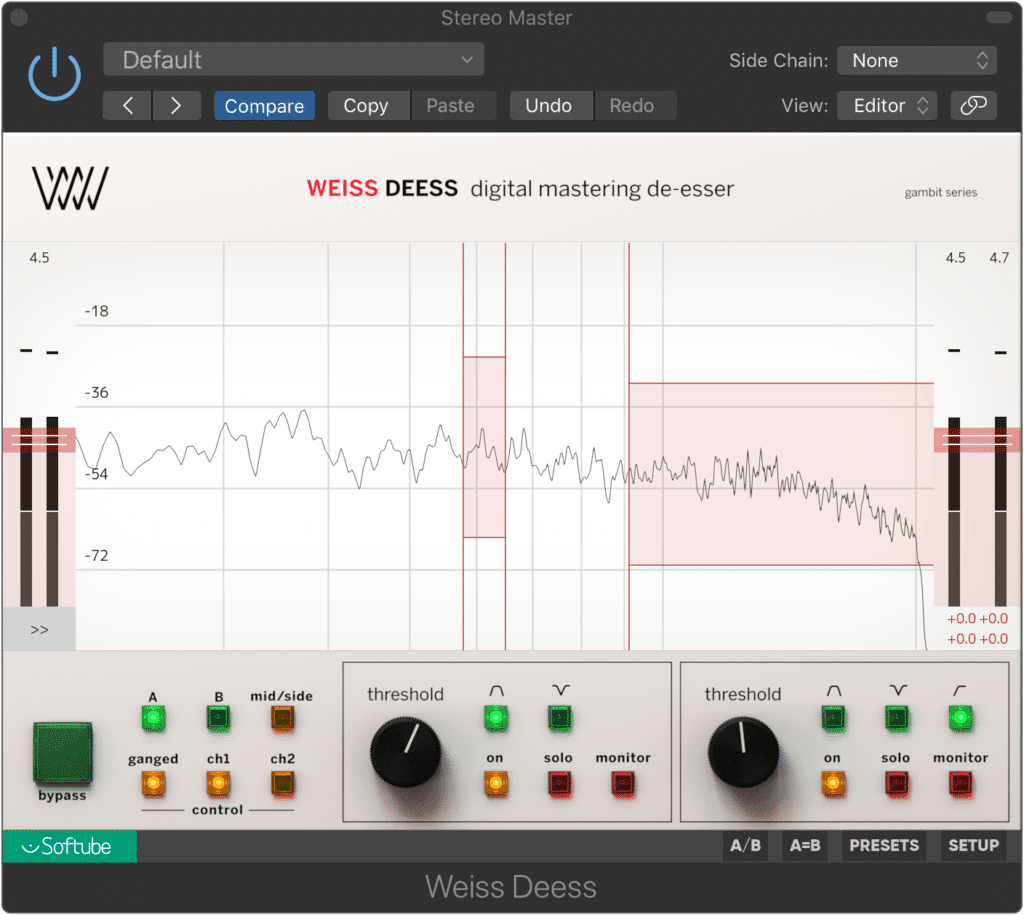
Although they are rare, some plugins have been designed specifically for de-essing during the mastering process. The one that we’ve tested and found very useful is the Softube Weiss De-Esser.
Similar to a multi-band compressor, the Weiss Deess has two bands of compression that are set to frequencies specific to sibilance. These bands are adjustable in terms of their typical compressor settings, be it attack, release, threshold, range and so on.
Plugins like this one make de-essing during mastering easier.
What helps, and allows for transparency is the ability to change the bandwidth of the compression. You can alter between a band, notch, and high-pass filter, to determine how much of the band you are affecting with compression.
Between the two bands, you can easily and transparently address the sibilance in your master. The range function allows you to ensure you are capturing the sibilance by having a low enough threshold, but that only a specific amount is compressed.
If you’re finding that the two techniques presented previously aren’t controlling sibilance in a way that you find transparent or accurate, you can use this plugin, or a similar plugin to attenuate your sibilance.
If you have a sibilant mix that you’re looking to have fixed during the mastering process, send it to us here:
We’ll master it for you and send you a free sample of it for you to review.
Why De-Essing During Mastering is Becoming Increasingly Important
Ensuring that a master is properly de-essed prior to distribution is becoming increasingly important due to how people are consuming music.
The popularization of headphones, primarily earbuds, makes “ess” sounds much more perceivable and unpleasant - making it necessary to control them.

Headphones make sibilance much more perceivable.
Only a decade ago, the primary means of listening to a record was through speakers. This means that room acoustics played a large role in how an album sounded.
Today, things are a bit different. The majority of music listeners are hearing their music through small portable speakers, or earbuds.
Because earbuds are placed directly into the ear, room acoustics no longer play a role in shaping to sound of a record, at least not during playback. This means that the sibilance that was once dispersed by room reflections and affected by absorption, is now playing directly into the ear.
Speakers would cause a signal to be dispersed and reflected in a room.
As you can imagine, this can become unpleasant quickly, and can certainly detract from the overall listening experience.
Another thing to consider is that the majority of mixing engineers are monitoring their mixes through speaker systems. Although room acoustics are carefully controlled in studios, this monitoring setup still decreases the impact of sibilance during the mixing session.
These two factors are making de-essing during mastering increasingly important and relevant.
If you’re a mixing engineer, double-check your mixes with a pair of earbuds . This way you can hear how your mix will be shaped by the currently dominant speaker system.
If you want to know about how headphones are changing music production and other aspects of music, check out our blog post on the very topic:
It details how headphones changing recording, mixing and mastering.
Conclusion
Although De-essing isn’t a typical aspect of mastering, it is becoming increasingly common. If you’re a mastering engineer or a mixing engineer, it’s definitely helpful to understand how to attenuate sibilance during mastering, without it being noticeable.
One way you can remedy sibilance is with mid-side equalization. By attenuating the sibilance in the mid-channel, and amplifying the same frequency band in the side channel, you can effectively tame sibilance.
This causes the “ess” sound to be both turned down and masked - all while maintaining the balance of the frequency spectrum.
When performing de-essing with this method, it is best not to attenuate or amplify frequencies more than 2dB, as it may make a noticeable difference to the balance of the frequency spectrum.
Additionally , multi-band compression can be used to attenuate sibilance whenever it occurs. When using compression to remedy this issue, be sure to use a multi-band compressor and not a stereo compressor.
A multi-band compressor will allow you to hone in on the frequencies you want to compress while leaving other frequency bands unaffected.
Setting a quicker attack and release will ensure that the transient of your sibilance is compressed,in turn decreasing how perceivable it is. Setting a longer release time will result in more compression, but a more mellow, controlled sound.
Lastly , you can use a plugin designed specifically for de-essing during mastering. One good example of this type of plugin is the Weiss Deess, which offers two bands of compression and three different band types.
When using a plugin like this one, you can treat it similarly to a multi-band compressor; however, one function that makes these plugins especially useful is “range.” This added function allows you to determine how much a signal can be compressed.
This extra control will result in a more transparent sound if set to less than 3dB.
Try any of these options to create a more balanced master, and to attenuate any and all excessive sibilance.
If you have a mix that you need mastered, maybe one that has excessive sibilance, send it to us here:
We’ll master it for you using analog processing, and send you a sample of it for you to review.
Have you ever mastered a mix and needed to use de-essing?


