Master Music for Streaming
Quick Answer
Mastering music for streaming is the process of preparing a song or project for distribution on a digital streaming platform. When doing so, the process is similar to a typical mastering session, but the song’s LUFS and the intended platform’s loudness normalization process need to be kept in mind.
Mastering Music for Streaming in Detail

Each streaming service requires slightly altered mastering.
With the increased use of streaming services as a means of listening to music and the relatively low cost of distributing to these platforms, online streaming is here to stay. With that in mind, the process of mastering for streaming services such as Spotify and Apple Music has become a popular topic.
In truth, the mastering process is relatively unchanged from a traditional or typical mastering session, with one very important caveat. Using software known as ReplayGain or RG for short, Spotify and other streaming platforms implement loudness normalization to create a steady, mostly even playback in terms of loudness amongst multiple songs. The mastering engineer needs to keep this in mind when creating a master intended for streaming distribution.
Spotify allows listeners to turn off normalization, but it's on by default.
Let’s take an in-depth look at the information needed to make informed decisions when mastering for streaming. Again, mastering for streaming may be a relatively similar process to typical mastering, but small changes can have a substantial impact on the sound and quality of your master when played back on streaming platforms.
Mastering engineers now need to keep normalization in mind while mastering.
We’ll be discussing loudness normalization, how and when it’s applied across different platforms, how it can negatively impact your master, and how to make sure your master falls within the desired LUFS.
If this is something that you’d rather have done by a professional mastering engineer, send us one of your songs here: https://www.sageaudio.com/register.php
We’ll master it for you and send you a free mastered sample.
Loudness Normalization
To better understand loudness normalization, let’s compare it to how radio stations process and playback songs.
Radio stations alter music somewhat similarly to how streaming services do.
The concept of loudness normalization is very similar to how radio stations operate, but with some important differences. During radio playback, or slightly prior to it, songs are processed using compression and equalization. Radio stations implement this for the sake of creating a uniform sound on their station, and if we’re being honest, to make their station sound louder than others (unless you’re listening to a classical music radio station).
This processing alters the frequency response and dynamics of the song - sometimes resulting in a highly compressed signal, intended to sound loud even through the most uncooperative car stereo-system amplifiers.

Radio stations typically make their music louder, to accommodate subpar amplifiers.
Although similar, this is different than the process of loudness normalization. Loudness normalization works by first measuring the perceived loudness of the track and then applying clean gain if needed. It should be noted that the gain added during loudness normalization is ‘clean’ due to the lack of harmonic generation, or distortion associated with any analog equipment or analog emulation.
Prior to broadcasting, most radio stations compress and equalize their signal.
Once the track is measured, based on the ideal or set LUFS or Loudness Units relative to Full Scale, the track has it’s perceived volume increased, or decreased with this clean gain.
Of course, changing the gain of a track has the potential to change its perceived loudness, but it does not have the ability to change its dynamic range. This is a very important distinction between Loudness Normalization, and the processing radio stations implement. With Loudness Normalization the perceived loudness is changed, but the dynamics and frequency spectrum stay intact; with Radio Stations the perceived loudness, the dynamics, and the frequency spectrum are changed.

Loudness normalization does not affect dynamics.
If you’d like to learn about dynamic range and compressors, check out our blog where we have numerous videos about compressors and dynamic based techniques: https://www.sageaudio.com/blog/mixing
When and How Loudness Normalization is Applied
Now that we understand that Loudness Normalization does not affect the dynamic range of your track, let’s discuss when and how it’s implemented during streaming distribution.
As stated previously, streaming services use software known as ReplayGain or RG. RG’s job is to perform loudness normalization to tracks on the streaming service, to provide a uniform listening experience for any users.
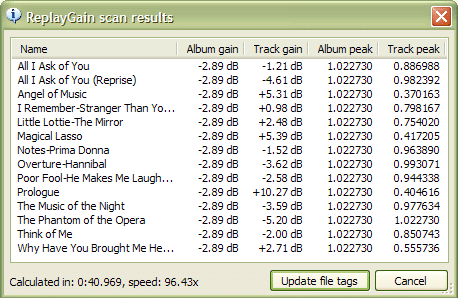
ReplayGain scans and encodes data for normalized playback.
It measures a track’s perceived loudness in LUFS, and then encodes it with instructions that it can later read. These instructions detail how many LUFS the track needs to be amplified or attenuated to ensure normalized playback. ReplayGain will adjust each track’s loudness prior to playback and will do so in an identical way each time the song is played.
Replay gain ensures that all tracks sound similar during playback.
It should be noted that this process occurs within Spotify’s, Apple Music’s or whatever streaming service’s platform. It does not and should not occur during the mastering process, meaning that normalization shouldn’t be used during mastering.
So if you’re mastering for the sake of streaming, the primary thing you will need to keep in mind is what loudness your track will be normalized to. This will determine how loud you will make your master.
Loudness Normalization Across Platforms
Knowing the normalization settings of a streaming service is integral to mastering for it. You should know how loud your track should be prior to exporting and distributing your song to that service.
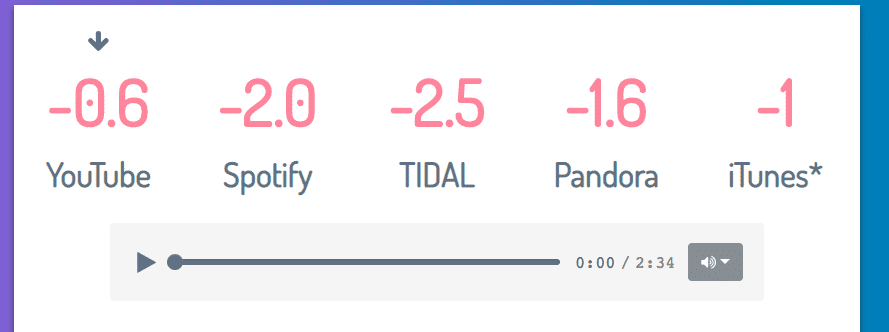
Here is a quick list of the different normalization settings for each streaming platform. Keep in mind that this may change with time, as each company has the ability to change how they implement loudness normalization. Also, these numbers, although accurate, are not exact. They may be off by roughly .5dB, or another minuscule amount.
YouTube: -12.5 LUFS

This is great info to know when considering releasing a music or lyric video.
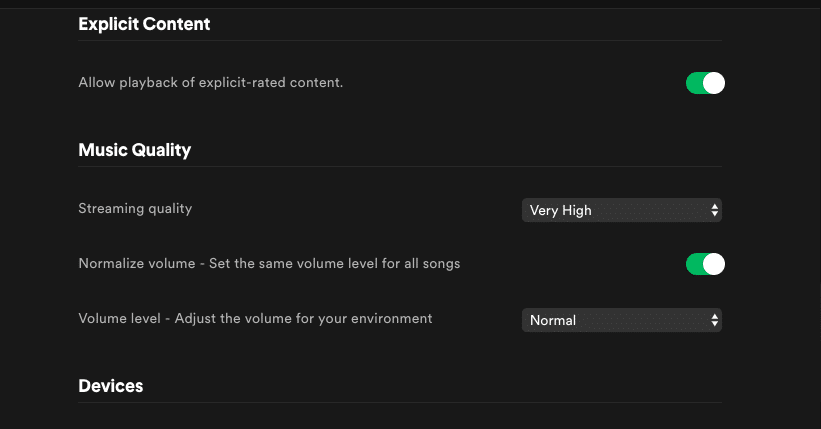
Spotify: -14 LUFS

Spotify's "Normal" loudness setting is -14 LUFS
Tidal: -14.5 LUFS

In addition to offering hi-fidelity streaming, Tidal also implements loudness normalization.
Pandora: -13.5 LUFS

Although Pandora may not be the go-to streaming service, it's still useful to know it's normalization setting.
Apple Music: -16LUFS

Apple Music has taken over iTunes, and employs the same Normalization settings as their iTune's soundcheck function.
So what does this mean for you master? Let’s look at some examples to understand it practically.
So, if you were to bounce your track out at -16 LUFS, YouTube would increase the volume of your track by 3.5 dB, Spotify by 2dB, Tidal by 1.5dB, and Pandora by 2.5dB.
Conversely, if your track was bounced out louder than the settings above, it would be attenuated. So, if you bounced your track out at -10 LUFS, YouTube would decrease the volume of your track by 2.5 dB, Spotify by 4dB, Tidal by 4.5dB, and Pandora by 3.5dB.
(You should note, that it has been speculated that YouTube’s loudness normalization only occurs when the track is louder than its current normalization setting. This means if the audio is quieter than -12.5 LUFS, it will not be brought up to that loudness. Considering YouTube is more elusive than other platforms when it comes to how they normalize audio, this may need to be tested before claiming it to be entirely true.)
YouTube is slightly elusive regarding its loudness normalization settings.
Again, it is important to remember that during this process the dynamics of your track are not changing, nor is distortion or equalization being used. The only thing that is changing is the loudness of your track. This means that in most circumstances, the quality of your master will not be degraded.
Loudness normalization does not introduce distortion.
But let’s take a look at how Loudness Normalization can negatively impact your master and the circumstances needed for this degradation to occur.
If you’re an artist looking to distribute your song, and you need some more help on the process, check out our blog titled:“ Everything you Need to Know About Releasing a Song,****” for more information.
How Loudness Normalization Can Negatively Impact Your Master
As we’ve already gone over, loudness normalization does not impact the dynamics of your master; however, it can make it sound far less dynamic than other masters. How does this work?
When CDs were the primary form of distribution and playback, something popularly known as the “Loudness Wars” took hold of the mastering process. Predicated on the notion that louder masters sound better, and uninhibited by the limitations of previous audio mediums (cassettes, vinyl records, etc.) mastering engineers soon attempted to make the loudest masters possible.

Excessively loud masters only made real "sense" during the era of the CD.
By doing so, they popularized the use of brick wall limiting in the final stages of mastering. The idea being, if you cut off the transients and the dynamics, you can increase the overall level of the track, in turn making the quieter aspects louder, and causing the overall perceived loudness to increase. Essentially, dynamics were sacrificed for the sake of loudness.
Using a limiter will affect your dynamic range.
Now that streaming is the popular form of distribution, and streaming platforms use loudness normalization, louder masters are being turned down. Since they’ve had their dynamics squashed when mastered, when compared to other masters at the same volume, they sound even more compressed and lifeless.

Compared to other masters, a loud master will sound quieter when normalized.
Essentially, quieter masters that were not processed with brick wall limiting, or least didn’t use it excessively, will be played back at a normalized volume. These masters will sound dynamic, whereas heavily compressed and limited masters will lack dynamics. When played side by side there is an obvious difference in quality.
If mastered too loudly, your track will be turned down during normalization.
With that said, creating loud masters doesn’t make sense any more especially when their primary medium is digital streaming. By mastering loudly, and attenuating transients and dynamics, all that you’d be doing is creating a squashed sound. Since it all plays back at the same volume, there are few if any reasons to create a master louder than the normalization setting of the intended streaming platform.
Creating loud mastered doesn't make sense if normalization will be introduced.
Furthermore, it should be stressed that quieter masters don’t sound better when normalized simply because they are quieter. They sound better because there were not processed with brick wall limiting. In fact, you could create a quiet master that sounds just as squashed as a loud master by using brick wall limiting and then turning down the track’s volume. If this track was normalized and had its overall volume turned up, it would sound just as squashed as a loud master that had its volume turned down by normalization.
All this to say that dynamics are the key aspect here. Maintain dynamics, and avoid brick wall limiting when creating a master for streaming.
Using Metering to Ensure Your Master is Ready for Streaming
VU meters are incredibly helpful when determining dynamics.
Despite the fact we can’t control how these streaming platforms normalize our masters, we can measure the loudness of ours using the same measurements, and adjust accordingly. The 3 meters you will need for this process are an LUFS meter, a True Peak Meter, and a VU meter.
With these 3 meters, you’ll be able to measure the integrated loudness, the digital peaks and overs, and get a good sense of the dynamic range. Place these meters after your final processing stage to get an accurate measurement for each parameter.
LUFS
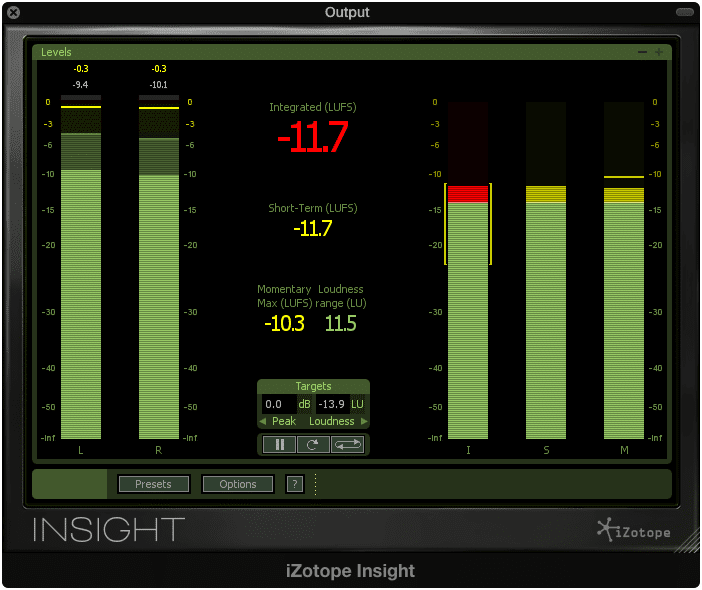
Integrated LUFS is the same metric ReplayGain uses to measure track loudness.
A great option for an LUFS meter is the Izotope Insight plugin, which offers the integrated LUFS, the short term LUFS, the Momentary Max LUFS, and the Loudness Range LUFS. If you didn’t get the VU meter and the True Peak meter, you’d still be able to get a great sense of your song’s loudness and dynamic range with this plugin.
Before playing the track, ensure that the metering has been reset. Once it has, play the track all the way thru without making any adjustments to ensure an accurate reading.
Ideally, the master will be at roughly the integrated LUFS of the platform to which you plan to distribute.
If it goes over slightly, it’s truly no need for concern. For example, if your master is at -12 LUFS and you aimed for Spotify’s -14 LUFS, if you aren’t truncating your transients, or using brick wall limiting, it will sound almost identical when it’s adjusted -2dB by ReplayGain.
True Peak
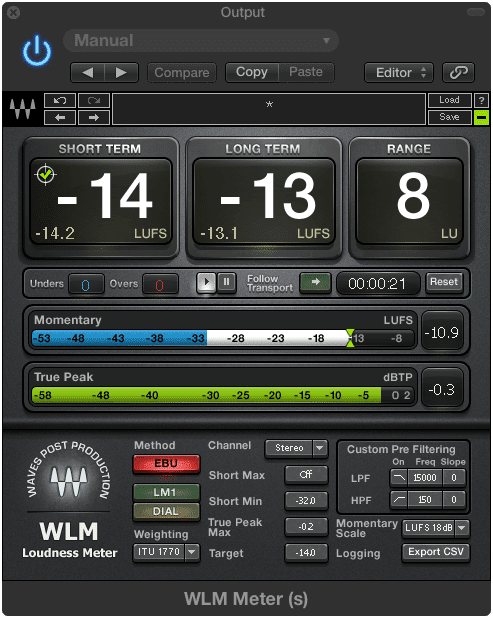
True Peak meters ensure that clipping distortion does not occur.
Most LUFS meters incorporate a True Peak meter in there somewhere - that’s exactly the case with the Waves WLM Loudness meter. Not only does it give you LUFS, True Peak, and allow you to set your specifications, it also allows you to export a CVS file with which you can document and observe the loudness of your project on a second-by-second basis.
This may seem excessive to some, but if you find numbers comforting then this is a great plugin for you.
The true peak meter allows you to accurately discern if you have an over or any clipping. Sometimes typical dB meters are not exactly accurate. A true peak meter ensures you know when your master is clipping.
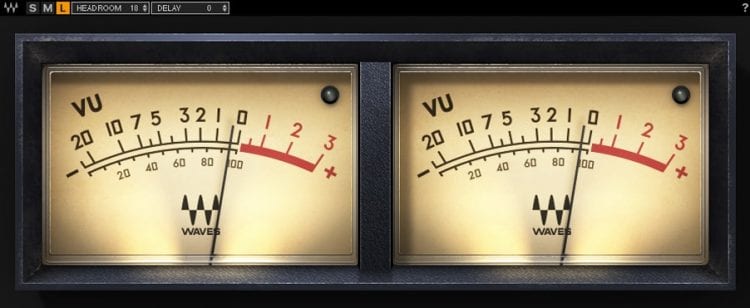
VU
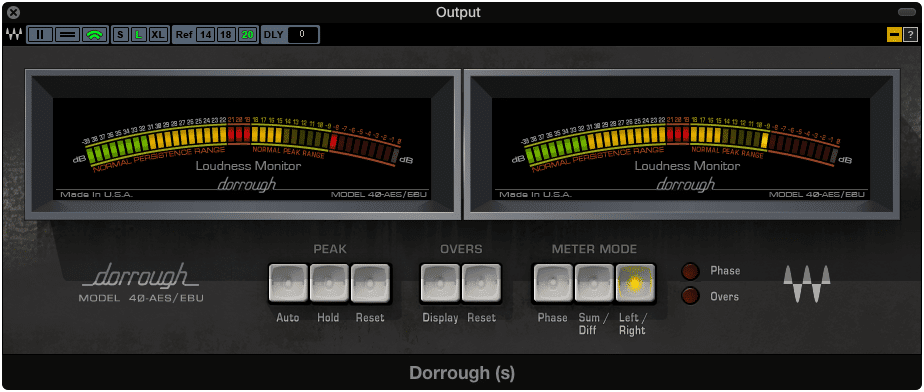
This Waves Dorrough meter is a versatile VU meter.
VU meters are a great way to get a feel for the dynamic range of your master. It’s even more helpful when the VU meter has color-coded metering, demonstrating good levels for the normal persistence and peak range. That being said, a great option is the Waves Dorrough Plugin.
If you do decide to use this plugin as your go-to VU meter, keep in mind that the aforementioned persistence and peak levels may not always suit what you’re trying to create. But, adhering to them is a great way to ensure your integrated loudness and your peaks are distinct and separate. If they are, it means you have a decent dynamic range.
If you don’t feel like getting all three meters, or you prefer to keep things simple, most LUFS plugins offer a Loudness Range function, which is definitely useful.
These 3 meters can be used to determine if your song has the correct loudness, a decent dynamic range, and isn’t peaking.
If you don’t intend to use all 3, the most important is the integrated, and dynamic range LUFS meters.
Conclusion
Mastering for streaming service may not change the actual process too terribly much, but the matter of loudness definitely changes a lot. Mastering too loud now has penalties that can’t be remedied by sounding louder than other masters. Everything is on the same loudness playing field so to speak - and dynamics are the key to creating an impressive master.
Dynamics are, as they've always been, incredibly important when mastering.
To recap, each streaming platform implements loudness normalization differently. These are metrics any mastering needs to know if he or she intends to create a master best suited for a particular streaming service.
When loudness normalization is applied, it occurs within the streaming service and is typically performed by a software known as ReplayGain. ReplayGain amplifies or attenuates the signal using “clean” gain, or in other words, gain that doesn’t introduce any distortion or equalization to the signal.
This means that the signal is relatively the same if it was made louder or quieter, considering that loudness normalization does not affect dynamic range. The only time this processing will have a negative effect is when the master has had it’s dynamics truncated using brick wall limiting. When compared to non-truncated masters, brick wall limited masters will sound less impressive.
So, if you want to master properly for streaming services know the normalization settings (listed earlier in this blog), don’t use brick wall limiting or heavy compression on your master, and export your master relatively close to the normalization setting of your selected streaming service by using the proper metering.
If you’d like to hear your mix professionally mastered, using solely analog equipment, send us your mix here: https://www.sageaudio.com/register.php
We’ll master it for you and send you a free mastered sample.
Have you mastered music for streaming?


