What is Noise Shaping?
Quick Answer
Noise shaping is the combination of dithering and equalization, used to both cover quantization noise, and push any noise created by dithering into less perceivable areas of the frequency spectrum. With the use of noise shaping, dithering can be applied, while theoretically reducing the overall perceivable noise floor.
Noise Shaping in Detail
Since the introduction of digital quantization and sampling, engineers have sought to remedy the negative effects of inaccurate quantization, or quantization error, and the noise it generates.
Digital recording has its shortcomings - quantization noise being one of them.
Although the best way to reduce this noise is to record at a higher bit depth, and to maintain that bit depth through the production and distribution process, this option is just now becoming a possibility.
For years, engineers had to make do with the technical limitations of their digital systems - this meant recording at 16-bit, and reducing the bit depth to 8-bit when necessary. Throughout this process, dithering, and noise-shaping became a common tool to mask the negative effects of quantization error, to increase the dynamic range, and to reduce the perceivable noise floor.
Older digital recorders and processers truly needed dithering due to inaccurate quantization and lower bit depths.
Today, these practices are still upheld. They may not always be entirely necessary, but understanding them means understanding an important aspect of digital recording, and digital recording history.
Furthermore, delving into this topic reveals highly important information regarding the workings of the inner ear, and the perceptual science behind listening to music. Although this may seem like a dry topic, understanding it will absolutely help you as an audio engineer and musician so definitely read on if that’s something which interests you.
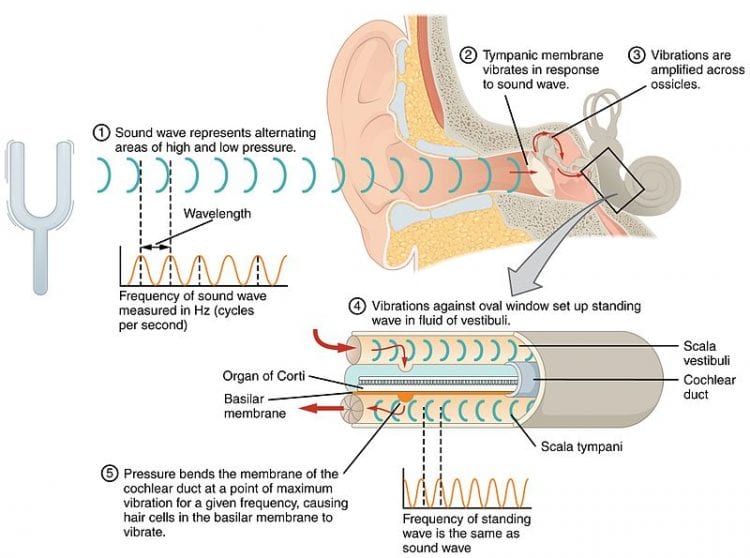
The mechanisms of the inner ear, and the outer ear's shape affect how we perceive sound sources.
To best understand what noise shaping is, we should start by understanding how we perceive sound, then what dithering is and why it’s used, and then lastly, what noise-shaping is, and how it ties into these two former topics.
We’ll be looking into when to use dithering, when not to, and how noise-shaping may affect and influence these decisions. This way, you’ll be able to make informed decisions during your mastering process.
If you have a mix you need mastered, and you’re not sure how to master it yourself - send it to us here:
We'll master it for you, and send you a free mastered sample of that mix.
Let’s begin with the “Fletcher-Munson Curve.”
What is the Fletcher-Munson Curve?
The Fletcher-Munson Curve, also known as the Equal-Loudness Contour, is the measurement of the sound pressure (SPL) needed to created an equally perceived loudness across the full frequency spectrum. The Fletcher Munson Curve demonstrates how our ears affect our perception of sound sources in a unique manner.
What does the Fletcher-Munson Curve look like?
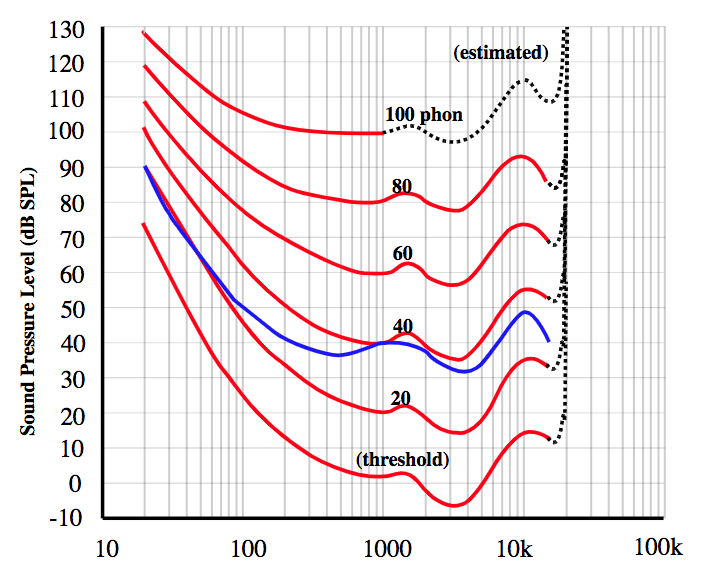
At first glance, the Fletcher-Munson curve is difficult to understand.
When looking at this chart, it can be a little difficult to decipher what’s exactly happening, so let’s break it down.
On the left, you see the SPL or the loudness of a signal measured in dB. This makes up your y-axis or your vertical axis.
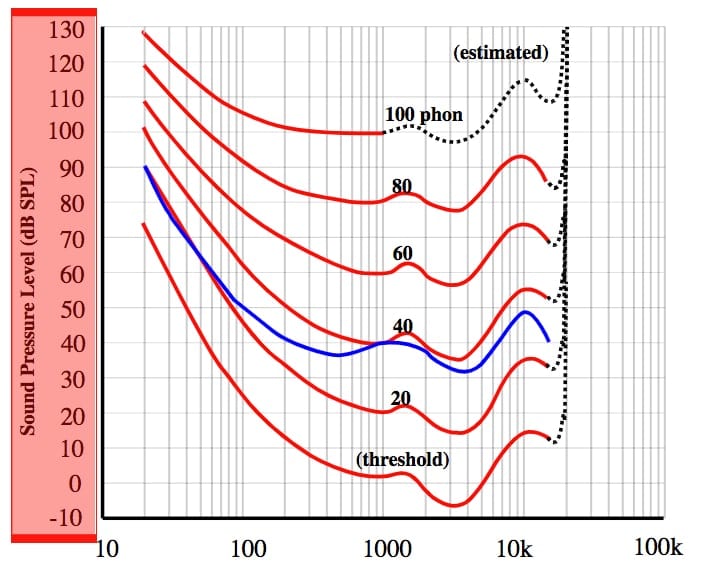
On the y-axis is the dB
On the bottom, you see the frequency response, from 10Hz. to 100kHz. left to right respectively. This makes up your x-axis of your horizontal axis.
On the x-axis is the frequency
The red lines that you see curving from left to right, indicate how loud a signal needs to be in dB SPL, to be perceived equally when listened to. The unit used to denote the perceived loudness of the signal is the “Phon” which can be seen above each red curve.

In the middle are the 'Phon' curves
So for example, if you wanted to hear 100Hz at 60 Phon, the loudness in dB SPL would need to be a little less than 80dB. To find this answer, look at the 60 Phon curve, and see where it alines with 100Hz. Where the 60 Phon red curve and 100Hz. intersect will show the dB SPL needed to create a perceived 60 Phon.
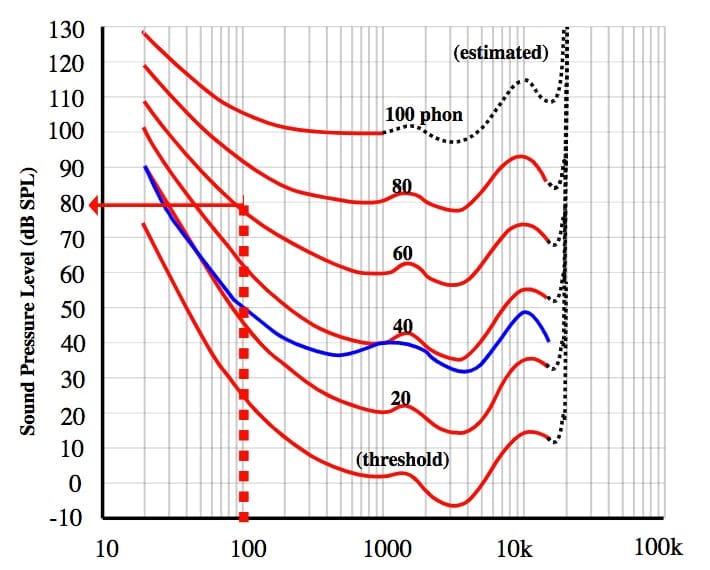
The intersections of frequency and phon indicate the necessary dB
So why is this important?
Well, it shows that our ears do not translate sounds in a linear fashion - in other words, the sound that goes in, isn’t always the sound that is perceived.
That being said, you can observe that lower frequencies need to be louder to be perceived at the same volume as some higher frequencies.
For example, if you’d like to hear that same 100Hz tone at 60 Phon, it needs to be nearly 20dB louder than 1kHz to be perceived as the same volume. As you can imagine, this has huge implications for mixing, mastering, and perceptual sciences.
As you also may have imagined, this will influence how dithering is implemented and how noise-shaping is used in conjunction with dithering.
What is Dithering and Why is it Used?
As stated briefly in the section Noise Shaping in Detail, dithering is used to cover up quantization noise.
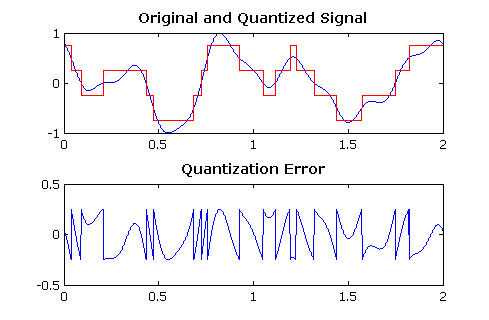
Quantization noise occurs due to quantization error. Quantization error is the difference between the actual amplitude of an analog signal, and the available bits of information that amplitude can be rounded to.
With that said, the greater the bit-depth, the more accurate a signal’s amplitude can be quantized. Greater accuracy will result in less quantization error and less noise created from this error.
So, a 24-bit file has 16,777,215 values an amplitude can be quantized to, whereas 16-bit and 8-bit recordings have 65,536 values and 6502 values respectively. Again, the greater number of values will result in a more accurately quantized signal, and ultimately less noise.
Of these 3 different bit-depths, a 24-bit file will have the least amount of quantization noise, whereas an 8-bit file will have the most.
Dithering is the process of adding what is essentially white noise into a signal, to mask and randomize the effects of quantization distortion. Ideally, this process will result in a lower noise floor, and create a greater perceived dynamic range (this occurs more so at low bit depths).

Dithering is very valuable at lower bit-depths.
The reason masking and randomizing quantization noise is so important, is because along with noise, quantization error generates high order harmonics.
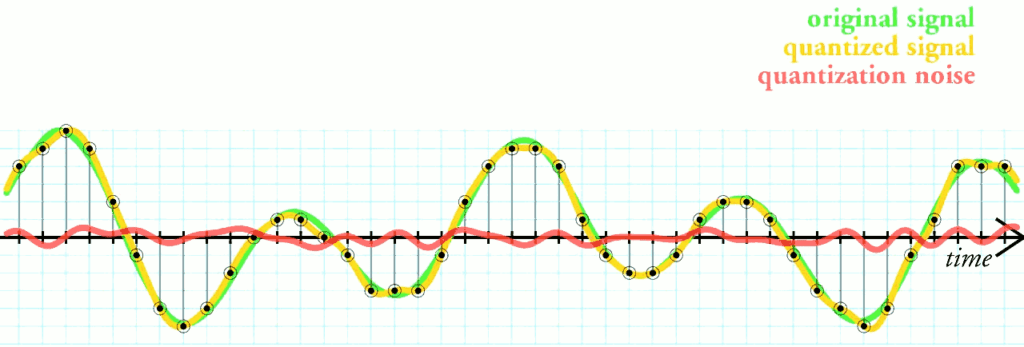
The red line above represents the small amount of noise generated from quantization distortion. This occurs when truncating your higher bit-depth files to lower ones.
These harmonics are unpleasant sounding, and are easily perceived since they directly correlate to the fundamental frequency from which they were derived.
Introducing noise to cover or mask these harmonics randomizes the relationship between these harmonics and the fundamental, making them harder to perceive.
If you’d like to hear these harmonics, check out our blog post that details different distortion types:
It goes over various forms of harmonic generation, and shows what bit depth distortion looks and sounds like.
And if you’d like to learn more about dithering, when to use it, and how it applies to mastering, check out our blog post on the topic:
It’s full of detailed information on dithering, and when dithering may not even be needed.
When dithering is combined with equalization that keeps the Fletcher-Munson Curve in mind, we create what is commonly known as noise shaping.
How is Noise Shaping Accomplished?
As just stated, noise shaping is combining dithering with equalization. This equalization is done with how we perceive sound in mind, and how that affects the perceivable noise floor.
By using subtractive equalization on frequencies we can easily hear, and using additive equalization on frequencies we cannot easily hear, dithering can be applied while being less easily perceived.
Typically this means that frequencies between 500Hz and 5kHz are attenuated, while frequencies above 6kHz are amplified. Again, this results in roughly the same amount of dithering noise applied, but the frequencies are now attenuated in areas where our ears are more sensitive, and amplified in areas which are more difficult to hear.
With that in mind, let’s look at some different, perhaps recognizable dithering types to examine what they mean, and what type of noise shaping is being applied.
POW-R #1:

Although not labeled as a noise shaping dither, POW-r #1 does include some shaping.
Flat dither has a flat frequency response. This means that no noise shaping has been applied to the dithering noise. However, in this particular algorithm, some noise shaping has been applied above 15kHz.
POW-R #2:
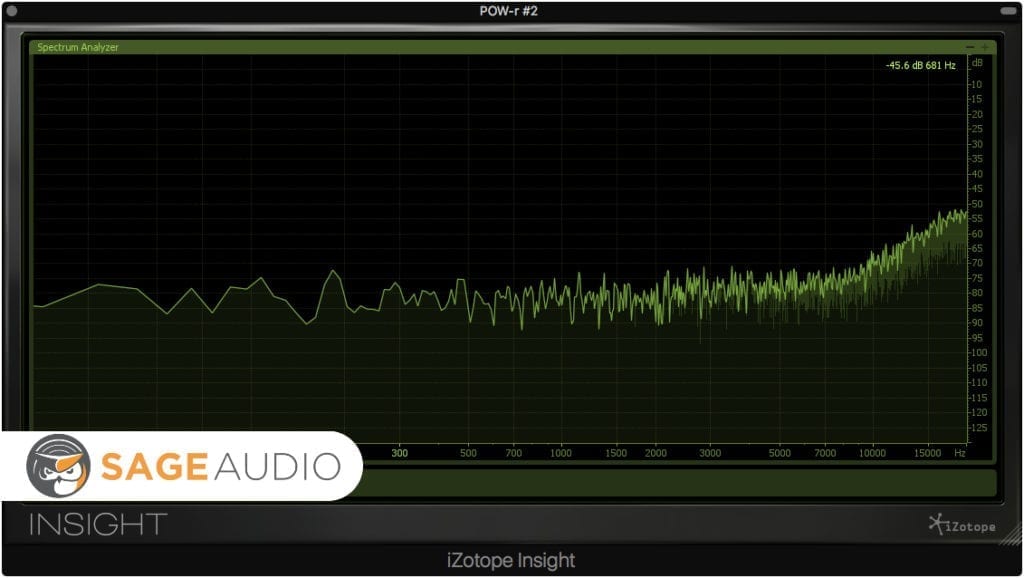
POW-r #2 has gradual and subtle shaping.
POW-R #2 is attenuated from 2kHz to 8kHz. At 8kHz. the noise is amplified roughly 15dB between 8kHz and 14kHz. There's an additional 5dB amplified between 16kHz and 20kHz.
POW-R #3:

Many report POW-r #3 sounds more noticeable.
POW-R #3 is attenuated drastically around between 3kHz and 4kHz, and then gradually amplified back to unity between 5kHz and 9kHz. It dips again between 12kHz and 14kHz and is then amplified drastically between 16kHz and 20kHz by roughly 35dB.
This algorithm is a bit more extreme in its equalization curve, or noise shaping, and may result in more perceived noise despite its intention to do the opposite.
UV22HR:

This dither is relatively flat until 18kHz.
UV22HR is created by Apogee, and is relatively flat between 1kHz and 18kHz, although it should be noted that these frequencies are quieter than Flat TPDF Dither by roughly 5dB. At 18kHz the noise is amplified drastically by about 30dB
FabFilter Basic :
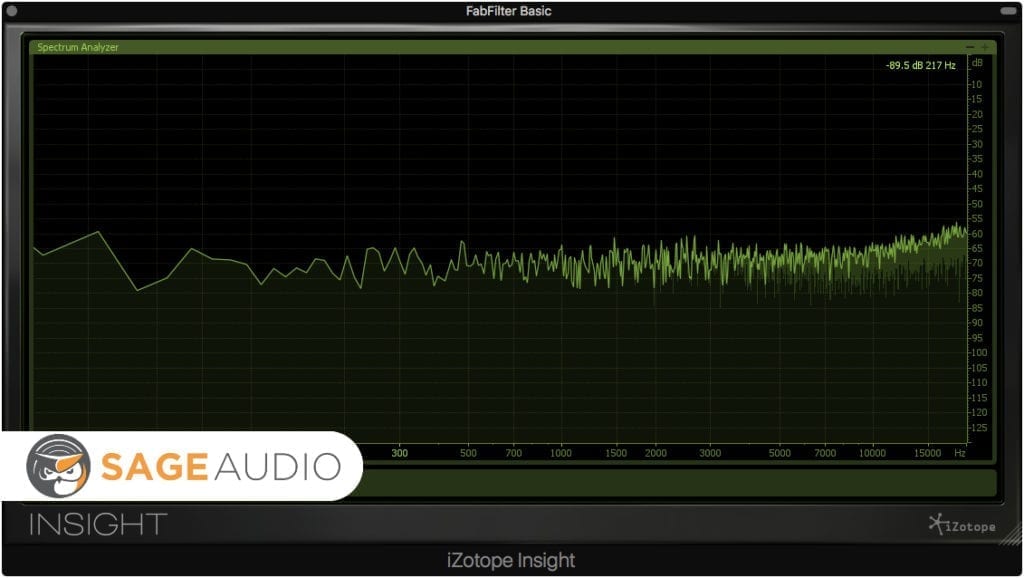
FabFilter Basic provides very subtle noise shaping.
FabFilter Basic is relatively flat until 7kHz. From 7kHz. to 20kHz. the noise is gradually amplified by 10dB.
FabFilter Optimized :
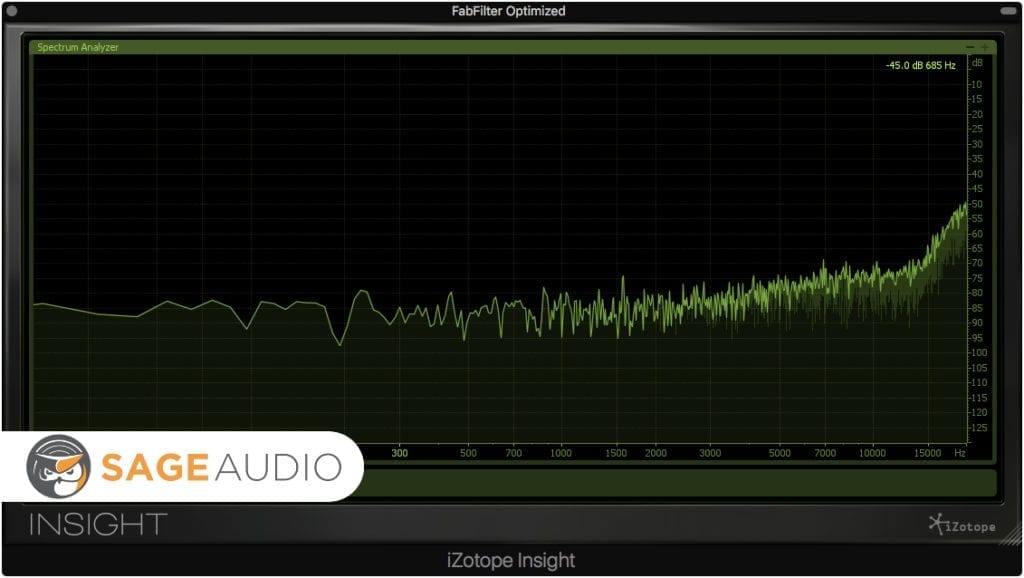
This option has more intense shaping.
FabFilter Optimized is flat until 3kHz. From 3kHz to 7kHz. the amplitude is increased gradually by 10dB. From 7kHz. to 14kHz. it is again flat, at which point the amplitude increases drastically by 25dB until reaching 20kHz.
FabFilter Weighted :
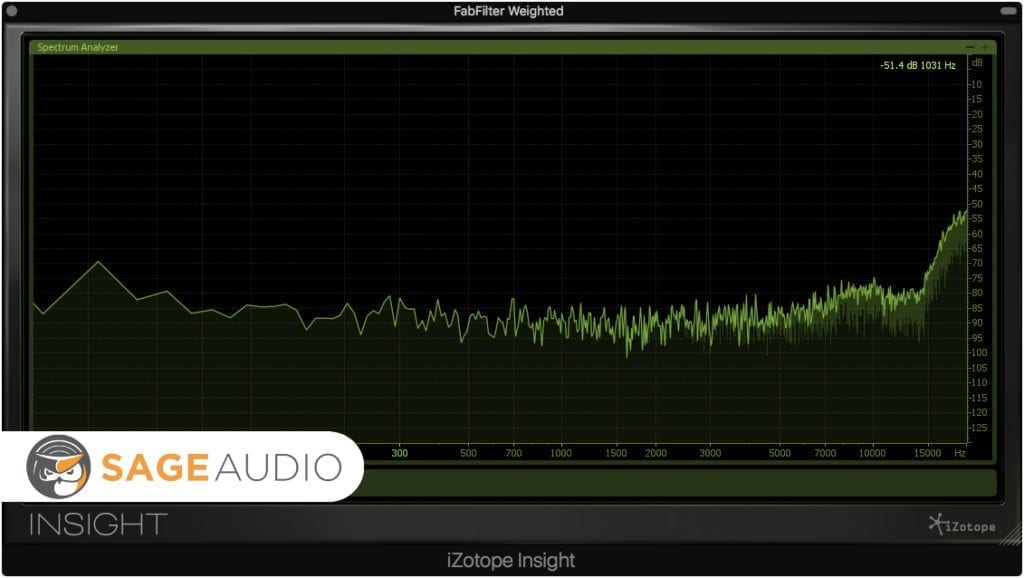
FabFilter Weighted has a similar shape to POW-r #3.
FabFilter Weighted remains flat until 6kHz. From 6kHz to 10kHz. the amplitude is increased by 10dB. From 11kHz. to 14kHz. it dips by 5dB. And at 14kHz to 20kHz it increases in gain by 30dB.
Waves IDR Type 1 Ultra :
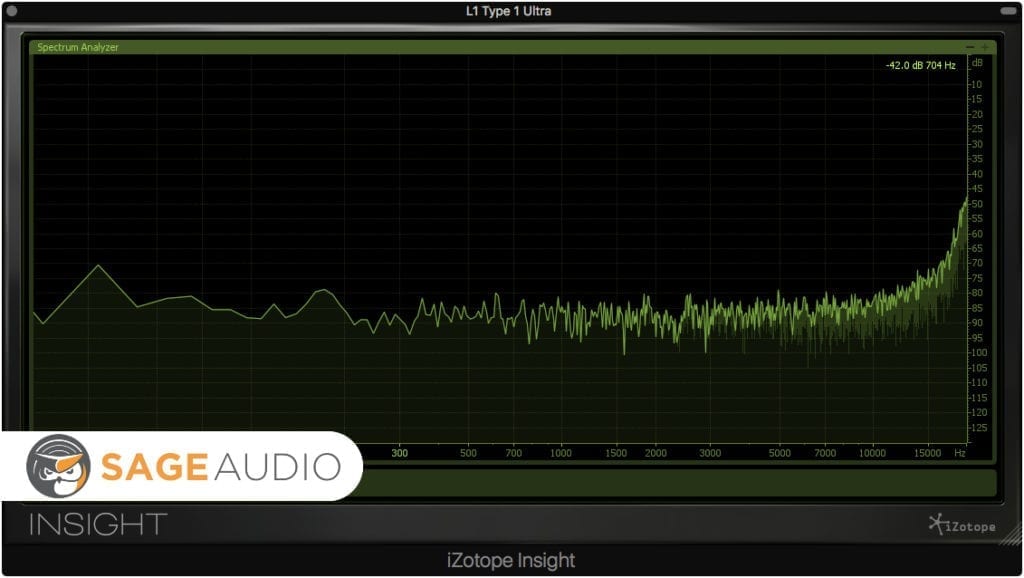
This noise shaping is flat until the exponential curve from 10kHz to 20kHz.
Waves IDR Type 1 Ultra stays flat until about 10kHz. At which point it quickly and exponentially slopes upward 40dB until it reaches 20kHz.
As you can see, different dithering and noise shaping types accentuate and attenuate different frequencies. Each type may work better for a specific master and depends on the instrumentation used in the mix.
In certain situations, you may not need dithering and the noise shaping that comes along with it.
Here are Some Situations in Which You Don’t Need Dithering and Noise Shaping:
- If there is enough noise from the recording and mixing process to cover quantization noise.
- If you record, mix, master, and distribute at a 24-bit depth or higher.
- If the noise generated from dithering and noise shaping is greater than that generated from quantization noise.
- If your master is significantly loud at all parts of the track.
Here is How You Can Determine if Quantization Noise, or the Noise from Dithering is Louder:
Step 1: Export Your Master from 24-bits to 16-bits without Dithering
Step 2: Export Your Master from 24-bits to 16-bits with Dithering
Step 3: Import Both of Your Masters into Your DAW
Step 4: Align these Two Masters with Your Original 24-bit Master
Step 5: Use a Null Test and a LUFS Meter to Measure the Differences
Step 6: Determine Which Master Results in the Least Amount of Noise
This test may seem difficult, but if you’d like to see how to do it, check out our video and blog on the topic:
The video shows how you can do this test on your own.
If you’re finding this whole thing to be a bit more than what you bargained for, you can always send us your mix here:
We’ll master it for you for free, and send you a sample of that master.
Now that we understand what noise shaping is, and how it’s essentially white noise with additive and subtractive equalization, we can use these two tools to recreate some of the popular dithering plugins.
How to Create Your Own Dithering and Noise Shaping
Step 1: Use a Test Oscillator to create white noise. At this point, you’ve essentially already created a flat dither. Granted you’d have to blend this into your master, but it’s the same noise used for the dithering process.
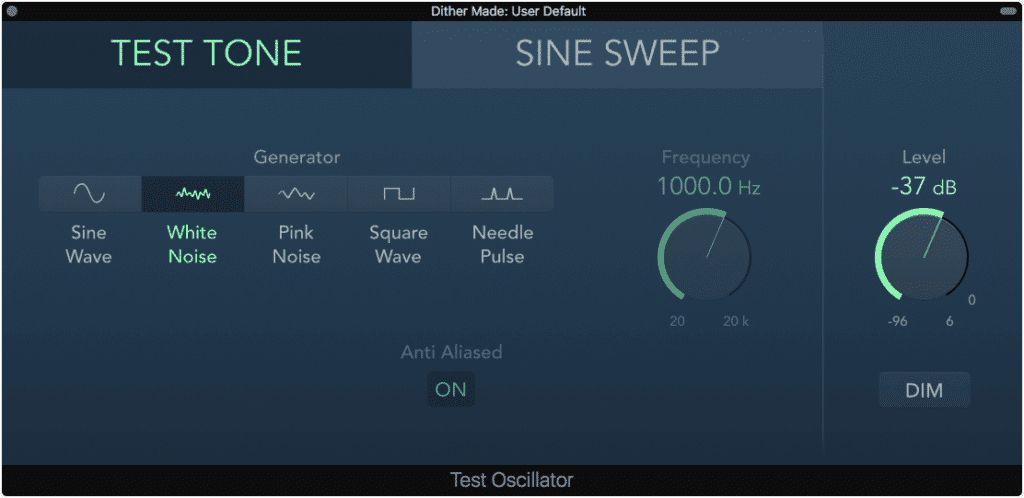
Any white noise generator will work well.
Step 2 : Add an equalizer after the test oscillator. With the Fletcher-Munson curve in mind, begin attenuated and accentuating specific amplitudes.
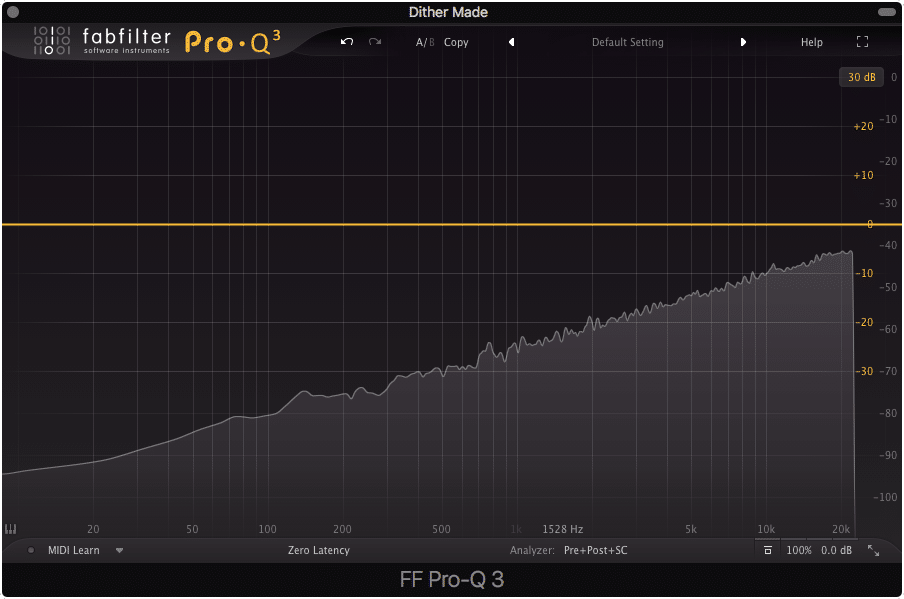
Choose an EQ that doesn't color or distort the sound.
Since dithering is typically very quiet, I’ll model my noise shaping after the 20 Phon curve.
Step 3: To do this, attenuate 3kHz to 4kHz by roughly 8-10dB.
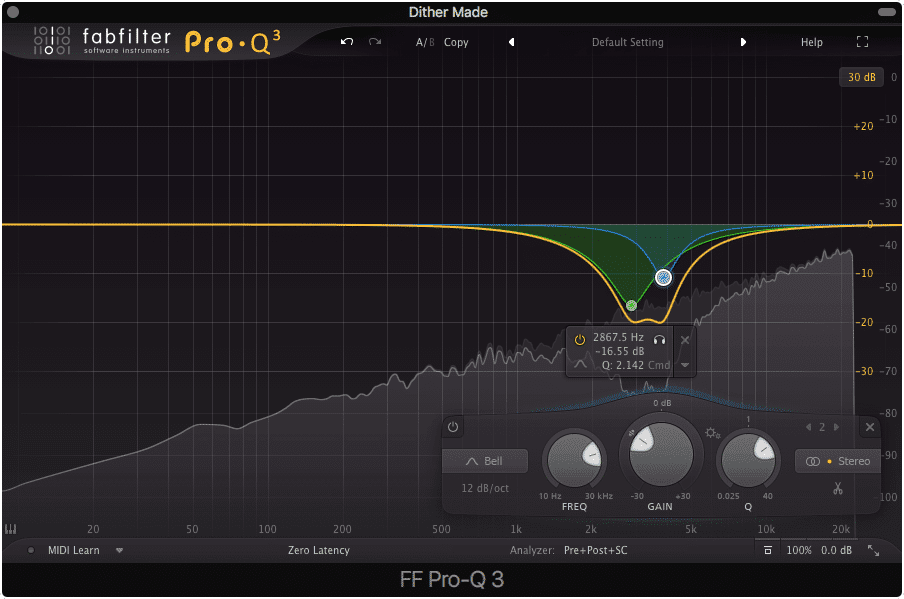
Reference the Fletcher-Munson curve to see why this EQ is being made.
Step 4: Amplify 1.5kHz by roughly 5dB.
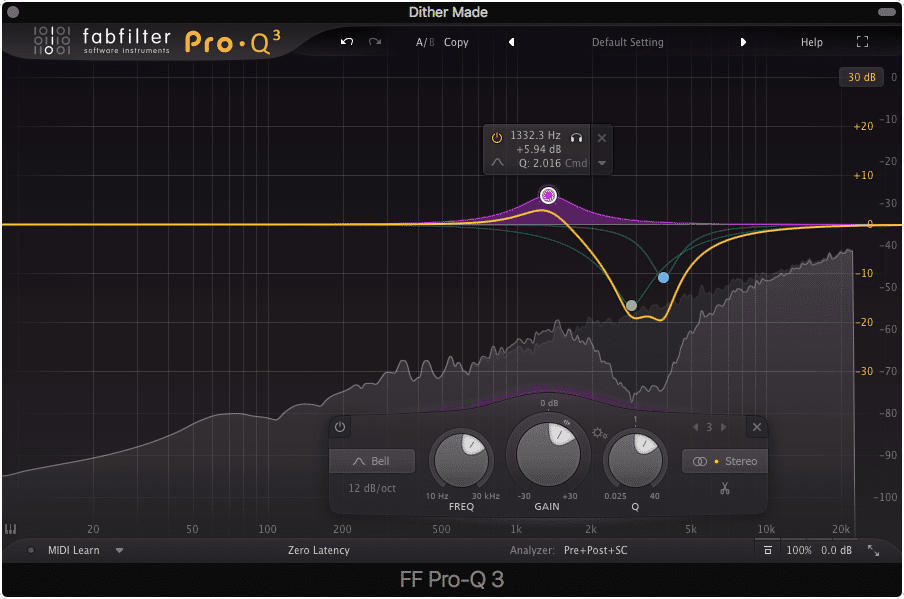
Our ears are less sensitive to 1.5kHz.
Step 5: Amplify 20kHz by about 15dB with a bell or shelf filter. This way you create a gradual increase in amplitude.
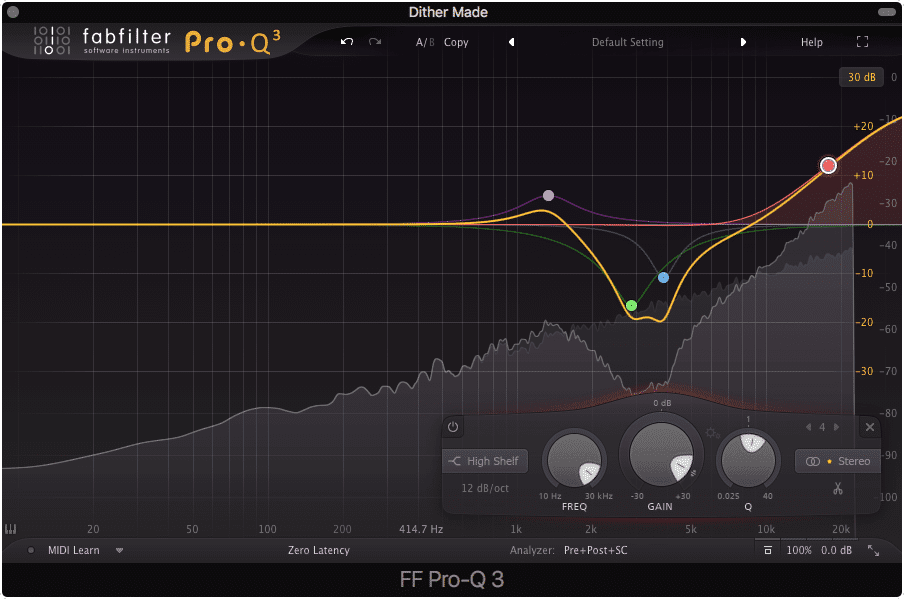
Our ears are significantly less sensitive to 15kHz. plus.
If you’d like you can export this noise and use it later, or save the settings for future use. Be sure that this noise is the last thing added prior to exporting your track, otherwise, you may process it in an unintended way.
Experiment with this technique until you find noise shaping that works well for you and your master’s needs. Also, it may make things easier if you use a frequency analyzer after your equalizer so you can measure how your noise shaping is affecting the frequency response.
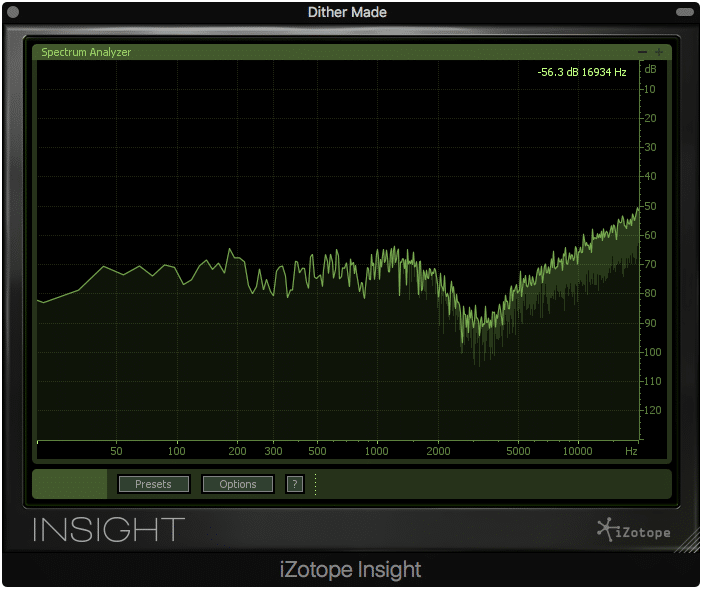
Use a frequency analyzer to measure and visualize your noise shaping.
Also, it is important to use an equalizer that doesn't introduce any distortion or harmonic generation. As you can imagine, this would interfere with any noise shaping you wished to accomplish.
Conclusion
Noise shaping may seem somewhat straight forward, but the principles behind it influence aspects of digital recording, perceptual sciences, and everything influenced by and dependent upon those fields.
Understanding noise shaping means understanding how the human ear works, and how that affects mixing and mastering.
Understanding dithering means knowing the principles of digital recording, quantization, and phase relationships when it comes to understanding quantization noise, and how to perform the necessary testing detailed above.
Quickly, let’s recap everything detailed here for a synopsis of what dithering is, how noise shaping relates, and how the unique way our ears perceive sound ties in.
First, an analog signal is converted to a digital signal. The amplitude is encoded using quantization.
Quantization occurs during the analog to digital conversion process.
The bit depth details the number of available values the analog’s amplitude can be quantized to during the A/D conversion.
The difference between the analog signal’s amplitude and the value the amplitude is rounded to is called quantization error. This error causes noise to exist in the recording.
This noise is typically quiet but presents itself as unpleasant high order harmonics when loud enough. Dithering is used to mask this noise and randomize any harmonics.
Noise shaping is the method of equalizing dithering noise. Typically dithering noise is loud enough to be perceived at bit depths of 16 and lower.
Attenuating frequencies that are easy to hear, and amplifying those that are harder to hear can remedy this issue.
Lastly, you can create your own dither and noise shaping using a white noise generator and equalization. Reference the Fletcher-Munson curve in the “What is the Fletcher-Munson Curve?” or “How to Create Your Own Dithering and Noise Shaping” sections to see how you can accomplish this.
If you’re looking to have your music mastered, and perhaps you’d like to limit quantization noise by using analog mastering, send us your mix here:
We’ll master it for you and send you a free mastered sample of that mix.
Do you use dithering and noise shaping when mastering?


