4 Ways to Use Drum Bus Compression
- Traditional Drum Bus Compression: Use a Drum Bus Compressor with a Longer Attack and Short Release to Create a Cohesive Sound
- Bus and Parallel Compression: Use Drum Bus Compression in Combination with Parallel Compression.
- Emphasis and De-emphasis Compression: Place an Additive EQ before Drum Bus Compression, and an equal and opposite Subtractive EQ after.
- Harmonic Distortion Following Bus Compression: Place a Harmonic Generator Plugin before and/or after Drum Bus Compression.
4 Ways to Use Drum Bus Compression in Detail
Any conversation about bus compression or about processing drums inevitably leads to a conversation about how to use drum bus compression.
In truth, bus compression and drum bus compression are so often talked about in tandem that knowing which form of bus compression is being discussed can be difficult to discern.

Drum bus compression can greatly improve the tonality and impact of your drums.
With that in mind, drum bus compression is no doubt a popular and highly useful form of compression - one that can be used to easily create a cohesive sound amongst the percussive instrumentation in a song.
Let’s look at 4 separate ways you can use drum bus compression in a step by step manner. We’ll cover the usefulness of each as well as some of the practical applications of using drum bus compression in this particular way.
We’ll also listen to some audio examples of these effects in use (in the video embedded above).
If you have a mix that you’d like to hear mastered professionally, send it to us here:
We’ll master it for you and send you a free sample for you to review.
1) Traditional Drum Bus Compression
First, let’s cover how to use drum bus compression in its most simple and fundamental form. In this section, we’ll cover how to route your drum tracks for bus compression, as well as some of the best settings that you can use for this compression.

Traditional drum bus compression is the simplest form, yet still yields great results.
First, here’s how to route your signal for bus compression in Logic Pro X.
Step 1: On your channel strip, click on the tab title ‘Stereo Out.’ You should now see multiple options. Scroll down to the ‘Bus’ section and select ‘Bus 1,’ or the next available unused bus.
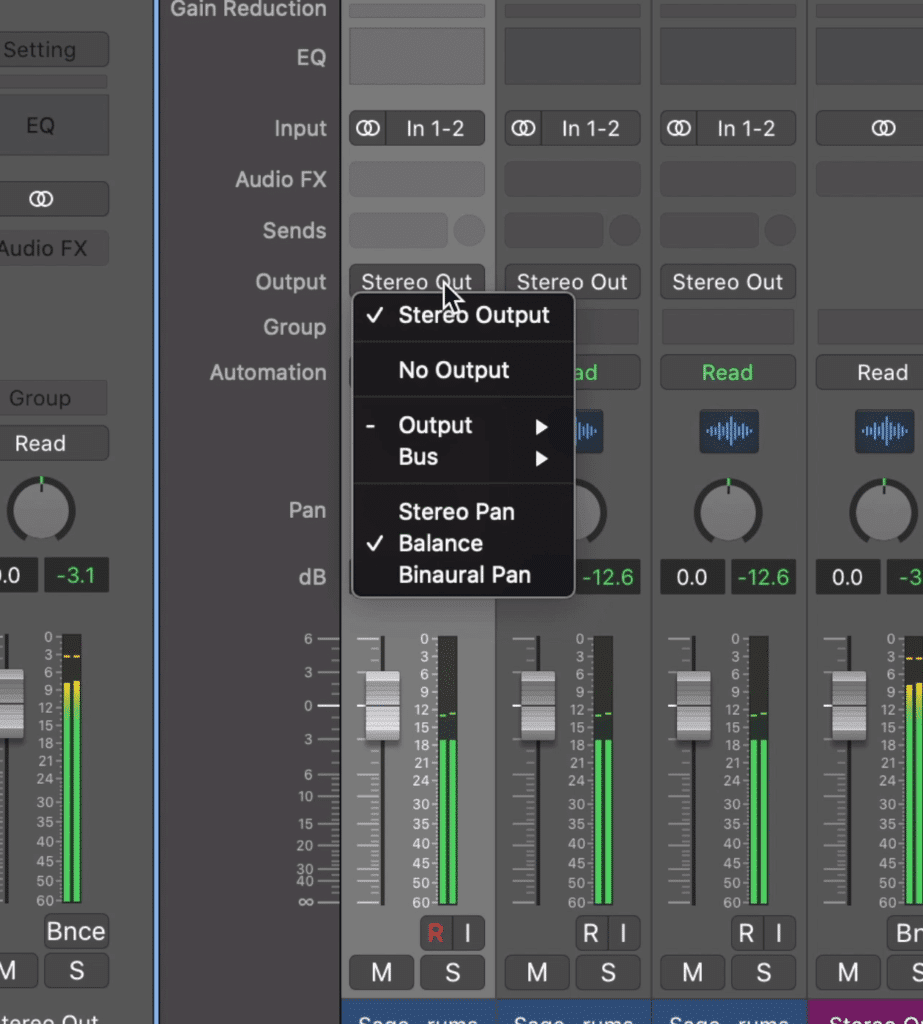
Click on the Stereo Out tab for this menu to pop up. Select one of the busses.
Logic Pro X will automatically create an auxiliary track.
Use this same bus for all of your drum tracks. Additionally, you can highlight all of your drum tracks and perform this routing simultaneously.
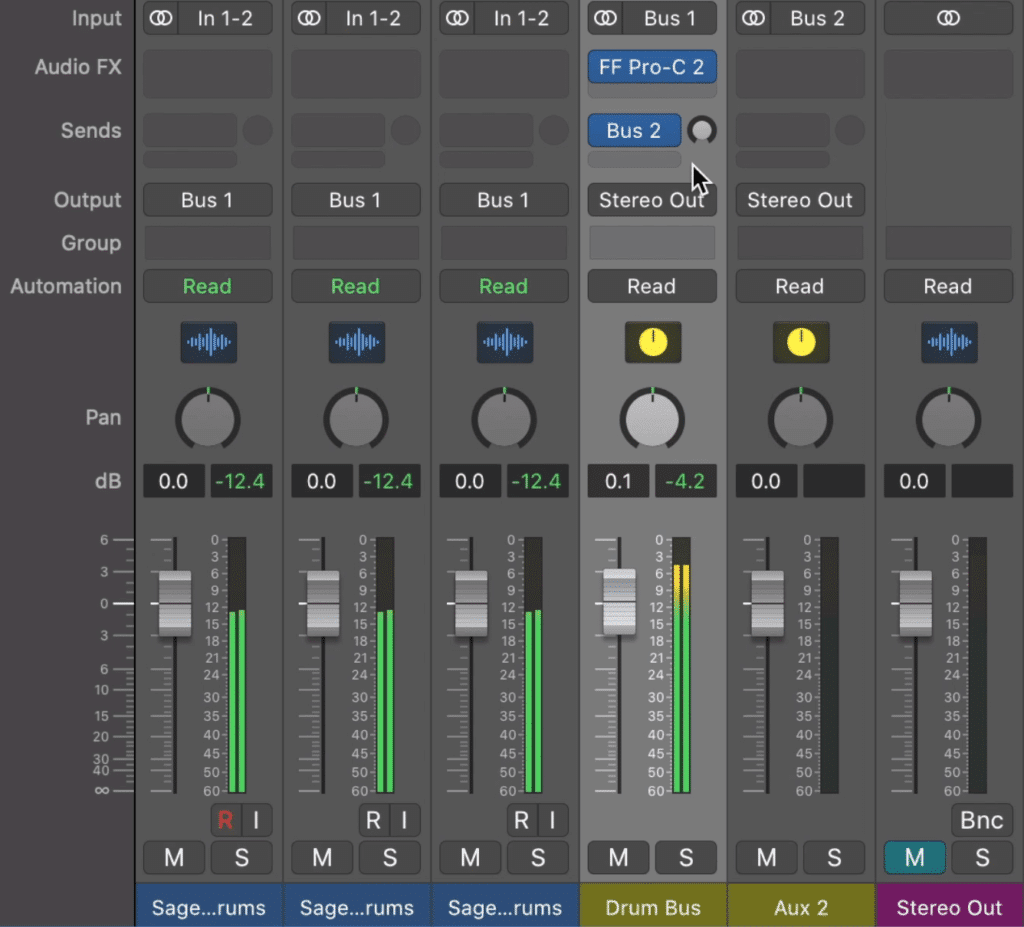
Step 2: Title this new auxiliary track Drum Bus . This way you can easily reference and access this bus when your session becomes more complex and more busses are being used.
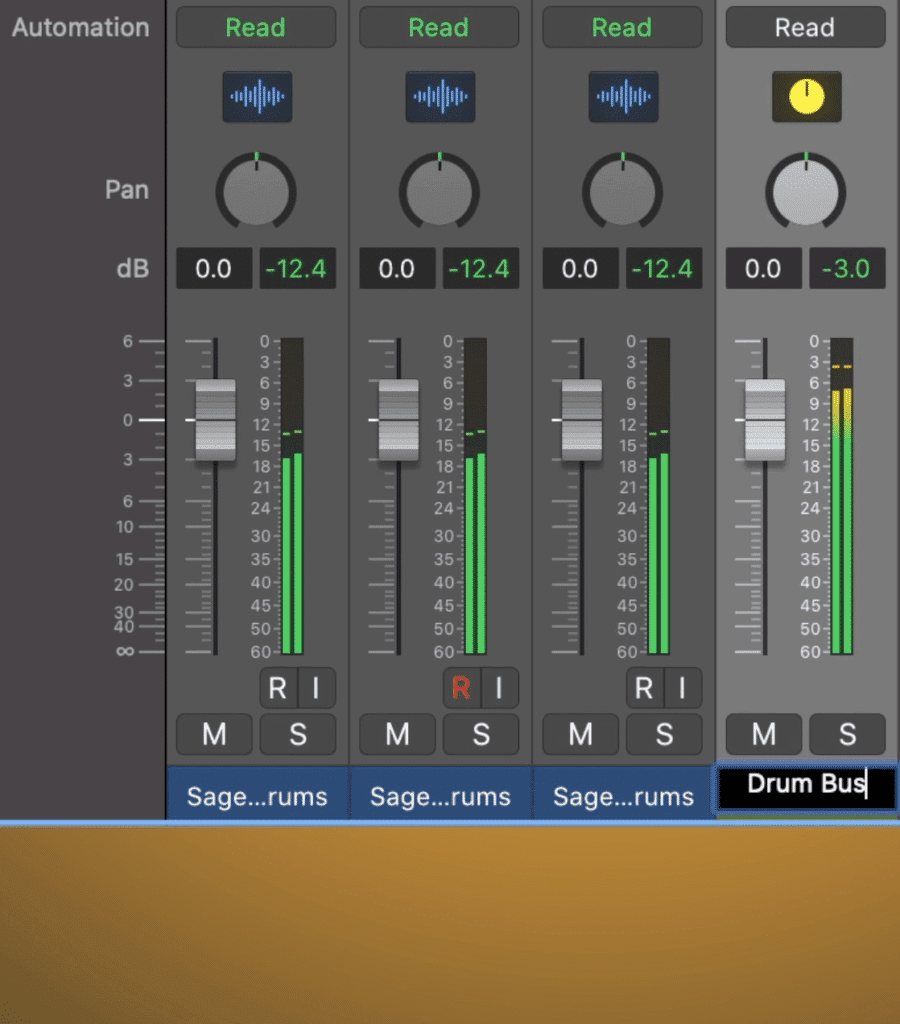
Title the new auxiliary channel 'Drum Bus' or something similar.
Step 3: You can now use your drum bus to affect all of your drum tracks simultaneously. Because all of your drum tracks are being routed to this auxiliary channel, any processing you perform will affect all of them.
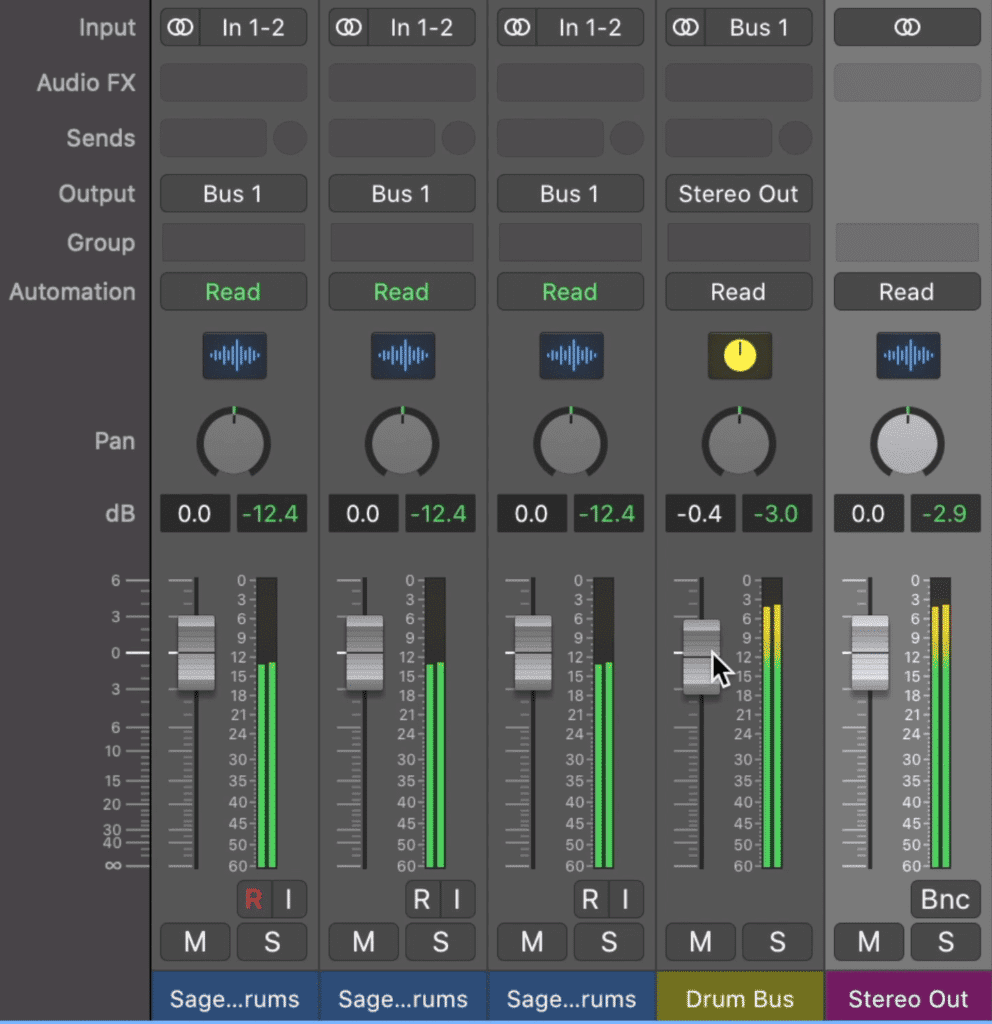
Notice that when you affect your Drum Bus channel, the signal all of the other tracks will be affected.
Additionally, notice that the output of your drum bus channel is the stereo output. Essentially, think of this channel as a barrier between all of your drum tracks and your stereo output.
If you mute it, you won’t be able to hear the drum tracks. If you turn it down or up, all of your drum tracks will be affected accordingly, and so on.
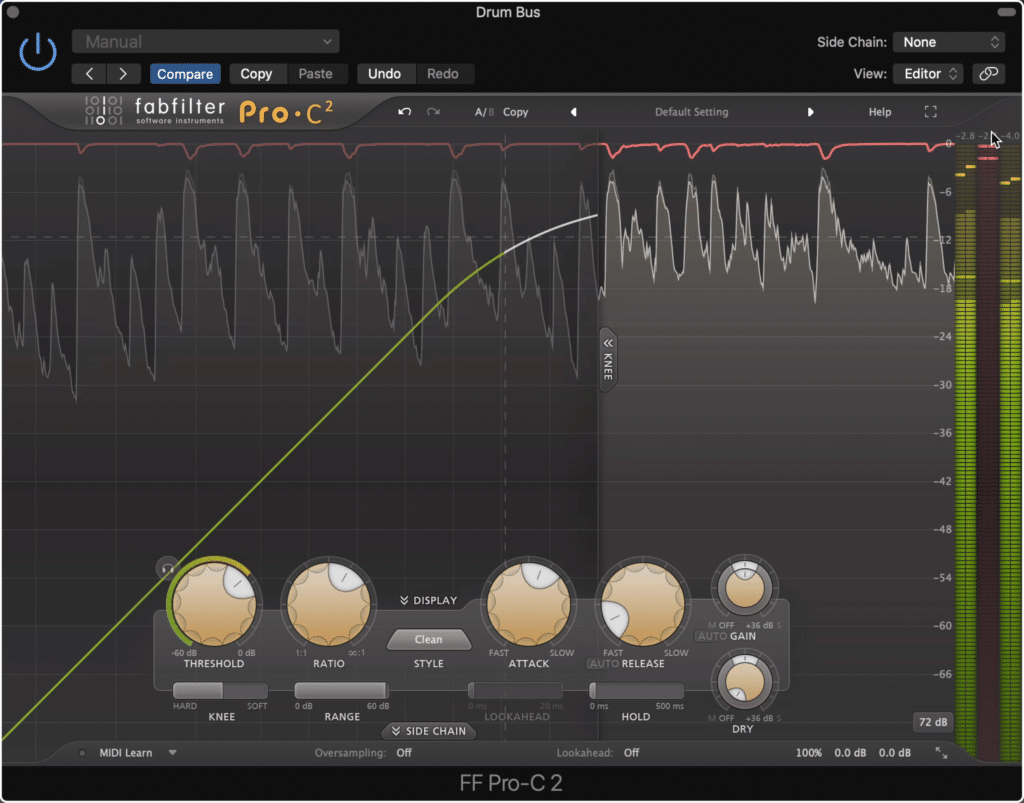
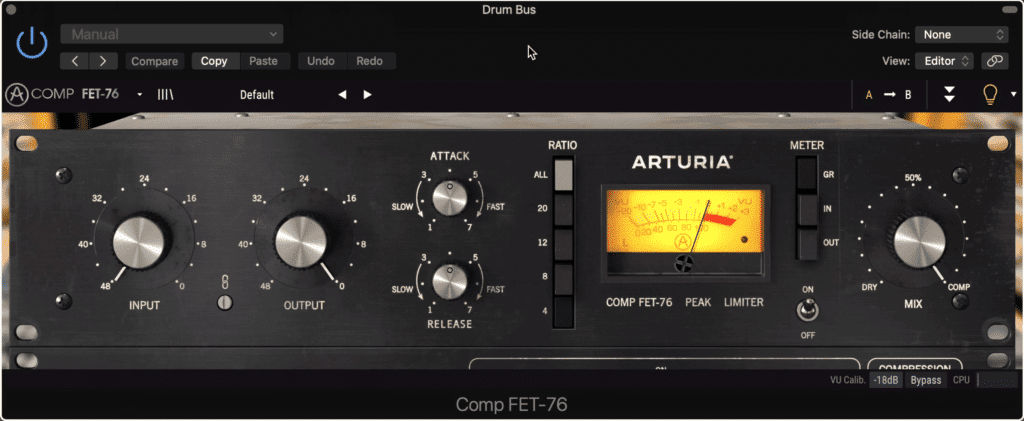
Now that we understand the routing, and have inserted our compressor of choice onto the drum bus channel, let’s dial in the settings we want.
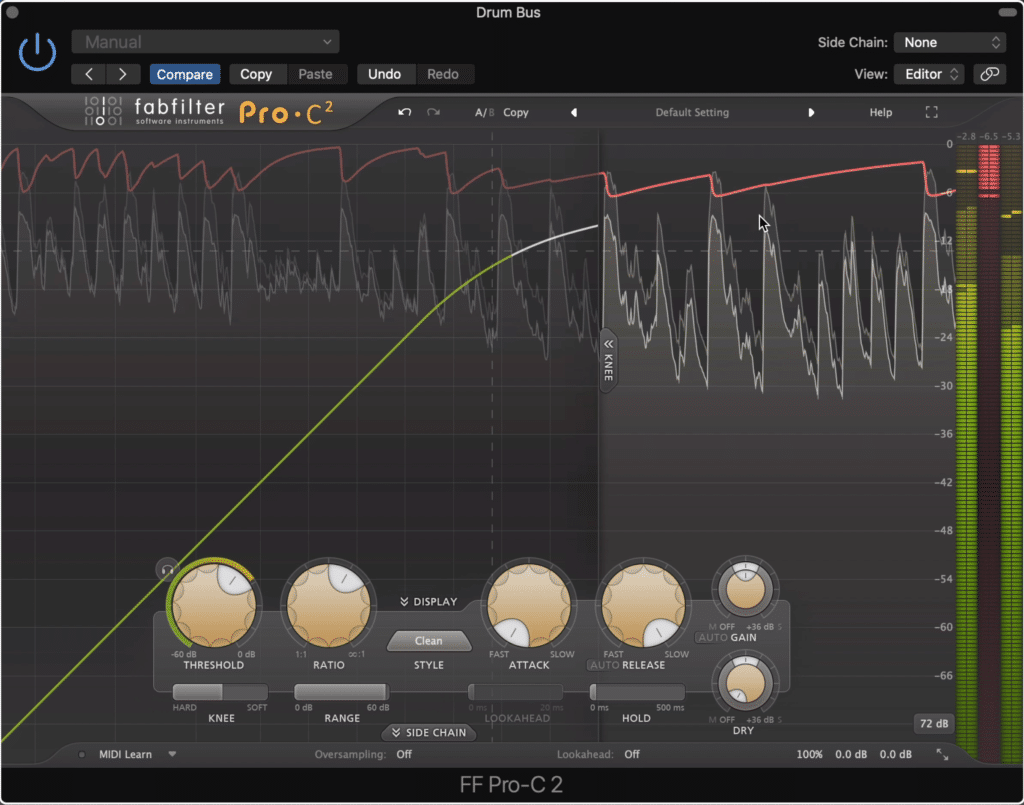
A short attack and long release will cause your drums transients to become attenuated. This isn't something you want to have happen.
The primary settings that will affect the timbre and tonality of your drum bus are the attack and release of your drum bus compressor. If you set too quick of an attack, you’ll cause the compressor to attenuate the transients of your drums, in turn making them have less impact.
Considering snares, high hats, toms, and kicks are all identified by their transients, you want to avoid attenuating these transients.

The kick, snare, toms, high hat, and other percussive instruments are defined by their transients.
The same goes for the release setting. Too long of a release, and your compressor will hold onto the signal for too long, which will cause other transients to be caught by the compressor.
With that said, use a shorter release, but not one under 20 milliseconds , as this may cause some distortion on the lower frequencies.
Use a longer attack and shorter release time on your drum bus compressor.
Additionally, use subtle compression. If you compress too heavily then your compression will be noticeable, and you won’t create an impressive controlled sound.
As a rule of thumb,try to compress between 3dB and 6dB of your drums , and possibly even less , depending on the performance and how much your drums have already been compressed.
Lastly, if this function is included in your compressor, a moderate knee shape, or one that isn’t super hard or soft, will be best. This will cause gradual and natural-sounding compression, but won’t result in too much attenuation, like with a completely soft-knee setting.
So these are the basics of drum bus compression. The routing is simple, and so is the premise. Use a longer attack, shorter release, moderate threshold knee setting, and don’t heavily compress.
If you want to get a little more character out of the compressor, turn down the channel fader, and use the compressor's makeup gain to fill in the difference.
If you’re curious about different ways to route your signal when mixing, here’s a great blog post and video that goes into that topic:
It delves into how routing your sessions in a particular manner can be beneficial when creating multiple versions of your song.
2) Bus and Parallel Compression
Bus compression and parallel compression serve two very different purposes.
Whereas drum bus compression is used to create a sense of uniformity amongst all drum tracks, parallel compression is used to squash the signal for a lack of a better term , and then amplify the lower-level aspects of the signal.

Parallel compression can be used in tandem with bus compression to improve the sound of drums.
These lower-level aspects are the details that are often masked by louder parts of the signal. For example, the detail of a snare drum that often gets masked is the buzz and ring of the drum - or perhaps the slight rattle of the stick resting on a vibrating drum skin.
The point is, these details, although seemingly unimportant at first, are what bring life into a recording. Without them, drums sound dull or boring.
With that in mind, it's helpful to know how to utilize both bus compression and parallel compression when trying to create an impressive drum sound.
Let’s check out a step by step process for incorporating parallel compression into your drum bus compression.
Step 1: Accomplish all of the steps discussed in the first section. That is, route the drum tracks accordingly and set up your drum bus compression.
Just like before, create the best possible settings for your drum bus compression using subtle and intentional compression and specific attack and release times.
Step 2: With your drum bus compression set up, use an auxiliary send to split the routing of your drum bus channel to another auxiliary channel.
Create an auxiliary send using the bus tab.
Keep in mind that this is not the same as changing the output of your drum bus channel, as that would route the full signal to another channel.
Instead, we’re using a send.
Step 3: Set this send to unity . This means that a signal identical to your drum bus is being routed to this new auxiliary channel.
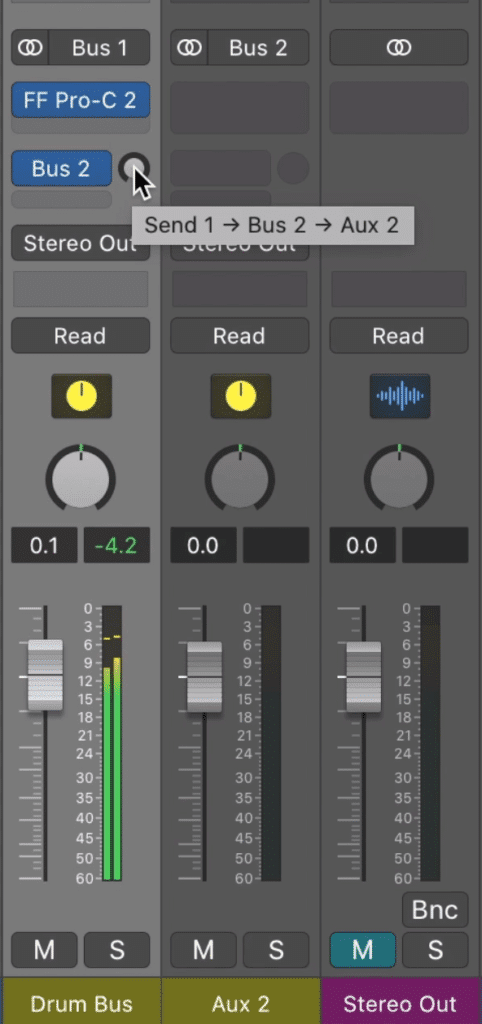
Set this send to unity or 0dB.
Label this new auxiliary channel, parallel drum comp - or something similar so you know what it is.
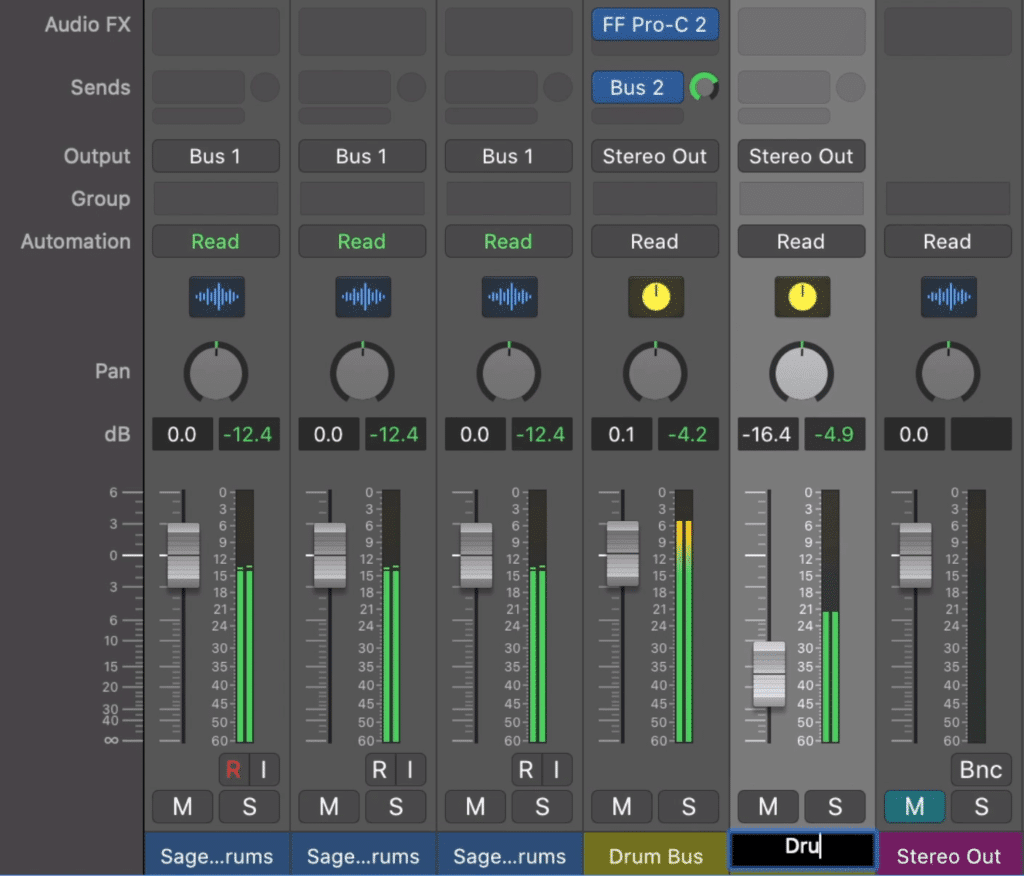
Rename your new parallel drum compression track so that you don't confuse it with another.
Step 4: Insert a compressor on your parallel drum compression channel. I’m going to use the Drawmer 73 so that I can accomplish multi-band compression - but choose a compressor that you like the tonality of.
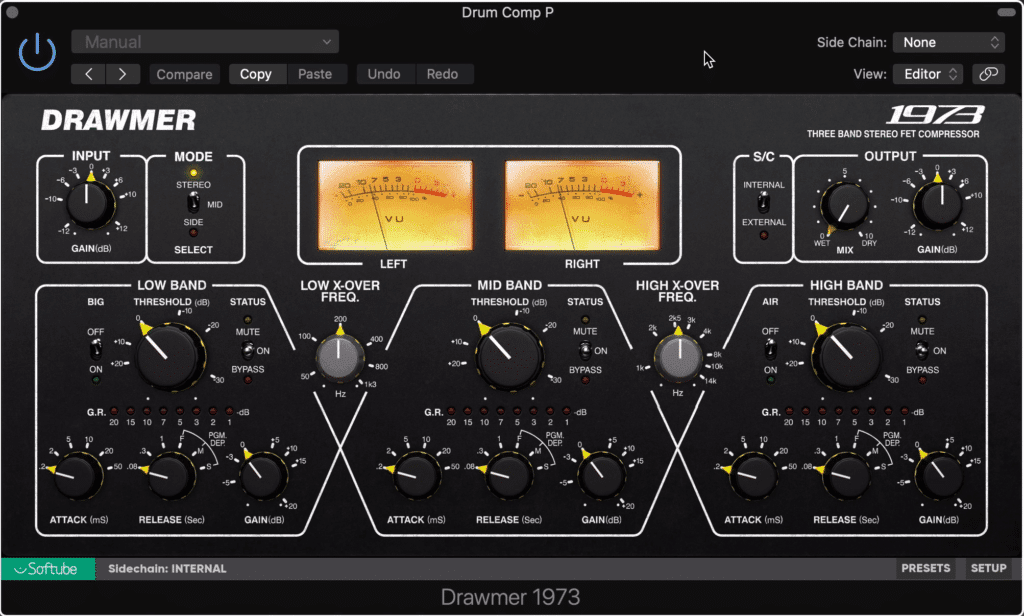
When performing parallel compression, choose a compressor that you like the tonality of.
Step 5: Heavily compress the signal and use make-up gain to compensate for the amount of signal you attenuated.
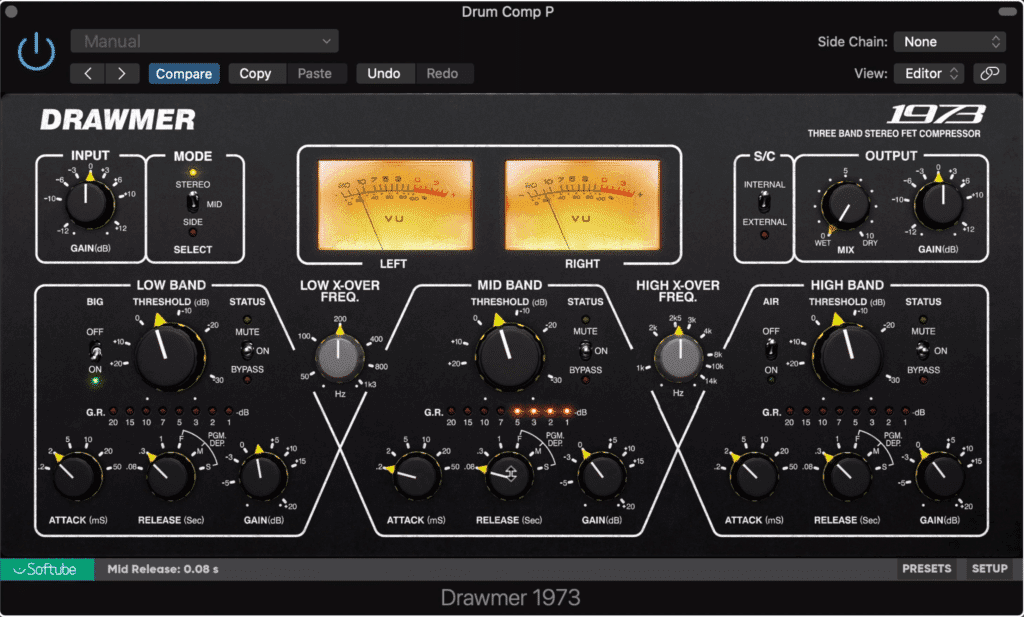
Use heavy compression and makeup gain to increase the amplitude of low-level signals.
When heavily compressing your parallel drum channel, still retain the longer attack and shorter release settings to maintain your drum’s dynamics.
Step 6: Using the channel fader, slowly blend this heavily compressed signal back in - until you feel that you’ve reached the right balance between low-level signal and your original signal.
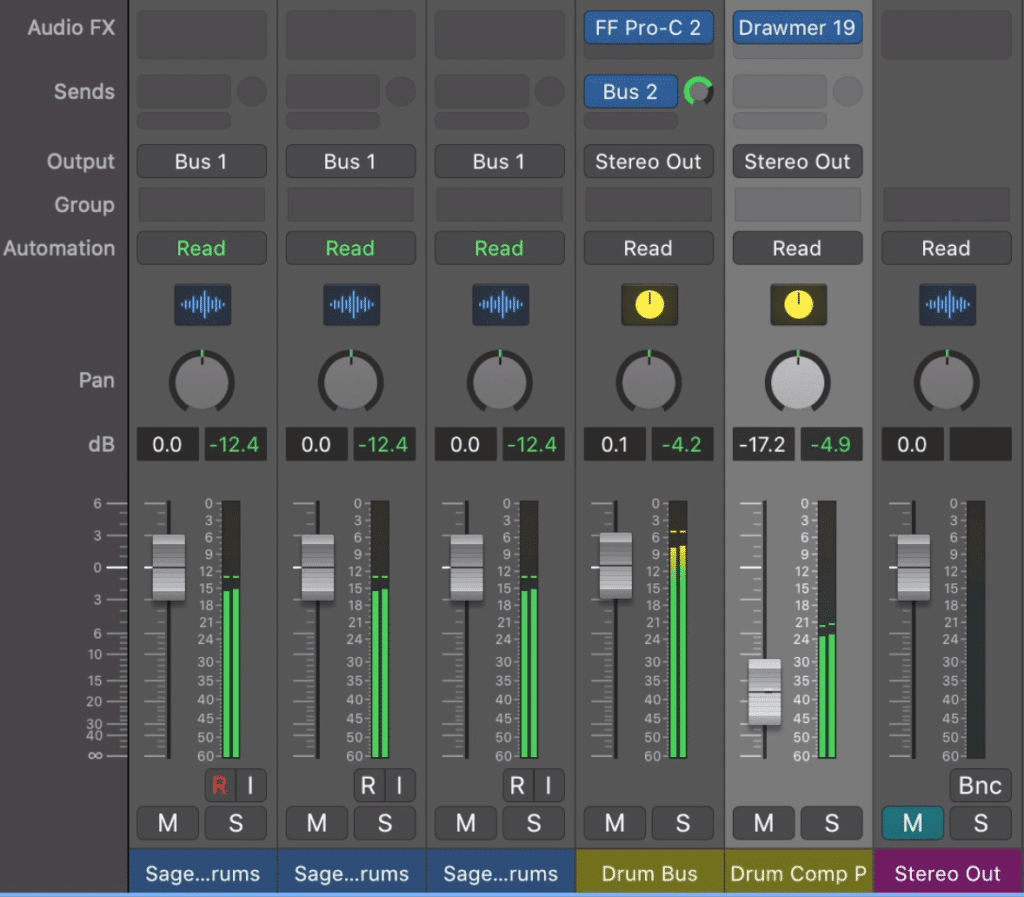
Blend the heavily compressed signal back into your mix.
At this point, your drum bus channel is being routed to both the stereo output and the parallel drum compression channel.
The signal is then running through the parallel compressor, being heavily compressed, and then subtly introduced to the stereo output via the parallel drum channel’s channel fader.
Both the Drum Bus channel and the Parallel channel’s signals meet at the stereo output - this is ultimately what we hear from our headphones or speakers.
Adjust this relationship between the two channels until you’ve created something you like.
If you want to learn more about parallel compression, and how you can use it to make your mixes and masters sound great, check out our blog post and video on the topic:
It shows how low-level compression can be used after parallel compression to make the effect even more pronounced.
3) Emphasis and De-emphasis Compression
The Emphasis and De-emphasis technique started as a way for vinyl records to be properly played-back. In short, as the needle of a turntable moves closer toward the center , the velocity slows, and high frequencies can’t be replicated.

The emphasis and de-emphasis technique started when engineers want to ensure proper playback of vinyl records.
To counteract this engineers began introducing a high-frequency boost on the tracks sequenced in the center of the record.
Since then, the emphasis and de-emphasis technique doesn’t get used too often - but it definitely has its uses.
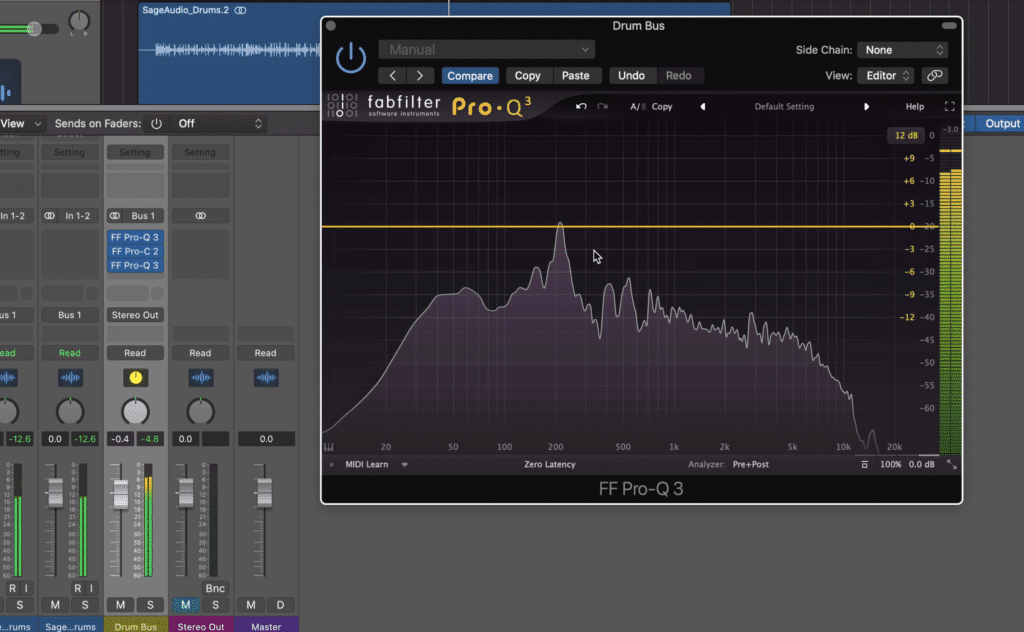
Notice the equalizers inserted before and after the bus compressor.
When compressing drums via a drum bus channel you can use an equalizer before the compressor to amplify certain frequencies. The idea being, you’ll make the compressor work harder in these areas, causing more compression to those frequencies.
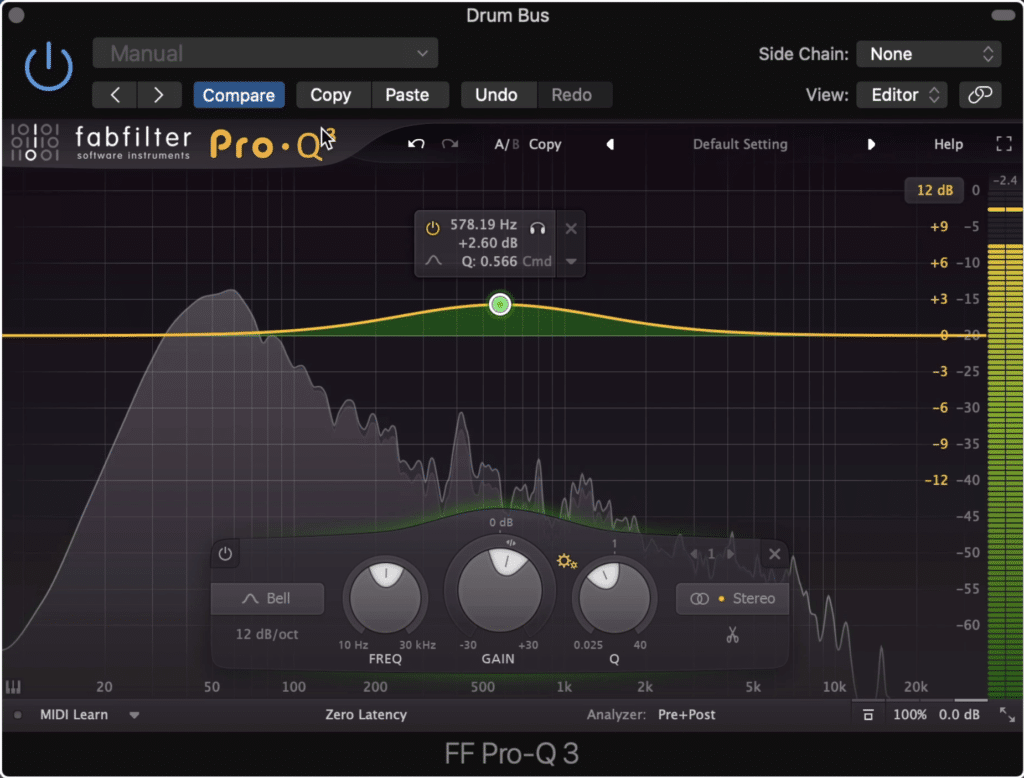
On the emphasis EQ, boost frequencies you'd like the compressor to compress more.
To counteract the original eq boost, an equal and opposite eq curve can be introduced after the compressor.
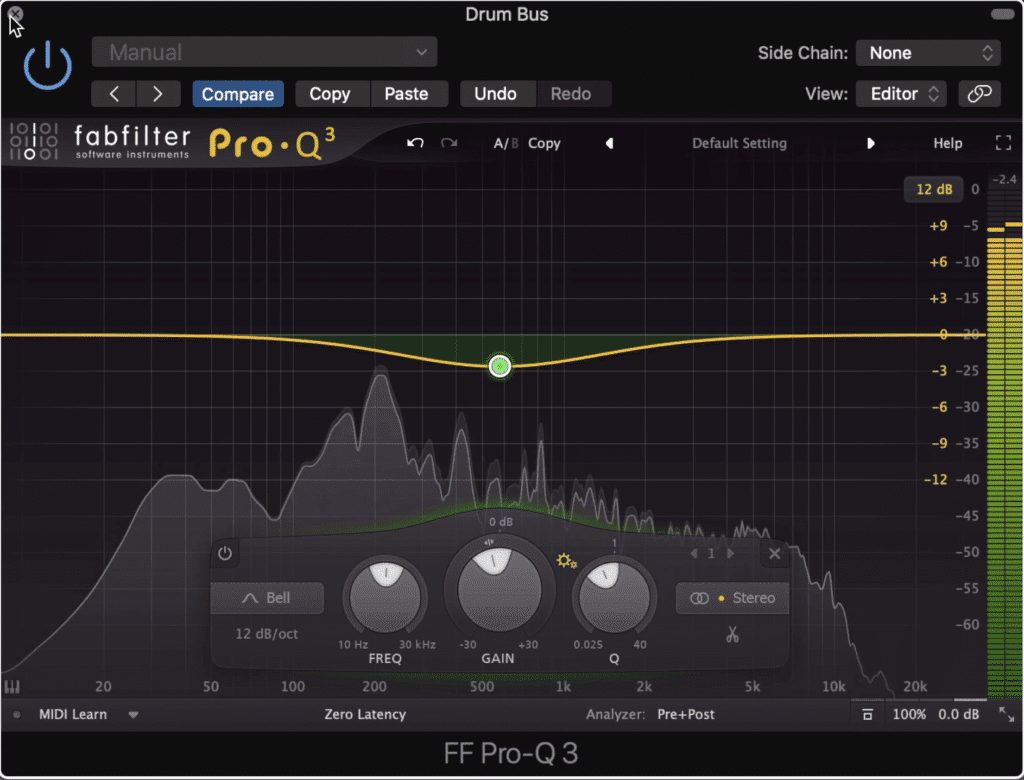
On the de-emphasis EQ, attenuate the frequencies that you boosted with the emphasis EQ.
In this instance, the first equalizer is the emphasis, and the second equalizer that is placed after the compressor is the de-emphasis.
Where I think this effect becomes more useful for drum compression, is in the inverse setup of this technique - that is, to use a de-emphasis and then an emphasis EQ.
In other words, you’d use the first compressor to attenuate the signal - this way, the compressor won’t compress or attenuate it, while still compressing other parts of the signal.
Then follow the compressor with the emphasis or additive equalizer.
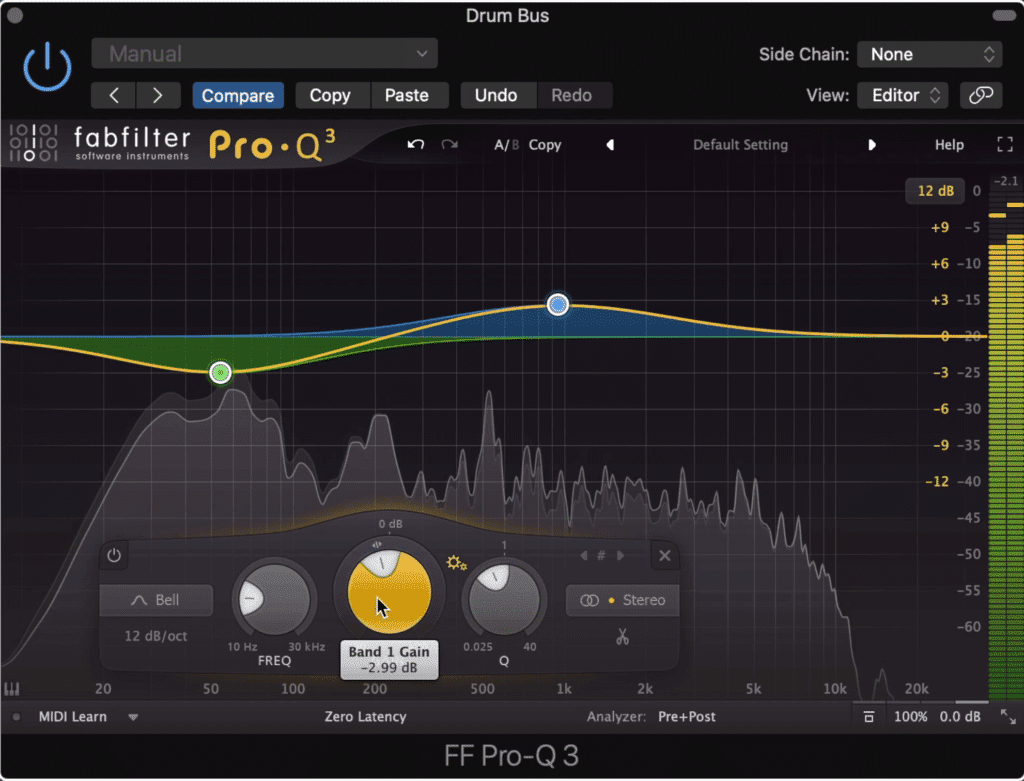
You can create more complex curves for your emphasis EQ. This one would allow the kick to pass through unaffected and would cause the mid-range to be compressed more.
So let’s say you want the kick drum to pass through relatively unaffected, but you want to compress your mid-range more heavily. You could use subtractive equalization on the low frequencies, and additive equalization on the high frequencies before compression.
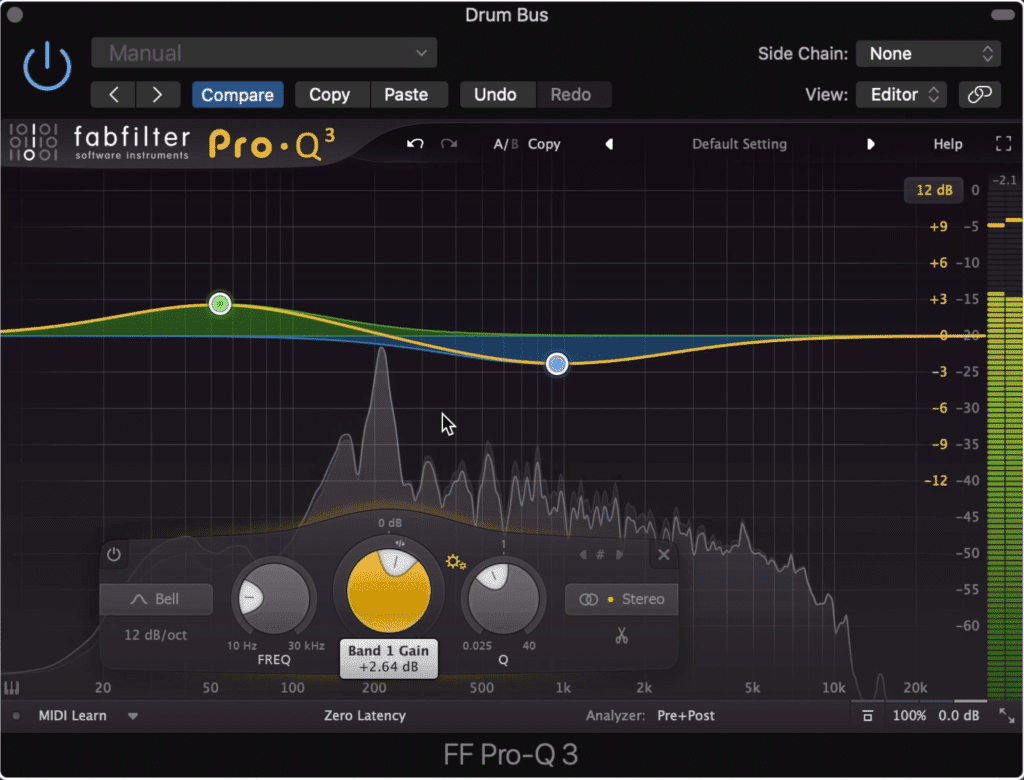
Again, create a near-identical opposite curve (due to the compressor's attenuation, your emphasis curve may need to be slightly different).
Then after the compression, create the equal and opposite curves to the first equalizer.
You may be thinking at this point, why not just use a multi-band compressor?
That’s an absolutely valid point. You can use a multi-band compressor to accomplish the same thing as an emphasis and de-emphasis technique.

Using a multi-band compressor results in a similar effect.
But if you don’t have a multi-band compressor, or more commonly, your favorite compressor for bus compression doesn’t include multi-band compression, then you’ll want to use this technique.
The emphasis and de-emphasis technique is great for when you're using a bus compressor that doesn't support multiband.
If you want to learn more about the emphasis and de-emphasis technique, check out our blog post and video on the topic:
It showcases some more practical applications for the technique.
4) Harmonic Distortion Following Bus Compression
This last technique is a very simple one. All you need to do is use an analog emulation plugin, preferably one designed to create harmonics , and insert it either before or after your compression plugin.
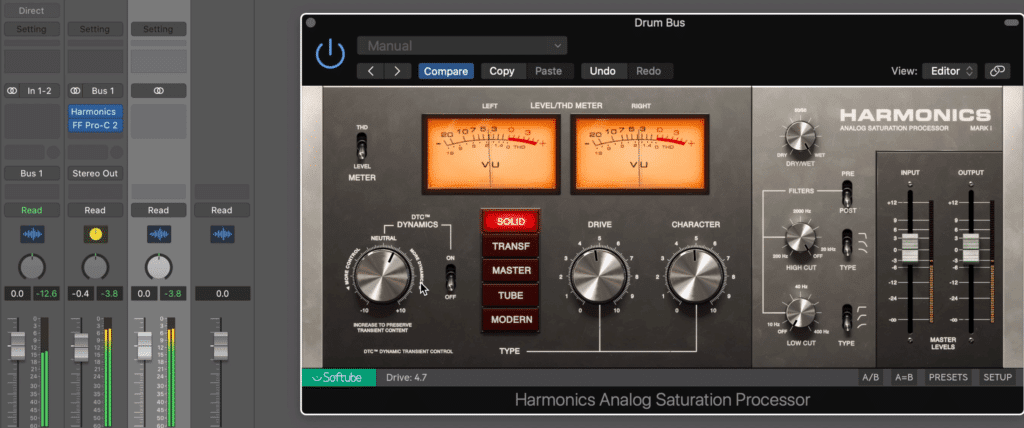
Use a harmonics plugin either before or after your drum bus compression.
If you place it on the Drum Bus channel before your compression, you’ll in turn compress the added harmonics in addition to the original signal. This can make them more prevalent if makeup gain is used, or if you combine this technique with technique 2.
Or you can place this harmonic generator plugin after you compression , in turn generating harmonics off of the more controlled and tonally uniform signal.
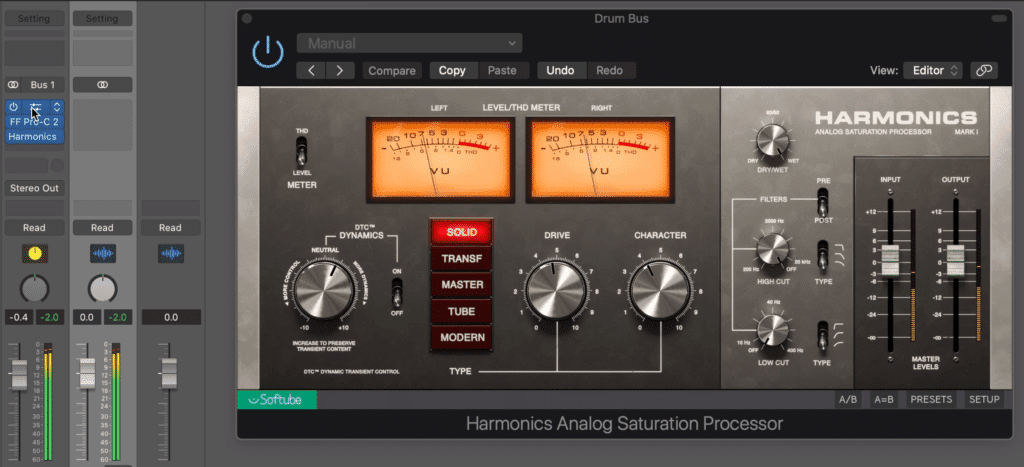
You can also use one before and after the compression, to create the most complex and impact sound.
Lastly, you can use a harmonic generation plugin both before and after the compression. In this instance, you create the most distortion, in turn making your drums have the most presence and intensity.
Although this won’t sound the best for every genre, it does work well when you want your drums to stick out in a mix. Just be sure not to use excessive settings on either plugin and especially not both.
If you have a mix that you’d like to hear mastered using solely analog equipment, send it to us here:
We’ll master it for you and send you a free sample for you to review.
Conclusion
Drum bus compression is a seemingly simple topic, but when you consider the multiple ways you can affect the signal and the different means by which the signal can be routed, there’s certainly a lot to consider.
Here are some highlights from this post to give you a quick understanding of the different methods we’ve covered here:
Traditional Drum Bus Compression
Use a longer attack and shorter release time to preserve dynamics and transients. Avoid high ratios, soft knee settings, and excessive compression and makeup gain.
Bus and Parallel Compression
Split your Drum Bus channel into two by sending it to another auxiliary channel via a bus send. On this auxiliary channel, heavily compress the signal, and then slowly blend it back in with your original via the channel fader.
Emphasis and De-emphasis Compression
Use equalization boosts and cuts before your bus compressor to make the compressor work harder, or less hard, on certain frequencies. Follow the compressor with an equalizer that has equal and opposite curves the to original equalizer.
Harmonic Distortion Following Bus Compression
Follow your bus compression with some harmonic distortion. This way you fill out the signal and create a more complex drum recording.
You can place this harmonic generator before, or after the compressor, but be sure to keep your distortion under control.
Lastly, keep in mind that any of these techniques can be combined with each other.
In fact, you could use all 4 of these techniques to create something unique and powerful - that is, if you use the right settings and listen critically.
If you have a mix that you’d like to hear mastered professionally, send it to us here:
We’ll master it for you and send you a free sample for you to review.
Do you use drum bus compression?


