How to Distort or Compress Only Specific Frequencies Using Equalization
Today, a lot of newer plugins offer frequency specific distortion or compression.
A lot of the classic and some of our favorite plugins still don’t offer this function, and probably won’t in the near future.
With this in mind it’s definitely helpful to know, how to distort or compress the frequencies you want, while leaving the rest either untouched or less affected.
The best way to distort or compress specific frequencies is by using an emphasis and de-emphasis equalization technique. To do so, insert an EQ that employs the desired frequencies, follow with either a distortion or compression plugin, and then conclude with another EQ, with settings opposite to that of the first EQ insert.
Let’s take a closer look at this technique
Emphasis and De-Emphasis Technique
Step 1: On the track you’re trying to affect, insert an EQ plugin. Then create bands and curves to amplify or attenuate the frequencies you want to be affected.
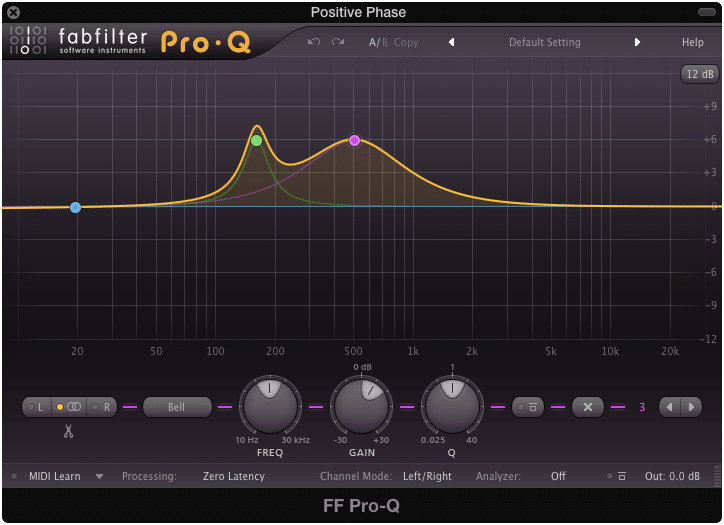
Here two bands with a gain of 6dB are positioned at 160Hz and 500Hz.
Step 2: Pay particular attention to the exact frequency, amplitude of the bands or curves, and the Q. These will need to be replicated later.

You will need to set exact settings in the last insert, that mirror your first EQ insert.
Step 3: Insert either a distortion or compression plugin. In truth, you can put whatever plugin in this slot that you want. The idea is, whatever EQ curve you created a moment before, will be fed into whatever this plugin is, affecting how it operates. Keep this in mind when picking this plugin, and be as creative in your choices as you see fit.
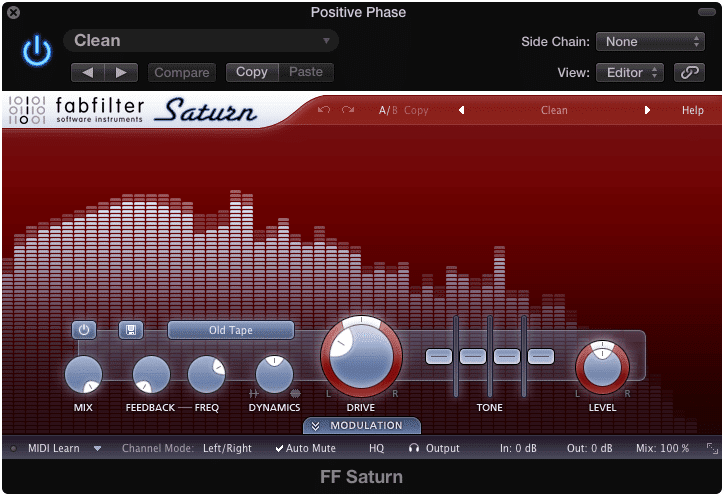
The FabFilter Saturn plugin is great for distinctive distortion types.
Step 4: Follow your distortion, or whatever plugin type you chose, with another equalizer. It is important this this EQ is the same type that you used before. Noting the frequencies that you boosted before, do the exact opposite to negate the first EQ insert. The frequencies and Q’s should be the exact same, but the gain should be the inverse of the gain or gains used in the first Insert.
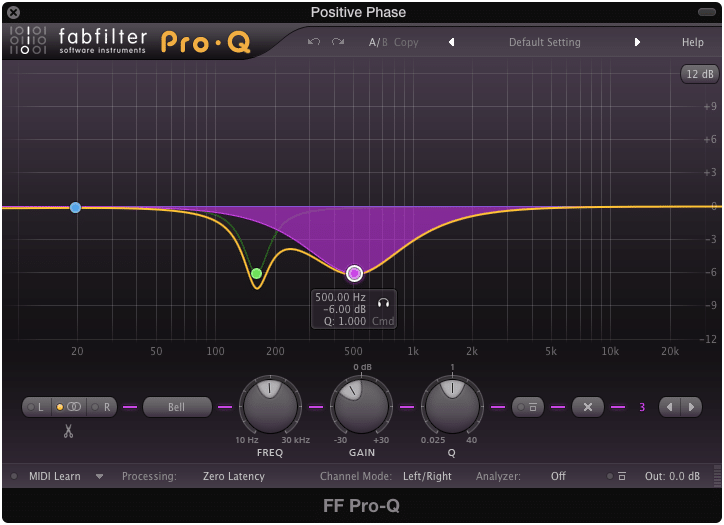
Notice that this EQ is exactly equal to and opposite of the first EQ insert.
Step 5: Listen to your results and adjust accordingly. It’s almost impossible to predict how a certain plugin will respond to being fed specific frequency boosts without first listening, so experiment with your settings to create new and distinct sounds.
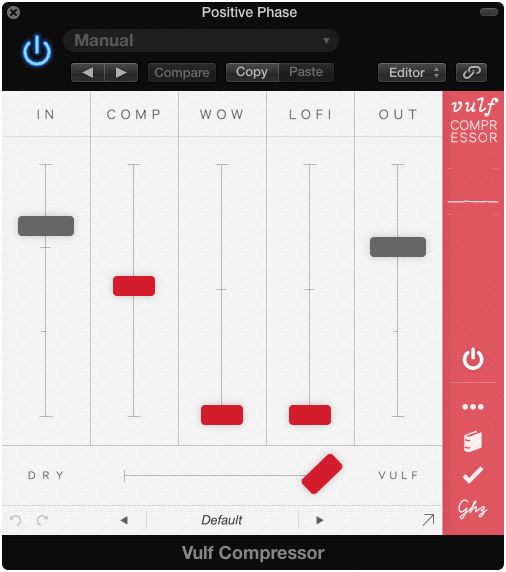
The Vulf Compressor from Good Hertz has unique functions that could behave in very different ways based on the input.
3 Things You Need to Know When Using This Technique
A few things will make this technique not work as intended.
The First: If the EQ plugins you choose do not have identical phase relations. This is why it is best to use identical EQ plugin types when using this technique.
The Second: If the EQ you choose doesn’t have identical phase relations internally. This is to say, if an EQ boost does not have the same phase relationship to an EQ attenuation. Certain plugins are designed this way, so it’s best to stay away from stylized or niche equalizers when using this technique.
The Third: Although this was stated previously, it is still important that you use the exact opposite gain for your last EQ insert. Essentially, this last insert should be a mirror image of the first EQ insert.
Conclusion:
The emphasis and de-emphasis equalization technique has many practical uses. Try it whenever you can’t seem to create new sounds. It can take even the most typical of distortions or compressors and turn them into unique tools for shaping a distinct sound.
Have you ever tried this technique before?


