Top 10 Recording Mistakes to Avoid
1. Recording too Hot
2. Recording too Quietly
3. Recording with Phase Issues/Destructive interference
4. Using the Wrong Microphone Type
5. Using Subpar Sounding Samples
6. Recording at a Low Sampling Rate and/or Bit Depth
7. Tracking in an Improperly Sound-proofed room
8. Neglecting Proper Microphone Placement
9. Avoiding Recording with Processing or Outboard Gear when Available
10. Recording with a Significant Buffer Size or Latency
We like to talk a lot about mastering on this channel - and for good reason, it’s an incredibly important aspect of audio production.
But far too often, the first stages of production, the actual recording of the audio, is done with little consideration for the sound. The excuse is usually ‘It’s okay, we’ll fix it during mixing.’
Learning how to recording the right way is how you'll end up with a great sounding finished master.
However, the worse the recording the worse the mix - the worse the mix the worse the master. That said, knowing how to record and record right is paramount to the quality of your music.
With that in mind, let’s cover 10 recording mistakes to avoid. We’ll look at each common mistake in detail and explain why they should be avoided.
Additionally, we won’t keep these points vague, but instead offer very specific things to avoid. If you want more information on the mistakes we’re detailing here, check out the video that’s embedded above.
Lastly, if you've recorded a track, mixed it, and it's ready for mastering, send it to us here:
We’ll master it for you and send you a free mastered sample for you to review.
1. Recording too Hot
Let’s start off this list with something that’s pretty well known, but important nonetheless. As many of you have probably heard already, if you record your signal too hot or too loudly, you’ll cause clipping distortion.
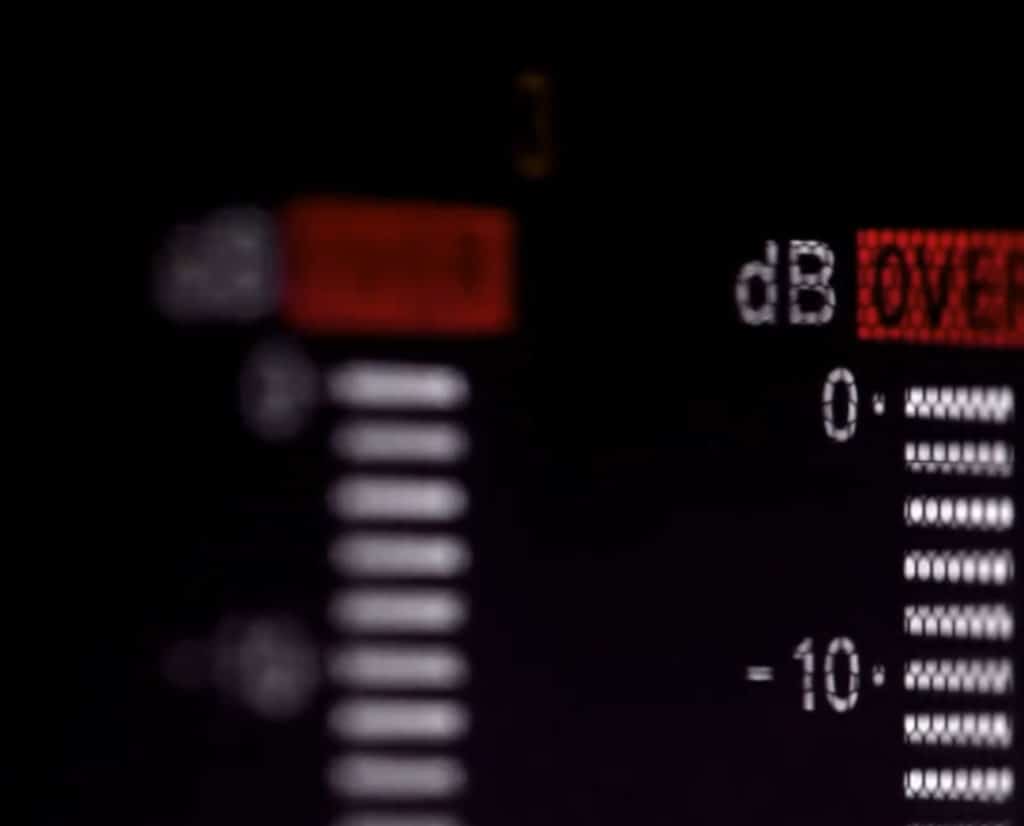
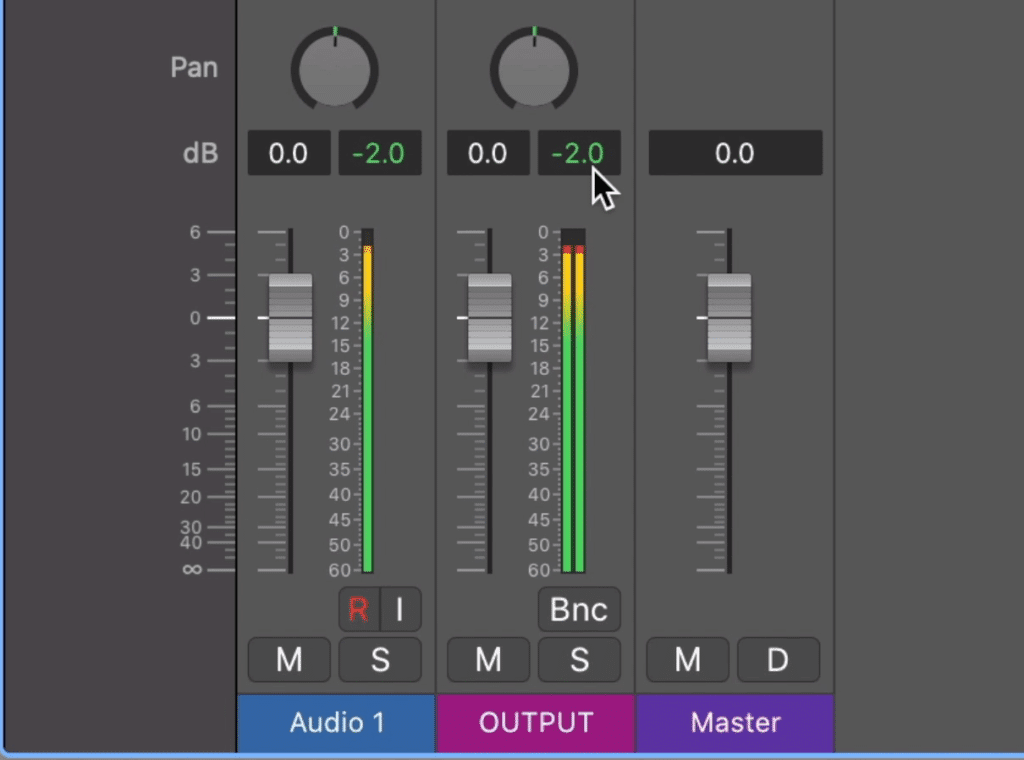
0dB is the highest a level can be in a digital system before clipping distortion occurs.
In a DAW or digital audio workstation, 0dB represents the loudest a signal can be before clipping distortion begins to occur. Clipping distortion results in the generation of odd ordered harmonics that can become unpleasant sounding when they’re higher in amplitude and frequency.
With that said, try to record your signal with its max peaks around -3dBTP. This way your signal is loud enough to cover your recording’s noise floor, but not so loud that it clips.
Clipping distortion generates odd harmonics.
Additionally, if you’re using outboard gear like a preamp or compressor you can cause distortion in these units if you record too loudly.
This can sound pleasant on occasion, but may not be the timbre you’re going for - so keep distortion in mind when setting your preamp levels.
2. Recording too Quietly
Conversely, recording too quietly is just as much of a problem as recording too loud.
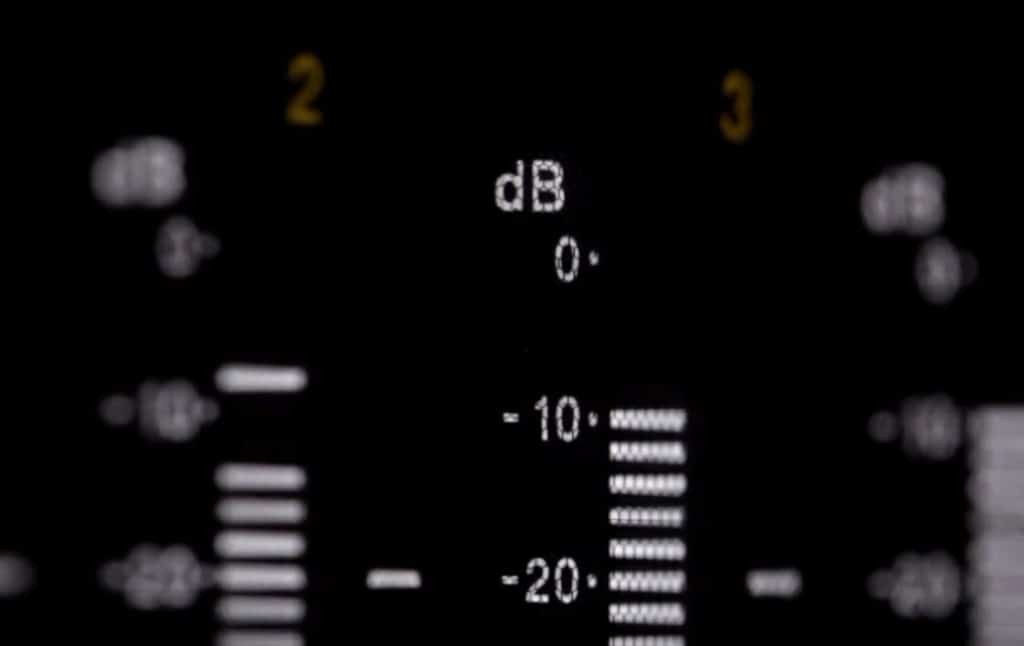
Recording too quiet is also an issue and can lessen the quality of a recording.
Recording too quietly will result in a louder noise floor and lacking dynamic range. This will depend on the noise floor of the room you’re in, the bit depth of the recording, and the microphone and gear you’re using, but it’s always going in increase noise nonetheless.
Additionally, recording too quietly may cause more distortion in your preamp - this is due to how some amplifiers work, with more distortion and noise when set to lower levels.

The dynamic range of your recording is directly tied to the number of bits being used.
Lastly, if you’re recording in a digital system then recording at lower levels will cause problems.
By recording at a lower level you’re losing a fair deal of your dynamic range due to how digital encoding works. In a digital recording, your dynamic range is determined by the number of bits available and how many of those bits are being used.
The higher a signal peaks, the more bits are being used, and the greater dynamic range it can utilize.
If you record your signal closer to the maximum number of possible bits, or in other words louder, then you achieve the greatest dynamic range possible - but if you do the opposite and record at a lower level, you aren’t using these bits and in turn have a less dynamic recording.
3. Recording with Phase Issues/Destructive Interference
Using multiple microphones when recording can be a great way to achieve a wider image and a more detailed and intricate sound. However, if these microphones are placed incorrectly, it can wreak havoc on your recording.
To understand this better, let’s discuss phase - an incredibly important part of recording. 2 or more signals can be in-phase, meaning they create constructive interference (they add to each other’s signals) or they can be out-of-phase, meaning they create destructive interference (they detract from each other’s signals.)
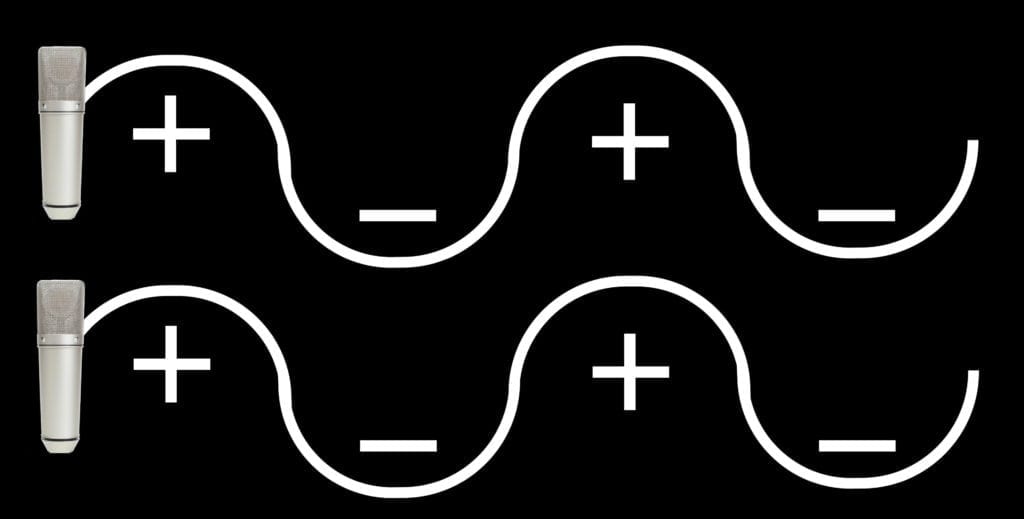
Shown is a visual example of constructive interference.
Destructive interference is almost always a negative thing (unless you’re trying to get rid of a sound) during tracking.
It's caused by the improper placement of microphones.
If 2 microphones are placed correctly, the phase of the 2 signals will be constructive and will result in a louder, clearer sound.
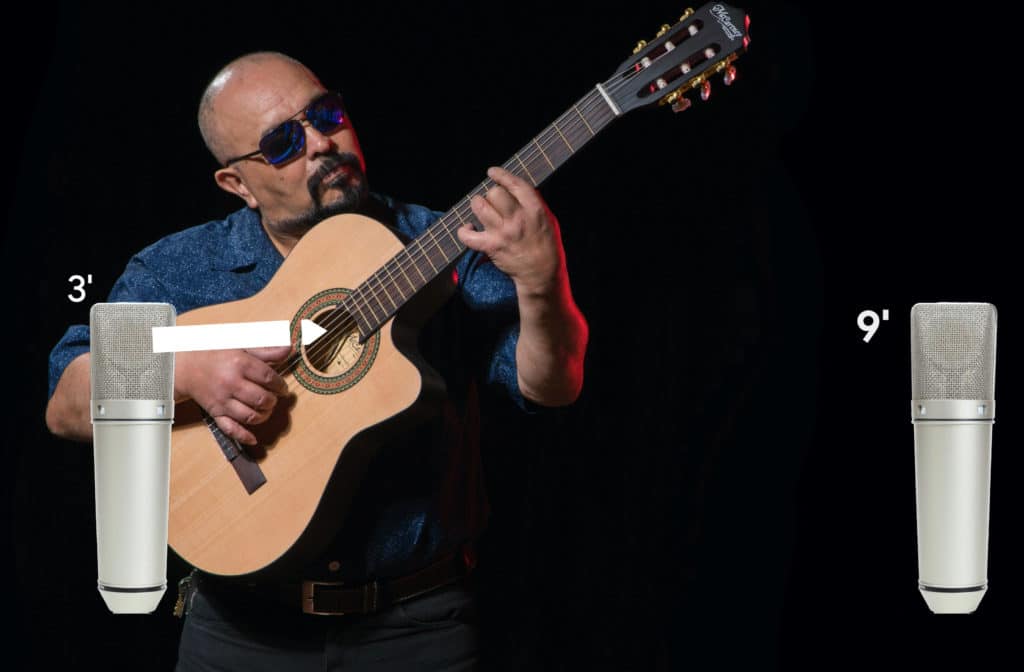
The 3:1 ratio can help minimize phase cancellation.
Constructive interference is achieved by measuring the distance of the microphones from a sound source, and ensuring that they are identical. It can also be achieved with a 3:1 ratio - in other words, if a microphone is 3 feet away from the sound source, the other should be either 1 foot away or 9 feet away.
If a different ratio is used, or the microphones are not carefully placed, you’ll end up with destructive interference.
If you want to learn more about phase and how it affects tracking, mixing, and mastering, take a look at our blog post on the topic:
In it, we got into great detail about the physics behind sound and how you can use them to your advantage.
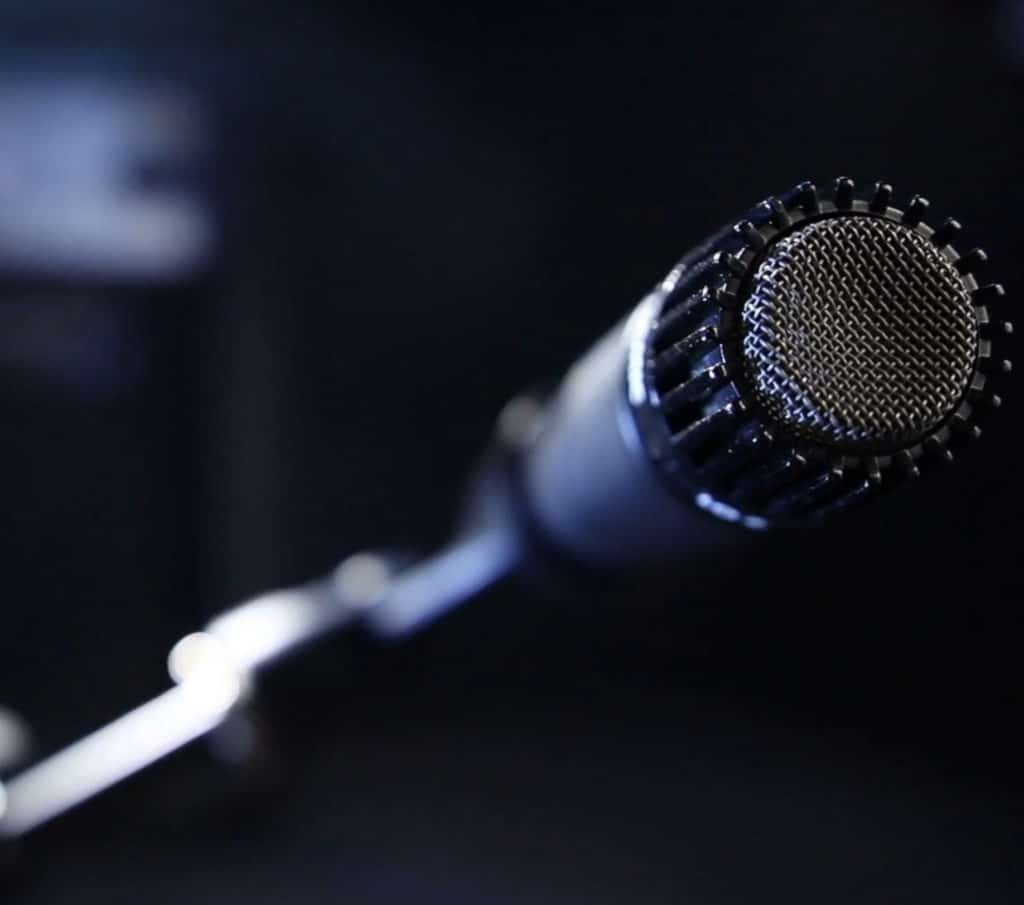
4. Using the Wrong Microphone Type
There are 3 main microphone types that are used when recording music - a condenser microphone (aka capacitor), a dynamic microphone (aka moving coil), and a ribbon microphone.
Each microphone type has a different timbre and is better suited for picking up different sound sources.
Condenser microphones are great at recording subtle details.
For example, condenser microphones are great for picking up details due to how sensitive they are. This is especially true for small-diaphragm condenser microphones since the capsule takes less energy to move.
That said, large-diaphragm condensers are great for vocals and small-diaphragm condensers are great for acoustic guitars and other stringed instruments.
Dynamic microphones can handle very high SPLs.
A dynamic microphone takes more energy to move the capsule is as a result is less sensitive and detailed. This makes them great for very loud sources like guitar amps and snare drums.
They also often have a slightly attenuated high-frequency range, resulting in a slightly subdued sound - this makes it better for recording particular genres like when tracking rock vocals or lo-fi source material.
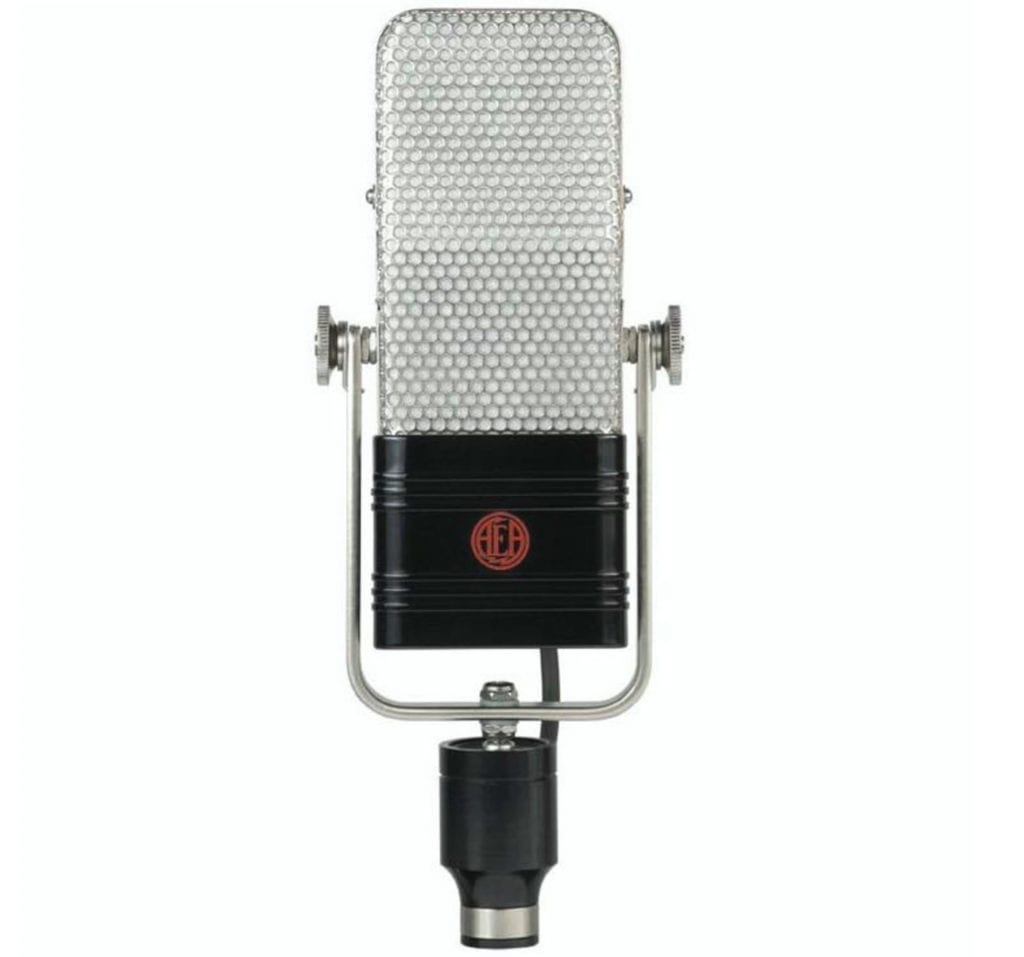
Ribbon microphones offer classic tonality and a subdued frequency response.
Lastly, a ribbon microphone requires a significant amount of amplification and results in the warmest and most subdued sound of these 3 microphone types. It’s also indicative of a more classic sound, making it great for Folk and other older sounding genres.
Consider what genre you’re creating and the sound you’re trying to achieve when choosing your microphone - sometimes a brighter or more detailed sound is not better.
Finding the right microphone for a particular sound source will take some testing and experimentation - so be sure to try out as many options as possible when tracking something new.
5. Using Subpar Sounding Samples
Samples have provided a lot of convenience to engineering, and have resulted in incredibly unique and new sounds. When the right samples are used, they augment a production, and can often pass as a recording native to the project.
Samples have allowed for new genres and production styles.
Unfortunately, samples can also make a recording sound amateurish. That’s why picking the correct samples is incredibly important.
The wrong samples can be detrimental to the quality of a production.
For many, this process will be more of a mixing decision than a tracking one, but if you’re recording the audio for your synth, or drum pad, then picking the right samples is a decision best made before recording.
Even if you are recording midi data and can switch the samples later on, it helps to have a good idea of how the track will sound when deciding what to layer on. With that in mind, picking the right samples, or at least good sounding ones is important during tracking.
If you need some better sounding samples, check out our video on the best free sample websites.
Using these sites, you can find new samples to use in your productions.
6. Recording at a Low Sampling Rate and/or Bit Depth
Although this is a more technical mistake that can be made, it will negatively impact the entirety of your production if you do make it.
With that in mind let’s discuss the importance of recording at a higher bit-depth and sampling rate.

The bit-depth is directly tied to the recording's dynamic range.
Bit-depth determines the dynamic range of a recording and affects the recording’s noise floor. Recording at a lower bit depth, like 16-bits, will result in less of a dynamic range and higher noise floor due to quantization distortion.
With that in mind, don’t record at 16-bits. Instead, record at 24-bits or higher if your CPU can handle the extra processing.
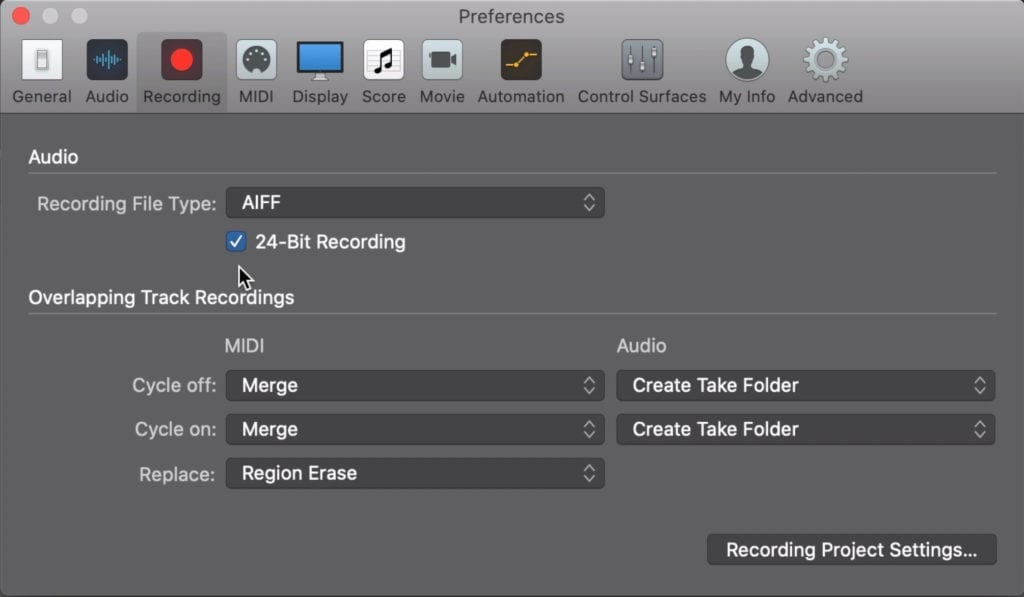
Recording with 24-bits ensures a lower noise floor.
The sampling rate determines the frequency response and range of a recording. A lower sampling rate results in a smaller frequency range, a higher sampling rate in a larger. For example, the lowest available sampling rate of 44.1kHz allows for a frequency range of 22.1kHz.

A 96kHz sampling rate ensures that aliasing distortion doesn't occur.
Because human hearing only goes up to 20kHz, this seems like it wouldn’t cause any issues; however, some processing causes the signal to go above this 22.1kHz frequency. When this occurs, the signal cannot be represented, resulting in what is known as aliasing - an unpleasant sounding form of harmonic distortion.
That said, it’s best to record at a higher sampling rate like 48kHz, or if possible 96kHz to avoid aliasing distortion.
7. Tracking in an Improperly Sound-Proofed Room
Sound-proofing and room acoustics is an incredibly complex topic - definitely more than I can cover here. Regardless, it helps to know some of the fundamental reasons why it's so important.

The shape of the room and the wall materials greatly affect the sound of a recording.
First, let’s talk about room reflections. Room reflections can be a great thing - think ‘amazing sounding reverb.’ But it can also have severe negative consequences for a recording.
Collections of frequencies called ‘Nodes’ cause your recording to sound unbalanced. For example, if your room is shaped in a particular way that causes 200Hz to build and amplify, then your recording will sound muddy.
The easiest way to avoid this is by putting up as many sound absorption panels as possible. This way, excessive frequencies are absorbed and aren’t recorded in addition to your sound source.
Another reason to soundproof a room is your noise floor. A recording can only be as quiet as the room it’s recorded in - so if your room has an AC vent that’s pumping air into it, and a loud TV playing outside of it, and some noise leaking in from the street outside, your ability to create a quiet recording is shot.

If the room isn't isolated, loud sounds from outside can make their way onto your recording.
Fixing this issue is a little trickier since sound can come in wherever a gap exists. To try and remedy it, play noise or music outside the room, and try to fill any gap you can find.
Odds are it won’t be perfect, but you’ll minimize the amount of room noise that you record.
8. Neglecting Proper Microphone Placement
We’ve already somewhat covered this topic when discussing the placement of 2 or more microphones, but microphone placement is just as important when recording with just 1.
The placement of a microphone determines the frequency response, the timbre and tone, the number of room reflections captured, and more.
Microphone placement greatly affects your recording.
Far too often, engineers think that they can fix mic placement issues in post, but your recordings, mixes, and masters will sound significantly better if you start your production recording things right.
For example, when recording acoustic guitar if you place the microphone directly in front of the soundhole, it’ll sound boomy and unbalanced. By placing the microphone near the 12th fret and angling the capsule toward the soundhole, you’ll achieve a more balanced sound.

For example, an acoustic guitar shouldn't be recorded by placing the microphone directly at the sound hole - this would create a muddy sound.
Listen intently to the source and the signal that you’re picking up with the microphone. Move the microphone around accordingly until you find the best spot for it - only once you’ve found the best sounding microphone position should you record.
9. Avoiding Recording with Processing or Outboard Gear when Available
This mistake is a less common one, especially in modern recording, but it’s worth covering regardless.
Essentially, you shouldn’t be afraid of or avoid committing to particular signal chains if the hardware is available.
Use outboard gear if its good and available.
So for example, say you have a great sounding outboard compressor and equalizer - but you’re afraid of committing to the settings that they establish, and in turn, choose not to use them entirely.
This is most likely a mistake - instead of avoiding hardware because you can’t alter the settings later, learn how to create and commit to a good sounding signal chain.
You’ll still be able to add more processing later on if needed - but learning how to commit to some settings will make you double think how you’re processing your signal.
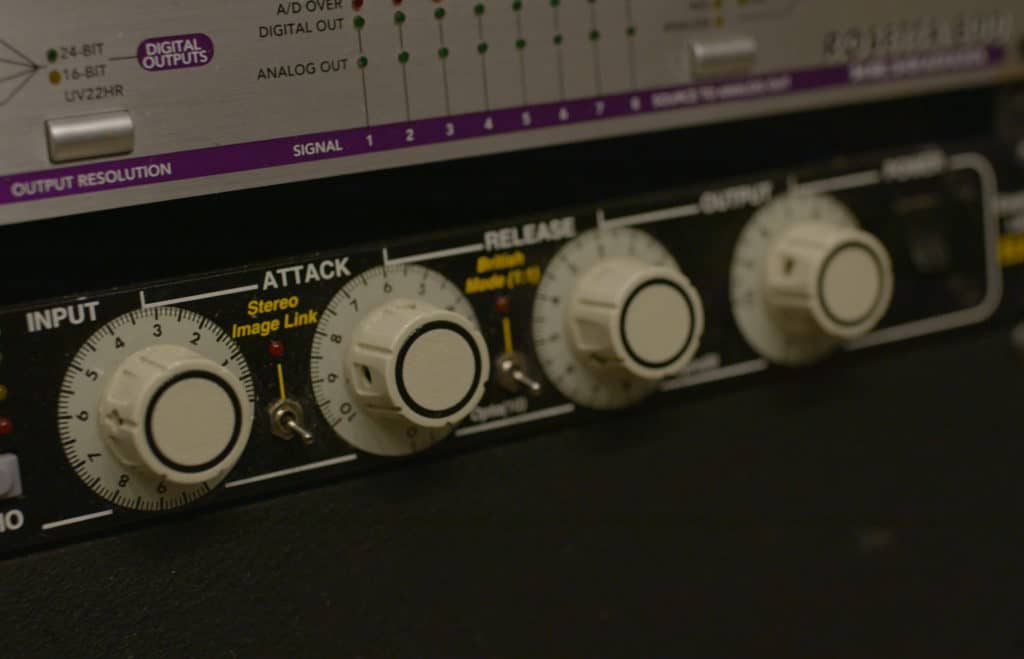
Don't be afraid to commit to a hardware-based signal chain.
This may not be something you’ll need to consider if the only hardware you have is your interface, but if the analog equipment is available, then implement it into your productions.
If you’re curious how analog processing can affect your session, send us one of your mixes for a free mastered sample:
We’ll master it for you and send you a free sample for you to review.
10. Recording with a Significant Buffer Size or Latency
Last up, its best not to record your signal with any form of latency. Granted, there will always be some latency, but the lower the latency the better.
Latency can be thought of as a slight delay between the monitored signal and the actual recording or quantization of the signal.
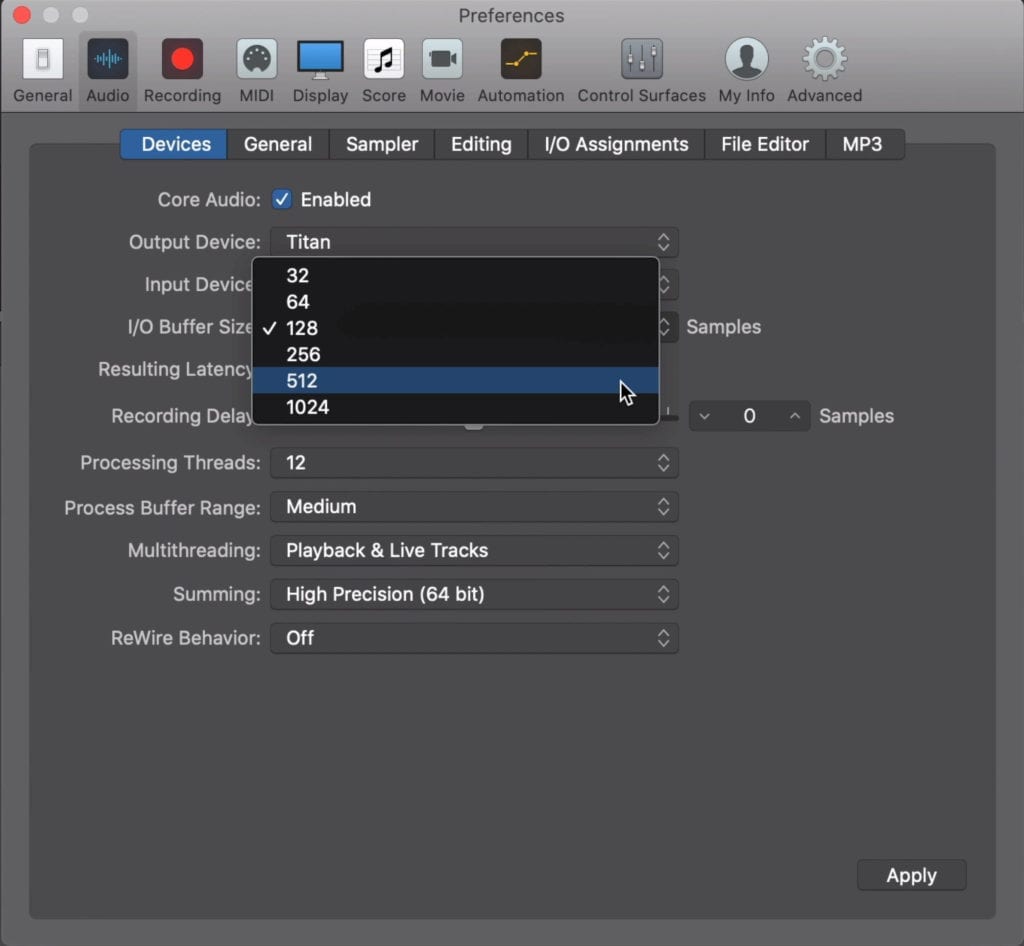
When recording, the lower the buffer size the better
At small levels , this delay is negligible and shouldn’t affect your recording - but at higher levels, it’ll lead to significant timing issues with the performance.
The buffer size of your session and the amount of processing you’re using will both contribute to latency.
Buffer size is the number of samples between your monitoring and the computer’s processing of the signal. A higher buffer size results in less CPU but in more latency.
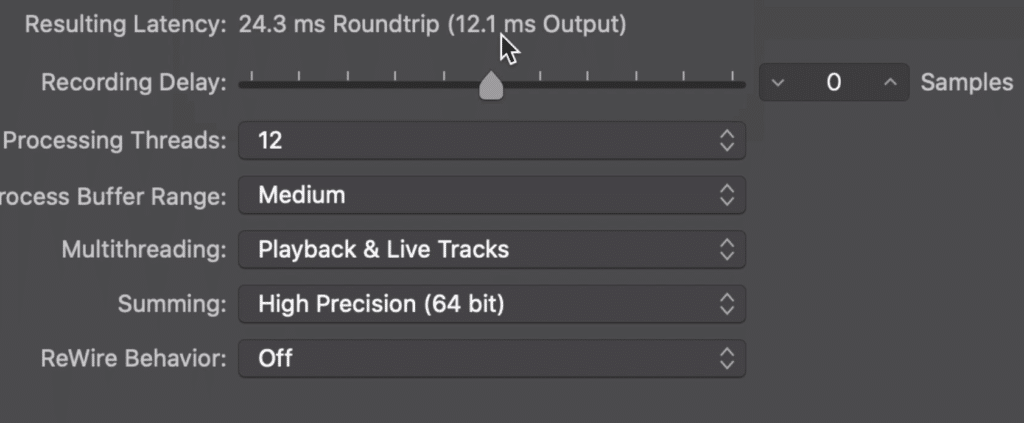
Notice that a higher buffer size causes greater latency.
With that in mind, it’s best to lower the buffer size when tracking and raise it during mixing and mastering to lower CPU (if needed).
A similar concept applies when using plugins during tracking. Plugins don’t instantaneously process your signal and take time to get it from point A to point B.
With that in mind, the more plugins you use, the greater delay you’ll cause between the incoming signal and the monitored signal. This latency is exacerbated by more demanding and intricate plugins.
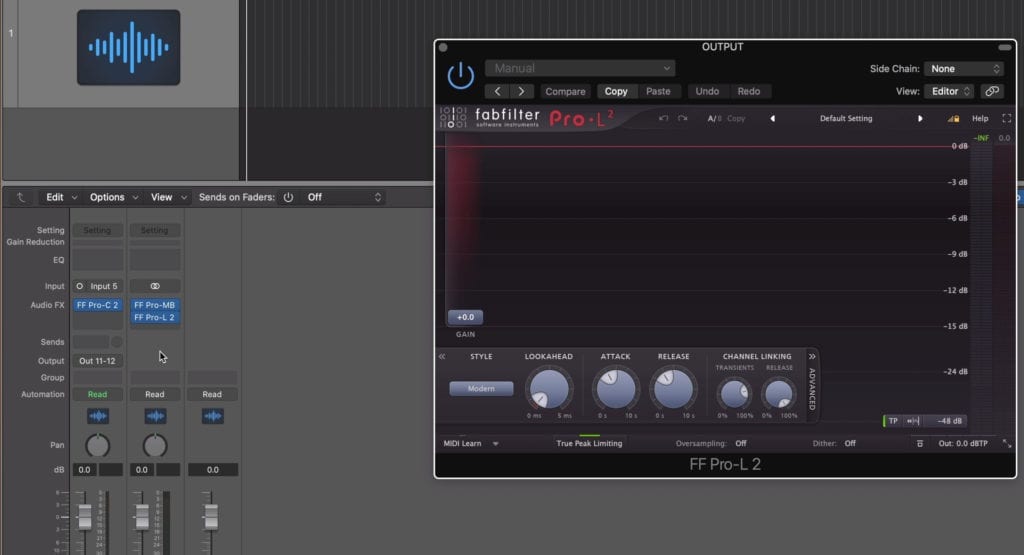
Too many plugins can cause latency.
Try to limit the number of plugins you use when you’re recording, otherwise, your recording will suffer.
If you’ve already inserted some plugins and don’t want to remove them, most DAWs have a low-latency mode.
For more information like the points provided in this blog post, check our thoughts on mixing mistakes to avoid:
Conclusion
There are a lot of mistakes that can be made when recording music - thankfully, there's more information on the topic than ever before.
Use this list to ensure that you’re not making mistakes prior to and during recording.
When setting up your session:
Ensure you’re using a high sampling rate and bit depth, and that the buffer size is low. Also, ensure you’re recording in a quiet room.
When setting up your microphones:
Ensure that you’re not causing significant phase cancellation and that the microphones are placed in the best-sounding position.
When recording:
Be sure that you’re signal is peaking near -3dBTP. Also, utilize analog equipment if it's available to you and of high quality.
If you’re recorded a track, mixed it, and it's ready for mastering, send it to us here:
We’ll master it for you and send you a free mastered sample for you to review.
How do you avoid recording mistakes?


