Best Practices for Mastering Your Song
Some of the Best Practices for Mastering Your Song are
- Avoiding excessive limiting and compression
- Using a True Peak meter to ensure peaking is not occurring
- Avoiding excessive equalization, distortion, and stereo imaging
- Mastering with a specific medium in mind
- Using the highest original bit-depth and sampling rate source file
- Leaving encoding and sample-rate conversion to the Streaming Service
Best Practices for Mastering Your Song in Detail
Mastering music isn’t the most difficult task; mastering music to sound as good as it possibly can is a difficult task. Although I can’t tell you how to make every track sound as good as it possibly can, I can share some of the best practices for mastering.

Some mastering practices can ensure your master is on the right track to sounding professional.
This will at the very least ensure that you’re avoiding some huge mistakes that can negatively impact the overall quality of your master. Additionally, we’ll be looking into some practices that although won’t ensure a good master, will help the quality of your master both technically and sonically.
Let’s delve into some mastering practices you should seriously consider following while mastering any future project. If followed they’ll lead to better-sounding masters.

If your master is created using these practices, you'll likely create a sound that listeners enjoy.
If you'd like to hear your music mastered with these practices in mind, send it to us here:
We'll master it for you and send you a free mastered sample of your mix.
Avoid Excessive Limiting and Compression
Compression and limiting have a place in most masters - but doing so in an excessive manner can lead to a distorted master lacking in dynamic range.
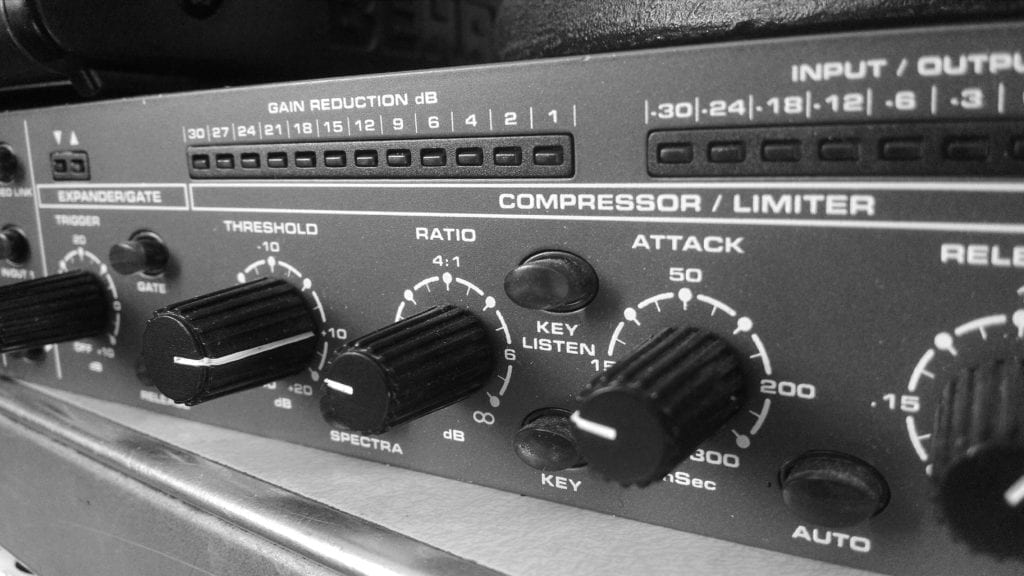
Excessive limiting and compression can distortion your signal, and leave it void of dynamics.
Often compression and limiting are used as a means of making a loud master. By compressing any particularly dynamic passages, and truncating any transients with limiting, a mix can be amplified to a greater degree.

If a master is too loud, and lakes dynamics, this will wear greatly on any listener over time.
This makes sense to a certain extent, as such a method results in the quieter aspects of a mix becoming louder, and louder aspects becoming quieter; however, when done in excess the results are often unpleasant. If pushed far enough, distortion can start to occur. Just a bad, the severe lack in dynamics and the excessive loudness will wear on any listener.
The one upside to such a technique is that any amplification system won’t have to work as hard to amplify your master, and in turn, that amplifiers noise floor won’t become an issue. That being said, amplifying the quieter aspects of your master enough will result in raising your master’s noise floor, so the supposed benefits are somewhat negligible.
Creating louder masters first became popular as a means of covering up the noise generated by consumer-grade amplifiers.
The distortion that can occur results from clipping, which has an unpleasant sound and is caused by noticeable high order harmonics. Despite precautions, pushing a signal loud enough will no doubt result in this undesirable form of distortion.
Furthermore, if your music is distributed on a streaming service, and this is the primary means by which most listeners will playback your music, excessive loudness is completely unnecessary.

Streaming services will turn down excessively loud tracks by using Loudness Normalization.
In truth, loudness normalization will turn down any master louder than -14LUFS. As a result, your louder master will be turned down, and played back at the same volume as all other tracks on the platform.
If you want to avoid this, then create a dynamic master that avoids excessive compression or brick wall limiting.
If you're attenuating a fair amount of your signal, you're using too much compression or limiting. Scale it back, and see if you really need to make your master that loud.
If you’d like to learn more about clipping distortion and other forms of distortion, check out our blog post on the topic:
It’s full of great and relevant information on the topic.
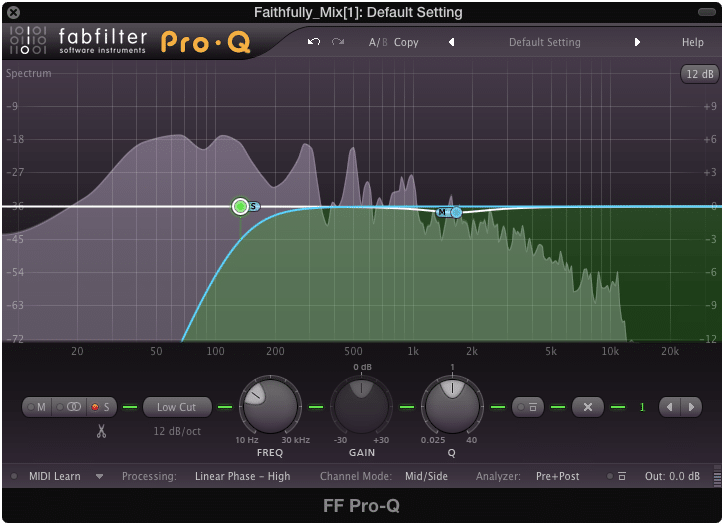
Use a True Peak Meter to Ensure Peaking is Not Occurring
As we just covered, excessive loudness can lead to peaking. This is particularly true within a digital system, where only certain values can be represented before they begin to saturate and represent the signal in a nonlinear manner.
True Peak meters ensure that clipping distortion isn't occurring on or between samples.
This is the case when a signal peaks past 0dB on a digital meter. Sometimes, even though our digital meters are telling us that no peaking is occurring, the waveform generated between samples can peak.
Because a quantized signal is comprised of square waves, when it's converted to an electrical signal, the space between samples may not accurately represent that waveform.
This phenomenon can be measured with a tool known as a true peak meter. A true peak meter measures the volume of a track as if it has generated that inter-sample waveform. Using one is a crucial precaution against unwanted clipping distortion. Considering this form of distortion occurs most often during the mastering process, using a true peak meter during mastering is a good idea.
Furthermore, this meter is incredibly valuable when one considers the peaking that can occur during the conversion process.

The encoding process can lead to both inter-sample peaking and regular clipping distortion.
Whenever a song is uploaded to a streaming service it is converted from a PCM file to a lossy file. During this process the overall amplitude of a track may change - often it increases in amplitude due to decreased accuracy regarding amplitude quantization.
When this occurs, a PCM file that was close to peaking may peak. By using a true peak meter, and setting the loudest peak to roughly -.5dB, you’re likely to avoid all peaking caused by the conversion process.
Lastly, a highly dynamic master can peak during loudness normalization. If a track’s loudness is quieter than the loudness normalization setting of a streaming service, it will, of course, be turned up. If the loudest dynamic is great enough, then when this track is turned up, that peak will distort.
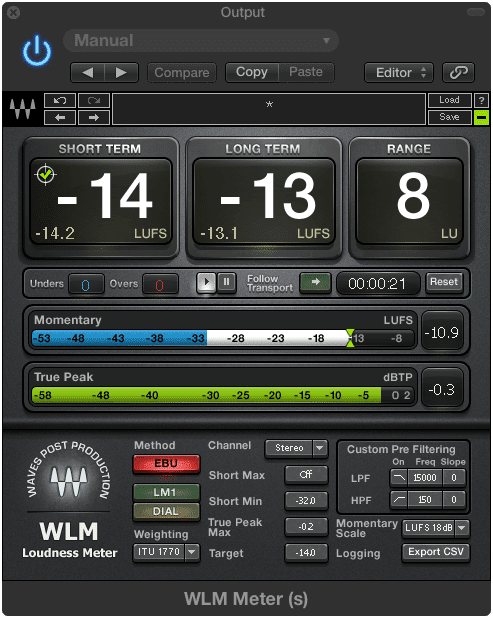
Controlling your peaks is crucial to avoiding distortion during loudness normalization.
This isn’t always the case, as some streaming service introduces limiters, but if you’d like to avoid this altogether than it’s best to use your true peak meter, and keep your loudest peak to -1dB. This way your track can be turned up during normalization without resulting in clipping distortion or unwanted limiting.
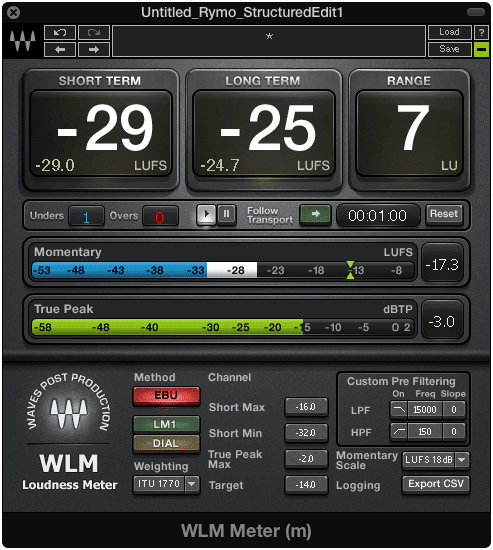
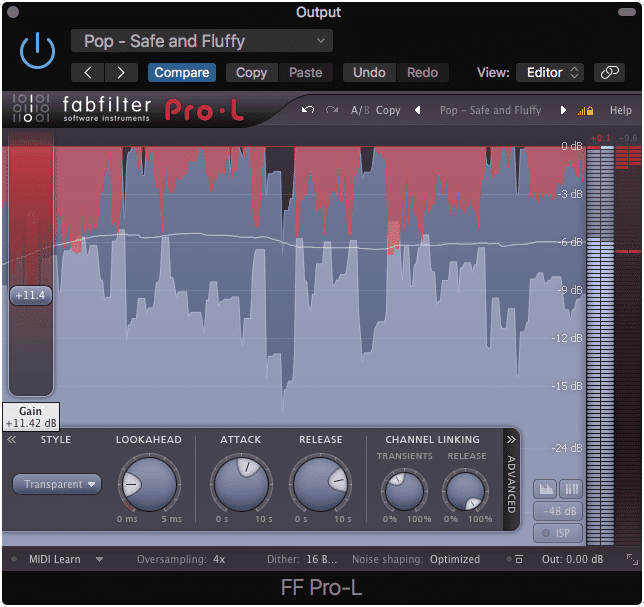
In the particular situation shown above, the master will distort. If it gets turned up to -14LUFS by adding 11dB of gain, what do you imagine will occur to the -3dBTP peak?
In short, use a true peak meter during mastering to be sure your track isn’t peaking, and won’t peak during any conversion or normalization process.
If you’re curious how loudness normalization affects streaming, and how this relates to compression and limiting, check out our blog post on the topic:
It provides an in-depth look at the relationship between mastering and streaming music.
Avoid Excessive Equalization, Distortion, and Stereo Imaging
Each of these practices differs slightly in their reasoning, but all represent the same idea. Don’t do anything drastic to your master, as it will have a negative effect on its overall quality.
With that said, let’s look at each principle individual to better understand why each excessive form of processing should be avoided.
Equalization
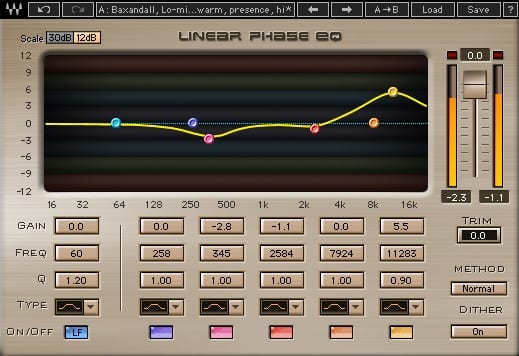
Excessive equalization should be avoided during mastering.
Excessive equalization is almost never ideal. Even when it’s used during the mixing process, the results vary. The results are certainly worse when excessive equalization is applied during the mastering stage.
As you may know, when mastering, a stereo file is typically used. Although stem mastering is a viable option, stereo mastering is the primary method with which songs are mastered.
Any change applied to a stereo file will affect a great deal of information. As a result, any drastic EQ curve will affect a great deal of instrumentation, and in turn, change more than what was intended. For example, bumping 2kHz with a wider range will affect vocals, guitars, cymbals, bass, to a lesser extent sibilance, and just about any form of instrumentation.
When equalizing a stereo master, you must keep in mind that you're affecting all instrument groups within that range.
Odds are when mastering, you won’t want to affect all of these instruments at once, and if you do you probably don’t want to do so in a drastic or extreme manner. That being said, subtle equalization during mastering a good thing to keep in mind. Any equalization that amplifies or attenuates a frequency band more than 3dB is cause for concern.
Distortion
Adding excessive distortion will no doubt cause issues for your master's intelligibility.
The same principle that guides us against excessive equalization applies to excessive distortion. Often times distortion is used to quickly add character to a master. But if this distortion comes at the expense of intelligibility or sonic fidelity, perhaps it’s best to limit its use.
Distortion can become even more of an issue when considering the medium onto which a song will be distributed. A digital medium can handle a fair deal of distortion, but if this same signal was applied to a vinyl record or a cassette, the results may be unpleasant to listen to.

Some mediums, such as cassette tape cannot handle excessive distortion. Keep this in mind when using distortion on your master.
Unless you’re set on having a significantly distorted master, or the artist you’re working with is, it may be best to turn down any distortion settings you’re using in your mastering chain.
Stereo-Imaging
Creating an excessively wide stereo image will make the master have playback issues amongst certain devices.
Excessive stereo imaging will lead to an undefined and often washed out sounding record. Stereo imaging may often be associated with higher fidelity, but if pushed past a certain point you may not only be degrading the listening experience, but also completely cutting out certain frequencies and instruments.
Most amplification and stereo systems can handle stereo imaging to a certain degree, but if excessive, those spread frequencies cannot be replicated, at least not at the amplitude necessary to be perceived.

For example, some car stereo systems are not equipped for wide images. This will result in those frequencies being attenuated or even completely missing during playback.
Furthermore, excessive imaging will not translate well to a vinyl record or any medium that cannot physically support such a wide image.
Want to hear your mix mastered with just the right amount of equalization, distortion, and stereo width? Send it to us here:
Master with a Specific Medium in Mind
Mastering has as much to do with the technical limitations of a playback system, as it does making a song sound great. In fact, the two things are undeniably intertwined.
If a master doesn’t meet the specifications of a medium and adhere to its limitations, it won’t sound good during playback. No matter how great a track sounds in the studio, if mastering isn’t done with a specific medium in mind, all that effort goes to waste.
No matter how good something sounds in the studio, the medium onto which it's recorded can make or break your master's sound.
Although the digital medium may seem like it has few technical limitations, processing such as loudness normalization and encoding need to be kept in mind when mastering. When mastering for physical mediums, these limitations become more apparent.
The grooves and other physical factors of a vinyl record cause certain sonic limitations to occur.
For example, when mastering for vinyl, an engineer will need to keep the loudness, stereo width, dynamic range, and track sequencing in mind, among other things.
One particularly unique aspect of mastering for vinyl is sequencing the tracks in such a way that the attenuation of high range frequencies caused by the record’s physical layout, don’t cause a master to sound unbalanced. By using an emphasis, de-emphasis equalization technique, this issue can be remedied.
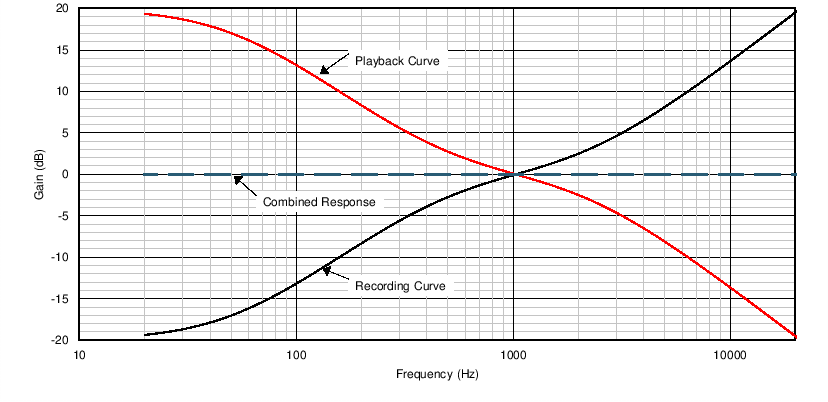
An emphasis and de-emphasis equalization technique is used to ensure playability across various consumer equipment and for vinyl record playback.
But, this, of course, is just one of many things that need to be kept in mind when mastering for the medium.
If you’d like to learn more about mastering for vinyl, and the unique characteristics its technical limitations cause, check out our blog post:
It details everything you’ll need to know if you want to master for vinyl.
Also if you’d like to learn more about the emphasis, de-emphasis technique here is a video and blog post detailing what it is and how it’s accomplished:
Another example of mastering with a specific medium in mind occurs when considering mastering for cassette. In this instance, the tape chosen for distribution and replication will affect how the mastering is handled.

The tape type affects the point of distortion and the frequency spectrum of any signal recorded onto it.
For example, if tape type 2 was chosen as the primary tape type for replication, a mastering engineer would need to know that this particular tape type accentuates the high-frequency range while attenuating the low-frequency range. This would need to be accounted for, and counteracted with the correct equalization.
If you’re curious about mastering for cassette, take a look at our blog on the topic:
It goes into detail about the 3 primary tape types used, how to master for them, and the best practices for cassette duplication.
Use the Highest Original Bit-Depth and Sampling Rate Source File
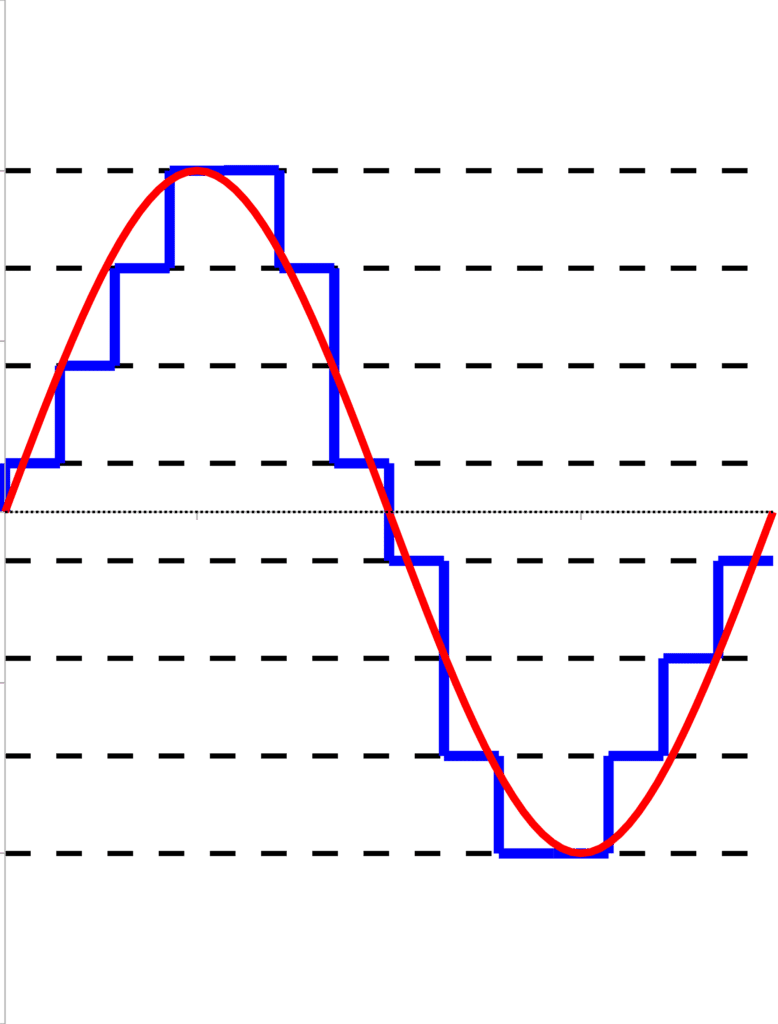
This one may seem obvious, but it's definitely important nonetheless. Often times, a mix will be sent to a mastering engineer as a 16-bit 48kHz file, when it was originally mixed as a 24-bit 96kHz. This truncation can have some very negative effects, primary aliasing, and increased quantization noise.
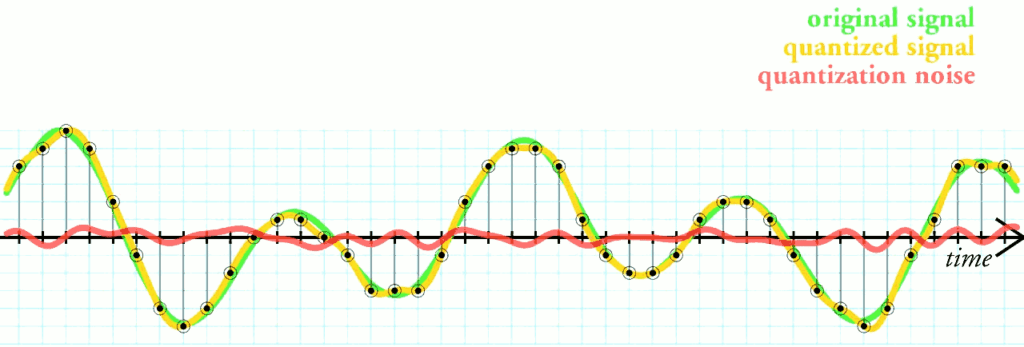
The red line above represents the small amount of noise generated from quantization distortion. This occurs when truncating your higher bit-depth files to lower ones.
Considering mastering engineers seek to avoid additional noise and phase cancellation at all costs, these issues are certainly a setback. Using the highest bit-depth and sampling rate possible for your master makes for a better, less noisy master.
If you’d like to learn more about quantization distortion, take a look at our video and blog post:
It details what quantization distortion is, how it’s typically avoided, and whether or not dithering is a necessary step in the mastering process.
Leave Encoding and Sample-Rate Conversion to the Streaming Service
It’s only natural that as a mastering engineer, you’d like to control as many aspects of your master as possible. For many engineers, this includes handling the creation of a lossy file. However, this is often a mistake, as this process should be left to either the distributor or the streaming service with which you’re working.

Apple has come up with a protocol and an advanced encoding process, designed to create great-sounding music. It's best to leave encoding up to them.
Perhaps the best example of this occurs when mastering for Apple Music. Apple has gone to great lengths to provide one of the best lossy file types and encoding processes to its users. Their newest encoding process can create an AAC file that deletes less information than other lossy files, while still resulting in a smaller file.
The being said, if you were to handle this encoding process yourself, you’d most likely create an inferior lossy file, with larger file size and more unwanted artifacts.
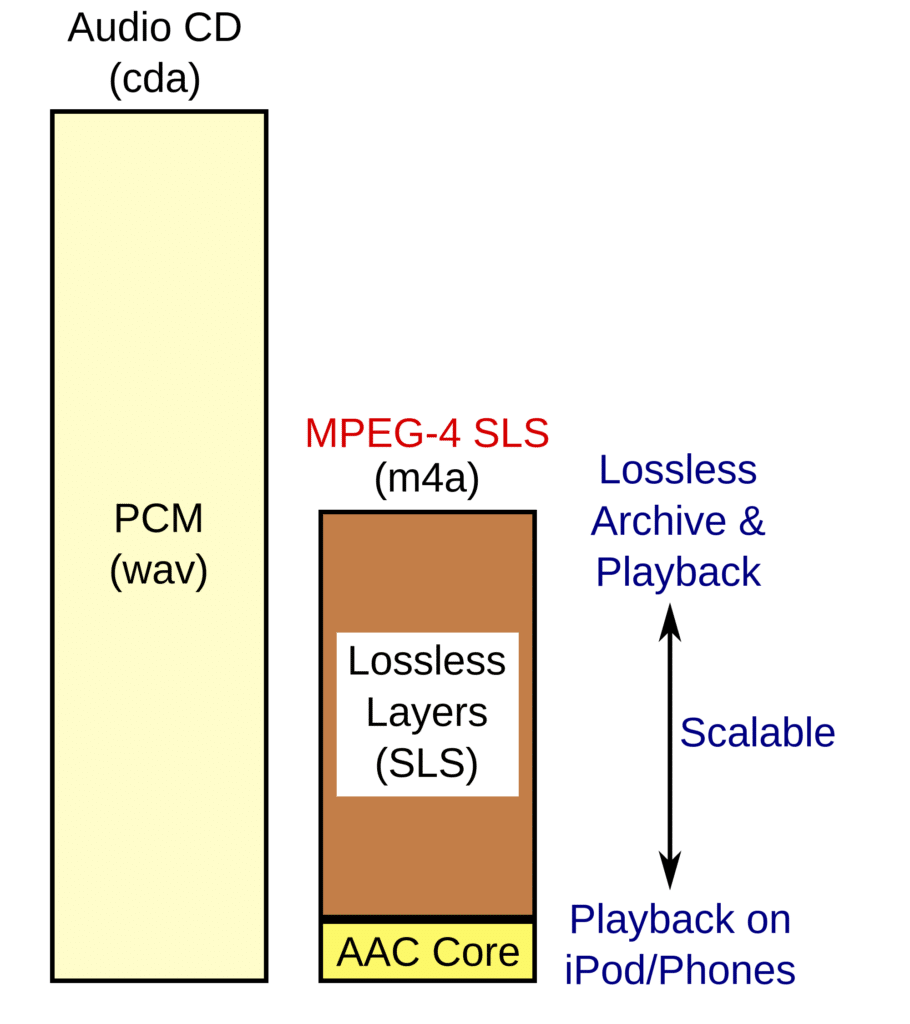
Here's a generalized look at Apple's encoding process.
The one thing you can do though is to leave enough headroom when mastering. Doing so ensures that any encoding process won’t result in the peaking caused by amplitude inaccuracies during the quantization process.
If you’d like to learn more about Apple Music’s specifications, and how they create their lossy files, here is a blog post on that topic:
Conclusion
Mastering is certainly no easy task. Creating a great sounding master takes time, patience, and a lot of trial and error. But if you follow some of the best practices for mastering, you’re certainly on your way to making a professional master.
Some of the Best Practices for Mastering Your Song are:
- Avoiding excessive limiting and compression
- Using a True Peak meter to ensure peaking is not occurring
- Avoiding excessive equalization, distortion, and stereo imaging
- Mastering with a specific medium in mind
- Using the highest original bit-depth and sampling rate source file
- Leaving encoding and sample-rate conversion to the Streaming Service
Each one of these recommendations needs to be followed for various reasons.
If you use excessive limiting or compression, you run the risk of significantly losing dynamics. Furthermore, you create the possibility of having unpleasant clipping distortion.
If you use a true-peak meter, you can know for certain whether your track has inter-sample peaking. This tool becomes particularly important when establishing a loudness that won’t peak during normalization or encoding.
If you use excessive equalization, distortion, or stereo-imaging, you’ll affect frequencies in a manner that sounds noticeable and most likely unpleasant. This is perhaps the easiest way to make your masters sound unprofessional.
The technical limitations of the medium onto which a master is recorded is just as important as the master itself. If you don’t master with the medium in mind, you may create unwanted distortion, noise, phase cancellation, or a slew of other playback issues.
Mastering with the highest original bit-depth and sampling rate in mind means creating the most accurate processing. Furthermore, truncating your master can result in aliasing or increase quantization noise.
Lastly, encoding your master yourself may mean creating an inferior lossy file. Letting your distributor or streaming service handle encoding means the best encoding practices will be followed.
If you'd like to hear your music will all of these practices followed, and for free, send it to us here:
What mastering practice do you always follow?


