What is De-Essing?
Quick Answer
De-Essing is any vocal technique, plugin, hardware, or post-production technique that reduces vocal sibilance, and causes a balanced frequency response in the higher-frequency range. Excessive vocal sibilance can be unpleasant for most listeners; as a result, De-Essing is typically used to remedy these issues.
De-Essing in Detail
With the introduction of close miking, and the advent of vocal processing came the need to attenuate vocal sibilance.

Vocal sibilance becomes a larger issue with vocal processing.
Although an improperly tamed vocal can be passable on some consumer-grade speaker systems with a truncated high-frequency response, any listener with a full-spectrum speaker or headphone system will hear the unpleasant effects.

Vocal sibilance can become more noticeable when listening over headphones.
That’s why, for the sake of consistency amongst all speaker systems, and the enjoyability of the listening experience, De-Essing has become a popular form of vocal processing.
Despite its popularity, it isn’t often discussed in detail. Perhaps it isn’t as exciting as distortion or compression techniques, but it is an important aspect of creating a professional-sounding mix or master.

Although De-Essing is needed, it isn't talked about as much as other forms of processing.
With that said, let’s look at some of the different ways de-essing can be used during mixing and mastering to create a balanced vocal frequency response.
We’ll be looking at techniques that can be implemented during tracking, editing, mixing and mastering, so be sure to read the full blog to know how to accomplish de-essing at all stages of production.
If you’re currently working on, or have already finished a mix send it to us here: https://www.sageaudio.com/register.php
We’ll master it for you and send you a free mastered sample.
De-Essing During the Vocal Performance
Using software or hardware to fix a sibilant vocal is all well and good, but sometimes the “fix it in the mix” approach isn’t the best option.
Before post-production was readily available, many artists had to learn how to properly sing into a microphone. They employed various techniques and tricks to ensure that their vocal performance was as pleasant and balanced as it could possibly be.
One trick that was used during this era, was placing a pencil or pen between the microphone capsule and the vocalist at the same height as the singer’s mouth. This pen or pencil would be equal distance from the capsule and singer, with the singer’s distance from the microphone being roughly 8 inches.

Placing a pencil between the singer and the mic capsule can help tame sibilance while tracking.
By placing the pen or pencil here, any sibilance would be broken up by the obstruction prior to hitting the mic capsule. This would cause the sibilance to be recorded but at lower energy. Although this may seem as if it would drastically change the timbre of the performance, it doesn't.
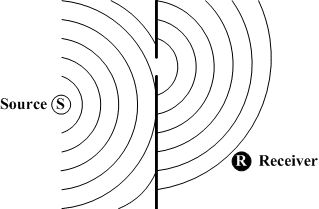
Sound waves diffract around and in between obstacles.
Because sound waves can easily bend and diffract around a small object, the small obstacle only reduces the energy of the hyper-directional sound waves. As a result, the vocals sound great, without the need for post-production techniques.
Another example of a similar technique can be seen while observing the legendary vocalist Frank Sinatra.

Frank Sinatra could masterfully move around a microphone, to create a balanced vocal performance, while reducing plosives and harsh sibilance.
No stranger to the studio, Sinatra learned how to carefully and purposely move his head and mouth during vocal takes to avoid an unpleasant recording. In fact, considering Frank Sinatra recorded the majority of his songs live and in front of a studio audience, he had to be spot on if he wanted to create a perfect vocal take.
With that in mind, he would intentionally tilt his head to the left or right when singing a word with a plosive or an Ess sound. This way, the energy wasn’t directed toward the mic capsule but was made weaker by angling the sound source. This technique is very similar to the pencil trick in that the intention is to weaker the sound source when unpleasant sounds are occurring.

Frank's technique is difficult and takes practice.
In Frank Sinatra’s case, being able to move closer or farther from a mic, in accordance with how strong you want a particular aspect of a vocal performance to be, takes a fair amount of skill. If you’re a vocalist, this definitely takes a lot of trial and error, so keep this in mind when attempting it.
De-Essing During the Editing Process
Editing is often underrated. Today, it’s the first thing to be overlooked when a small budget interferes with a thorough post-production process.

Vocal editing offers a great opportunity to reduce sibilants.
Unfortunately for those that forgo the editing processing, editing presents one of the better opportunities to attenuate excessive sibilance.
Doing so is incredibly simple, yet time-consuming. All you need to do is listen to your vocal track or tracks, identify the Ess sounds, and use clip gain to attenuate that aspect of the performance.
Simply zoom in on the waveform in question, cut it into a new clip, and then adjust the gain of that clip.
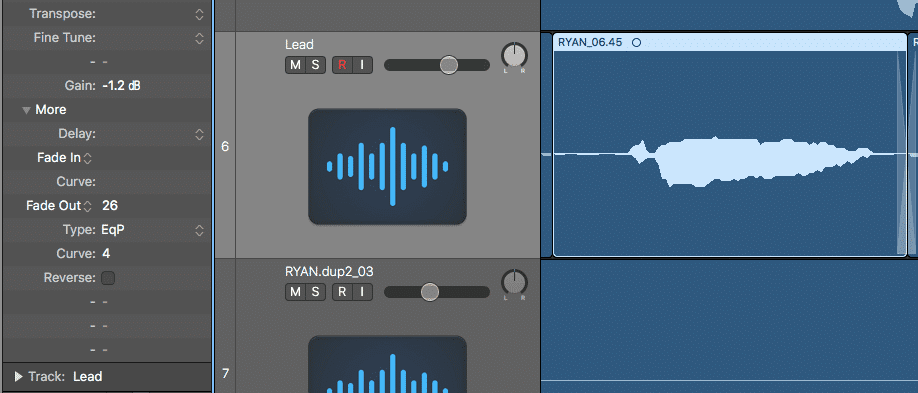
To control sibilance during editing, simply use clip gain.
Again, this processing is time-consuming, but it is one of the better ways to get rid of sibilance. Unlike equalization, or compression (mentioned in the next section) using clip gain to attenuate the Ess sound accounts for the frequency variance that occurs with various sibilants.
Furthermore, using clip gain is the only foolproof method of attenuating sibilances without affecting other frequencies or aspects of the performance.
De-Essing During the Mixing Process
This section may be a bit more common knowledge to audio engineers, but it’s important to cover it regardless. Let’s look at some various mixing techniques that can be used to attenuate vocal sibilance.
Keep in mind that not all of these techniques are recommended, nor do they work in all situations. You will most likely need to use a combination of these forms of processing during mixing, to accomplish the desired effect.
Equalization
This seems like an obvious choice to remove unwanted frequencies, but approaching vocal sibilance with this method needs to be implemented carefully. If you attenuate too much, you can certainly change the timbre of your vocal in a negative way.
When doing so, you first need to determine the frequencies at fault. Not surprisingly, different vocalists produce different types of sibilance. Furthermore, each sibilant aspect of a performance is unique, and can be performed with a different strength, or at a different frequency.
This causes some difficulty for equalizing the sibilance of a vocal performance out of the mix. If they’re constantly shifting in terms of frequency, and are recorded at different strengths, then changing the amplitude of a frequency band is probably not the best approach.
Regardless, here is how to accurately identify and attenuate troublesome sibilance laden frequencies.
First, I’d highly recommend using the FabFilter Pro Q plugin - this way you have the ability to listen to solely the frequency band with which you’re working.
Step 1: Start with a lower Q in the 4kHz to 12kHz frequency range.
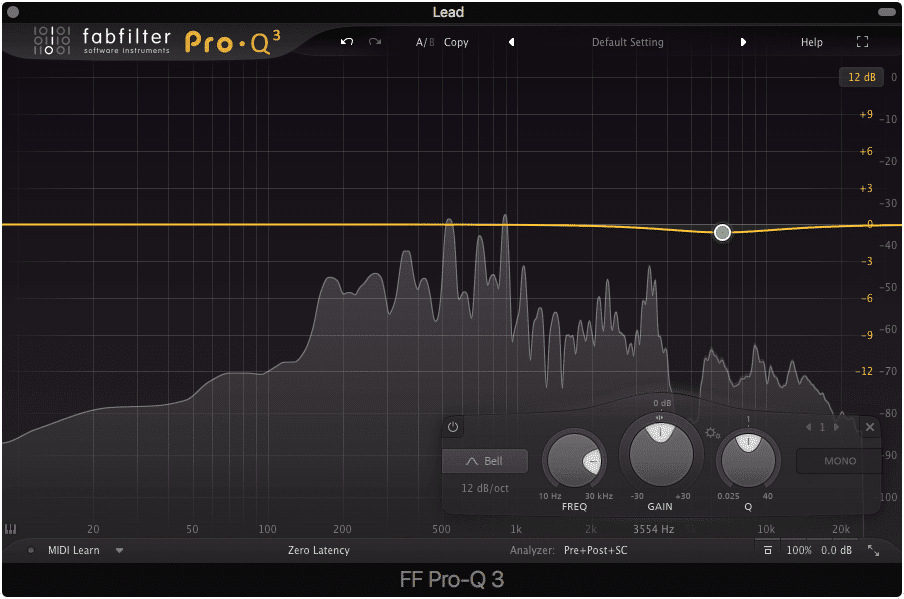
Sibilance typically occurs between 4kHz. and 8kHz. Search this area first for the most problematic frequencies.
Step 2 : With the track playing, slowly narrow the Q. Be sure to have the ‘Solo’ function enabled by clicking the headphone icon on the band.
The 'Solo' function allows you to be certain you are affecting the correct frequencies.
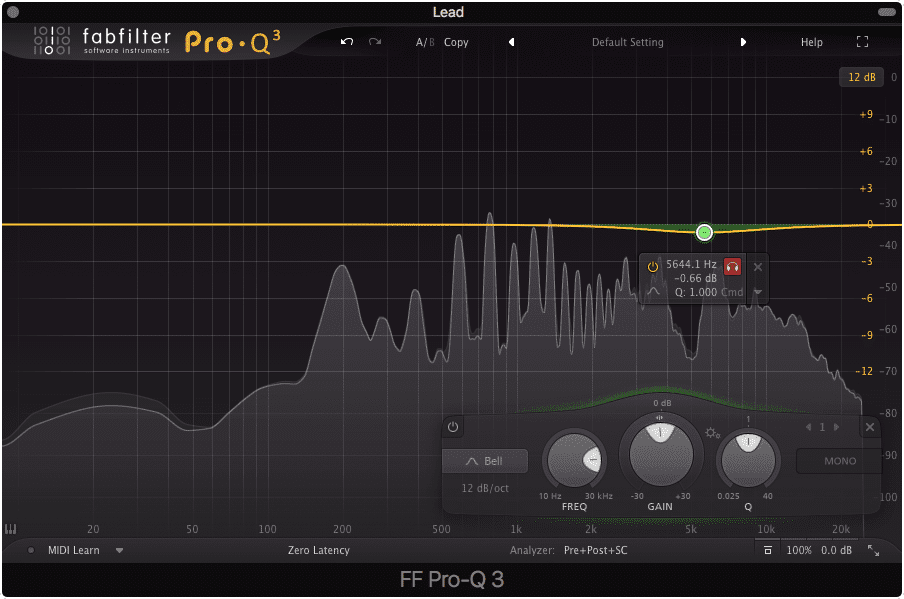
Step 3: As the track plays, and with the ‘Solo’ function enabled, moved the band’s center frequency up and down, as well as narrow the Q to determine where the majority of sibilant energy is occupied.
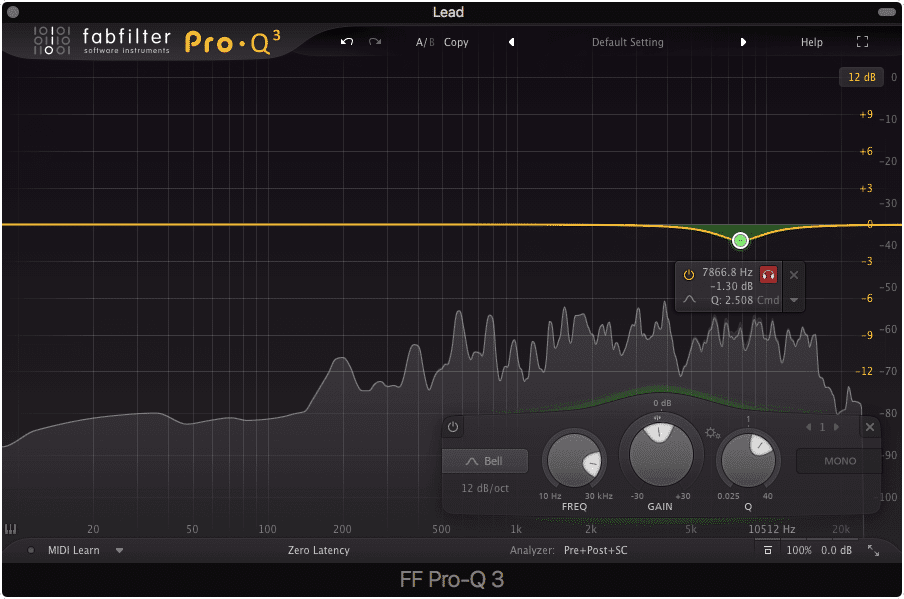
Adjust the Q to pinpoint the correct frequencies.
Step 4: Once you feel that you’ve accurately identified the problem frequencies, carefully attenuate them, using a reasonable gain reduction. Too much and you can severely alter your vocal’s timbre.
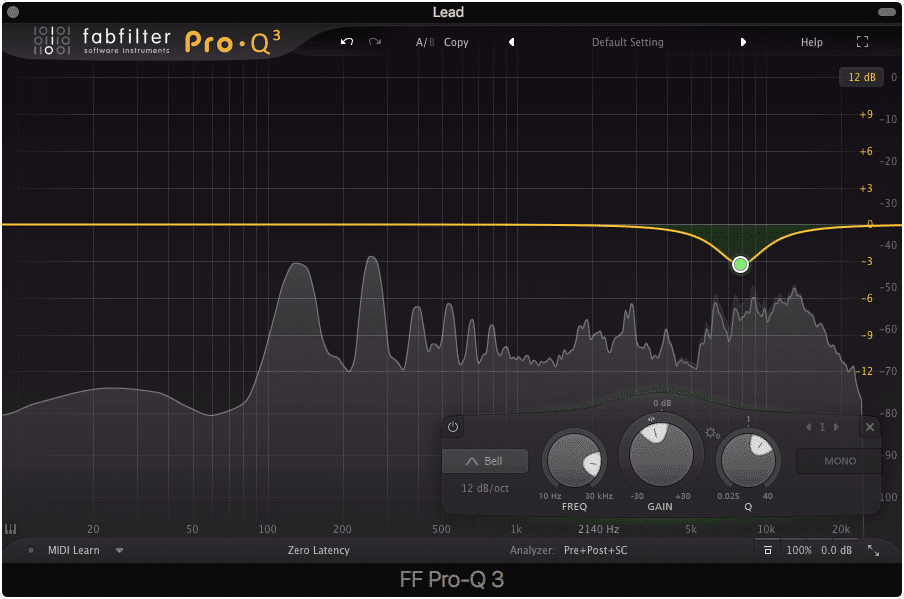
Once they've been pinpointed, carefully attenuate them.
Again, equalization is not ideal, as it will alter the sound of your vocal recording, regardless if there is sibilance present. For a more accurate form of sibilance processing, let’s look at the next technique.
If you’d like to learn about some of the best equalization plugins, check out our blog on the topic:
Top 10 Equalizer Plugins :Mixing & Mastering
Multi-band Compressor or Dynamic Equalization
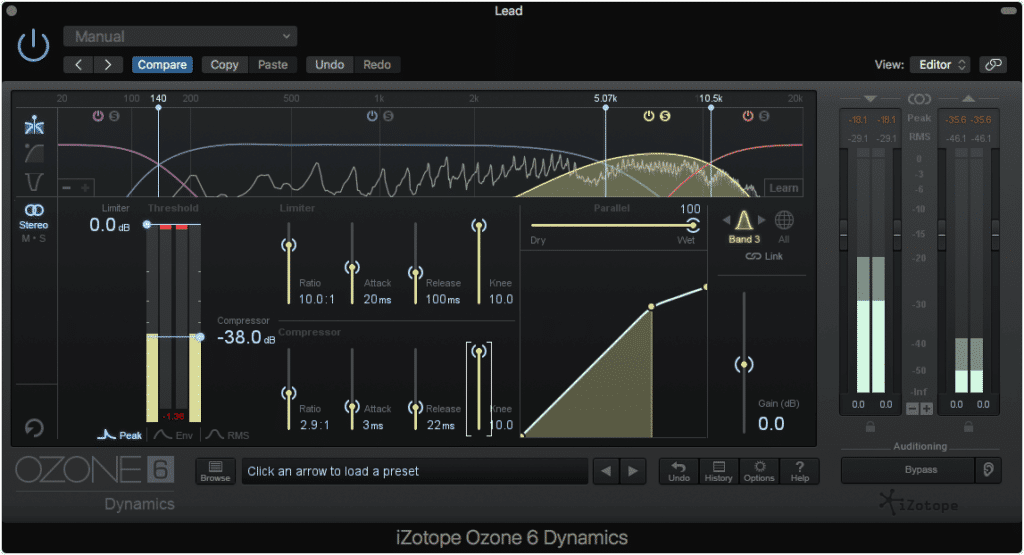
If you want to affect the relevant frequency range only when the sibilance is occurring then using either multi-band compression or dynamic equalization is a great option. Just like equalization, implementing this technique should be done so carefully, to avoid changing the sonic characteristics of the vocal performance.
When using a multi-band compression, you should first identify the frequency band that contains the sibilant frequencies. This can be done in a similar way to the FabFilter Pro Q.
Step 1: While playing the track, solo the frequency band with which you’re working, and adjust the parameters until it encapsulates the frequency range of the sibilance.
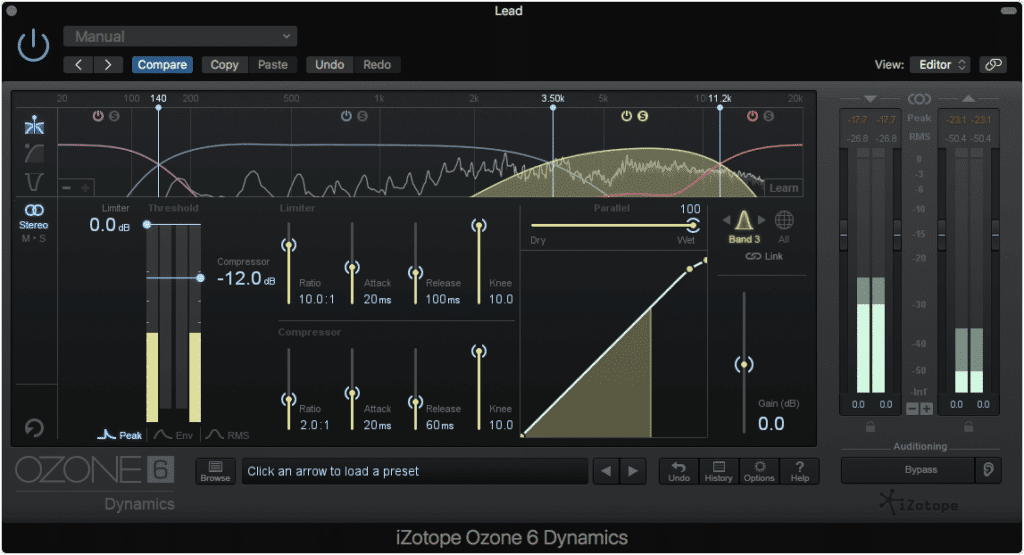
Solo and adjust the correct band. For sibilance, this is typically between 4kHz and 12kHz.
Step 2: With the correct frequency band highlighted, adjust your compressor settings. You should utilize a relatively fast attack and release time to ensure the sibilance is captured by the compressor, and that the frequency range in question remains detailed. If you’d like a smoother, but perhaps less realistic high-frequency range, then implement a longer release time.
Set a quicker attack and release for sibilants.
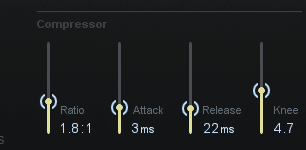
Step 3: Then adjust the ratio to above a 1:1 ratio. A 2:1 ratio is a good place to start, but this will need to be adjusted according to preference and the amount of sibilance present.
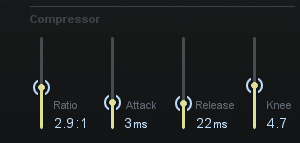
Adjust your ratio to higher than 1:1 to attenuate the frequency band.
Step 4: Again with the track playing, lower the compressor’s threshold until only the sibilance is compressed. A good way to tell if this is happening is to listen intently to the vocal performance and ensure that gain is only being reduced during an Ess, Shh, or Cha sound.
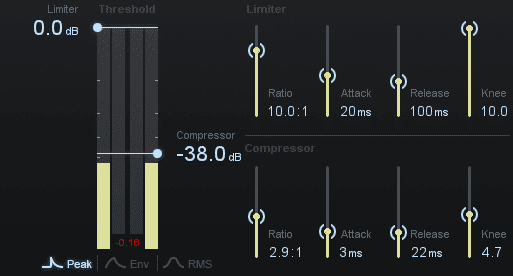
Slowly lower the threshold until the signal is attenuated, only when Esses are sung.
Step 5: Adjust the ratio, attack and release times, and then the threshold until the sibilance is accurately compressed. You may also want to adjust the knee of your compressor for a smoother sound (Soft-knee compression results in a more gradual, some say natural-sounding compression).
Adjust your settings until you've achieved the De-Essing you want.
Dynamic equalization can be utilized in a very similar fashion. In fact, you could follow the steps above, as they would almost translate in the exact same way.
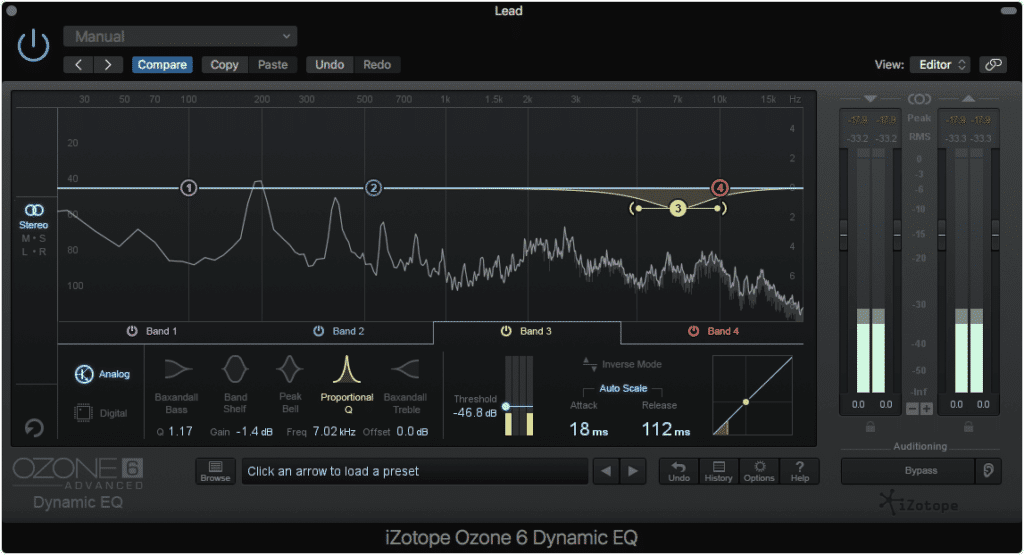
Dynamic EQs work in a similar way to multi-band compressors.
One important distinction between using a multi-band compressor and a dynamic equalizer for de-essing, is the ability to affect the “shape” of the compression. With a dynamic equalizer, you can adjust the Q size and filter type of the relevant band. This simply provides you with more options when compressing, especially if you combine the two forms of processing, each gently attenuating the sibilance.
If you’d like to take a look at the best compression plugins, here are some great options: Top 10 Compressor Plugins
De-Esser
This is probably the most obvious method for attenuating vocal sibilance. Essentially, a De-Esser plugin is a frequency-specific compressor. In most cases, this frequency-specific compressor has fewer options than a multi-band compressor offers.
For this reason, I typically recommend attempting to use a multi-band compressor first, prior to a De-Esser. If your time is limited, or perhaps you’re working on a more casual project, a De-Esser plugin is a great option.
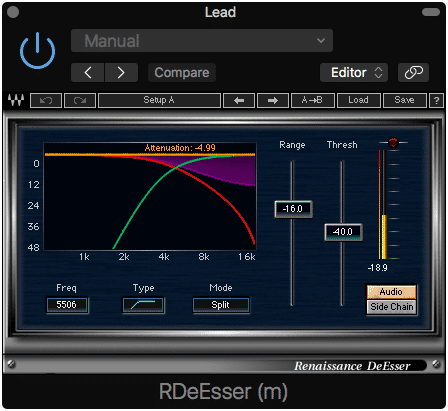
De-esser plugins are great for quickly attenuating Esses.
But if you’d really like to dial in on some specific settings, some of the more traditional de-essers may not do you the job.
This, of course, isn’t to say that all de-essers are simplified frequency-specific compressors. In fact, some have some advanced settings, specifically tailored to the process of attenuating sibilance.
With that said, I won’t be going into how to use these plugins, as their functionality varies based on the software being used - however, they can be treated in a similar fashion to a compressor.
If you’d like to learn more about some of the most popular and useful de-esser plugins, check out our top 10 countdown: Top 10 De-Essers
Each de-esser on this list offers unique functionality tailored for specific de-essing situations.
De-Essing During the Mastering Process
Admittedly, this is a less common practice than de-essing during mixing or editing; however, the use of de-essing in mastering can be incredibly useful.

Sometimes, it's necessary to de-ess, even during mastering. Although it typically occurs during mixing, it's certainly possible for some harsh sibilants to sneak through.
Sometimes, a mix revision isn’t possible, and you may be faced with an excessively sibilant track to master. This can be frustrating, but know that it can be remedied.
If you’d like to remove sibilance during a mastering session, there are two techniques that may come in handy.
The first is the multi-band compressor technique mentioned above (if you skimmed to this section, the instructions for this technique are in the De-Essing During the Mixing Process” section).
When using multi-band compression on a master though, keep in mind that they act of compressing an entire frequency band will affect a lot more than just the sibilance. With that said, be sure to dial in your settings to be as specific to the sibilance as possible. You don’t want to run the risk of compressing cymbals, or other high-frequency instrumentation along with the sibilants.
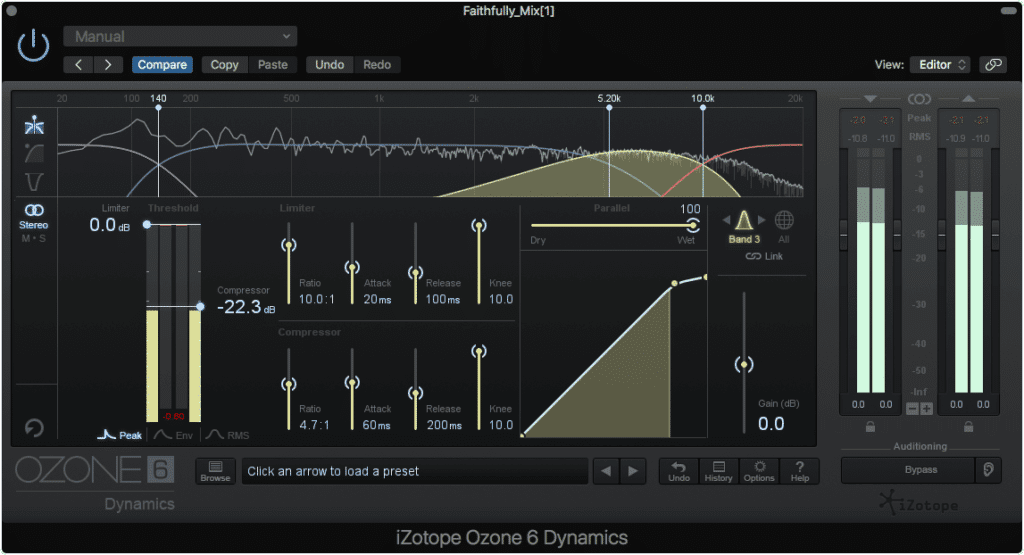
Using the same technique as listed above can also work for de-essing during mastering. Be careful not to attenuate more than the 'Ess' sounds.
The second technique involves utilizing mid-side processing, and careful equalization. This is something I’ve used during mastering, and the results are generally positive, but be sure to perform this technique carefully. Otherwise, it may negatively impact your master.
The general idea is to slightly attenuate the sibilant frequencies on the mid-channel, while gently amplifying the similar frequency range on the side-channel. Doing so will cause a masking effect, in which the sibilance of the mid-channel is slightly attenuated by phase cancellation.
Ideally, this technique is implemented only when the side frequencies do not contain sibilants (which they usually do not) and the relevant side-channel frequencies offer instrumentation that can be boosted without becoming excessive or undesirable.
Note that lower frequencies typically mask the frequencies directly above it, so when using this technique boost the side frequencies directly below the mid frequencies.
An example of how this technique could be implemented would be if the sibilance is primarily located say within the mid-channel at 7500Hz. At 7200Hz on the side channel, you have a say reverberated cymbal, as well as the upper register of various instrumentation.
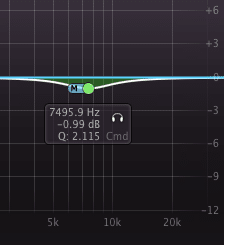
Identify the sibilance in the mid-channel and attenuate it.
In this example, you would attenuate 7500Hz on the mid-channel, while amplifying 7200Hz on the side channel. This will cause an emphasis/deemphasis phase relationship, with which the master will still sound balanced.
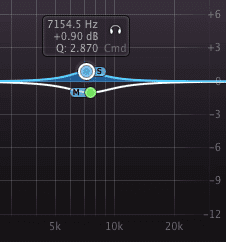
Boost the side image's frequency right below the mid-channel's.
In short, you’re essentially swapping the sibilance of the mid-channel, for the instrumentation of the side channel. Again this technique doesn’t work in all situations but can be useful with the right conditions.
If you’d like to learn more about the mid-side equalization technique, you can learn more about it here: "How to Use Mid-Side Processing Like a Champ"
Or if you’re curious about mastering, and want to learn more about the process, check out the many helpful blogs we have on the topic: https://www.sageaudio.com/blog/mastering
Whether you’re mastering a project or we are, we want to ensure it sounds as good as it possibly can.
Conclusion
De-Essing can be a tricky endeavor. It certainly involves various techniques for tracking to mastering, all used with the intention of naturally reducing the power of vocal sibilants.
Some of the techniques detailed above are more useful and effective than others, whereas some offer a quick fix, but not the best solution.
Whatever your case may be, try combining the tricks detailed above to discover how de-essing can best be implemented during your tracking, editing, mixing or mastering session.
If you’d like to hear you mix professionally mastered for free, send it to us here: https://www.sageaudio.com/register.php
We’ll master it for you, using solely analog equipment, and then send you a mastered sample of it.
All it takes is a minute to create a short account.
Have you encountered excessive sibilance in your mixes or masters?


