10 Mastering Mistakes to Avoid
- Making a Master Excessively Loud
- Applying Processing too Aggressively
- Going against the intentions of the mixing engineer and artist
- Making a Master excessively wide
- Applying Unneeded Compression
- Causing Clipping Distortion with Improper Gain Staging
- Applying Unnecessary Dithering
- Using the Wrong Genre as a Reference
- Not Saving Signal Chain Settings or Taking Notes
- Monitoring Your Master too Loudly or Quietly
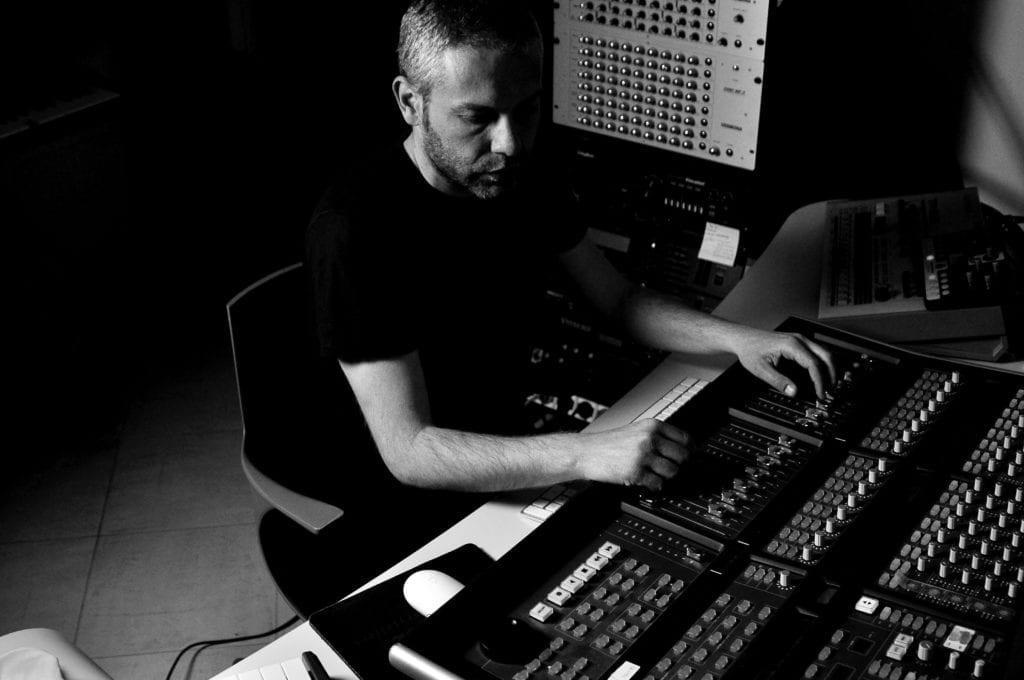
There’s no shame in admitting it, even the most seasoned and experienced mastering engineers make mistakes.
Even the most seasoned engineers make mistakes
It’s not uncommon to become so wrapped up in the mastering process, that you neglect certain precautions, or just flat out do something wrong.
There's no reason to worry, it happens to everyone - what’s important is identifying what these mistakes are, and working to remedy them in future sessions.
Identifying mistakes and remedying them is crucial to mastering music properly
With that in mind, let’s look at 10 mastering mistakes to avoid.
If you’re an artist or an engineer and you have a mix that you need mastered, send it to us here:
We’ll master your music for you, and send you a sample of it, completely free of charge.
1. Making a Master Excessively Loud
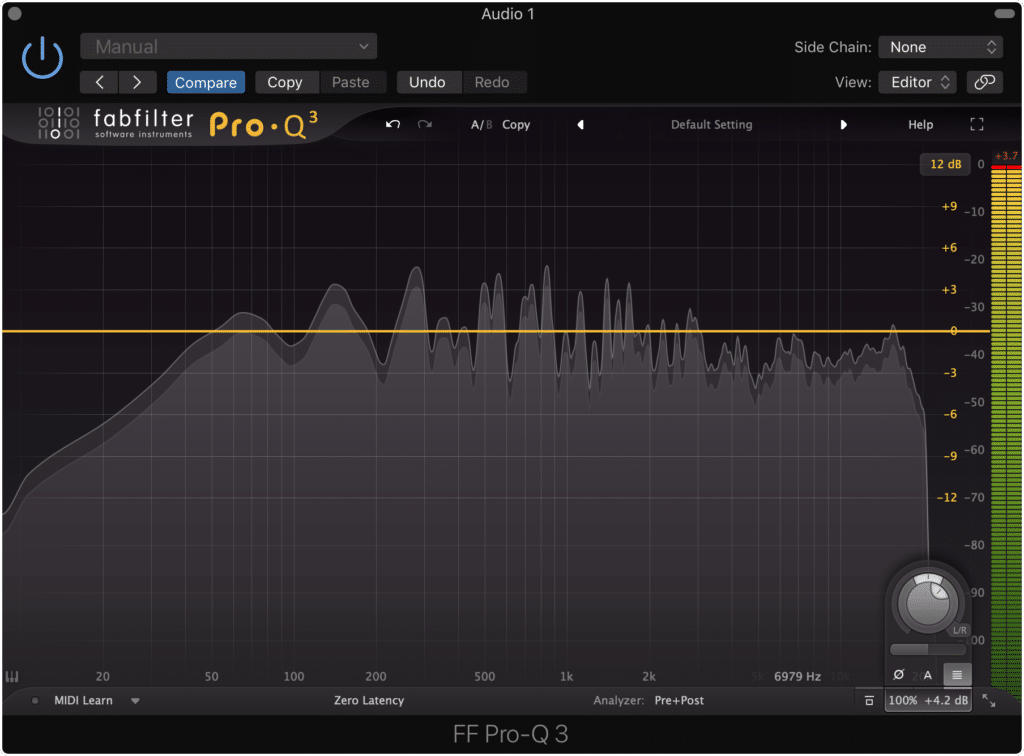
This is probably the one mistake we all know about, yet still, somehow make on a regular basis. It isn’t difficult to feel like your master isn’t good enough, and then resort to simply increasing the gain on a limiter.
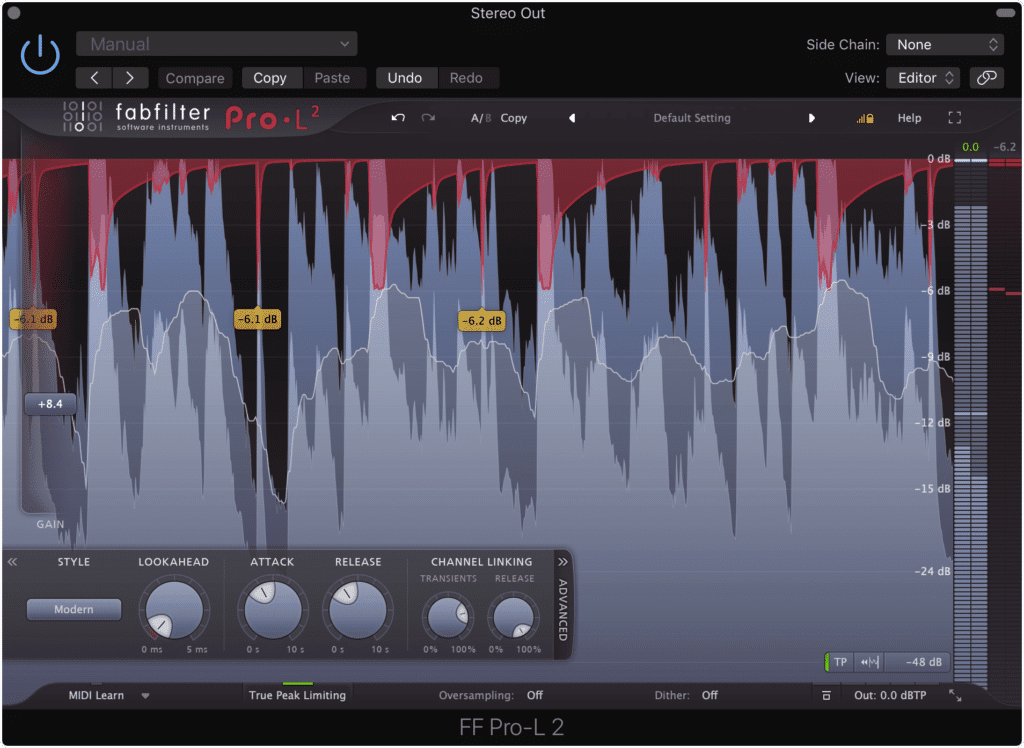
Excessive limiting it usually a crutch for a subpar master.
But without a doubt, this has negative repercussions for your master. Not only are you causing a lack of dynamics and depth in your master, you’re most likely causing mild but noticeable inter-sample clipping distortion.
Notice the "True Peak" meter and the distortion that is showing.
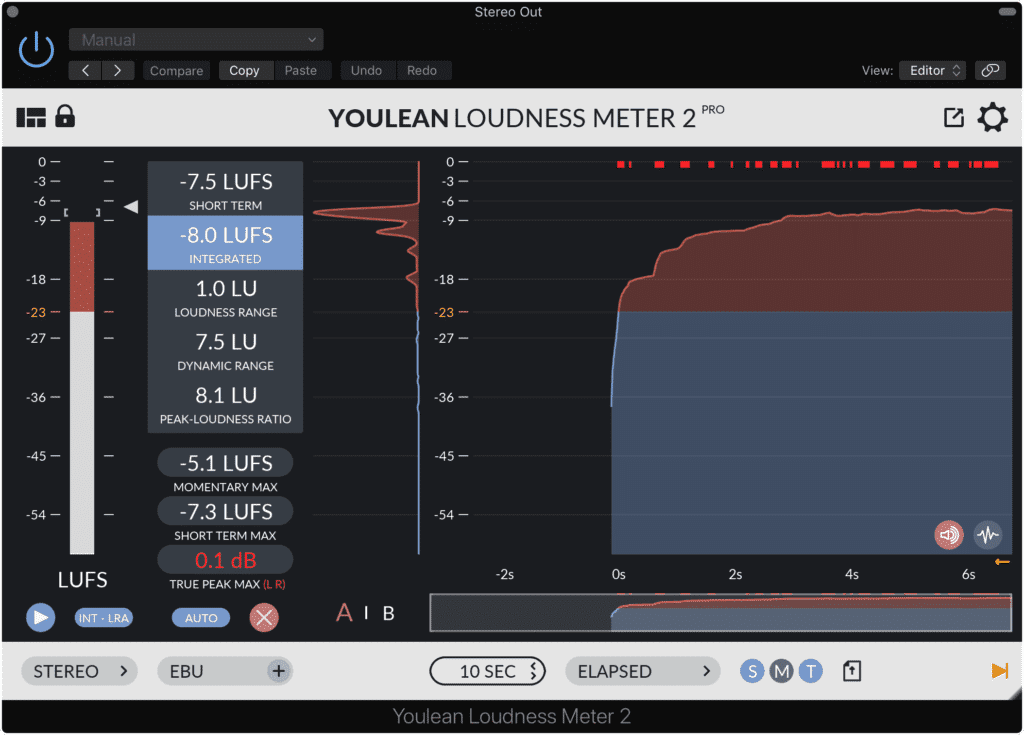
Additionally, with the popularization of streaming services and the use of loudness normalization, your super loud master will only be turned down in the end.
So by making a loud master, you are:
- Ruining your dynamics
- Disrupting the balance between instruments by pushing everything forward
- Causing unwanted distortion
And you’re doing all of this for nothing due to how streaming affects your master.
Your master will be turned down due to loudness normalization.
Keep this in mind the next time you start pushing the gain of your limiter slightly higher, or pull down on a threshold.
If you want to learn more about loudness normalization and how it's affecting mastering, check out one of our blog posts on the topic:
It shows how loudness normalization affects mastering in detail - more particularly, how it affects how loud today’s masters are made.
2. Applying Processing too Aggressively
Another common mistake, aggressive processing can take many forms. It may mean using too much of one plugin or piece of hardware, or it may mean adding too many plugins and using redundant processing.

If you use reductant processing, you're most likely introducing unwanted forms of processing.
However aggressive processing is introduced, its a mistake best avoided when mastering.
Some examples of Aggressive Processing when mastering are:
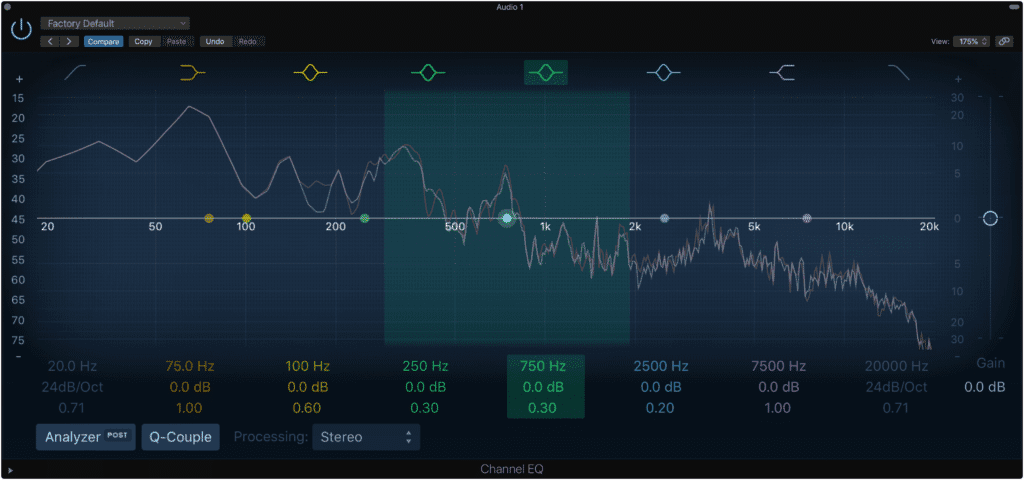
- EQ amplifications or attenuations of greater than 2dB
- Compression greater than 4dB
- High Saturation or harmonic distortion settings
Essentially any processing that’s introduced during mastering should be done so subtly. If you find that you need severe eq curves and compression, it’s possible that a new mix is needed.
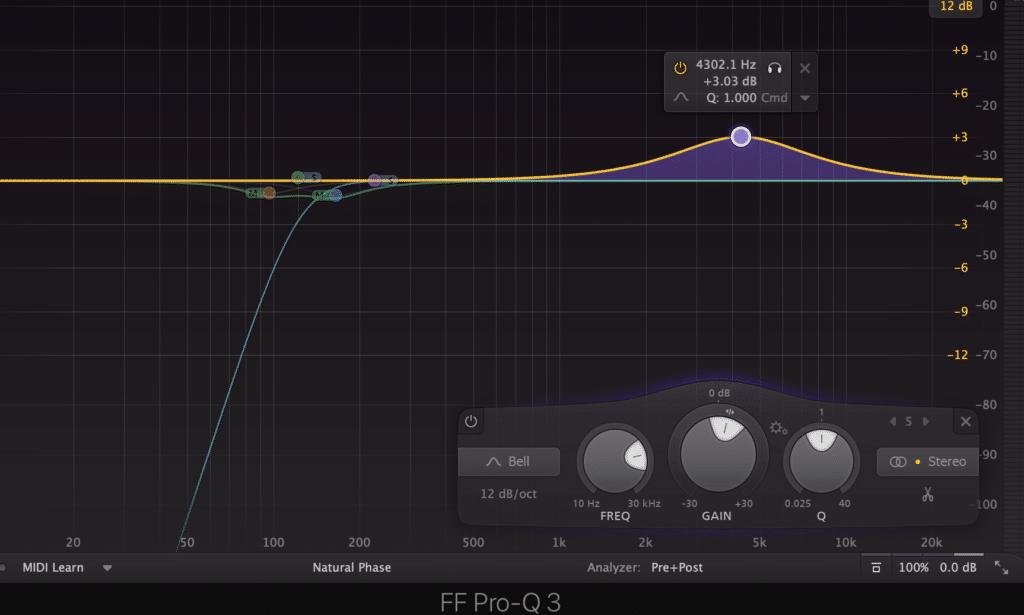
An EQ boost of dip or more than 2dB is excessive when mastering.
Another telltale sign of aggressive processing is if you use more than 10 separate forms of processing or plugins. Odds are, you can accomplish the same processing with half the number of plugins if you utilize them correctly.
It's best to take the time to learn how to use your plugins and to understand their functionality entirely prior to using them.
If you use multiple plugins to accomplish something one plugin could do, you’re employing unnecessary processing and possibly adding some effects that are “behind the scenes” more times than you intend to.
In short, keep things simple and subtle.
3. Going Against the Intentions of the Mixing Engineer and Artist
After learning how to master music, and spending countless hours understanding your gear, its effect on a signal, and learning the general science and art behind mastering, its easy to think you know what's best for a song.

Never blatantly disregard what an artist and mixing engineer have created.
But this is certainly not always the case. Although you can offer a unique perspective on a song’s production, this does not mean you should drastically alter the sound of a production to better suit your personal preferences.
Augment the sound of a mix - don't recreate its sound.
Any engineer or artist you work with has a vision that needs to be respected and upheld to the best of your ability. this doesn’t mean that you can’t augment what has been created, but it does mean that this augmentation should stay within the general guidelines of what has already been created.
Respecting your clients and your fellow engineers is just as important as the mastering itself.
If you have a specific vision for your mix, and you want it augmented during mastering, send it to us here:
We’ll master it for you and send you a free sample of it.
4. Making a Master Excessively Wide
Not only does an excessively wide master sound bad, but it can also wreak havoc on certain mediums and playback systems.

Excessively wide masters cannot playback on certain mediums.
For example, if you were to embed a wide master into a vinyl record, the end result would be a needle that couldn’t stay its groove. Ultimately this would be an unplayable master and a costly mistake for the artist that used this master for their vinyl record cutting process.
Additionally, a wide master will not playback as intended on most consumer-grade equipment. If a playback system is mono, then any signal that has been pushed into the side image will inevitably be lost and imperceivable to the listener.

Stereo imaging will be lost on mono playback systems.
That’s why its best to keep frequencies up to 135Hz mono, while only adding subtle stereo widening to your master.
Additionally keeping the frequencies of 1.5kHz to 2.5kHz more mono is helpful for creating a focused vocal. Since these are some of the more important frequencies vocals occupy, widening this range may make them sound washed out, or cause them to lose presence.
If you’re looking to create a wide master, but not one that is excessively wide - check out some of our techniques for doing this:
It's full of great information on how to create a wide master that doesn’t become excessively wide.
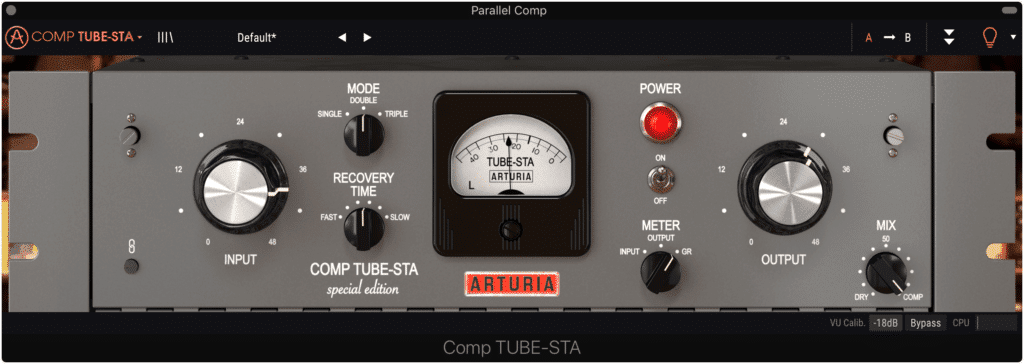
5. Applying Unneeded Compression
Although you might think that this mistake is identical to “Avoid Aggressive Processing,” things are a little different when it comes to compression.
Today, many mixes are already heavily compressed with they arrive for mastering. This means that any and all additional compression should be avoided, as it will only exacerbate this issue.
Many mixes already have heavy compression.
Despite this, many engineers insert a compressor plugin, or a multi-band compressor simply because it’s always a part of their signal chain. As you can imagine, this type of thinking is problematic and can definitely hinder a master’s potential.
That being said, listen critically to your mix before applying any processing - especially when that processing is compression.

Before applying additional compression, closely monitor the mix and determine if it is needed at all
Additional compression simply isn't needed more times than not.
If you do find yourself in a position where the mix you received is too compressed, try using expansion instead of additionally compression. Expanding instrument bands that the kick, snare, and vocal occupy is a great way to counteract some of the negative effects of excessive compression.
If you do find that compression is needed, try setting your compressor settings to be in time with the BPM of the song. Or you can use some specific attack and release times to avoid losing dynamics.
If you want to learn more about compression and how it relates to mastering, here is a blog post on that very topic:
Is hows how compressors can be used to compress when needed, and to remain inactive when you don’t want to compress your signal.
6. Causing Clipping Distortion with Improper Gain Staging
Unfortunately, it’s entirely possible to distort a signal without realizing it. Even if your meters aren’t showing any clipping, clipping can occur between your various inserts or forms of processing.
Notice the clipping distortion that is occurring with this plugin via the top right meter.
For example, if you increase the output of an equalizer to the point of clipping, and then follow it with another form of processing, if that next form of processing attenuates the signal in any way or back below the point of clipping, then that clipping won’t show up on your channel or master output.
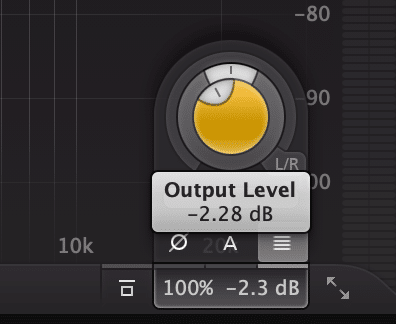
If a subsequent plugin attenuates the signal, clipping distortion will not show up in the meters.
This means that to ensure clipping distortion is not occurring, you need to closely monitor the level of your signal between each processing step . If you don’t, then this clipping is entirely possible.
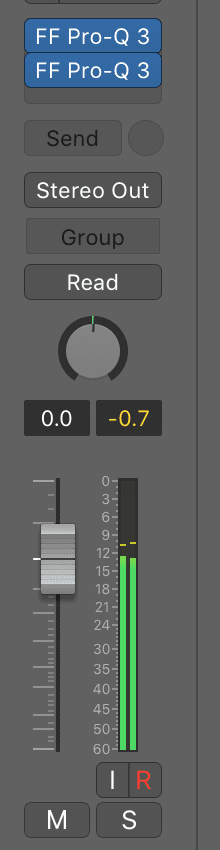
Notice that the same clipping distortion will not show up in the channel's meter.
This is especially true if the mix you received is already at a higher level or loudness. If you find yourself in this situation, it may be best to decrease the gain of the mix prior to adding any additional processing.
Using clip gain is a good option for lowering the loudness of a mix that was made too loud. Try this next time you receive a loud mix, and be sure to watch the outputs of your plugins.
7. Applying Unnecessary Dithering
Although dithering is a popular topic when discussing mixing and mastering, the truth is, dithering can be entirely pointless if not harmful to your master.

Dithering is very valuable at lower bit-depths.
Dithering should only be used when lowering the bit depth of your master. For example, when lowering from 24 bits to 16 bits, dithering may be needed.
But even in this example, the noise created from dithering is often higher than the noise created from quantization distortion.
The complex nature of a musical recording means that harmonic distortion caused by quantization error will become randomized.
Furthermore, if the signal is as complex as most songs, then the variable nature of the instrumentation, and the self-noise present in most recordings, will turn any minute harmonics created from quantization distortion into randomized intermodulation distortion.
In short, the white noise that is dithering is often unnecessary, as it does not have the intended effect (to lower perceivable distortion).
But the real reason dithering may be unnecessary is that 24-bit masters are becoming increasingly common. If you recorded in 24 bits, and master and distribute a 24-bit file, dithering should not be used.
Try to avoid unnecessary dithering, as you’re simply adding noise to your master.
If you want to learn more about dithering and noise shaping, check out these two blog posts:
8. Using the Wrong Genre as a Reference
If you’re used to mastering one genre over another, it may be difficult to switch styles and processing when presented with a different genre. This is increasingly problematic when you consider how much mastering can vary based on the genre.

Knowing the genre you're mastering means knowing which forms of processing to use and to what extent.
As you can imagine, rap and pop music will be mastered much differently than Jazz or Classical music. That being said, you simply can’t master one genre like another and expect it the fit within the expected framework of that genre.
Be sure to listen to the right references when mastering a genre with which you are unfamiliar.
If you plan on mastering a new genre, the best way to wrap your head around how to master for that genre is by listening to popular and acclaimed albums of the type of music.
Additionally, you can import songs into your DAW and analyze various aspects of the stereo image and frequency response to better understand how it is mastered.
Lastly, if you’re truly stumped, you can take a look at some of our blog posts on the topic - each one will detail how to master for a particular genre:
Each respective blog post will detail how to best implement processing when mastering these genres.
9. Not Saving Signal Chain Settings or Taking Notes
This is an often overlooked but incredibly important part of mastering. Saving your signal chain and taking notes is the difference between being able to recall a mastering session, and painstakingly trying to precisely recreate it.
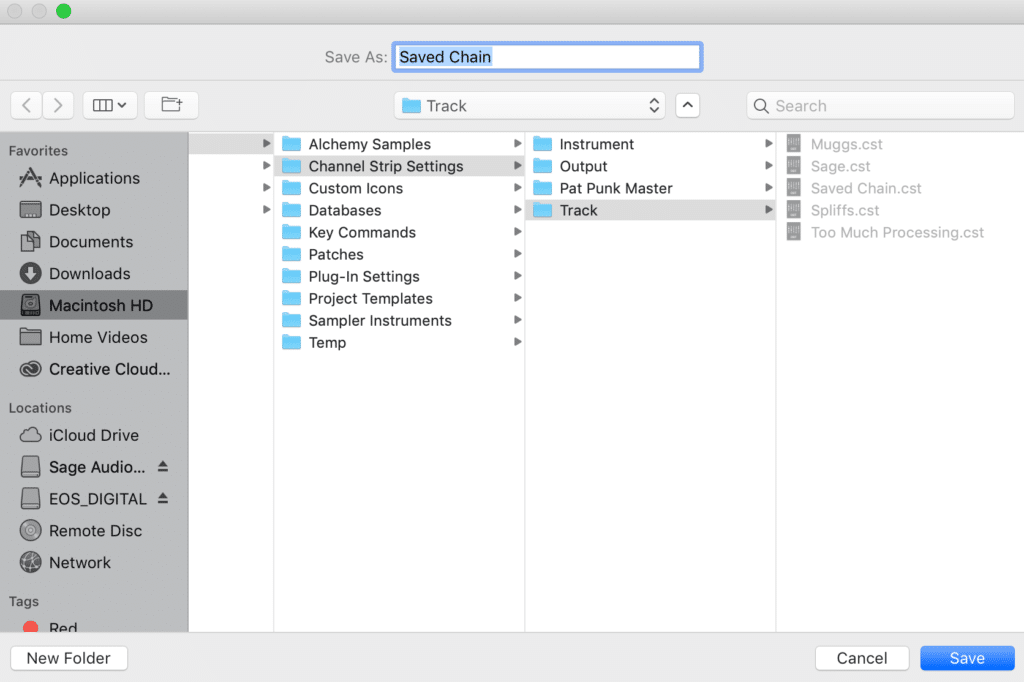
Always save your signal chain settings.
Although this isn’t a huge issue when mastering a single song since simply saving the session will result in saving all of your settings (things aren’t so convenient with analog mastering), mastering a full album is a different story.
So say you deliver your masters to the artist and on tracks 3 and 9 they want a “brighter sound” (high-frequency boost/maybe some high order harmonic distortion), and on tracks 4 and 6 they want it to sound a little fuller (low-order harmonic distortion, maybe increase parallel compression).
If you don’t have your settings saved, performing these revisions change from an hour task to an entirely new mastering session.

Whatever settings that cannot be saved should be recorded as written notes.
Do yourself the favor of saving your settings in your DAW, and taking notes for any settings that can’t be saved.
10. Monitoring Your Master too Loudly or Quietly
If you’ve heard of the Fletcher-Munson curve or studied auditory perception, you’ve probably come across the idea of how different sound pressures and frequencies affect our perception of a sound source.
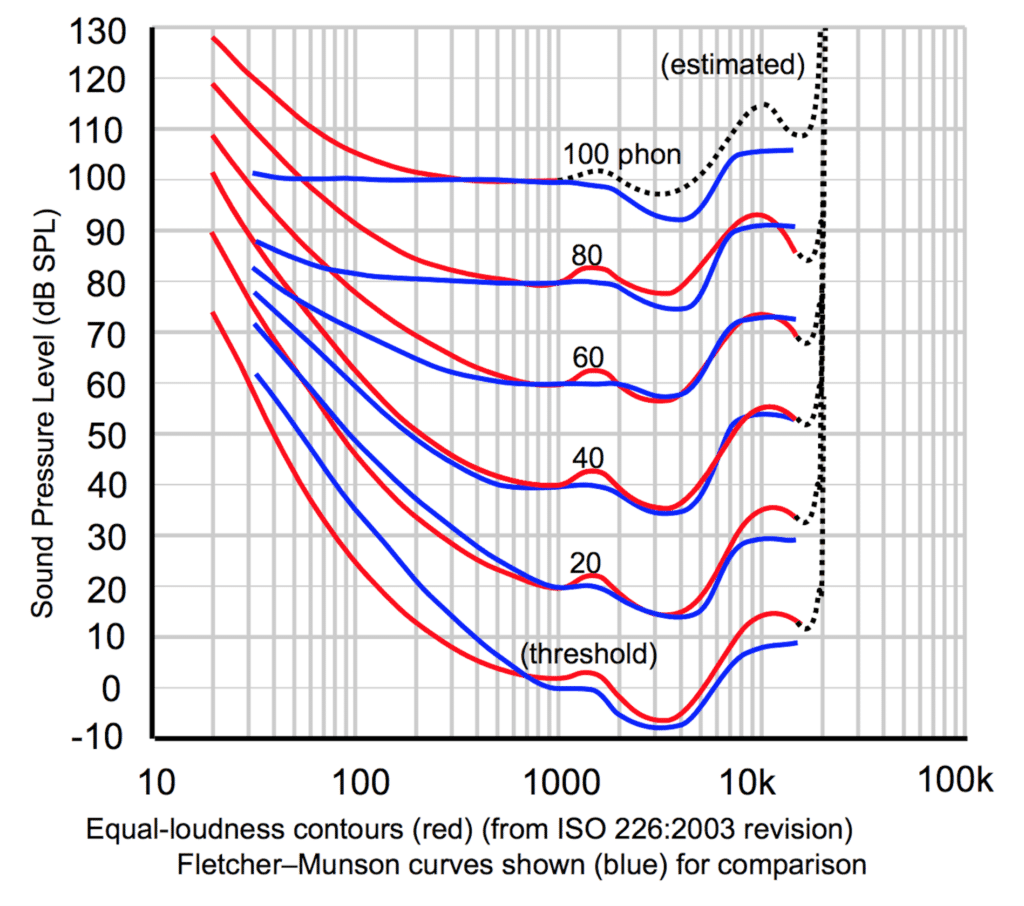
We perceive different frequencies differently, based on their amplitude.
In short, our ears are more sensitive to certain frequencies than others. This changes based on the loudness of the signal to which we’re listening.
With that said, it’s important to listen to your music at the more balanced “phon” level (roughly 70 phon). At the very least, it’s best to master at a consistent loudness, so that you’re aware of how your processing is affecting your master.
There are a couple of other reasons why monitoring at a reasonable level is so important. The first being that monitoring at a loud level is damaging to your ears and will result in hearing loss over time.

Listening to music loudly will lead to hearing loss
The other is that amplification systems cause increased distortion at lower and louder volumes. The same goes for speakers. So if you monitor at a lower volume, or at a louder volume, you’re hearing more distortion than if you monitored your master at a reasonable volume.
To recap, monitoring at a low or loud volume causes:
- Discrepancies with the perception of the master
- Potential Hearing Damage
- Increased distortion during monitoring
Conclusion
There are many mistakes that can be made during a mastering session, but hopefully, by knowing them you can avoid them more often than not.
If you do make some of these mistakes, keep in mind that it’s okay, but ideally you will master music without subjecting your master or your mastering processing to these mistakes.
When mastering, avoid unnecessary processing and other various mistakes.
In short,try to avoid unnecessary processing be it distortion, limiting, compression, equalization or even dithering. Also, attempt to set up your sessions for productivity by saving your settings, and taking adequate notes for session recall.
Also, avoid unwanted clipping distortion by closely monitoring your gain-staging and keeping an eye on all your meters, not just your channel or master outputs.
If you have a mix you need mastered, send it to us here:
We’ll master it for you and send you a sample of your master for you to review.
What mastering mistakes have you come encountered?


